Slugs and Beer

Around my home I have gravel and hostas.  Just perfect, as you might imagine, for lots of slug damage.  This is where I do my work on slug remedies.  And there are lots of remedies for slugs!  One of the oldest of these remedies is beer.  Almost any beer will be adequate (including alcohol free), but generally the darker the beer the better.  When I first started testing different cures for slugs about five years ago one of the first ones that I looked at was beer.  And when I first tried it…..well, see for yourself.

This is the way that I set up my first beer trap (for this test).  There’s fine sand all the way around the trap and the trap is filled with Moose Drool (a nice beer — Suzanne, my wife — was actually a little irritated that I wasted a good Moose Drool when we had a Bud Light in the fridge — But I was only thirsty for half a beer when I set it out….and I don’t like Bud Light)

I set this trap up around 8 o’clock on a nice warm summer evening, the idea being that the next morning I could go out and see how many slugs approached the beer (by looking at the sand) and then see how many slugs the beer actually caught.

As you can see below we had quite a few slugs approach the beer (By my count about twenty).  And guess how many dead slugs were in that beer?

If you guessed 20…you’d be wrong!  There were no slugs in that beer.  Why?  Because this is a poorly designed slug trap!  slug traps are best when they are made with something like a mason jar and that jar is buried up to the lip of the jar in soil.  Then the jar should be filled up to within about an inch of the top with beer.  If you fill it higher the slug will be able to just reach his head in and drink.  In fact, after I set this trap out, I spent much of the evening watching slugs do just that — it was actually a little like watching old episodes of Cheers!  I had names for the slugs and everything (like Norm and Frazier and that mailman guy whose name I can’t remember now…).

So slug traps are good — but only if they’re set up right!

Bags and Apples

One of my favorite garden “cures” is placing a clear plastic sandwich bag around apples when they are young to protect them from insects and disease.  It usually works great and impresses the heck out of people who see and eat the apples which are normally tough to grow without using  bunches of organic or synthetic pesticides.

Unfortunately this year was different.  Rebecca Koetter, the person who planted these trees and put the bags on the apples (on the University of Minnesota campus) discovered that birds may choose to ignore the bags.  And, as if that wasn’t bad enough, Asian lady beetles decided to get in on the fun!

Health care reform (of trees)

Nothing is more frustrating to a gardener than watching a newly installed tree or shrub slowly die.  In performing “post mortem” analyses on failed landscape plantings, I’ve identified four common errors that can be easily avoided:

  • inadequate root preparation
  • improper soil preparation
  • planting below grade
  • inadequate aftercare

This blog entry will be dedicated to the first point – but before I do so, we need to understand how nursery plant production has changed over the last several decades.

A brief history of propagation
Many years ago the only way to obtain young trees and shrubs was as bare-root plants.  Plants were field grown, then dug up during dormancy for storage and shipping.  Bare-root trees and shrubs are usually only available during a narrow window of time, but in general these plants are healthy and structurally sound.  Most importantly for our discussion, growers can see the woody root system of bare-root plants and cull those that are not well formed.

The development of containerized production methods meant that plants could be grown and sold year around.  When plants are grown in a production greenhouse, they are generally started in small liner pots and gradually moved through a succession of increasingly larger pots.  Ideally this is done before roots become potbound, or the roots are corrected when “potted up” (moved to a larger container).  What we found, unfortunately, in a study of nursery plant quality, is that root systems are often ignored in an effort to produce large quantities of plants quickly and cheaply.  It is not considered to be cost effective to examine and correct root flaws during potting up, so the entire root mass is moved into the new container.  Structural root flaws are not self-correcting and will become more severe the longer they are ignored.

Based on our study, as well as evidence collected by numerous researchers and arborists, it is apparent that poor root quality is a significant problem in containerized and balled-and-burlapped trees and shrubs, at least in this part of the country.  Therefore, we need to correct root flaws before installing woody plants into the landscape.

A quick intro to correcting poor root systems
Balled-and-burlapped plants have a clay rootball; despite its appearance, it is fairly easy to remove the clay simply by removing the burlap and twine and soaking the entire rootball in water.  You can facilitate the process using your fingers to work out the clay, or use a gentle stream of water (Figure 1).

Figure%201.jpg
Figure 1.

Once the clay is removed the root system can be evaluated.  If you find woody roots that are circling, girdling, or in general not growing horizontally and away from the trunk (Figure 2), they should be pruned (Figure 3).  You want to develop an evenly distributed structural root system.

Figure%202.jpg     Figure%203.jpg 
Figures 2 and 3 – before and after

The pictures in this post are from my own Cercis tree, which I planted in April of 2004.  This is not a great time for planting, since Seattle has notoriously dry summers.  Nevertheless, that’s when I planted and as you can see from Figure 3, I had to remove close to 70% of the root system.  I mudded it in well (which eliminated the need for staking), mulched, and kept the root zone well rooted.  It sat for about 3 months and did nothing (Figure 4), except of course the flowers died quickly!.  In July it leafed out (Figure 5), and 3 years later had doubled in size (Figure 6).  It is now close to 15 feet tall and is in excellent health.  Given its initial root system, it’s doubtful it would have done this well without intervention.

Figure%204.jpg   Figure%205.jpg   Figure%206.jpg
Figure 4 – April 04              Figure 5 – July 04               Figure 6 – July 07

(I have performed radical surgery on hundreds of tree and shrub root systems and have only lost one small shrub, whose root system is in Figures 7-8.  Kind of tough to prune something as fatally flawed as this.)

Figure%207.jpg     Figure%208.jpg
Figures 7 and 8 say so much more than I can.

I *heart* My NRG Pro Transplanter

[Disclaimer: I do not endorse any particular product over another, nor do I receive ANY compensation (darn it), free stuff, etc. from any companies, whether recommending or dissing their product.] 

Seeing Linda’s favorite mulch fork prompted this post – scroll on down past the Great Root Debate (rowr)!  I remember first laying eyes on this beauty at a local garden center…shiny stainless steel,comfy chartreuse handle, large step area, nice and solid…”I must have eet!” But it’s the functionality that makes me reach for it every weekend. I’m tall (6′) and was a bit concerned that the short handle would compromise my leverage. Not the case! The round handle allows you to grip it most anywhere, reducing repetitive stress on wrist, elbow, and shoulder joints. The unique tapered blade – probably 5″ across at the tip – make it perfect for working around established plantings, removing king-sized gobs of crabgrass, and ideal for planting 1 gallon or smaller perennials or annuals.  I must have dug 400 holes in the frenzy of planting that followed our agreeing (idiots!!!) to be on the local garden tour this summer. But I was darn comfortable and stylish while doing it. These puppies have been on the market for a few years, so this may not be news to you. But I just had to share my affection – two thumbs up. Wish they made a mulch fork!

Another look at TreeGators

Following up on Linda’s earlier comments about potential problems with TreeGators, my summer interns and I did a random spot check of about 150 TreeGators currently in use on the MSU campus.  As background, MSU Landscape Services plants about 1,200 trees and shrubs each year.  All newly-planted trees which are not on an automatic irrigation system are fitted with one or two TreeGators, which are filled from a water wagon every week or every two weeks, depending on weather.  Conifers and multi-stemmed trees are fitted with Tree-Tubes, another style of irrigation bag that fits like an inner-tube around the base of a tree.  At MSU irrigation bags are usually left on trees during the first growing season.  Presnetly there are over 1,000 irrigation bags in use on the MSU campus.

During our spot-check, we found few items I would consider to be a major concern.  We found 25 trees with mold or saprophytic fungi growing in the mulch under the bags.  While unsightly, these are unlikely to cause major tree problems and will be gone once the bags are removed and the mulch is exposed to air.  All but a handful of the bags had drained properly and therefore the trunks on most of the trees were dry – eliminating the potential problems that Linda noted about the trunks remaining constantly wet.  TreeGators are designed to drain in 4-5 hours.  Therefore, on a once every two weeks or once a week filling-cycle, they should be full only 1.5% to 3% of the time.  TreeGators that are not draining between fill-ups should be checked for clogs and have a new hole punched, if needed.

It is worth noting that the dark protected space between the irrigation bag and the trunk can provide habitat for various organisms.  We found an assortment or earwigs, spiders, and millipedes; plus one tree frog and one dead bird. The major concern that we found, however, were gypsy moth egg masses (photo 1), which occurred on 14 trees.  Gypsy moths, which are serious defoliators of trees in the eastern US, like to lay their egg masses in protected locations on tree trunks so the inside of the Gator bags makes a handy hideout.  Once found, egg masses are fairly easy to remove, though killing the eggs takes some effort.

While there is a potential for pests to hide out under irrigation bags, I think the benefits of irrigating with TreeGators outweigh the potential negatives. This is especially true in our heavy Midwestern soils where it is impossible to deliver any meaningful amount of water to a newly planted tree in a reasonable time without run-off.   MSU Campus Arborist Paul Swartz reported less than 0.5% mortality out of over 1,000 newly planted trees on campus last year.  The high success rate is attributable to good overall tree management by Landscape Services, including supplemental irrigation using the irrigation bags.  The take home message from our survey is that tree care workers need to check bags at each filling to ensure that bags are draining properly and to lift up the bags and inspect for signs of pests or other issues.


TreeGators on MSU Campus


Tree frog inside TreeGator


TreeGators should drain in 4-5 hours when working properly.


Cause for concern.  Gypsy moth egg mass on trunk.

Bare Root Trees

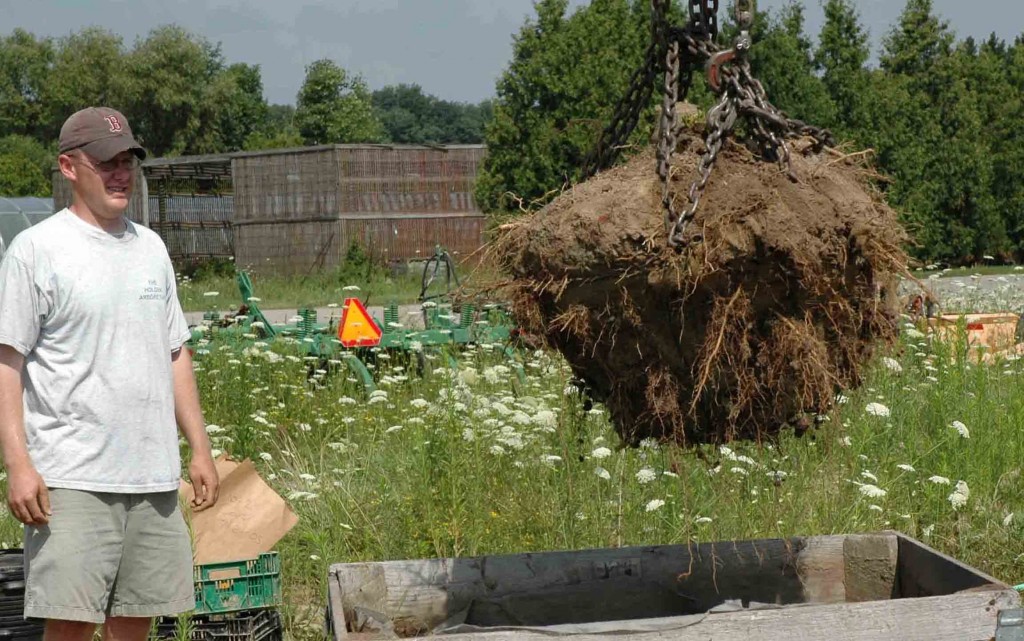
For the past 11 years I’ve been running a nursery at the University of Minnesota called the TRE (for Teaching, Research, and Extension) nursery where we research all kinds of fun stuff like Dutch elm disease, the dangers of mulching, and what happens when you plant a tree too deeply.  One of the most interesting things we’ve done recently, though, is to install Missouri gravel beds into the nursery.  Missouri gravel beds are called Missouri gravel beds because they were invented by Chris Starbuck, a professor at Missouri State.  He mostly works with gravel beds above the surface of the soil, while here at Minnesota we work with gravel beds below the surface of the soil (the gravel bed below is 60 feet by 10 feet and filled with about 2 feet of pea gravel — we do have a system for recirculating the water — which we sometimes use and sometimes don’t because of clogs, algae buildup, etc.).

We take bare root trees and place them into these beds in spring (when bare root trees are available from nurseries) to encourage root growth and then plant them out into the field later in the season.  The amount of beautiful fine roots for transplanting is just incredible, and the resulting plant can be planted bare root any time of year, instead of just spring when bare root plants in our area are usually transplanted.

Now to be a little more specific: I’m a tremendous fan of planting bare root plants, but I’m not a fan of planting larger plants bare root (at least not without Missouri gravel bed treatment), particularly what are known as B&B trees — trees that are harvested and held in a burlap and wire cage, such as those being harvested below from our nursery.

The reason that I don’t like taking a B&B tree and planting it after bare rooting it (by removing all of the burlap as well as the wire cage and then washing off the soil that surrounds the roots) is that, no matter how gently you wash off the roots, fine roots tend to be destroyed.  When you harvest a root ball for a larger tree you are removing about 80-90 % of the roots.  The additional roots that you remove by washing the ball will often make the tree non-viable.  This is something that have I learned from experience with individual trees, as well as from replicated experiments using hedge maples and Turkish filberts.  We used trees with a stem diameter of about 2 inches with standard sized root balls for that size tree, washed off the root ball for half (five trees of each species) and planted the other half using our more standard system (we removed the top portion of the burlap and wire, but not the bottom portion so as not to disturb the ball).  All of the trees which we bare rooted from B&B died after planting and all that we didn’t bare root lived.  This is further supported by some research coming out of the University of Illinois earlier this year by Andrew Koeser (and coauthors) which shows that handling the balls of B&B trees just isn’t that good for them.

So why am I spending so much time with this?  Simple, this is an area where researchers disagree. In fact, based on what Linda has written in the past I’ll bet that she disagrees with me.  And that’s a good thing.  People always want the quick and simple answer, but often there isn’t a quick and simple answer.  I can’t deny that sometimes bare-rooting a B&B tree before planting might be a good thing.  But I think that, in the majority of cases, it’s a mistake.  In terms of containers — We’ve got a big research experiment going on that right now — we’ll have results next year.

Mmmmm…mulch!

It’s a nice sunny September day in Seattle and I’m in my happy place.  What better topic to match my mood than mulch?

For those of you not familiar with my fixation on woody mulches, I’ll refer you to an article in MasterGardener Magazine here.  Briefly, I am a fan of coarse, chunky organic mulch, particularly arborist wood chips or other chipped material from trees and shrubs.

Rather than send this material off to the landfill, it’s so much better to use it as a protective layer on top of your landscape soil.  It’s a cheap, natural way to protect and nourish your plants, and provides a great habitat for beneficial insects and microorganisms.

Practically speaking, how does one move a mountain of mulch?  Shovels don’t work well, and compost forks have too much space between tines.  My favorite tool is the mulching fork.  It’s relatively lightweight, well balanced, and makes quick work of wood chips.


Sometimes you’ll find twigs in your mulch pile, or might have your own woody prunings that you’d like to use as mulch.  My second favorite tool is my electric chipper/shredder.  It’s powerful enough to deal with small branches and twigs and helps me create a more uniform mulch. Plus, I reuse my yard waste and keep the nutrients on site rather than throwing them away.

I don’t own stock in either of these products (my faculty salary doesn’t exactly allow me to be an investment tycoon). They’re just a few of my favorite things…

A Brief Discussion on the Wisdom of Barberry as Median Plant

We never know who to blame (or, rarely, thank) for roadside or median plantings. State D.O.T.? Local municipality? Subcontractor to either of the previous?

A few years ago, this appeared in the median of the Highway 460 bypass – the main road leading to Virginia Tech:

I am somehow reminded of Sideshow Bob from The Simpsons…

Two hedge rows. One of  green Japanese barberry (Berberis thunbergii, cultivar unknown); the other of the purple form (Berberis thunbergii var. atropurpurea) Side by side, they make their way up the median, alternating from the right-hand side of the culvert to the left, like two caterpillars in love.  Ooooh, lovely! Or at least SOMEBODY thought so.

Issues: 1) Barberry is a prolific fruit-setter and has made several state’s “Invasives” list.  It’s outright prohibited in Massachussettes (can’t buy, sell, or import it).  In our Blue Ridge Mountains of southwestern Virginia, it is popping up with startling regularity in state forests, road sides, open fields, etc. Interestingly, most of what I’ve seen is the purple form.  2) It’s very thorny. Which means most of the time it is adorned with plastic bags and other perforatable garbage.  3) They are actually mulching, pruning, and weeding this mess, which stretches for at least 2 miles. Best use of state budget/manpower??

I realize purple Japanese barberry is one of the bread-and-butter staples of many nurseries and garden designers. Folks just love the deep reddish-purple foliage.   Virginia Tech’s school colors are maroon and orange, so this is the go-to shrub for campus landscapers and ardent alumni desiring that particular color scheme (see below for our “living VT”). Very fun!  Growing next to a trillium on our section of the Appalachian Trail? Not so much.


Approximately one gazillion people get their photo made next to the VT logo each year – pretty good public relations for a noxious weed.

No Way! Something that actually works?

Sometimes I feel guilty because I always seem to be putting down the products that people sell to make their living.  But not today!  Today I’ve got something that actually works!  No, it isn’t pretty, and it does have some irritating problems, but I can honestly say that it does what the company that manufactures it says it does.  And that product is the Aqua Globe.

This is a very simple contraption (which is part of the reason that it works).  It’s just a glass ball with a hollow tube connecting to it.  At the base of the tube there’s a hole where water can be poured it to fill the globe.  When you push this into a container it will release the water in the globe slowly and give an extra day or two between waterings.  This contraption doesn’t affect the drainage of the media that you put it into, and it works with most types of media.

The down side to this thing is that….well….it’s kind of nasty looking.  The other problem with it is that, after you push it into the potting soil, it’s hollow tip will fill up with media, so when you fill it with water the next time you need to dig that media out with a fine-bladed knife or a thick piece of wire.  But hey, if you’re going on a short vacation and you’re feuding with your neighbors, then this little contraption will do the trick.