“Have you ever seen the rain?”

If you’ve been around as long as I have, you will no doubt remember the Creedence Clearwater Revival song “Have You Ever Seen the Rain”. This week I want to talk about sensing the rain using radar and how you can use it to provide you with local rainfall information if you don’t have a rain gauge of your own.

Source: Brocken Inaglory, Creative Commons

How does radar work?

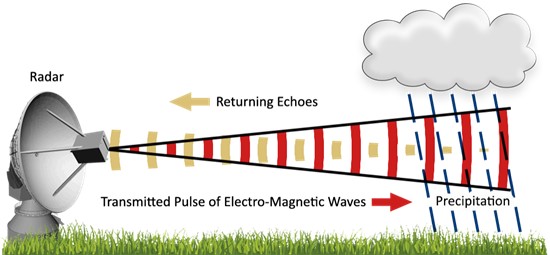
Radar is what scientists call an active sensor, because it sends out a beam of electromagnetic radiation that is reflected back to the radar if it hits something reflective like raindrops or hail (it also works on birds, insects, and cars traveling along interstates, but that’s another story). By detecting how much of the original beam is returned and how long it takes to get back, the radar can determine how much precipitation there is and how far away it is falling. The radar emitter usually rotates around a circle to provide a 2-dimensional picture of the precipitation in the area around the radar instrument. They can make it 3-dimensional by tilting the radar up at different angles to see different levels in the atmosphere. Now, the newest doppler radars used by the National Weather Service can also sense the size of the falling particles and how fast they are moving towards or away from the sensor. The radar displays that are usually used on television or online show a color-coded map with the brightest colors corresponding to the highest radar returns and thus the heaviest rain rates.

Source: Environment Canada

Radars can be used to estimate rainfall, but some assumptions must be made about the rain to get a good estimate. The major estimate that is needed is what size or sizes are the raindrops and how many of them are present. That will allow the radar software to calculate the volume of water that is falling and relate it to the strength of the return “echo” of the radar beam.

But how do they know the distribution of raindrop sizes in a rainstorm?

Source: Jason Zhang, Creative Commons

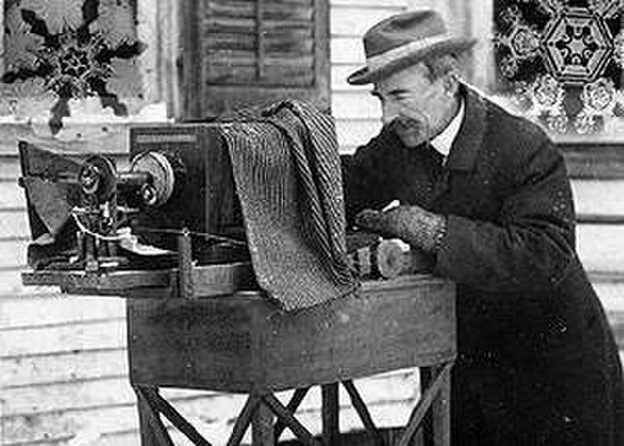
I learned this week in a video on raindrop shapes that the first person to measure rainfall size distributions was William Bentley, a citizen scientist in Vermont who is best known for his spectacular photographs of snowflakes. Bentley used a tray filled with a shallow layer of flour and exposed it to falling rain. The drops landed on the flour and dried into balls that provided a measure of how the size of the drops varied in the storm. Of course, now there are more sophisticated ways of determining this using optical sensors and other devices, but this was surprisingly good for its time.

William Bentley, photographer (public domain)

Today, by measuring the amount of radar emissions returned to the sensor and calibrating it to rain gauge measurements at the surface, atmospheric scientists have been able to provide good estimates of the rain falling across the region that the radar is able to sense. That is usually within about 120 miles before the radar beam overshoots most of the rain clouds due to the earth’s curvature. Fortunately, with a network of radars across the country, we can get a pretty good estimate of rainfall that is spatially much more detailed than we can get with a network of surface observers from the National Weather Service, state networks like the agricultural weather network I manage at the University of Georgia, or the volunteer corps of observers in CoCoRaHS (for more on this network, see https://gardenprofessors.com/the-weather-where-you-are/). That allows us to have a pretty good sense of how the rain is varying across fairly short distances and provides a reasonable estimate of the rain at your house if you don’t have a rain gauge available.

Radar-estimated rain where you are

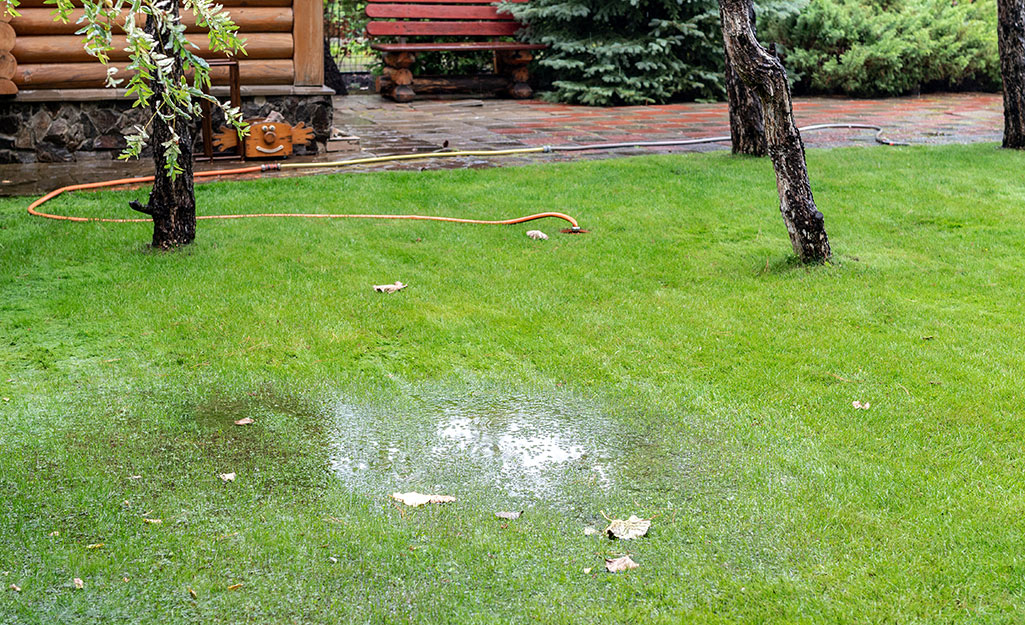
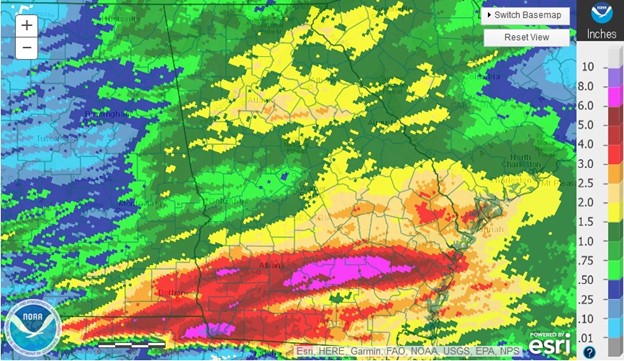
To find the rainfall estimates for your location, the easiest way to do it is to use the National Weather Service’s Advanced Hydrologic Prediction Service. This website provides a daily rainfall amount based on radar estimates for the period currently from 8 AM EDT on the previous day to 8 AM on the day of the map. They are usually available an hour or two after that time period ends so they can receive the data and perform quality control before releasing the maps. You can zoom in on the maps to your location and add county outlines or other backgrounds to help pin it to your exact location. The site also allows you to look at 7-day, 14-day, and longer accumulation periods and to compare those to normal or expected precipitation. The map below is one I created for a heavy rain event in Georgia this past week on April 25, 2021, where a few locations in southern Georgia got up to 10 inches in just a few hours, causing problems for farmers there due to standing water, erosion due to runoff, and scattered loss of seed and fertilizer.

Radar-estimated rainfall for 24 hours ending at 8 am EDT on April 25, 2021.

The radar maps are not perfect. You can only zoom down so far, and the smallest unit is still at least a few kilometers or miles on a side, so you will never be able to distinguish the exact edge of a summer thunderstorm that drops rain on one side of the road and leaves the other side dry. The estimates also tend to be too low in high-intensity rainfall because the relationships that the radar software uses to estimate the volume of water don’t work very well when it is raining harder than normal. But by calibrating the rainfall to observers’ reports, they are usually pretty reasonable. If you are not in the United States, you will need to check with your own nation’s weather service to see what radar information is available.

Coming in May…

Speaking of “normal”, in May NOAA is expected to update the normals for temperature and precipitation for the US from the 1981-2010 values to the 1991-2020 values. The new temperature values will be higher than the previous ones due to the upward trend in temperature in the US and the globe over time. Rainfall will also change but it will go up in some places and down in others due to wet and dry spells in different parts of the country over time. I will talk about the new normals and how they are created in my blog post in late May.

Leave your lawn alone!

Masses of spring bulbs transform this lawn. Photo by Charlotte Scott.

Nothing seems to take homeowners more time, or generate more frustration, than maintaining their lawns. In addition to mowing, fertilizing, and applying pesticides for weeds, insects, and diseases, gardeners fret about removing thatch and aerating the soil. Commercial interests have taken note and pedal various “aerifying” products like soap (cunningly described in non-soap terminology), spiked sandals, and thatching rakes. Previous posts (here and here) have addressed ways to decrease fertilizer and pesticide use. This post will look at the science behind aeration of home lawns.

First, let’s acknowledge that most research has focused on maintaining turf on golf courses and playing fields. Neither of these are good models for home lawn management because home lawns have different functions. The turf that one might find on a putting green, for instance, is devoid of most life except for closely mown monocultural (or oligocultural) grasses. The management of these grasses is chemically and physically intensive to preserve a completely unnatural system. Yet these management techniques, including core aeration and vertical mowing (aka verticutting), have seeped into the lucrative home lawn maintenance market, especially to address the dreaded thatch layer common in many home lawns.

What is thatch?

Briefly, thatch is caused by organic material accumulating at the base of grass plants. (It is NOT caused by lawn clippings, which are small and nitrogen rich – they are broken down quickly.) Accumulation of thatch is said to lessen lawn resilience and increase disease, but this appears to be a classic CCC (correlation conflated to causation) error. I’ve seen nothing in the literature to suggest that thatch causes these problems. Instead, I see evidence that thatch is yet one more negative result of poor lawn management. Removing thatch, without addressing the CAUSE of thatch, is an exercise in futility.

Look at these two images of grass-covered soil: one is a typical lawn, and the other is a natural grassland. There are no roots extending below the “thatch” layer in the lawn, while grassland soils support deep and extensive root systems. The problem with the lawn is that the system is not well aerated, meaning that the grass roots are shallow and contribute to the buildup of thatch. Lack of aeration also inhibits a robust community of microbes, which are necessary to decompose the organic material that makes up thatch.

If you have standing water on your lawn, there is no oxygen in the soil beneath.

So, lack of poor oxygen and water movement between the grass layer and the underlying soil creates a dead zone in that soil, with life restricted to those few inches of soil where oxygen and water can penetrate. Thatch accumulates and underlying roots from nearby trees and shrubs are forced upwards into the lawn to obtain water and oxygen. This is where lawn maintenance companies promise to fix the problem through core aeration or verticutting.

Does core aeration and verticutting improve home lawns?

While there is scant research on home lawns, the results are fairly uniform: core aeration does not reduce thatch accumulation and does not improve grass coverage. Verticutting can decrease thatch slightly but decreases grass coverage and reduces turf quality. Several quotes from published research stand out:

  • “All cultivation practices [which included core aeration and verticutting] resulted in some quality loss at various times during the spring transition period compared to the control.”
  • “Thus, under homelawn conditions, core aeration and vertical mowing should only be used if a specific problem exists and not as routine practices to prevent thatch accumulation.”
  • “After two years, no treatments consistently reduced thatch accumulation compared to the non-cultivated control.”

There is no published research, anywhere, that supports these techniques in maintaining healthy home lawns. So, it’s time to stop using these heavily promoted products and practices and instead focus on why lawns accumulate thatch in the first place.

It’s all about the oxygen!

There’s no question that lawns can be heavily compacted, but it’s not because grasses can’t tolerate foot traffic. Think about those hundreds of thousands of bison that use to roam the Great Plains grasslands. Even modern cattle ranching, done sustainably, does not damage pastureland by compacting the soil. There’s something else going on in home lawns that creates compacted conditions and the cascade of negative effects that follow; it’s improper soil preparation and management.

Pastureland dosen’t become compacted despite the significant pressure cattle exert on the soil.

When sod is laid for home lawns, several inches of compost are tilled into the soil bed. The tilled soil is then flattened with a roller, and then a layer of sand is applied. Then the sod (which consists of grass and growing media and a mat of some sort) is arranged. And voilà! You have a turfed landscape that more closely resembles a five-layer dessert than a functional grassland. Those layered materials restrict the movement of water and oxygen, and this restricts root growth into the underlying native soil. Not only do these barriers create a shallowly-rooted turf, they compound the problem by stimulating ethylene gas production in grass, further inhibiting root growth. To top it off, the anaerobic conditions in the lower layers restrict microbial decomposition. As decomposition and root growth slow, thatch accumulates. And homeowners despair.

So, thatch serves as a warning sign that soil conditions are poor – and any attempts to permanently remove thatch without addressing poor soil preparation and management are going to fail. Possible corrective actions to improve soil structure and function are beyond the scope of this column; over the years we’ve had blog posts touching on this topic and I encourage readers to explore our blog archives.

To (direct) sow, or not to sow, that is the question: whether ’tis nobler in the garden to transplant

Most experienced gardeners will tell you what should be started indoors (or purchased) as transplants and what should be direct sown into the garden, but this can often be confusing for new gardeners.  Add to the confusion the fact that some plants have a gray area when it comes to what is best, sometimes it depends on the time of year, and sometimes it depends on where you are as to whether what is possible.  So if you forget to start your favorite tomato or begonia indoors in time to transplant, do you have options?  Let’s explore!

Why start transplants, anyway? 

This is a good question.  Why do we take the time and energy to start seeds indoors, or the added expense of buying vegetable or annual transplants?  There are a few good reasons:

  1. Germination temperatures. Many of the plants that we traditionally start as transplants require minimum soil temperatures of around 60F and have optimum germination between 70F and 80F.  Waiting for soils to reach these temperatures, especially in cooler climates, can really shorten the growing season.  Vegetable temperatures, via UNL Extension
  2. Extending the growing season.  Related to germination temperatures, starting transplants for warm season crops before soil temperatures warm up and before the weather is suitable for planting can have a plant ready to go once those weather conditions are ideal.  This can give you a head start of weeks or months over direct sowing. 
  3. Ideal growing conditions.  Seedlings for many vegetable and annual crops are quite tender and dainty when they first start out and any changes in temperature, water, or even sunlight can cause damage.  This is even more important as spring weather is becoming a bit more unpredictable as the climate changes, where temperatures can drop suddenly and the weather can go from rainy to dry (or snowy) at the drop of a hat (he writes as the temps drop to the 30s and 40s from the 70s the previous week and some parts of the state are receiving 6+ inches of snow in late April). 

What about direct seeding?

  1. Ease.  Many gardeners, especially newbies, find it a lot easier and less intimidating to just hop out to the garden and plop seeds in the soil versus staring seeds indoors.  Of course, buying transplants is equally as easy, but that does limit the variety you have available to plant.
  2. Cost effectiveness.  Only needing a pack of seeds (or saved seeds) is typically much cheaper than buying transplants or buying the equipment than starting seeds indoors.  This allows for much better cost effectiveness for gardeners. 
  3. Some things don’t transplant well.  Root crops, like radishes, carrots, and beets don’t transplant well because damaging that tiny little root in any way as you transplant can damage the actual harvestable portion of the crop and result in much lower produce quality (or even loss).  Additionally, some plants don’t like to have their roots disturbed, even when they’re tiny little transplants.  Cilantro and zinnias, for example, don’t do well with root disturbance so if you do want to transplant them you’ll need to start them in large enough containers so that you don’t have to repot them, and then plant them carefully as to not disturb the roots.

So sow, or not to sow?  How do I know?

This is a good question. Oftentimes we can take a look at the seed packet and know, but sometimes we don’t have that packet or maybe we want to fudge a little with what we read on the packet.  So what is possible, and what is “best practice”? 

A newly transplanted pepper, getting a start for the season

Using some of the information we discussed previously about soil temps and growing season, most of those warm season crops you plant that take a while to grow from seed, like tomatoes, peppers, and eggplants should be started as transplants, especially for folks in cooler climates (like most of the US).  Same for those summer annuals (if you absolutely MUST grow annuals, I know some people love them and some loathe them).  In warmer or topical areas, you may be able to direct sow these crops, but they may still do better as transplants. 

Some of the warm season crops, like beans, corn, cucumbers, squash, and pumpkins can be started indoors and transplanted, but it isn’t necessarily needed.  These crops typically grow much more quickly from seed and the seedlings are a bit hardier.  We also typically grow some of these plants in much larger quantities, making them take up more space for indoor starting and resulting in a bit more work to transplant versus sow.  Therefore, it is usually easier to direct sow these crops, but there could be situations (like overcoming weed pressure in the garden or if you have a really short growing season or low soil temps) where you might want to start them indoors. 

What about cool season plants?  Sometimes the answer to this one is – “it depends.”   Lots of the leafy greens, like lettuce and spinach, and those aforementioned root crops can be direct sown into the garden well before the last frost date.  If you have a soil thermometer, or a nearby weather station with soil temp probes, keeping an eye for when soil temps get into germination range can signal when to direct sow outdoors. The leafy greens can be started as transplants, but figure out the optimum soil temperature for gemination – for some, like spinach, it may be way cooler than your indoor temperatures can get (unless you keep your house around 45 degrees).  For the Cole crops like broccoli, cauliflower, and cabbage, transplants should be started for spring planting, since they still require warmer (75ish degrees) temperatures for germination.  However, if you’re sowing them for fall crops you can possibly direct sow them if other conditions, like water availability and low weed pressure, will support good growth in the garden. 

There are several resources, like this graphic from Virginia Cooperative Extension, that can help you out.  But keep in mind that certain situations may make other options possible.  For example, this graphic is for spring planting, so some of the items, like the Cole crops, may have options for direct sowing for fall cropping depending on where you’re located and your local climate. 

Chart showing how to start vegetables transplant vs direct sow: Transplant: Broccoli, Brussles sprouts, cabbage, Chinese cabbage, Cauliflower, Eggplant, Leeks, Lettuce, head; peppers; tomatoes. Direct sow: asparagus; beets; beans, bush; beans, pole; beans, lima; carrots; chard, swiss; collards, kale; cucumbers; kohlrabi; lettuce, baby salad; muskmelons; mustard; okra; onion, bulbing; radish; potatoes; southern pea (cowpeas); spinach; squash, summer; squash, winter; sweet corn; sweet potato; pumpkins; rutabaga; radish; turnips; watermelon. VCE and Master gardener logo at the bottom with link to publication (also included in post text)
This info is good for many areas for spring planting, but climate and planting time can change options for some gardeners
Source: Virginia Cooperative Extension Master Gardener Facebook

My Soil is Crap

My Soil is Crap! Or is it?

Over several years of teaching basic soil science to arborists, master gardeners and students something started to coalesce into a trend. If I ask my students do they have “good” soil, many say no. I have heard Master Gardeners complain their soil is terrible or that a certain soil is bad in some way. People form opinions about soil based on its color, texture, odor, or even how plants grow in it (perhaps the most diagnostic quality). So how do you know if your soil is “crap”? Soil is a combination of physical, chemical and biological properties not all of which are obvious from a casual examination. Soil is infinitely variable depending on how it was formed and what has happened to it. Many soils are fragile and their growing properties can easily be harmed.

Soil forms from its parent material or rocks that weather over time to form smaller and smaller particles

Soil Formation
To understand soil you need to understand how it forms. Soils are often depositional, forming as particles are deposited in place from wind, or water or other weathering factors. Deep soils form from the alluvium  as water washes particles down from mountains. Terraces along streams also form soil deposits when they overflow the stream bed. Almost all soils form from rocks that are referred to as the parent material. The kind of rocks that form the parent material determine the minerals that will dominate that soil. Exotic soils like serpentine soil contain large amounts of magnesium but lack calcium. Soils can be young (not deep or fine textured) or very old (deep clays). One of first things gardeners should seek to find out is if they have “native” soil or are gardening on fill. Soils are also modified by climate especially rainfall. High rainfall areas have leached soils, are usually forested, and have acid soil reaction (pH). Arid soils usually have excess salts, and tend toward being alkaline. Understanding soil formation helps to understand what kind of soil you have and how to utilize it best for your garden.

Residential landscapes are often on fill soils with various textures and interfaces. Here decomposing granite surface soils cover the actual clay loam textures underneath. Soils can vary significantly on the same property requiring multiple tests and actions for their treatment.

Fill is not Soil
One of first things gardeners should discover is if they have “native” soil or are gardening on fill.  Fill around homes and cities is not soil in the natural sense. Fill soil is not formed in a natural process, it will not have the predictable qualities of soils and may be extremely variable even on a single property. Soil maps are available from your cooperative extension office and on line from the NRCS (https://websoilsurvey.sc.egov.usda.gov/App/HomePage.htm). The web soil survey is a map of naturally occurring soil types. Soils are described in detail and understanding your soil type will inform its ability to grow plants, hold water and minerals, etc.

Soil Physical Properties
No matter which soil you have, gardeners will want to know what to do to make it better for growing their plants. The physical characteristics of soil are important for gardeners to understand. Soil texture is described by analyzing the content of various particle sizes. Sands are composed of large particles silts have intermediate size particles and clays contain the finest particles. Soils texture is the relative content of sand, silt and clay particles and are described by their content of these particles such as a “clay loam” Pure loams are relatively rare because they have equal measures of sand silt and clay and are considered the most arable soil textures. A clay loam has more clay than the other particle sizes but enough to still be considered a loam. Textural classes are described by the soil triangle. You can diagnose your soil texture by using a ribbon test where you feel the soil and analyze its qualities. A laboratory can separate the particles and give an exact analysis. Soil texture affects horticulture directly as it determines drainage characteristics, moisture content and mineral holding capabilities.

Soil Chemical Qualities
One of the most defining chemical qualities of soil for gardeners is nutrient content. Minerals or elements in soils are highly variable based on soil age, their formation processes and the parent material from which they  developed. Fine textured soils have more mineral nutrients and storage capacity than coarse textured soils. Sands tend to be hungry for plant nutrients and clays are usually rich in nutrients. This is because as particle size decreases the electrical properties of soil become more negative in charge and tend to retain positively charged mineral nutrients. You can estimate nutrient content by seeing how plants grow in a given soil without fertilization. If weeds are abundant and happy, the soil may contain adequate amounts of the 18 different elements necessary for plant growth. The only way to accurately know the nutrient content of a soil is to have it analyzed in a soils lab. There are other blogs at this site that tell you how to take a soil sample. Never fertilize a soil that already grows plants well as you will be polluting surface waters and contaminating streams with excess fertilizer elements that can leach or run off.

A well structured soil has water-stable aggregates, pore spaces, roots, hyphae, organic matter etc. This kind of soil is the product of a robust soil food web.

Biological Qualities of Soil
The most elusive quality of soil is the biological quality. Soils are ecosystems of organisms. Much has been written about the soil food web and it is a critical part of how soils and plants interact. While we can see worms and small arthropods; bacteria, fungi and nematodes are not visible. It is difficult to visually assess soil biology. However there are some indicators. “Healthy” soils are often well structured. Soil structure is a physical description of the way soils form aggregates, clumps and clods. Well structured soils have abundant pore spaces, bits of organic matter, and have distinct clods or clumps. Often these clods are water-stable, that is, if you put a soil clod in a jar of water it will not dissolve. This is an easy test you can make of your soil. Place a clod in water and leave it there over night if it dissolves it is not a water-stable aggregate. Water stable aggregates from from the action of soil microorganisms that bind soil particles with polymers as well as the hyphae of fungi which connect particles together.

Soil Carbon Drives Soil Biology
Healthy soils have more carbon in them then soils that are not biologically active. Organic matter is an important part of soil and is added as litter or mulch breaks down and by plants themselves as they deposit carbon through exudates and associations with microorganisms. Plants can add as much as 20% of their carbon captured through photosynthesis into soil through root exudates and microbial association. Carbon is food for microbes and an essential component of a healthy soil. Soil with large amounts of organic matter are dark in color (but so are many low OM clays so don’t be fooled). Again the only way to know exactly how much organic matter is in soil is by a soil test. A detailed soil organism analysis may not help you that much because it is difficult to assign specific roles to groups of organisms living in soil. If we provide organic matter (fresh wood chip mulches in perennial plantings) the food web will grow to utilize it and we do not need to worry about who is using the carbon.

A bio-assay of three soils (2 cups each) planted with radish and carrot. From top left to bottom right: clay loam; silt loam and potting medium

Despite all these factors soils are still a bit magical. Even with soil surveys, and soil analyses you really can’t tell if a soil will grow well until you try to do so. In my University class I am having my students do a simple bio-assay (growing seeds in soils) The assignment was to grow radish and carrots in three different soils, hoping that some would show up signs of damping off disease. I did the experiment as well. My seedlings were grown in a silt loam, a clay loam and a potting medium. The soil-based differences are very visible. The clay loam grew the largest seedlings. Bio assays such as this are helpful to see what the growing qualities of soil are. They don’t tell the entire story but they are very interesting for comparative purposes. Bio assays are great to do before you purchase soil for raised beds or if you are gardening in a new soil that you don’t know much about. In the next blog I will touch on how, when, and why soils should be modified to enhance your garden.