The weather where you are

Greetings from Athens, GA! I am happy to join the group of contributors to the Garden Professors blog. My name is Pam Knox, and I am an agricultural climatologist in Extension at the University of Georgia as well as the Director of the UGA Weather Network and a former State Climatologist from Wisconsin. While I don’t claim to be an expert in gardening, I do know a thing or two about how weather and climate affect plants and hope to share some of that expertise with you over time. You can learn a little more about me from my bio on the blog page.

Source: Merritt Melancon, University of Georgia College of Agricultural and Environmental Sciences

If you really like learning more about weather, climate, and agriculture, you are welcome to visit my own blog page, “On the CASE—Climate and Agriculture in the SouthEast” at https://site.extension.uga.edu/climate/, where I post almost daily about stories that have caught my eye as well as climate summaries and outlooks for the southeastern US. I plan to post on the Garden Professors blog here about once a month and am happy to answer questions at any time at pknox@uga.edu.

A simple way to compare temperatures around your yard

For my first post, I thought I would talk a little bit more about the weather in your yard and how you can learn more about it. As gardeners, you probably spend more time in your yards than I usually do, and so you have noticed that the climate of your yard or field can vary quite a bit from one spot to another. We call that “microclimate” and if you search this blog for that term, you will find several articles about microclimates in previous years, so I won’t spend a lot of time on that here.

Source: toby everard / Blaen y Cwm in a frost pocket / CC BY-SA 2.0

One easy and inexpensive way to measure how temperature varies across your domain is to use an infrared thermometer to spot-check the temperature at a variety of locations. These thermometers are used a lot now to check forehead temperatures in the age of COVID, but they are also used by HVAC technicians to check heating and air conditioning, for example. You can find inexpensive ones selling for less than $20 online, and many hardware stores have them, too. You will be amazed how much difference there is in temperature between sunny and shady locations! Don’t forget to try it at night too to see how much tree canopy can affect night-time temperatures. Of course, if you want a more systematic and scientific approach, you can follow Linda Chalker-Scott’s experience using multiple min-max thermometers as described in http://gardenprofessors.com/microclimate-follow-up/.

Infrared thermometer. Source: LuckyLouie, licensed under the Creative Commons Attribution-Share Alike 3.0 Unported.

CoCoRaHS: Precipitation measurements by citizen scientists

One of the many things I do is to serve as a regional coordinator for CoCoRaHS, short for Community Collaborative Rain, Hail, and Snow network. This is a group of dedicated citizen scientists who take daily rainfall measurements and report them online via computer or smartphone as part of a nationwide (and now international) network of precipitation observers. Theses observations are used by the National Weather Service, drought monitors, water supply managers, and others to document local variations in rainfall at a much denser scale than other available observing networks. I am sure that some of the readers of this blog are already contributing! You can learn more about the network and how to sign up at https://www.cocorahs.org/. Please keep in mind that they do require the use of a particular scientific rain gauge, so a hardware store gauge is not likely to have the degree of accuracy that is needed to participate. A list of inexpensive vendors (costs start around $40 plus shipping) can be found on their site in the right column. By measuring precipitation at your house, you are not only monitoring your own conditions but contributing to our knowledge of water availability around the US and beyond.

One version of the standard CoCoRaHS precipitation gauge. Source: Lamartin, licensed under the Creative Commons Attribution-Share Alike 3.0 Unported.

I am looking forward to interacting with you all in the months ahead, and please feel free to contact me if you have specific weather or climate questions.

Not all Extension publications are created equal

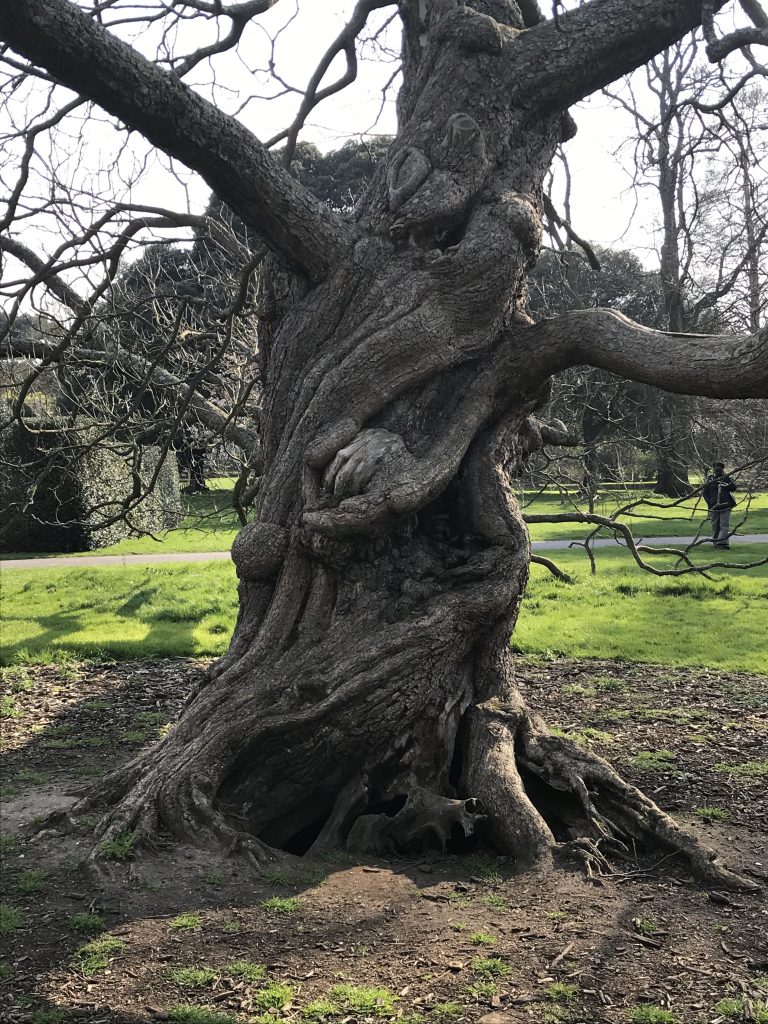
(A friendly caveat – this post does not lend itself well to images. So the pictures here are simply eye candy from my 2019 trip to London to reward you for considering this visually drab but important topic.)

The actual “whomping willow” in Kew Gardens

I’ve been involved in Extension education for 17 years and one of the most important things I’ve learned is that Extension audiences want information that’s easily understood and has obvious practical use. Most peer-reviewed research articles are written for academic audiences, so only the most persistent nonscientists will slog their way through pages of dense, technical writing.  It’s up to Extension educators to accurately translate and summarize technical scientific information for use by the public.

Epiphyte “tree” in Kew Gardens glasshouse

Extension is part of the American land-grant university system and extends traditional academic teaching to citizens statewide (hence the term “extension”). In addition to providing seminars and workshops to interest groups, Extension publishes educational materials in-house and provides them at low or no cost to their clientele.

The Bonsai Walk at RHS Wisley Gardens

But here’s the problem: the standards for Extension publications are set by each university. Unlike the peer-review system adopted by reputable journal publishers, Extension publications can vary widely in quality. Some universities have adopted a system that parallels that of scientific journals in that they require double-blind peer review. But many universities have not – and this means that looking for Extension publications on a particular topic results in a collection of materials with contradictory messages. This is incredibly frustrating to confused nonscientists and to Extension faculty who have to sift through the mess to find publications that are relevant and science-based. As a result, Extension publications are often regarded with suspicion by both nonscientists and academic faculty (who often do not have the disciplinary expertise to sort through the mess). Since I was a traditional academic before entering Extension, I have a foot in both camps.

Sunken gardens at Kensington

Nonscientists are probably not going to have the disciplinary expertise to tease out the good stuff from the dreck. But they can look for some indicators that will help them identify the most reliable publications. Here’s a checklist to start the process: the more “yes” answers you have, the better the chances are that the information is reliable.

  1. Is the author identified? Anonymous publications are not reliable.
  2. Is the author an expert? Expertise is determined by advanced degrees (at least a Master’s degree) in the subject matter.
  3. Is the publication peer reviewed? There should be a logo or a statement on the publication that says so.
  4. Is the publication relevant? High-quality Extension publications targeted towards commercial agricultural production are usually inappropriate for use in home gardens and landscapes.
  5. Is the publication current? Information relative to urban horticulture and arboriculture is rapidly changing. Publications over 10 years old likely do not contain the newest information.
  6. Are there scientific references included, either as citations or as additional readings?

As necessary as this process is for identifying reliable information, there can also be negative outcomes. Universities that do not have a rigorous process for publishing Extension materials put their Extension faculty into the uncomfortable position of having to defend their work when it’s questioned. It would benefit all parties for every land-grant university to institute a rigorous, peer-reviewed process for their Extension publications.

My favorite ad at the tube station

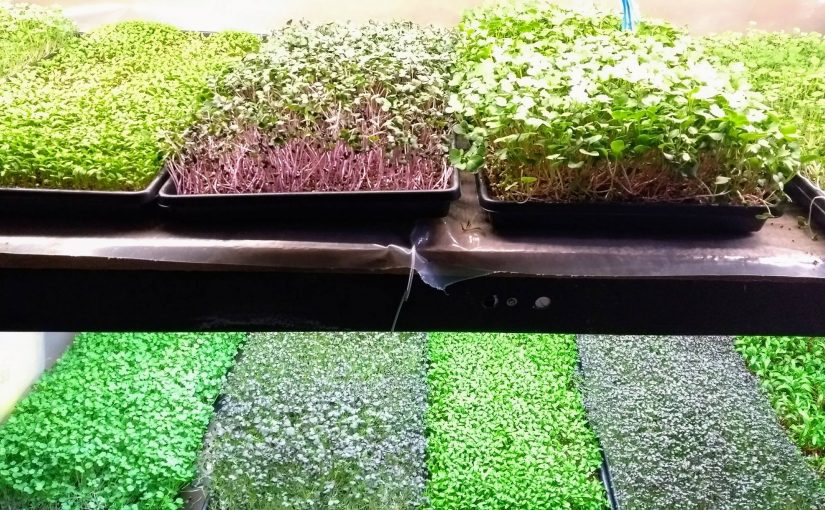
Tiny plants that pack a flavor and nutrition punch: getting in on the microgreen trend

If you do any searching for gardening (or even think about the color green), you’re likely bombarded with adds on social media and search engines about all stuff gardening.  One of the recent trends is microgreen production.  There’s all kinds of fancy little systems and gizmos that will help you grow microgreens for a price.  But what are microgreens?  Are they the same thing as sprouts? And do they have the same food safety issues as sprouts?  Let’s discuss, shall we?

What are microgreens?

Microgreens are basically tiny plants harvested shortly after germination.  Unlike sprouts, like the common alfalfa or bean variety, these baby plants are grown on a medium of some sort and just the “above ground” portion of the plant is harvested.  Sprouts, on the other hand, are typically grown in a moist environment without a medium and harvested whole -roots, seed, and all.  It is this wet and warm environment that make sprouts especially risky for food borne illness. 

Microgreens can be any number of different crops, but common types are kale, mustard, chard, broccoli, arugula, and radish.  Sunflower and pea are also common, but they fall more in the “shoot” classification since they are harvested a bit larger.  There’s lots of other crops that are used for microgreens, including herbs like cilantro and even marigolds, so the sky is the limit!

Why microgreens?

There are a few things that make them attractive to farmers which also are good for home growers.  First, it only takes 1-3 weeks for a finished crop.  This fast turn-around makes it easy to keep up with production needs for customers (or your own uses) and also reduces risk.  If a crop fails, it is much less damaging if it only took a week to grow rather than a whole field full of peppers that have been growing for months getting wiped out by disease or a storm. 

Second, is the value and profit.  While there is some investment in seed starting equipment and then continued expenses of seeds, trays, and media, microgreens have a high per pound value.  Microgreens are used in small quantities and are therefore sold in small quantities.  A small amount you may purchase at a farmers market for a few bucks may be an ounce or less.  When you calculate it out by the pound, microgreens are sold for between $20 and $200ish per pound (depending on the variety, organic production, other factors). 

And of course, microgreens lend themselves to year-round production.  It can be a fun and easy way to get some flavor and color on the plate even in the dead of winter.  Just a few square feet of production area can provide a decent sized crop, so it is great for those with limited space or no garden at all.

Look ma….I made fancy mac and cheese. All I had to do was add some microgreens.

Microgreens are popular with home cooks and chefs alike because they pack a flavor punch and add some color and texture with just a pinch or two of product.  Studies have shown that microgreens also pack a nutritional punch in a small package.  However, production practices can greatly influence nutrient content, especially light.  Microgreens grown with higher quantities (brightness) and quality (spectrum colors, mainly red and blue but also green) of light have higher nutrient values. 

How do you grow microgreens?

The way you grow microgreens lends itself to why they are so popular to grow, for both home enthusiasts and farmers alike.  Microgreens are basically recently germinated seedlings.  If you are good at seed starting, you can be good at growing microgreens.  Lots of the ads I’ve been seeing recently are for attractive but pricey growing trays and mats that you just lay down and water.  However, budget conscious gardeners can grow them pretty simply and inexpensively at home.  And you probably have most of the equipment you need, especially if you start your own seeds each year! 

Microgreens are usually grown in those flat plastic seedling trays, the type that don’t have cells in them (the ones used to hold the cell packs).  For those “in the know,” they’re called 1020 trays.  You can either use a sterile media like peat or coir or purchase specific fiber mats (I have some made from hemp -they work well but smell like a moldy gym sock full of weed when in use). We’ll talk about the importance of a sterile media when we talk food safety. 

A demonstration of sowing microgreen seeds on hemp fiber mats.

The sowing density of seeds can vary by crop due to seed and seedling size.  Typically, one ounce of seeds can sow anywhere from one to eight 1020 trays.  In general terms, large seeded crops like chard and beets may take up to ½ cup per tray and small seeded crops like radish or kale might require ¼ cup.  Tiny seeded crops, like sorrel may need just a few tablespoons.  If you’re really into production, Penn State extension has an excellent Excel calculator to calculate seeding rates. Typically, you’ll broadcast the seeds on top of your media and then maybe sprinkle a little more media on top to make it easy (no dibbler here!).

Most seeds require darkness to germinate, as well as high humidity.  You can use humidity domes and cover trays with an opaque material to achieve this, or you can use the trick that producers use and stack trays on top of each other for a day or two.  This keeps the seeds covered and dark and preserves moisture and humidity.  Just unstack them after a day or two and stick them in their growing location.  As with seed starting, you’ll have the most success if you provide some good quality light and heat.  (You can search through old articles to find lots of info on seeds starting).  There’s research that shows that light is a big factor in microgreen growth, coloration, and nutrition levels. 

You’ll harvest your microgreens typically one two three weeks after sowing.  Typically, this is done after at least one set of true leaves have formed, but you can usually let them go until there are at least two (or sometimes three) sets of leaves.  To harvest, use a sharp, cleaned pair of scissors to snip the seedling off just about soil level, being sure not to disturb the media so that you don’t get it on your precious produce.

There should be no need to wash the microgreens right after harvest and before storage, since they’re typically grown in a clean environment.  Washing before storage can increase storage moisture to levels that support microbial growth, reducing storage time and also increasing the risk of human pathogens.  Instead, store microgreens (and most leafy greens) without washing and wash just before use. 

Working with a local farmer to demonstrate microgreen production at a regional production conference.

Food Safety

As we learned when discussing what microgreens are and comparing them to sprouts, we learned that microgreens have been found to have much lower risk of human pathogens.  However, the risk is not zero, especially if production practices are conducive to pathogens.  We just discussed that washing prior to storage can lead to microorganism contamination, but there are a few other areas where contamination is easy.  To reduce contamination, follow these steps:

  • Always use clean and sanitized trays or containers.  If reusing trays, be sure to wash with soapy water then sanitize with a dilute bleach solution or other approved sanitizer. 
  • Keep the production area clean and sanitized.  Microgreens are often produced on multi-leveled vertical racks, so contaminants can drip down.  Make sure all surrounding surfaces are clean.
  • Use sterile media for production.  This is typically a soil-less media made primarily of peat or coir, like a seed starting mix, or specialized fiber growing mats.  Do not use regular potting soil, any mix containing compost, or anything containing soil to avoid the introduction of human pathogens or other microorganisms that might affect the crop, such as those that cause damping off.
  • Use cleaned and sterilized seed. Many companies sell seeds specifically for microgreens that have been processed to remove pathogens.  I’ve seen seed production, and while it isn’t filthy, it typically isn’t sterilized to the level of food production standards.  You can sterilize common seed at home using a solution of hydrogen peroxide or vinegar.  For guidance, visit this guide from K-State extension.
  • Use a clean source of potable drinking water.  If you wouldn’t drink it as is, don’t use it.  Typically this means it should be straight from the tap of a trusted source. 

Conclusion

Growing microgreens can be a fairly easy and enjoyable way to produce something fresh and green year round.  In terms of production practices, it is basically ramped up seed starting where your seedlings only grow a few weeks before harvest. This makes it a fairly easy process and one that can be done almost anywhere.  If you’re looking for an indoor gardening project or just want to add a quick source of nutrients to your diet, give microgreen production a try. 

Sources and resources:

Microgreen nutrition, food safety, and shelf life: A review

Microgreens and Produce Safety

Microgreens—A review of food safety considerations along the farm to fork continuum

A step-by-step guide for growing microgreens at home

Pruning Paints Debunked

When my turn comes up to blog for the Garden Professor site I like to reflect on the horticulture in my own gardens and orchard. Right now I am focused on pruning my old apple and stone fruit orchard. It has suffered bear attacks, drought, and mismanagement before we arrived in 2018. The previous owners were very aware of the need to treat pruning cuts large and small. The remnants of tree wound dressings are found all through our orchard and range from white latex paint to silicone caulk. Unfortunately there has never been good research evidence to support pruning paint use. Despite the lack of any published evidence, for their usefulness, pruning paints are still available in garden centers and there are no end of do it yourself preparations that gardeners continue to use on pruning wounds.

Wound dressings did not protect this apple branch from decay fungi

So why paint the cuts on your fruit trees after pruning? One idea is to keep the surface protected from infection by pathogens. Plant pathogenic fungi and bacteria can cause disease that may lead to blight, cankers, or wood decay.

Laetiporus gilbersonii (chicken of the woods) is a common brown rot wood decay fungus that destroys cellulose in wood.

Wounds are often implicated in pathogenesis or disease development. Many horticulturists believed that wound dressings provide a barrier to entry of pathogens and insects. Fruit trees are easily decayed by a number of fungi which cause white and brown rots in their wood. Wood decay organisms enter through wounds created when branches break from excessive fruit loads or when pruning wounds expose heartwood or significant amounts of sapwood. So painting cuts became a very common practice advocated by gardening columns and various books over the last century.

Wound dressings used in Ukraine for many years on this shade trees did not stop decay fungi from fruiting under the wound dressing! Photo courtesy Igor Signer, Kiev, Ukraine

Wood contains cells that store starch. Here, parenchyma cells in the wood ray tissues have been stained purple to show their starch content. Fungi that invade wood use this stored energy to grow, invade and degrade wood. Fungi invade both the heartwood (non-living) and the living, water transporting sapwood. Sap-rotters typically lead to the decline in tree vigor and canopy density.

Over one hundred years ago Howe (1915) recognized that pruning paints did not help wounds to close, in fact, they retarded the development of callus wood especially in peaches. Howe called into question the necessity of using wound dressings at all. Still the use of wound dressings has prevailed to this day.

Shigo and Shortle (1981) showed that wound dressings do not prevent decay nor do they promote wound closure. If the poor pruning practices that harm trees are abandoned, then wound dressings are unnecessary (never mind that they don’t work). Shigo often maintained that tree genetics determine the extent of decay forming in a given species. His work conclusively showed that flush cuts would lead to more decay than cuts that were made outside the branch collar or bark ridge.

Expanding foam? As far as I know there is no research on expanding foam but lots of anecdotes and observations of how it is often used to fill tree cavities. Filling cavities with cement to prevent or limit decay is a practice that subsided some decades ago and is generally not recommended as part of modern arboricultural practice. By the time decay has caused a cavity it is usually well entrenched in the wood of a tree and is not controlled by filling in the void. The best way to limit decay in trees is to prune them frequently so cuts are never large and the tree (fruit or shade) develops a strong structure that is unlikely to fail.

Literature:

Chalker-Scott, L., and A.J. Downer 2018. Garden Myth Busting for Extension Educators: Reviewing the Literature on Landscape Tree. Journal of the NACCA 11:(2) https://www.nacaa.com/journal/index.php?jid=885

Howe, G.H. 1915. Effect of various dressings on pruning wounds of fruit trees. New York Agricultural Experiment Station, Geneva, N.Y. Bulletin No 396.

Shigo, A.L and W. C Shortle. 1983. Wound dressings: Results of studies over 13 ykears. J. or Arboriculture 9(10): 317-329.

Shigo, A.L. 1984. Tree Decay and Pruning. Arboricultural J. 8:1-12.

The complicated issue of heavy metals in residential soils. Part 3: How can we garden safely in the presence of heavy metals?

This is the last part of our discussion on gardening in soils that contain heavy metals (you can catch up on part 1 and part 2 if you need to). Today we’ll focus on the strategies you can use in your gardens and landscapes to reduce your exposure to soil-borne heavy metals.

Raised beds can be an easy solution for gardeners with contaminated soils

Test your soil!

First – and this should really go without saying – you must test your soil to determine if it contains heavy metals of concern. The COVID19 pandemic provides the perfect comparison: you can’t assume you don’t have the virus just because you don’t have symptoms, and you can’t assume your soil doesn’t have toxic heavy metals just because you don’t think it does. The only way to know for sure, in either case, is through testing.

This eyesore did more than spoil the view.

Most soil tests routinely report aluminum, lead, zinc, and aluminum. Other metals, such as arsenic, cadmium, and chromium, may not be part of a basic soil test and you will need to request additional tests if these metals are likely to be present. Often, county health offices will provide free soil testing if you live in a region where there are known contaminants. For example, I live in the Tacoma area where large amounts of arsenic were deposited for decades downwind of an aluminum smelter. Residents of Pierce County can get free soil testing because of the potential danger.

The aluminum is higher than we would like to see, though everything else looks fine.

Even if you don’t live in an area where industrial or agricultural activity may have added toxic heavy metals to your soils, your soil may naturally contain high levels of some metal of concern. As I’ve mentioned in a previous post, our soils have high levels of aluminum. Because we are not downwind of the smelter site mentioned above, I would not have assumed we had any metals of concern, given the rural location of our land, but knowing this informs my choice of vegetables to plant.

The demolition of the Tacoma smelter. Finally.

Avoid adding more heavy metals

Fortunately, many of the consumer products that contained heavy metals are now gone and no longer will add to existing levels of soil metals. But there are still sources out there that gardeners are well-advised to avoid.

  • Older treated timbers. As mentioned in my first post, landscape timbers were once treated with a chemical preservative containing arsenic and chromium. Even though gardeners love reusing materials (we are a thrifty bunch!), these older timbers should be removed if they are still on your property. New timbers are treated with a copper-based solution, which is a more environmentally friendly preservative.
  • Kelp-based fertilizers and amendments. While these products are wildly popular with gardeners, they aren’t very effective fertilizers. Moreover, some kelp species accumulate heavy metals, like arsenic, in seawater and these metals will become a permanent part of your soils. Take a look at this fact sheet for more information.
  • Recycled rubber mulch. This product should be avoided for many reasons (you can read more about the problems in this fact sheet). As it disintegrates it releases high levels of zinc into the soil. And while zinc is an essential micronutrient in plants (and people!), high levels are toxic.
  • Unregulated composts and organic products. Certified composts and other organic products have been tested for pesticide residues and heavy metals: unregulated products have not. Unless you are making your own compost from materials you know to be free from contamination, your safest bet is to purchase certified products.

If you have materials like old timbers, you should never burn them or throw them away. They need to be disposed of as a hazardous waste, much like old cans of paint, mercury-containing thermometers, etc. Eventually, we may be able to use these hazardous discards for biofuel production through pyrolysis, or extract the heavy metals from them for reuse. For now, just dispose of them in a legal and environmentally responsible way.

Cedar is naturally decay-resistant and can be a good choice for rasied beds

Suggestions for safe gardening

If soil testing reveals high levels of metals of concern, there are work-arounds to allow you to still enjoy growing vegetables safely. If your soil tests reveal that your soil is safe for growing edibles, congratulations! You may still benefit from some of the suggestions below.

  • Cover exposed soil with ground covers and mulches (coarse organic or inorganic materials) to eliminate metal-laden dust.
  • Create raised beds for edibles using untreated wood or other metal-free materials. Line the bottom of the bed with an impermeable membrane to prevent movement of soil-borne metals into the beds.
  • If raised beds are not possible, use large containers to grow edibles.
  • Avoid using galvanized tubs, as they will leach zinc (and sometimes chromium) into the soil.
  • Fill beds and containers with clean (i.e., tested) soils or potting media.
  • Don’t plant vegetables near roadways, which are a source of airborne lead.