“Cry Me A River”

I got a Facebook message early this week from a friend in Sacramento CA that said after over 200 days with no rain, she got 4.83 inches in a 24-hour period from the latest extreme rainfall that occurred over northern California. Others have reported up to a foot of rain in three days. If you follow the news, you may have heard the term “atmospheric river” used to describe the torrential rains and flooding that have occurred this week in San Francisco and other parts of Northern California. In this post, I want to explain what atmospheric rivers are and how they affect rain climatology in the Western U.S. as well as other parts of the United States and the world.

Tahquamenon Falls–Autumn. Source: Wfgc, Commons Wikimedia.

What is an “atmospheric river”?

The term “atmospheric river” first appeared in the modern scientific literature in the early 1990s. Since it was first used, there has been a lot of discussion about what the term actually means. Commonly, it is seen as a band of very moist air flowing into a coastal area, bringing the potential for a lot of rain to the region that is at the downwind end of the flow. In some respects, it is like being on the receiving end of a firehose streaming high-intensity water right towards you! After a lot of discussion by meteorologists (described in this Bulletin of the American Meteorological Society article) the official definition in the Glossary of Meteorology became:

Atmospheric river – A long, narrow, and transient corridor of strong horizontal water vapor transport that is typically associated with a low-level jet stream ahead of the cold front of an extratropical cyclone. The water vapor in atmospheric rivers is supplied by tropical and/or extratropical moisture sources. Atmospheric rivers frequently lead to heavy precipitation where they are forced upward—for example, by mountains or by ascent in the warm conveyor belt. Horizontal water vapor transport in the mid-latitudes occurs primarily in atmospheric rivers and is focused in the lower troposphere. Atmospheric rivers are the largest “rivers” of fresh water on Earth, transporting on average more than double the flow of the Amazon River.

Source: NASA Earth Observatory

Why do atmospheric rivers produce so much rain?

The strong flow of moisture into a region provides an excellent source of water vapor for the development of heavy rain, especially if it is moving into an area with flow up mountain slopes that can help storms develop vertically. That enhances the rain-producing process. The West Coast of the United States provides a perfect location for the occurrence of atmospheric rivers since there is a broad expanse of ocean to provide the water vapor, dynamic storms that concentrate the flow into bands that can stretch all the way from the Hawaiian Islands to California (which explains an alternate name, “Pineapple Express”), and mountains near the coast to provide lifting for the moist air once it comes onshore. Cliff Mass of the University of Washington often discusses them in his blog on the weather of the Pacific Northwest.

Do atmospheric rivers occur in other places?

The short answer is Yes! While historically they are discussed most often when talking about weather on the West Coast, atmospheric rivers (ARs) can and do occur in other places as well. Anywhere that has a good source of moisture plus dynamic storms with strong airflow can experience ARs. In the Southeastern U.S., we get them when strong flow from the Gulf of Mexico or the Atlantic Ocean feeds into our region, usually ahead of a strong low pressure center that provides the necessary dynamics to create a narrow band of moisture feeding into the region. According to research by University of Georgia researchers, they occur most often in the cold months of November through March but can occur in any month of the year. In the Southeast, we get about 40 events per year that are classified as ARs. I was surprised to read that there are slightly more events on the East Coast than along the Gulf of Mexico, but anywhere along the Southeast coast can be affected. No trend towards more or fewer events was seen in the 1979-2014 period.

NOAA’s Physical Sciences Laboratory’s page describing ARs says that on average, about 30-50% of annual precipitation in the west coast states occurs in just a few AR events, thus contributing to water supply. ARs move with the weather and are present somewhere on the Earth at any given time. This site has some great resources for tracking and forecasting ARs around the world.

Of course, atmospheric rivers are not the only source of heavy rain events, but they are one of the primary sources for the West Coast. In other areas, tropical systems like slow-moving hurricanes or stalled fronts can also drop a lot of rain. You can also get very heavy rains from small local systems of thunderstorms if conditions are right, especially if the storms “train” or move one after another over the same area like cars on a freight train. We saw this in the Nashville area a few weeks ago, where the heavy rains resulted in significant flooding over a few counties.

Rain garden in the Allen Centennial Gardens on the campus of the University of Wisconsin-Madison. Source: James Steakley, Commons Wikimedia.

How do atmospheric rivers and other heavy rain events affect gardeners?

If you are a gardener in the Western United States, you are already well aware of the long dry season over the summer followed by bouts of rain that can occur over the winter months. The timing of the switchover from dry to wet conditions depends on how far north you are on the coast, with the summer dry spell coming earliest in southern California and moving northward with the position of the jet stream as the summer progresses. Dealing with the effects of an AR is like any other attempt to protect your garden against heavy rainfall, and can mean proactive action to make sure that water-sensitive plants and trees are not located in low-lying areas where rain collects. This 2013 article from the Garden Professors blog on-site assessment is still good advice for planning ahead for soggy conditions by walking through your property in the rain. Designing for erosion control, such as rain gardens, can also help divert water in high-intensity rainfall.

In spite of the heavy rain that fell in this last atmospheric river event, the rainfall barely made a dent in the long-term drought that is present across a lot of the Western U.S. Drought will continue to be a part of the hydrologic cycle that affects gardeners, farmers, and water managers across that region and across the world.

Why root washing is important – an illustrated cautionary tale

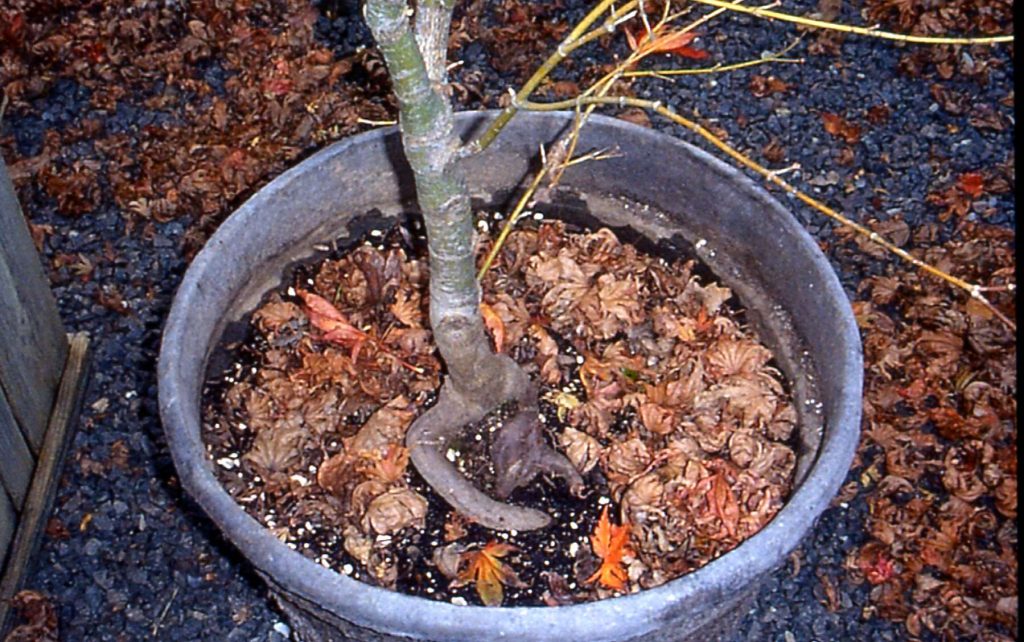
I’ve promoted root washing of containerized and B&B trees and shrubs for a few decades now. The experimental science is slowly coming along – it can take several years to determine if the practice is more successful in terms of plant survival than leaving the rootball intact. But we know how soils function in terms of water, air and root movement, and we understand woody plant physiology. So it’s pretty easy to predict what will happen when trees, whose roots are held captive in layers of stuff, are then planted, intact, into the landscape.

Maple newly purchased from nursery.

Early in spring 2021 I purchased a couple of Japanese maples to frame our garage. As always, I root washed these specimens. Here’s a play by play of what we did, and what we found.

Container removed, exposing fine roots. Some of the media has fallen away and is at the bottom of the wheelbarrow.
Since we can’t see the root flare, we mark the point at which the trunk and soil meet.
As we remove the container media, we find burlap and twine. And under that, a clay root ball. There is a root crown somewhere…
Some beating on the clay rootball helps create some cracks where water can then help with the process.
Into a nice soaky bath to loosen up that clay. The longer it sits, the more clay will slough off.
We speed the process along with a directional spray of water.
Jim gets his fingers into the wet clay to pry it away from the roots. Still no root crown, but you can see the Sharpie line on the trunk a couple inches above the clay.
Eureka! A root flare several inches below the original media level.

After more cleaning and untangling, we have a root system ready for planting. Well, almost.

We have roots, but we still have some problems.
It’s got some pretty crappy roots (from not being potted up properly at the nursery), and the remanent of a stake next to the trunk (about 4 o’clock). But there is a nice structural root to the left, with healthy fibrous branches.
“Knee roots” have to go (I call them “knee roots” because they are at 90 degree angles). They have poor structure and will only continue that downward growth pattern, rather than growing outwards. The easiest thing to do is sever them when they turn downward at 90 degrees – don’t worry about removing them if they are too tightly entwined. New root growth at the cut will be directed outwards.
We neglected to get “beauty shots” of our maples through the summer, but you can see one of them to the left of the New Zealand flax plant in the pot. Both maples established their root systems quickly and grew vigorously throughout the summer.
Now in late October, the maples are turning color. Note the distance between the trees and the garage – this ensures that we will have little branch/building conflict as the trees grow in height and spread.
Here’s one of our beauties getting ready to shut down for the winter. They thrived throughout the summer, even when we reached record high temperatures. We look forward to their continued success in years to come.

If you are still wondering why this is a cautionary tale, consider what would have happened if the rootball was planted intact:

  • The root flare would have been buried below grade.
  • There would be multiple layers of stuff between the roots and the native soil (i.e., clay, burlap, and media).
  • The twine circled around the trunk would girdle it eventually.
  • The poor structural roots would not create a stable support system.

Now, one can argue all they like that there isn’t a robust body of scientific literature to recommend this practice – and there isn’t, yet. But leaving rootballs intact creates textural discontinuities between the roots and the native soil, and poorly structured woody roots are not going to correct themselves. So why not embrace a practice that removes both the soil and root problems?

Caveat emptor!

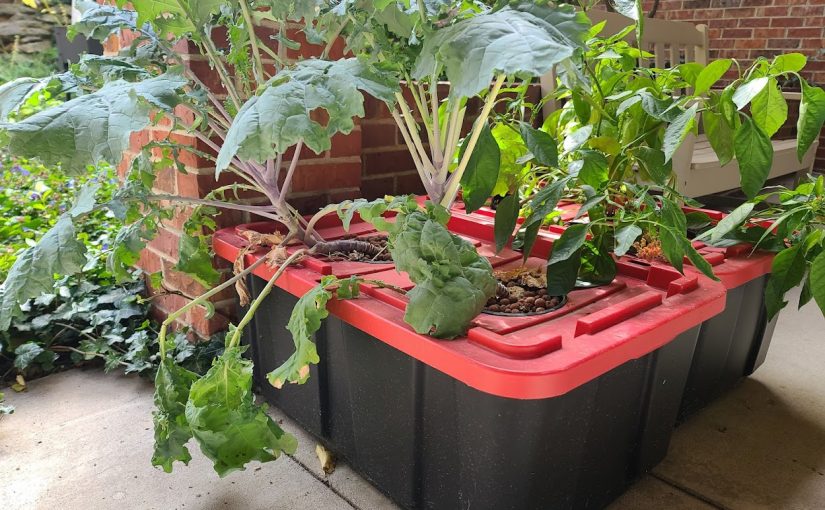
A Super Simple Salad in Stor(age): A DIY Home Hydroponics Example

Say the word “hydroponics” or the even more mysterious sounding “controlled environment agriculture” and the image that most people conjure in their minds is of large greenhouses or artificially lit rooms filled with complex hoses and tubes using all manner of technological gizmos to pump water and nutrients to plants.  True, modern ag technology does allow for some pretty amazing and technical production of food but hydroponics can be super simple and so easy that just about any home gardener can do it. 

Why grow hydroponically at home?

Growing vegetables can be pretty easy and straightforward for outdoor production – seeds, soil, water, and wait (sure, there’s a few other steps in there), so why complicate things by growing hydroponically?  Aside from the challenge and the novelty that delights many gardeners, intensive growing with hydroponics can allow gardeners with the smallest of spaces to grow impressive amounts of produce in a short amount of time.  Most of these systems also do well for winter production indoors with the use of grow lights or some good-sized south facing windows.

Hydroponic or similar-type production systems are the “craze” right now for folks wanting to grow some of their own produce at home, usually in smaller indoor spaces, but these systems can run into the hundreds or thousands of dollars making production less than economical.  Plus, most of these systems require the use of pre-made plant/seed plugs that add to the expense.

Why is hydroponic production important?

On a larger scale, hydroponic and controlled environment agriculture has a few benefits that will help in feeding a growing population on a warming planet.  Hydroponic production can be pretty intensive, meaning that it can grow a large amount of food in a relatively small amount of space.  This makes it ideal for production in urban areas, which is important as most countries become more urbanized.  It also cuts down on transportation needs to get food to consumers. This not only reduces fuel consumption but also, as we can see, makes it easier to get food to large populations when distribution becomes an issue.  And as the term “controlled environment agriculture” implies crops can be grown using hydroponics in greenhouses or indoor farms no matter what the season or climate making it ideal for year-round production in areas where it is too cold or too hot part of the year to do so.  This also means that hydroponics and controlled environment agriculture can be important mitigation strategies for climate change. When the temperatures or precipitation are no longer favorable for growing outdoor crops in certain areas, controlled environment ag can provide a stable source of produce with indoor production. 

And as ironic as it sounds, growing hydroponically drastically reduces the amount of water used for production.  Closed systems, which either recirculate water or grow in enclosed containers, use much less water than field production systems relying on irrigation.

A simple system example

Earlier this year I build some super simple enclosed hydroponic systems for demonstration at our Extension office and at the county fair.  My goal was to show how easy hydroponic production can be – no need for pumps, tubes, or expensive equipment.  The system was so simple that I built it with my non-horticultural interns as an onboarding/team building exercise. 

The system we built utilizes the Kratky method of hydroponic production – a simple system where the plant is suspended on top of a container full of nutrient solution.  In a typical recirculating hydroponic system where water is moved around air is introduced into the water that then provides oxygen to the roots to avoid hypoxic conditions that damage roots.  Some static systems rely on introducing air (like using aquarium air stones) to introduce oxygen but the Kratky method is even simpler than that.  Instead of introducing air into the solution, the level of the solution is reduced (usually through use and evaporation) as the roots grow keeping a section of roots exposed to open air.  The setup is super simple and low maintenance – no moving parts, no electricity (unless I need to use lights for indoors). Just plants, a medium to hold them, a container and a nutrient solution.

How To Start Growing With The Kratky Method - Upstart University
The Kratky Method, Source

I’ve seen the systems made with all kinds of containers but we chose 25 gallon storage totes because they are inexpensive and pretty easy to come by.  Having a lid that is relatively easy to cut/drill also makes these kinds of containers ideal to make multi-plant “beds” but I’ve also seen lidded buckets used as a single-plant system. 

To hold the plants we used plastic net pots that you can find at garden centers that sell pond or aquarium plants (or order) that are also now common at hydroponic supply stores, if you’re lucky enough to have one in town.  You can also use plastic orchid pots or standard nursery pots, perhaps adding extra holes for roots to grow out.  We used 6 inch and 2 inch pots to plant a variety of sizes.

Net pots in the system, with holes made slightly smaller for them to fit and not fall in.

Next we cut holes in the lid slightly smaller than the diameter of the pots so that they sit on top and don’t fall through.  You can do this by tracing and cutting with a sharp object, or use a drywall hole saw that you use with a drill to cut a perfectly round hole. We used one with adjustable sizes, rather than buying individual sizes. 

And now, to plant!

The pots were then filled with an inert, soil-less medium to support the plants.  We used a puffed clay stone called LECA, but you can use rockwool or hemp fiber blocks made for hydroponic starts, large particle perlite, or even something like a poly fiber filling (like used in sewing) – just something that won’t break down to hold the plants in place. 

Some of the plants I had started in fiber cubes so those easily went into the LECA, but we did end up buying a few transplants.  Since these were started in some sort of potting soil we had to wash as much of the soil off as we could.  We placed larger plants like peppers and kale in the large pots and smaller plants like herbs in the small pots. 

As for plant selection, leafy greens and herbs like basil and parsley are easiest and can use smaller containers and pots. Plants like tomatoes and peppers will need bigger containers and pots and will also require more light and heat if you are growing them indoors.

A solution for easy nutrient solutions

And last but not least – the nutrient solution.  Since we are growing without soil we have to provide basically all macro and micro nutrients. We are used to supplying nutrients like nitrogen and phosphorous, but not so used to supplying things like manganese and molybdenum. This one is probably the scariest to those new to hydroponics, but there are some easy options out there for small scale production that are “off the shelf” solutions.  Rather than worry about mixing up nutrients by hand, these pre-made mixes make it easy for home growers to try hydroponics.  They come in two or three part sets of either liquid or solid fertilizers, because some of the chemicals used will react and precipitate out into a sludge if kept together in concentrated form.  Just mix according to package directions and you’re good to go.  If you are growing anything like tomatoes or peppers that require flowering and fruiting, you’ll want to make sure the formula is for flowering plants. Regular water-soluble fertilizers might do in a pinch, but for long term growth you’ll want to invest in something with all micronutrients. 

Storage tote hydroponic system, sitting in the office courtyard.

If you’re planning on refining your technique, you might want to invest in a pH meter or TDS (total dissolved solids) meter to fine tune the solution based on the minerals dissolved in your water.  And if you have really hard water you can usually get an additional nutrient product to account for the pH and calcium levels to balance things out. 

So now we just filled the totes with the solution all the way up until the bottom few inches of the pots were covered.  We kept watch on the solution and added water as needed, keeping in mind that as the roots grow out of the pot the nutrient solution level needed to be low enough to expose around 2/3 of the roots to air. 

The nutrient solution is only a few inches deep in the bottom of the tote at this time, allowing roots to be exposed to air for oxygen uptake.

As the plants grow, you’ll just want to keep an eye for signs of nutrient deficiency and add nutrients to the water as needed.  The solution should be completely dumped and replaced every 6-8 weeks, as the plants rapidly deplete some nutrients, allowing some to build up to toxic levels.  You can typically just pour the solution out on the garden or lawn, as it only contains plant nutrients. However, you’ll want to make sure not to keep dumping in the same spot to avoid build up of salts in the area. Spraying the area with a bit of water from the hose can help wash it off of plants and start diluting it into the soil, rain and weather should do the rest of the job. But if you are in an area with little precipitation, you may also want to take care since there won’t be a lot of water to dilute the nutrient build up over time. And just remember, if you harvest and completely remove crops, pull apart and clean the system with some good soapy water and a sanitizer (bleach works well).  You should do this every few months if you have a long-lived crop in the system. 

In a nutshell…..

A simple system like this one can be a great way to explore a new growing technique, even for beginner gardeners.  After these were set up, we basically left them in our courtyard all summer with little to no maintenance, except adding water earlier in the season and changing out the nutrient solution once.  If you need a bit more info, or want to try something a little more complex, there are some great resources out there for small systems that I’ll share below.   

Resources:

Growing Lettuce in Small Hydroponic Systems – Univ of FL Extension

How to grow with the Kratky Method – Upstart Farms

Small-scale hydroponics – Univ of Minn Extension

Home Hydroponics – Illinois Extension

Pruning newly planted trees

As the climate warms the value of trees for cooling the environment around buildings, especially in cities, drives tree planting programs. Planting trees is just the first step in growing a tree in a sustainable landscape. Successful plantings require evaluation and guidance of the new tree’s current and future branch architecture. In almost every case, nursery grown trees will require some structural pruning so that a shade tree can develop strong and effective branch attachments that will support the canopy for the coming decades without failure. In this blog I cover maintenance of the newly planted tree including how to structurally prune young trees so that they develop strong and sustainable canopies.

As mentioned in earlier pruning blogs, trees do not require pruning. This is predicated on the assumption that trees are allowed to grow in the way they are genetically programmed to grow without damage. Unfortunately many container nurseries prune trees with a heading cut to the central leader in order to create branches that can further be pruned to make a “lollipop” canopy that mimics the form of a large tree. Consumers have become accustomed to this “in-pot” miniature version of a shade tree and nurseries are accustomed to producing them. Low branches are removed to enhance the tree lollipop shape. Nurseries often stake trees tightly to provide a way to keep them from being blown over in wind events and since all the temporary branches are removed from the low trunk they are top heavy and require rigid staking usually with a stake taped to the trunk. Tightly staked trees grow taller than unstaked trees and their trunks may lack caliper or taper (increase in trunk diameter lower on the stem). This requires that when these trees are planted out that they continue to be staked, otherwise they would fall over. This creates another burden in getting the newly planted landscape tree to survive—helping trees stand on their own.

This newly planted coast live oak complete with gator bag for water retains the nursery stake which should have been removed and has two other stakes because it does not have enough taper to stand on its own. There are no temporary branches low down and it has been “lolipopped” during nursery production. Branch faults such as “all branches from the same point” will certainly develop if it is not structurally pruned.
Crape myrtle is notorious for lacking taper when tightly staked during nursery production. this tree retains the nursery tape and stake and has the classic lolipop shape that will require structural pruning to correct.

Nursery pruning creates two kinds of branch faults that if left in the tree canopy will lead to failure later. These result from heading the main leader of the young tree. When buds grow from the pruned tree, they often produce too many branches from the same place or two branches or new leaders that are the same size. We call these faults: too many branches from one point and codominant stems respectively. If the nursery tree retains these branches and they are allowed to mature in the landscape tree, one or more branches may break loose. Almost all structural pruning seeks to correct these faults at some point in the life of a nursery-grown landscape tree. The approaches are different depending on how long the branch fault is left in the tree after planting. Branch faults of newly planted trees are best corrected in the first year–they are easy to correct in the first few years and problematic after that. This is because when poorly attached branches grow well and attain greater size over time, they will pose a problem upon removal as pruning will leave behind a substantial wound which provides an entry point for wood decay. Structural pruning is best done in the nursery or if in the landscape, in the first year after planting.

This young oak retains the nursery stake even after several years post planting. The lolipop shape is indicative of inherent branch faults that have not been corrected

There are several goals of early pruning (1-3 years post planting):
-Retain temporary branches on the stem to assist trunk growth (but keep them pruned)
-Remove competing leaders (remove a co-dominant stem)
– Thin clusters of branches (fix the all branches from one point fault)
-Leave the first permanent branch unpruned
-Subordinate all other branches to “temporary” status by heading them back
– Leave unpruned branches along the stem that will take a permanent place in the crown of the tree.
-Leave enough space between permanent branches to support their sustained growth over the life of a tree
-Permanent branches should be spaced vertically and helically around the main or central leader

Most trees will do all of this without any pruning if they are unpruned from the seedling stage. They will shade out their temporary branches and permanent large branches will form strong attachments and uniform spacings. Heading cuts on young trees destroy their form and this should be avoided. In the next blog I will cover pruning young to mature trees.

La Niña expected to affect climate around the world by end of year

Do you wish you had a crystal ball that could tell you what the climate will be next year when you plan your garden? So do many other gardeners (and climatologists). But while there is no magic answer, we do know that in many parts of the United States and other countries, year-to-year climate variability is strongly dominated by what is going on in the eastern tropical Pacific Ocean. This is through a phenomenon called “El Niño Southern Oscillation” or ENSO for short.

Witch Hazel Covered By Snow In The Garden. Hampshire UK. Source: Si Griffiths, Commons Wikimedia

What is ENSO and how does it affect climate?

ENSO has three phases—a cold phase with unusually cold water in the equatorial Eastern Pacific Ocean (EPO) called “La Niña”, a warm phase with unusually warm water in the EPO, and the neutral phase that occurs between the two extreme phases. The ocean see-saws back and forth between the two opposite phases on a semi-regular pattern that usually lasts between two and five years from one El Niño to the next. Sometimes you can have two La Niña years (or even three) back-to-back (the end of 2021 is expected to be a second La Niña in a row), but you almost never have two consecutive years of El Niño.

In many parts of the world, the phase of the ENSO is highly correlated with the climate. Scientists can use that relationship to predict what the climate might be like in the coming months. That is helpful for gardeners who need to know what to expect both next season and next year for planning purposes. Not all parts of the world have a climate that is well correlated with ENSO, however, and so folks in those areas will have to depend on other methods to look ahead to next growing season. Winter has the best correlation between ENSO phase and climate, while summer is much less predictable. And every El Niño and La Niña is distinct, leading to variations from the statistical pattern we expect.

How does the temperature of the tropical Pacific Ocean affect climate in other parts of the world?

You might think that unusually warm or cold water in the equatorial Pacific Ocean would not have much impact in other parts of the world because of the distances involved, but it does. Since the atmosphere flows like a river, putting unusually warm water (El Niño) into the EPO acts like putting a rock into a stream. The flow of water (or air) shifts around the rock, changing the pattern of atmospheric winds that blow weather systems around. When we are in a warm El Niño phase, the storm track shifts south and covers the southern US, leaving the northern US warmer and drier than usual. When I lived in Wisconsin, we noted that lake ice cover in El Niño winters did not last as long as other years, which made ice fishermen like my dad unhappy. La Niña shifts the storm track in the opposite direction. Because of that, La Niña winters are colder and wetter than average in the northern US since the storm track shifts north into the Ohio River Valley and sometimes even farther. This leads to cold, damp winters in the northern US. Similar correlations, called teleconnections, are seen statistically in climate records at many places on earth.

If we know what the phase of ENSO is likely to be, that tells us what climate conditions are expected in areas where there is a teleconnection between the EPO and that region. While every El Niño and La Niña is unique, statistically they do provide guidance on what to expect in that region, and most years they are correct, although once in a while a wildcard like a Sudden Stratospheric Warming will occur and give us an occasional busted forecast, as it did in February 2021.

What do we expect this year?

Right now, we are in neutral conditions following last winter’s La Niña, but we are headed back towards another La Niña in the next couple of months (almost an 80% chance in the November through January period). That phase should last for most of the winter but is expected to return to neutral by spring.  After that, it is too far out to make a believable prediction. The Global ENSO Temperature and Precipitation Linear Regressions website provides global correlations between the ENSO phase and what kind of temperature and precipitation anomalies to expect. In it, each three-month period shows the relationship between the temperature anomaly of the EPO and other parts of the world (regression) and how strong that relationship is (correlation).

In the map below for December-February (DJF) temperature, it shows that if the EPO is unusually warm (+) in an El Niño, then the northern part of the US will also be unusually warm (+) while the southern states are cooler than normal (-). The storm track over the southern US in an El Niño year brings rain and clouds to that region, keeping conditions wet and cool due to lack of sunshine. A La Niña year is just the opposite. The strong correlation in both southern and northern states shows that it happens most of the time, but in areas with little correlation, you can’t use ENSO reliably to predict seasonal conditions. If you have a hard time interpreting these maps, the website has a tab that explains it in more detail.

The bottom line

For this coming winter, I expect warmer and drier conditions than usual in the southern tier of US states as the storm track shifts north. That means more overwintering of insect pests and diseases; an early start to the growing season is also likely. The northern US is expected to see colder and wetter conditions than usual, which means a later start to the 2022 growing season but less chance of drought next year, although fungal diseases could be bad if the damp conditions continue into spring and summer. Western Europe could see warmer conditions than usual but the correlation is weak so that is not a strong forecast. Australia is likely to be colder than normal, with a fairly high probability because the correlations are high, at least near the coasts. This should last until spring, when the La Niña ends, and we swing back into neutral conditions when other climate factors become more important. In the Southeast, the summer after a La Niña ends is also a hot and dry summer due to the lack of recharging rain over the winter, so I think we have the potential for drought in the Southeast next summer.