Potting Soil Poison

Gardeners often struggle to grow plants in containers. You may feel that you have a really black thumb at times when newly planted seedlings fall over dead or fail to thrive. The problem may not be disease or poor gardening acumen but rather your container media otherwise sold as “Potting Soil”. A trip to one of the big box stores or a larger retail nursery will offer gardeners many choices of bagged potting soils. They are marketed to give you the impression they will grow anything and everything. But do they?
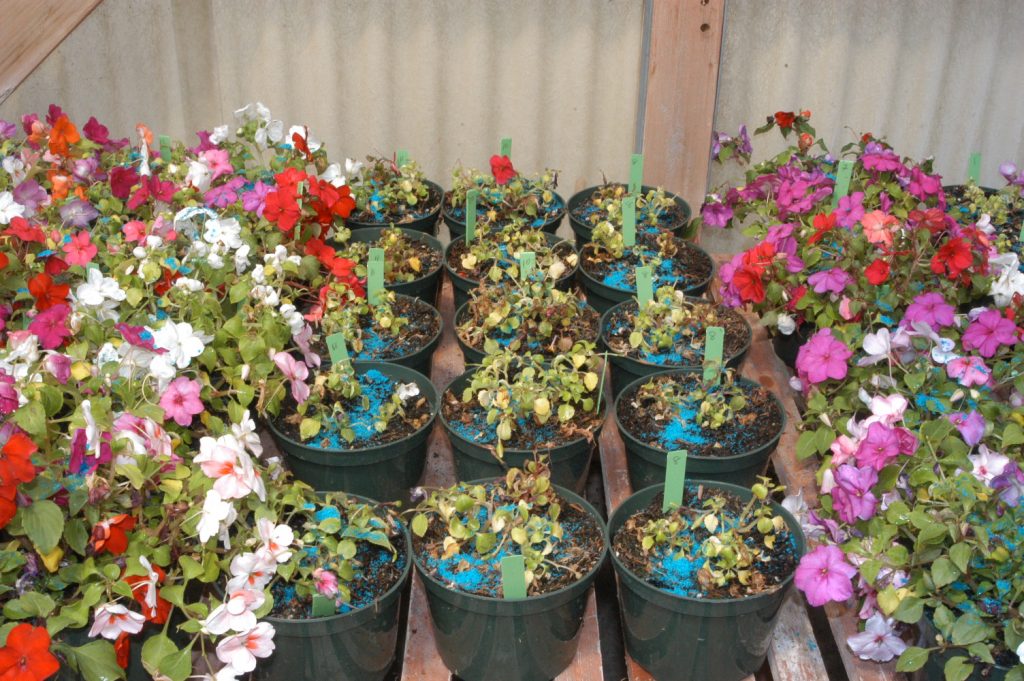
Over the last couple of decades I have done comparative potting media trials where I plant small plugs (usually impatiens) three per six inch container. I go out and find every retail brand of potting mix I can find and plant them all up and then follow them for about two months. I’ve been thinking of revisiting the studies and seeing if anything has changed. I also want to test the assumption that you can’t predict the grow ability of a potting soil by reading the ingredient label as some research suggests. While there can always be a surprise with any given product, I think that from my many trials I can make some suggestions to improve the outcome of your gardening adventures in containers.

Soil on the left has no nutrients same soil on the right with 2 grams of ammonium sulfate added on the surface of the medium one time.

Growing media is not the same as soil. Since media are placed in containers, often plastic ones, they need to be very porous. Porosity of up to 50% is not uncommon in container media. The bulk of the media needs to hold water and minerals for plant growth. Usually an organic material that has a high cation exchange capacity is used. The darling of potting mixes has been Peat Moss. Since peat moss harvesting is damaging to the environment (see previous blog by Linda CS), many gardeners may want to avoid media with peat moss. Bulking agents that do not hold much water or nutrients are also added to “lighten” or aerate the medium. Horticultural perlite (expanded volcanic glass) is the most common. Sand is also sometimes used but it adds weight to the bag and is not preferred by manufacturers. Some media use bark or other wood products to provide greater porosity.
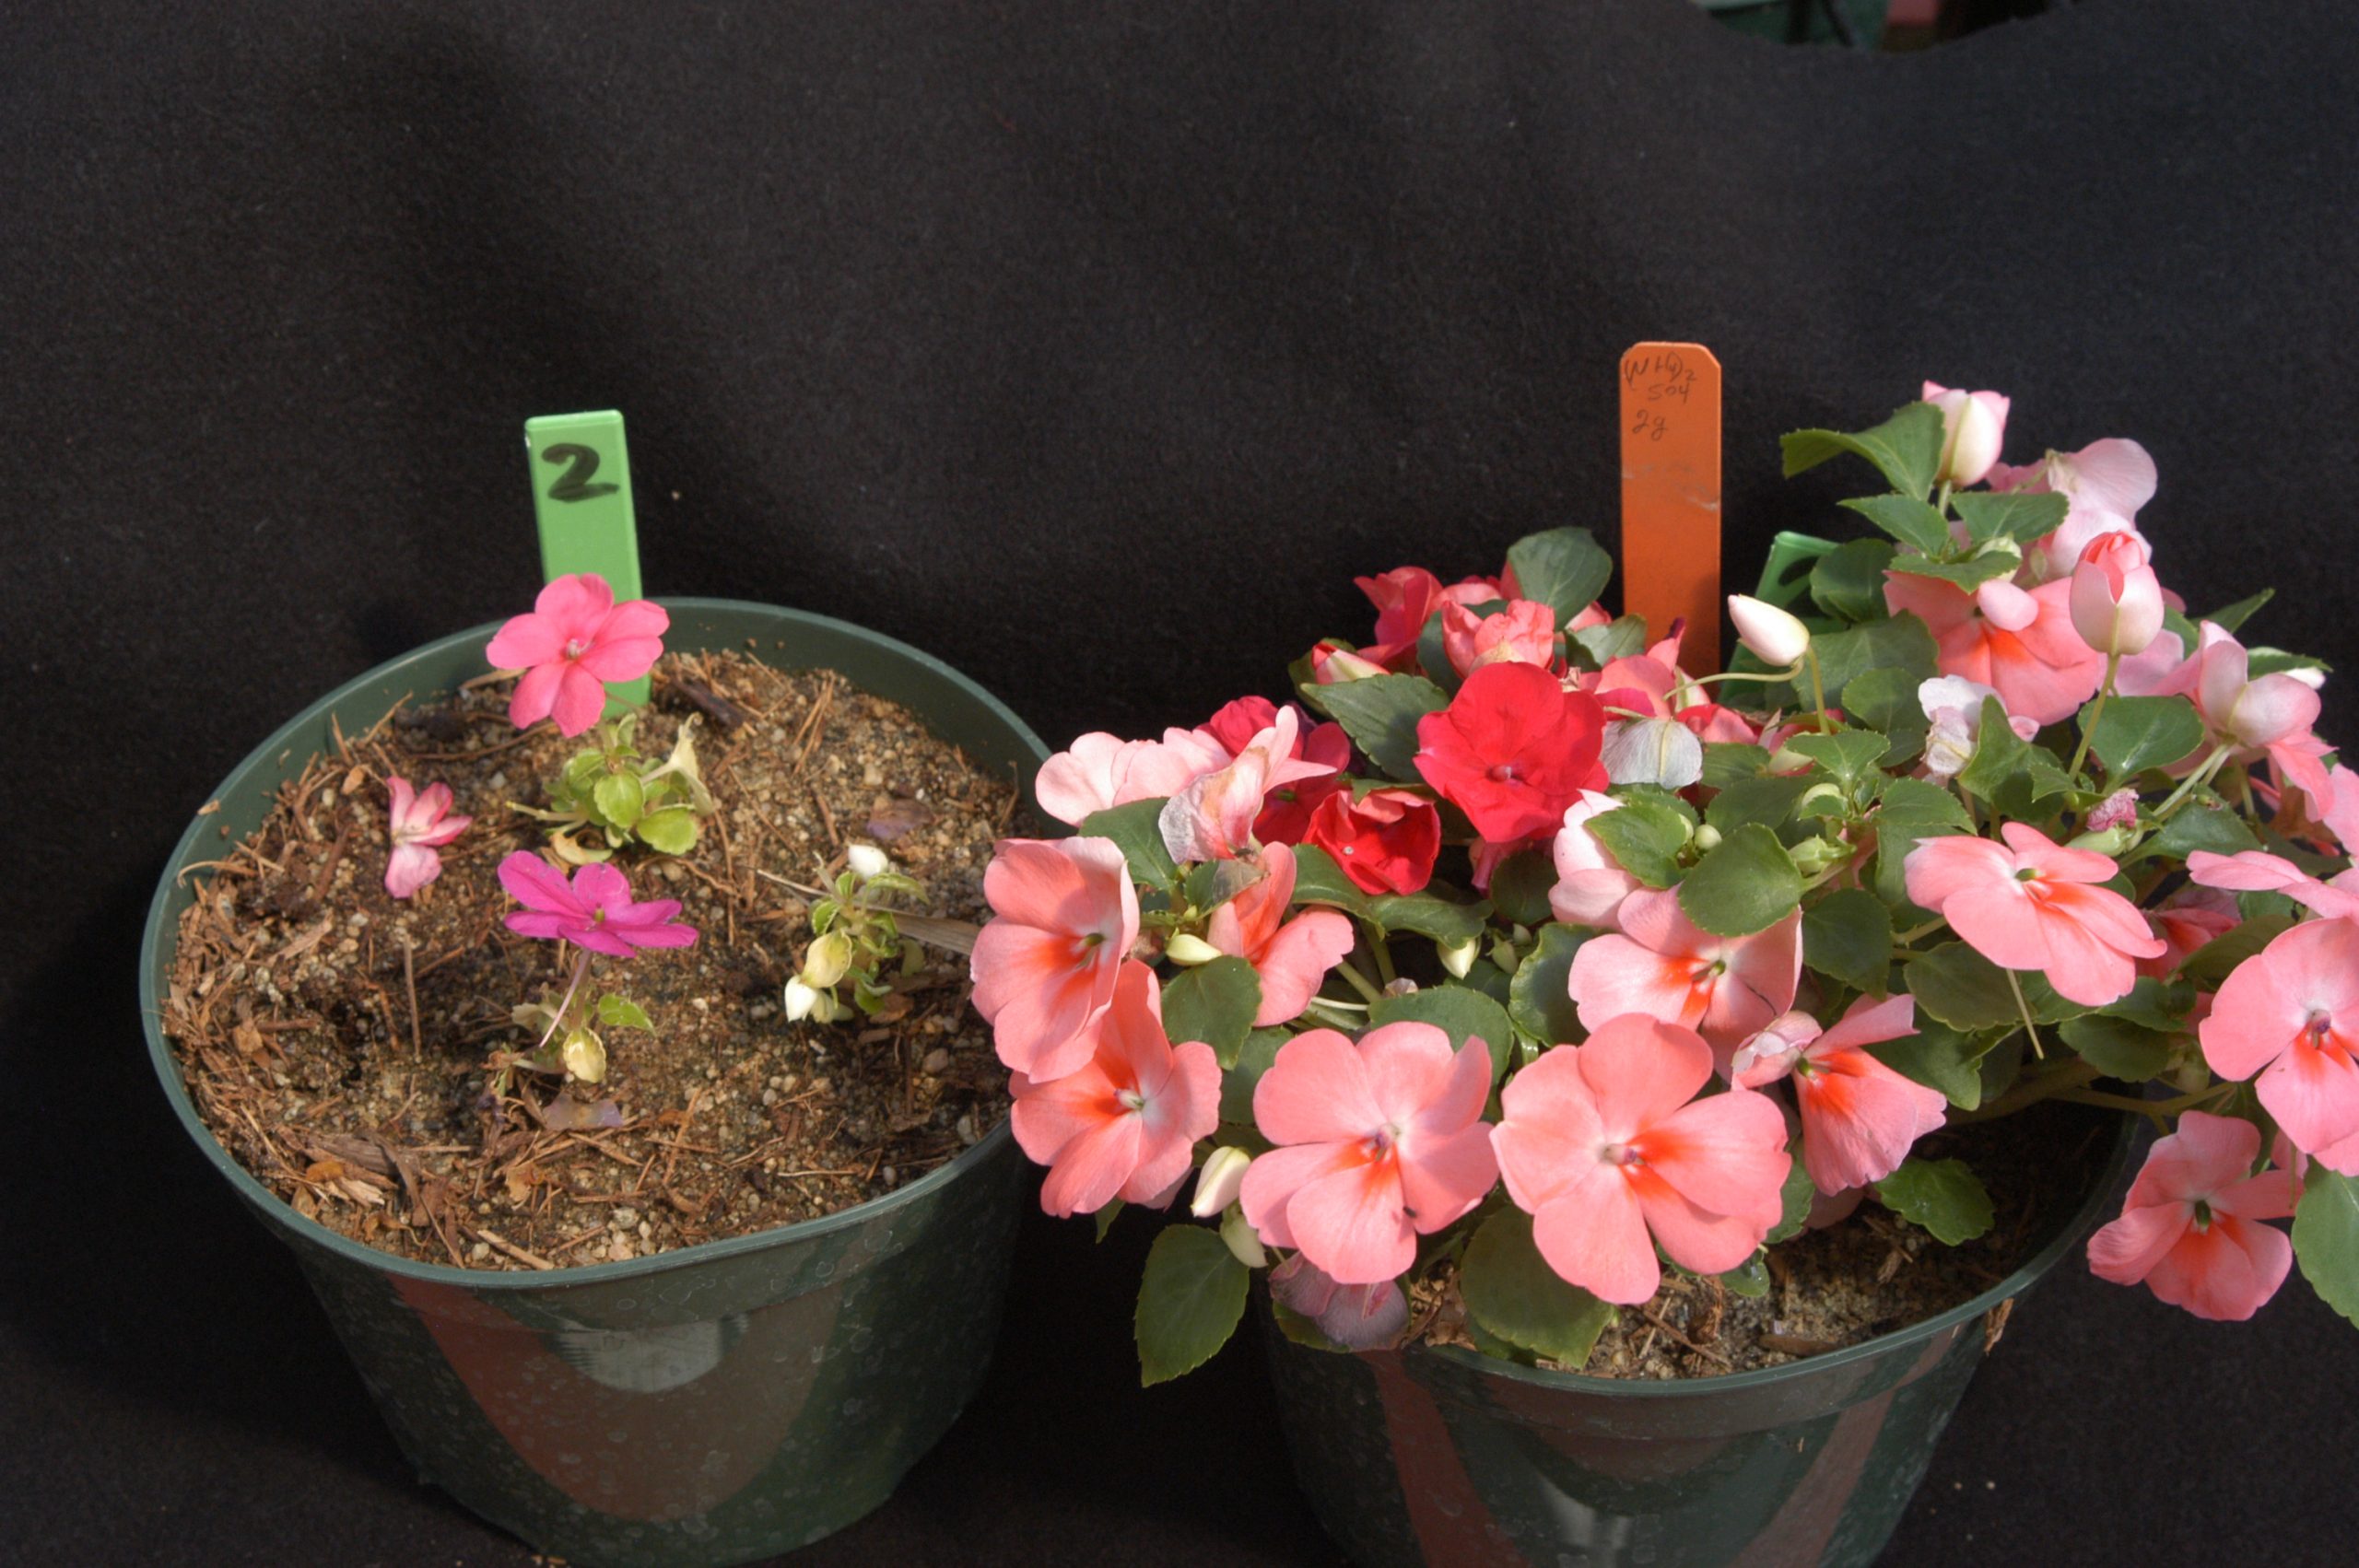
There are usually about 18 to 20 different media on the market at any given time and the results of growing plants in them is predictable. About 10 of the media will not grow anything very well, 5 give ok results and about 5 of the products will grow a nice plant. A lot of the reason for success or lack thereof is about nitrogen chemistry. If no fertilizer is added, the medium will likely not grow well. You can add your own fertilizer and make about  ½ of these poor growing media work. One quarter to one half a teaspoon (approximately 2gm) of ammonium sulfate usually peps up most media that are ok but lack nutrients.  This is an amount used in a standard height 6inch (15cm) diameter plastic container.  Larger containers and plants will require incrementally more fertilizer to achieve growth goals. 
Some media will not grow even when fertilized. This is because they may contain manures, or composts and manures that have added too much salt to the medium. Adding fertilizers to these products only makes them less growable. Sometimes these potting soils will improve with leaching but then fertilizer will need to be added back later to make up for what was leached away. Generally a salty potting mix is worth avoiding.
So how can you tell if you are getting a good or bad mix. You can start by reading the ingredient list. And you will need to decode that list to help you make some decisions. What manufacturers call things can be very misleading. Look for a medium that has fertilizer added and lists what kind of fertilizer was used. These media usually grow without help. Avoid media that use manures, they are not suitable container media ingredients.

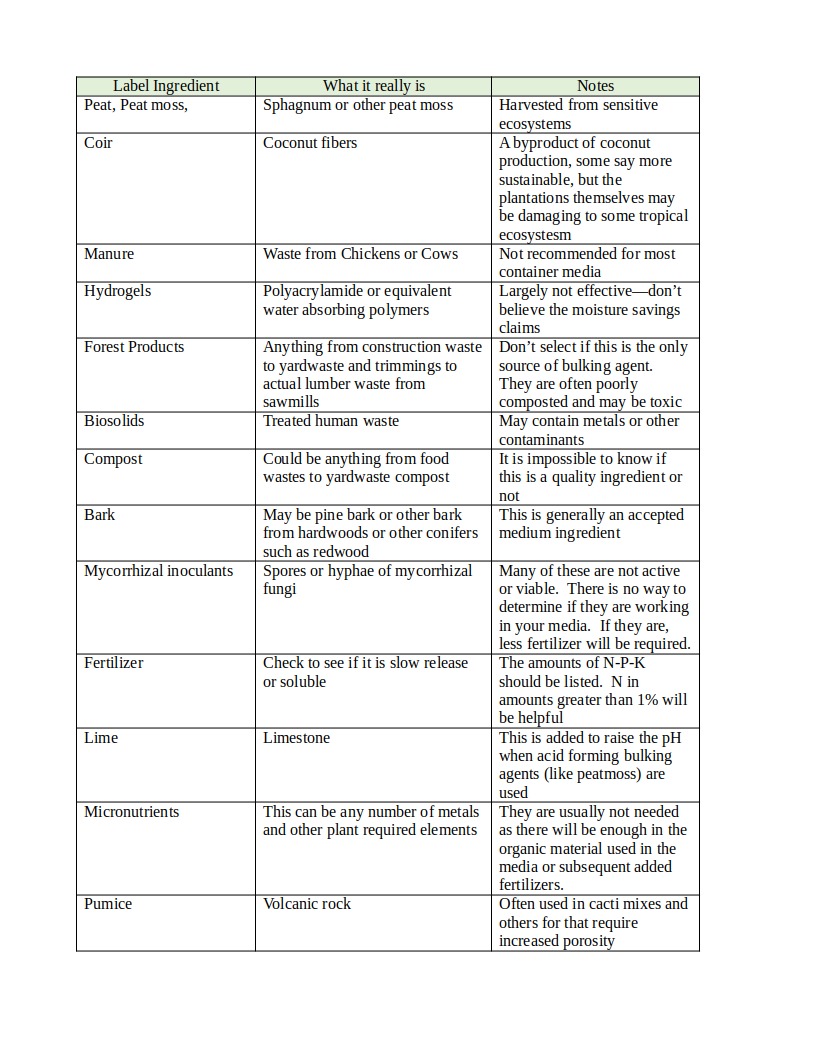
Some potting soils claim they can grow plants bigger than others, some claim to be all organic and some claim to be friendly to the earth. This is all marketing. Look for a simple ingredient list that is fortified with a nutrient charge (fertilizer). Begin there. You may want to sieve the medium to remove large particles if you are growing seeds, add more bulking agent (bark, sand, perlite, pumice) for plants that need increased porosity such as orchids, bromeliads and cactus. Don’t be afraid to modify potting mixes to suit the needs you might have. If plants don’t grow, consider adding more nutrients. After growing for some time (months to years), many media will breakdown, and the plant will need to be repotted in a new medium.

When Good Seeds Go Bad: How long can you store seeds?

Many gardeners, myself included, have that stash of old seed packets or saved seeds from garden seasons past, just waiting for the right time to be planted. They may be shoved in a drawer, a box, or in the fridge/freezer. Maybe you’re pulling some out of storage to start this spring – will they even germinate? Are those seeds good indefinitely? Do they ever expire? The answer to that really depends on what plant it is and how they are stored. While there isn’t a date where all the seeds go bad, they will eventually go bad over time. Why is this? And how can I make sure to use my seeds before they’re gone? Let’s find out!


Why Good Seeds Go Bad
While we think of seeds as perhaps inert, dormant, or in stasis they’re still very much alive and therefore are still undergoing processes like respiration, though at a much lower rate than a growing plant. During respiration, the seed (and plant within) are converting the stored sugars and starches in the endosperm to release energy. Once the germination process starts with the imbibition of water, the respiration rate increases drastically. A large amount of stored energy is needed to get through germination and sustain the seedling until it has its first set of true leaves and can photosynthesize on its own.

Seeds need to retain enough stored energy to sustain seedlings until they develop their first leaves and start photosynthesizing.

The shelf life of seeds is determined by the amount of energy that is stored, the amount used during storage, and the amount needed from germination to leaf development. This means that there’s a limit to how long a seed can stay in storage. After a while the seed loses viability if it doesn’t have enough energy stores to get it far enough along to photosynthesize on its own or to have that first burst of respiration at the initiation of germination. When searching for resources, keep in mind that viability refers to the ability of the seed to produce a robust seedling while germination refers to breaking of dormancy. The terms are inter-related, but the rates are not necessarily the same.

Some seeds have evolved to sit dormant for a long time, while others have a very short lifespan. It usually turns out that the seeds that last longest in storage are weeds that have evolved to wait long periods of time for an opportunity to germinate. Garden seeds tend to be on the shorter end of the storage time scale. A now 140-year old ongoing experiment at Michigan State University has given some interesting insight. In 1880, William Beal (one of the fathers of horticulture) buried 20 vials full of a variety of seeds (garden and weed) in secret locations around campus. The plan was to dig one up every 5 years and see what germinated. However, after the fist few rounds the cycle was bumped to 20 years. A vial was opened in 2000 and only one species, a weed, still germinated. This year is another germination year – we’ll have to wait and see if the mullein will germinate again this year.

How long will my seeds last?

Data from Nebraska Extension publication.

There are a few good sources that pull data from a variety of sources. The figure below lists some life expectancy times for common vegetable crops published by Nebraska Extension, using two common manuals on seeds as sources. You’ll also find some likes to other data, including average storage times for flowers, herbs, etc. in the references section (while we don’t typically promote commercial sites, the guide from Johnny’s Select Seeds has a good list of plants and has a variety of extension and academic sources listed). Like the MSU experiment, most of this research was done a while ago, but the data is still a good generalization. Most sources say that these time estimates are based on storage in optimal conditions. According to Johnny’s Select Seeds, “The actual storage life will depend upon the viability and moisture content of the seed when initially placed in storage, the specific variety, and the conditions of the storage environment”.

What are these “optimal” conditions? Generally the conditions are low humidity and low temperature. Low humidity ensures that the seed stays dry, avoiding potential initiation of germination. Low temperature reduces the respiration rate, slowing down usage of stored energy and increasing longevity. Optimal temperature for storage is below 42°F (15°C). Relative humidity should be between 20 and 40%.

The relationship between temperature and humidity seems to be inverse – meaning that as storage temperature goes lower, humidity can be higher and vice versa. However, storage times increase as both go down. Many sources state that seed longevity doubles for every one percent drop in humidity or five degree (F) drop in temperature. The relative humidity of the air affects the moisture level in the seeds. Germination usually starts at 25% moisture (and above). Ideal moisture levels for storage range between 8 and 12 percent and levels between 12 and 25 can lead to degradation of seeds, growth of fungi, etc. On the flip side, moisture levels below 5% can decrease vigor. Organizations like seed banks and germplasm centers that store seeds long term often will desiccate seeds to around 8% humidity to extend storage, but this isn’t usually needed for home gardeners.

Image result for seed vault
You don’t have to replicate conditions at the Global Seed Vault to have seed saving and starting success

Storage tips
Knowing that we need low temperatures and low relative humidity to extend seed life gives us some clues on how to store seeds to get the longest shelf life. This is key info if we’re trying to start seeds in spring that have been stored, or if we need to store extra or saved seeds. For the needed temperature levels, your standard home refrigerator is acceptable. Storage temps for cold foods are around the 40°F mark. However, humidity in a refrigerator is very variable. Humidity can skyrocket when doors are open, as condensation settles from warm room air settling on surfaces accumulates. Auto defrost cycles can also alter humidity. You’ll want to think about a desiccant like those silica packs to ensure that your seeds don’t get too moist. Store them in a plastic bag with the desiccant, and for added protection I always put mine in a sturdy container like a plastic box (or even a canning jar). Storing seeds in a freezer may help with the humidity issue, as any moisture that enters is frozen. You might also want to think about letting your bag or container warm up to room temperature before opening so that you don’t get condensation on the packets or the seeds themselves.

Sources:

Vegetable Garden Seed Storage and Germination Requirements – Nebraska Extension

Principles and Practices of Seed Storage – USDA

Seed Storage Guide – Johnny’s Select Seeds

Smith, R. D. (1992) Seed storage, temperature, and relative humidity. Seed Science Research 2, 113-116

120 Year Old Experiment Sprouts New Gardening Knowledge – MSU

Standing up for (and lying down on) the environmentally sustainable lawn

If you’ve been reading this blog for a while, you might remember that I got rid of our lawn (getting rid of your lawn post) at our Seattle house . It took too much water to keep it green in the summer, and the resulting ornamental landscape was more ecologically diverse and aesthetically pleasing for such a small site.

On the way to replacing the lawn with landscape
And the same landscape a few years later.

But that was then, and this is now. In 2017 we moved back to the family farm, which has a full acre of landscape – including lawn. Although we are slowly reducing the vast expanse of lawn, we will keep part of it because (1) we are on well water and there is an irrigation system and (2) because we are allowing the lawn to become a diverse tapestry of different plant species – an ecolawn, if you will.

Farmhouse landscape with an acre of lawn!

When I was growing up, my father fought unsuccessfully to keep the moss and weeds out. I happen to LOVE the moss and the fact that it grows here has nothing to do with poor drainage or anything else. It grows here because the environmental conditions support its growth. I love the spongy feel of the underlying moss, and it reduces the amount of mowing necessary because it’s limited in height. And no fertilizers or pesticides are needed.

Mossy lawns are lovely for walking…and laying down on.

Speaking of mowing…I hate gas powered mowers. They’re smelly and noisy, they contribute to air pollution, and when something goes wrong you have to take it to small engine repair. These excursions are infrequently successful but always expensive. So imagine my delight is discovering newer battery-powered mowers! All you have to do is swap battery packs. They are quieter, there are no emissions, they don’t smell, and they have an electric engine! No small engine repairs, and they are also lighter for this reason.

A newer technology, battery-operated mower with rechargeable battery

I was even more excited to find compatible leaf blowers. We have tons of Oregon white oak leaves, and we blow them into the beds. We do NOT leave them on the lawn, because they interfere with some of our non-grass lawn inhabitants. They are perfect on the beds because their curly, rigid structure prevents compaction and they keep weeds out while allowing water and oxygen to penetrate.

Keep the leaves off the lawn and over the beds.
Our container violets have escaped into the lawn; covering them with leaves could kill them.

Finally, our ecolawn allows me to see and appreciate the reproductive structures of our mycorrhizal fungi. I don’t even pretend to know the species and whether they are edible. I just love the fact that they appear every fall after we’ve stopped mowing.

Some of our lawn mushrooms…
…and some others…
…and others.

Sometimes lawns aren’t appropriate, as we found in Seattle. But sometimes they are – and as long as they are cared for in an environmentally sustainable manner, they shouldn’t have to be something we apologize for.