Tuning up for Pruning Up–Care, Maintenance and Utilization of Hand Pruning Tools

A. J. Downer

Fall is passing into winter and the bare sticks in my deciduous fruit orchard are calling to my annual fruit tree pruning chores.  I can prune my entire orchard with very few tools: a good pair of bypass clippers, a similar set of loppers
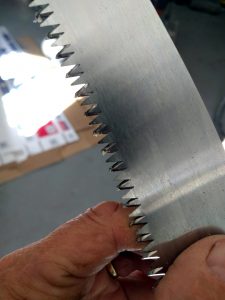
Illustration 1. Tri-edge saw blades are made from stainless steel and are not easily sharpened. When dull or bent they should be replaced.

(optional) and a high quality “razor” or “tri edge” saw.  Most hand tools require some maintenance especially the clippers and loppers.   Clippers are easily sharpened but modern saw blades can not be sharpened by gardeners. I usually just buy a new saw, replacing the old one when blade eventually dulls or bends from over zealous use (illustration 1).
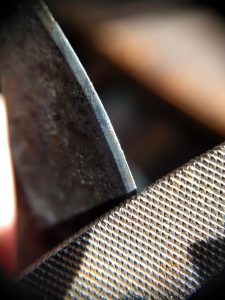
Illustration 2. To sharpen bypass clipper blades follow the angle of the bevel. Do not sharpen the flat side of the blade

Before using your pruning tools inspect them for signs of damage. Blades should be sharp and straight.  Loppers should have their rubber “bumpers” intact otherwise your knuckles will be smashed after exerting force on a difficult branch.  Sharp tools offer less resistance and actually decrease injury to users. One exception here is with the modern “tri-edge” or “razor” saws. These saws can cut so quickly that you may pass through the branch you are cutting and continue on to some part of your anatomy quickly ripping your flesh open. I have suffered more cuts (some serious) from these saws than from any other gardening activity (although I was recently impaled by a frog metal art sculpture!).  They should be used with careful precision, not with the wild abandon and pruning fervor of the craven academic desperate for real world pruning experiences.  A thick long sleeved shirt and gloves will also help prevent cuts from hand pruning equipment.

Bypass clippers are so termed because the blade passes by the hook. To sharpen these, find the bevel on the edge of the clippers and align a small file to the same angle of this bevel, and file the bevel until you can feel the sharpness with your finger (Illustration 2).  Never sharpen the back side of the bevel—this will create a gap, and every time you cut, a flap of tissue will remain. Back bevel sharpened clippers will require blade replacement or grinding until the back bevel is gone. The hook does not require sharpening, do not attempt to file it. Repeat this process with lopper blades.

When you are done pruning for the day, wipe the blades of your clippers and loppers with an oil soaked rag or apply a few drops of oil and rub it into the blade. Most modern saws blades are made from stainless steel and require no oil protection.

As a Cooperative Extension Advisor, one of the most common questions I receive is: “Should I sanitize my clippers between cuts or between uses on various plants?”.  Indeed, many publications, extension leaflets, gardening columns, and other sources make broad recommendations to sanitize clippers after every cut. Some articles even compare various products for their killing efficacy.  Blind recommendations are often made to sanitize clippers when the pathogen is not  known or specified.  It is not necessary to sanitize your clippers when pruning most garden plants and fruit trees.  There are a few pathogens that are spread by moving plant debris, but published evidence that they are spread by hand pruning equipment (especially clippers) is nil. One exception is palm wilt caused by Fusarium oxysporum f.sp. canariensis which is easily spread by saws. Some of the canker fungi caused by Botryosphaeria can also be spread by pruning equipment. With many of these pathogens, a wound is required for infection so it may not be that the clippers are spreading disease so much as providing an entry point (infection court) so that pathogens have a way to enter.

If diseases are present in or near the plant already, sterilizing pruning equipment will simply provide a clean entry port for the pathogen—infection can still follow after the cut is made with a sanitized tool.

In my garden, I never sanitize clippers between cuts.  However, conditions vary across the US, and in some places rain, humidity, and temperature are more favorable for disease development.  If you have concern about spreading pathogens, prune during the dormant season, when the likelihood of pathogen activity is lowest. Apply dormant sprays containing copper to limit the onset of new fungal diseases that may enter pruning wounds.  If you still feel you need to protect wounds from dirty clippers I like to use the flame from a plumber’s torch to sanitize.  A few seconds along the cutting edge front and back kills all pathogens (Illustration 3).  The process is similar for a saw but efficacy is increased if the saw gullets are wiped clean with a cloth and then the flame applied. The only time I take these measures is when I know I am working with plants that can be inoculated by pruning (which is rare).
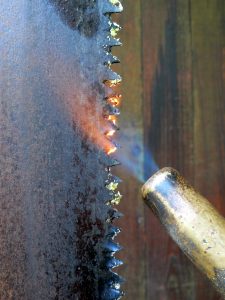

Illustration 3. A plumber’s torch will rapidly sanitize saws and blades when pathogens are present in plant tissues.

When pruning garden plants, there are a plethora of recommendations on how to make cuts. Rose experts have extolled the virtues of an angled cut so water runs away quickly, flush cuts used to be recommended by arborists as the highest quality cut. These examples are without research foundation. Cuts on woody plants should made to create the most circular exposure that leaves the smallest surface area possible. We abandoned flush cuts many years back because they cut into protective zones that limit decay in trees. Some gardeners feel compelled to cover their cuts with a pruning paint and there is a similar paucity of research to support this practice. Leave pruning wounds unpainted.

The Myth, the Legend, the Parasite: Romance, Lore, and Science beneath the Mistletoe

As we hurdle ever closer to the holidays and the end of the year, there’s lots of plants we could talk about – amaryllis, poinsettias (and the abuse thereof with glitter and paint), whether or not your cactus celebrates Thanksgiving, Christmas, Easter or is agnostic, and on and on.  Each of these plants have an interesting history and connection to the holidays, but today we’re going to be a little more naughty…but nice.  We’re going to talk about mistletoe.

Now, mistletoe is one of those holiday plants that you don’t really want growing in your own garden. That’s because, even though it is a symbol of love and even peace, it truly is a parasite … and poisonous. It has been celebrated and even worshipped for centuries, and still has a “naughty but nice” place in holiday celebrations.

Burl Ives, as the loveable, banjo-playing, umbrella-toting and story-narrating snowman in the classic “Rudolph the Red-Nosed Reindeer” claymation cartoon tells us that one of the secrets to a “Holly Jolly Christmas” is the “mistletoe hung where you can see.” But where does this tradition of giving someone an innocent (or not-so-innocent) peck on the cheek whenever you find yourselves beneath the mistletoe come from? And just what is mistletoe anyway?

While mistletoe specialists need mistletoe, the reverse does not hold—mistletoe in many regions is dispersed solely by dietary generalists.
Distribution of mistletoe (and mistletoe specialist birds). Source: Mistletoe Seed Dispersal. Watson, D.M.

There are around 1500 species of mistletoe around the world, mainly in tropical and warmer climates, distributed on every continent except Antarctica.  In North America, the majority of mistletoe grows in the warmer southern states and Mexico, but some species can be found in the northern US and Canada.  A wide variety of birds feed on the berries of mistletoe and thus disperse seeds.  These birds include generalists who opportunistically feed on mistletoe, and specialists who rely on the berries as a major food source.

Mistletoe Haustoria from from Julius Sachs’ 1887 Lectures on Plant Physiology. Source: The Mistletoe Pages

First, we’ll cover the not-so-romantic bits of this little plant.  Mistletoe is a parasitic plant that grows in a variety of tree species by sinking root-like structures called haustoria into the branches of its host trees to obtain nutrients and nourishment. It provides nothing in return to the tree, which is why it is considered a parasite.


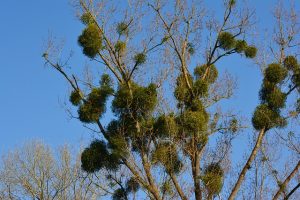
A heavy mistletoe infestation.                        Source: Pixabay

Mistletoe grows and spreads relatively slowly, so it typically does not pose an immediate risk to most trees.  While a few small colonies of mistletoe may not cause problems, trees with heavy infestations of mistletoe could have reduced vigor, stunting, or susceptibility to other issues like disease, drought, and heat. So be on the lookout for mistletoe in your trees and monitor it’s progression.

This little plant does have a long and storied history — from Norse mythology, to the Druids, and then finally European Christmas celebrations. Perhaps one of the most interesting things about the plant is the name. While there are varying sources for the name, the most generally accepted (and funniest) origin is German “mist” (dung) and “tang” (branch). A rough translation, then, would be “poop on a stick,” which comes from the fact that the plants are spread from tree to tree through seeds in bird droppings.

“Baldur’s Death” by Christoffer Wilhelm Eckersberg (1817)

In Norse mythology, the goddess Frigga (or Fricka for fans of Wagner’s operas) was an overprotective mother who made every object on Earth promise not to hurt her son, Baldr. She, of course, overlooked mistletoe because it was too small and young to do any harm. Finding this out, the trickster god Loki made a spear from mistletoe and gave it to Baldr’s blind brother Hod and tricked him into throwing it at Baldr (it was apparently a pastime to bounce objects off of Baldr, since he couldn’t be hurt).

Baldr, of course, died and Frigga was devastated. The white berries of the mistletoe are said to represent her tears, and as a memorial to her son she declared that the plant should represent love and that no harm should befall anyone standing beneath its branches.

The ancient Druids also held mistletoe in high esteem, so high that it could almost be called worship. During winter solstice celebrations, the Druids would harvest mistletoe from oak trees (which is rare — oak is not a common tree to see mistletoe in) using a golden sickle. The sprigs of mistletoe, which were not allowed to touch the ground, would then be distributed for people to hang above their doorways to ward off evil spirits.

While the collecting and displaying of mistletoe was likely incorporated into celebrations when Christmas became widespread in Europe in the third century, we don’t really see mention of it used specifically as a Christmas decoration until the 17th century. Custom dictates that mistletoe be hung in the home on Christmas Eve to protect the home, where it can stay until the next Christmas Eve or be removed on Candlemas (which is Feb. 2). The custom of kissing beneath the parasitic plant isn’t seen as part of the celebration until a century later.

Washington Irving, who more or less reinvigorated the celebration of Christmas in the United States in his day and whose writings still define the idyllic American Christmas celebration, reminisced quite humorously about mistletoe and Christmas from his travels to England. He wrote:

“Here were kept up the old games … [and] the Yule log and Christmas candle were regularly burnt, and the mistletoe with its white berries hung up, to the imminent peril of all the pretty housemaids.”

Whether or not your housemaids will be in peril, the hanging of the mistletoe can be a fun Christmas tradition. Look for it at garden centers and Christmas tree lots this season.  Or maybe you can find some growing wild and harvest it for your own decor. However, I would recommend not getting it out of the trees the “old Southern way” — shooting it out with a shotgun.

Sources:

  • Tainter, F.H. (2002). What Does Mistletoe Have To Do With Christmas?  APSnet Features. Online. doi: 10.1094/APSnetFeature-2002-1202
  • Briggs, J. (2000). What is Mistletoe? The Mistletoe Pages – Biology. Online. http://mistletoe.org.uk/homewp/
  • Watson, DM. (n.d.) (accessed). Mistletoe Seed Disperal [Blog Post]. Retrieved from https://ecosystemunraveller.com/connectivity/ecology-of-parasitic-plants/mistletoe-seed-dispersal/
  • Norse Mythology for Smart People. (nd) The Death of Baldur. Retrieved from https://norse-mythology.org/tales/the-death-of-baldur/


What’s wrong with my plant? You’re not going to find pat answers.

As many of you know, the Garden Professors host a Facebook group dedicated to the discussion of science-based practices for gardens and landscapes. (Side note – if you haven’t joined us please do!) Recently we’ve had a spate of “what’s wrong with my plant” posts, usually focusing on some leaf issue and little other information. And far too often an eager group member will jump in with a fertilizer recommendation.  So today’s blog post has two objectives: explaining why you can’t reliably diagnose problems from a picture of suffering leaves and why blanket fertilizer recommendations should be avoided.

To illustrate the problem with armchair diagnosis, consider this photo below.

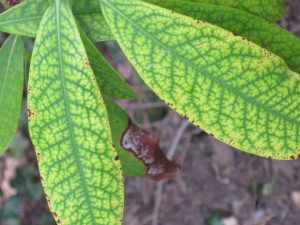
Interveinal chlorosis in Rhododendron.

Now there are two ways to ask a question here: the first is “what’s wrong with these leaves” and the second is “what’s wrong with my plant.” We can easily answer the first one: there is nutrient deficiency in the leaves, most probably iron or manganese. But that does NOT mean there is a deficiency in the soil. So we can’t address “what’s wrong with my plant” because we don’t have enough information.

How can we determine what’s wrong? My first question to the poster is invariably “have you had a soil test?” Soil test results will indicate whether the element in question is actually deficient, and will provide levels of other nutrients that could interfere with root uptake.  If there’s no deficiency of the nutrient in question, then adding fertilizer is not going to help! And adding fertilizer unnecessarily can create further soil nutrient imbalances and contribute to environmental pollution.

Lots of iron – no deficiency here!

Once we have the soil test results, we can then begin to address “what’s wrong with my plant.” But not from the original picture. (If you are curious about what else could be causing this problem, check out this blog post from 2011.)

Let’s try another. Consider the leaves in this photo:

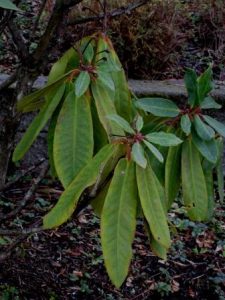
Another unhappy Rhododendron

We now know to ask “what’s wrong with these leaves?” Ignore for now the deficiencies in the older leaves and look at the size of youngest ones compared to the older. The answer is fairly straightforward here: there was too little water available when the newly emerging leaves were expanding. Leaf expansion depends on turgor pressure – the higher the turgor pressure, the larger the leaves get. Once expansion stops, protective plant biochemicals are laid down which prevent further expansion. By comparing the youngest leaves to the leaves from previous years, you can see that they are significantly smaller. But why?

Again, we need more information before we can answer “what’s wrong with my plant.” Was there too little available soil water during leaf expansion? It’s possible, but this example is from western Washington State, a climatic region with wet springs. Most likely there is an issue with the roots. My first question with these cases is “can you easily move the plant in the ground?” This is my “wiggle test” – a way to determine if roots are established. In this case – and in nearly every case like this that I’ve seen personally – the roots are NOT established. Often this is because the plant (1) was not bare-rooted at planting and/or (2) was planted too deeply. Without decent root establishment there is not enough water uptake to support full turgor in expanding leaves.

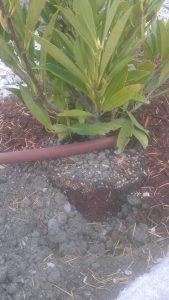
It may be quick and easy, but “pop and drop” is not a good planting method.

Lack of an established root system also account for the interveinal chlorosis you can see in the oldest leaves. These leaves are fully expanded, probably because the plant was still at the nursery when these leaves emerged. But their color is off. A root system that doesn’t supply sufficient water for leaf expansion is by default not going to provide sufficient nutrients, either.  Adding fertilizer to this plant is not going to help! It needs to be dug up and replanted correctly or replaced. It is never going to thrive under the current conditions.

Armchair diagnosis can be accurate and fun if you follow a set of guidelines to extract more information. But simply recommending a fertilizer based on leaf appearance is neither science-based nor environmentally responsible.

No. Just….no.