One of the “advantages” of being in the same office suite as me is hearing (a) that arborist wood chips are about as close to a miracle product as you can get and (b) that landscape fabric is hell on (the) earth. So my office mate Liz, either because she was convinced of the above or just wanted to shut me up, decided to rip out the landscape fabric in her ornamental bed and replace it with wood chips. She even made it a family project, somehow convincing her two young daughters that this was “fun.” Here’s her pictorial essay of the process.
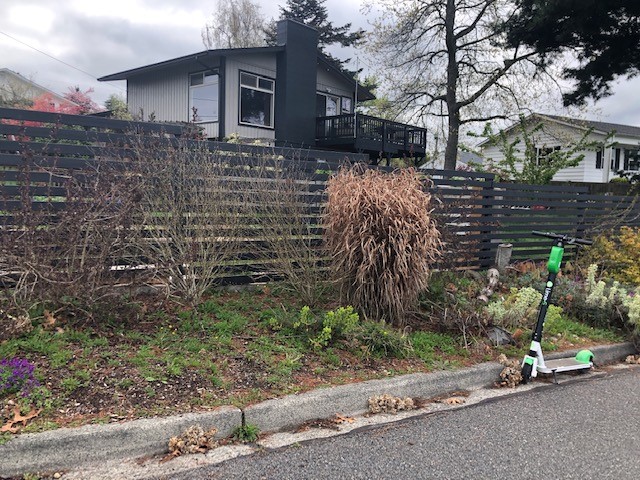
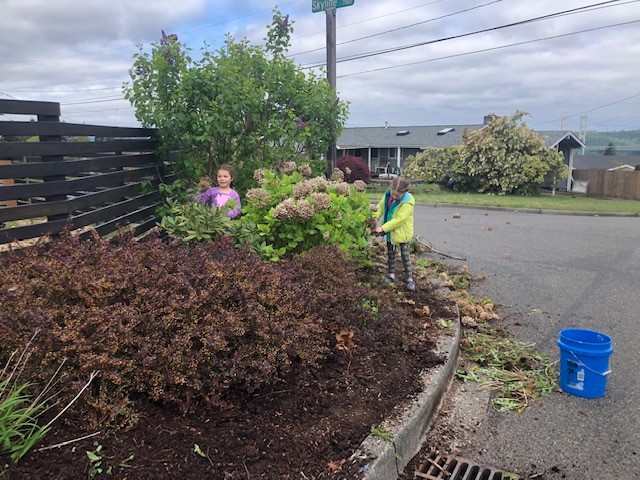
Before the switch
Yes, there is “weed block” underneath all those weeds
Why on earth does anyone still believe that “weed block” fabric actually does anything remotely related to controlling weeds? It provides a great substrate for all those weed seeds blowing around, which find themselves the recipients of any rainfall or irrigation. They germinate and grow like crazy – because they are WEEDS. It’s what they do.
Worse yet for the soil – all of those pores in the fabric that supposedly allow water and oxygen to move through are soon filled with bits of soil. The resulting mat is anything but permeable. But weeds love it!
The process
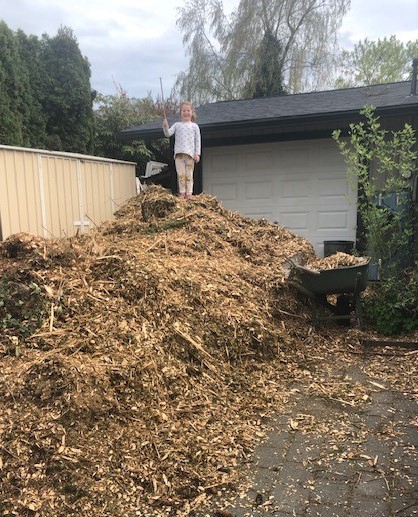
First Liz had to score some woodchips, which as you can see pretty much filled her driveway. The girls, however, thought they were a great addition.
Georgie scales Mt. Mulch
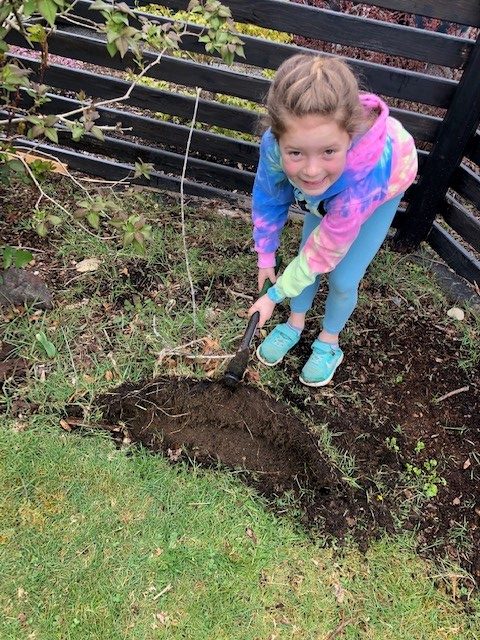
Next, all of that fabric had to come out. This is not an easy process, because the surface of the fabric was completely colonized by weeds. A mattock is a great tool for getting this done.
Viv tackles the landscape fabric with its weed colony.
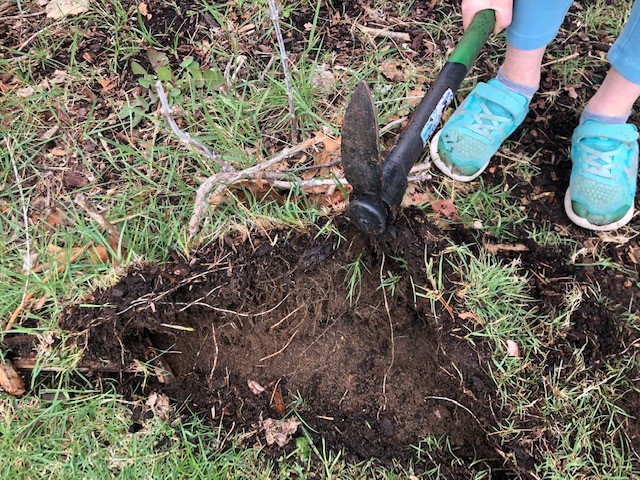
Now, let’s look at the soil underneath the fabric. You can see how dry it is. That’s because even during our rainy springs in the Pacific Northwest all of the rainfall stays on top of the fabric, allowing lush weed growth. The roots of all of the landscape plants get virtually none of this, and in the summer that’s a source of chronic drought stress.
Close up of soil under the fabric
Fortunately, the soil underneath, while dry, looks pretty good. Once the shrubs and perennials are able to take advantage of the increased water and oxygen they will thrive.
The girls still hard at work while Liz cleverly avoids it by taking pictures.
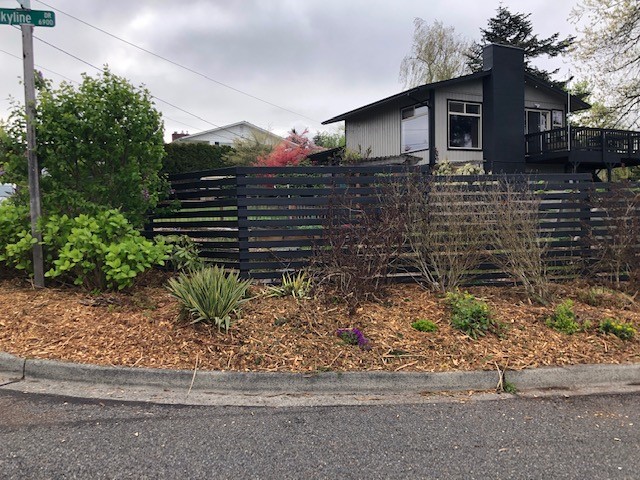
The results
A well-mulched ornamental bed
Maybe you don’t like the look of arborist wood chips, but it’s certainly better than the weedy mess that used to be there. Plus, the soil benefits from the increased water and oxygen, the beneficial microbes in the wood chips, and the slow feed of nutrients as those chips slowly decompose.
If you are ready to switch from “fabric fail” to “wood-chip win,” you can start with this fact sheet which will guide you through the process.
Ok. I admit this blog is going to turn into a rant pretty quick because there seems to be a lot of ways to screw up a fairly simple horticultural practice—tree planting. Since Arbor days are happening/happened everywhere around now, its a good time to talk about how to plant trees. First let me state some simple and useful guidelines for a successful tree planting.
-When at all possible, plant trees bare-root. Even washing the container media away. This allows for inspection and removal of root defects.
-Select trees carefully that are free of defect and disease and that are adapted to your climate and soils
-Plant the youngest tree you can
-Take care in choosing the planting site.
-Avoid Root Barriers
-Plant trees so that the root flare is above ground slightly
-Plant trees in a hole only deep enough to contain the root system, no double digging.
-Plant trees in a hole wide enough to contain the root system, no wide holes (unless there is a reason for using one)
-Fill the hole with soil removed to make it. Do not amend the backfill around newly planted trees—Do not put rocks in the bottom of a planting hole!
-Plant trees without staking unless there is a reason to stake them
-Plant trees away from turfgrass or other groundcovers.
-Plant trees under the cover of a fresh layer of arborist chips.
-Irrigate newly planted trees from the surface—Do not install U tubes or tree snorkels to irrigate deeply.
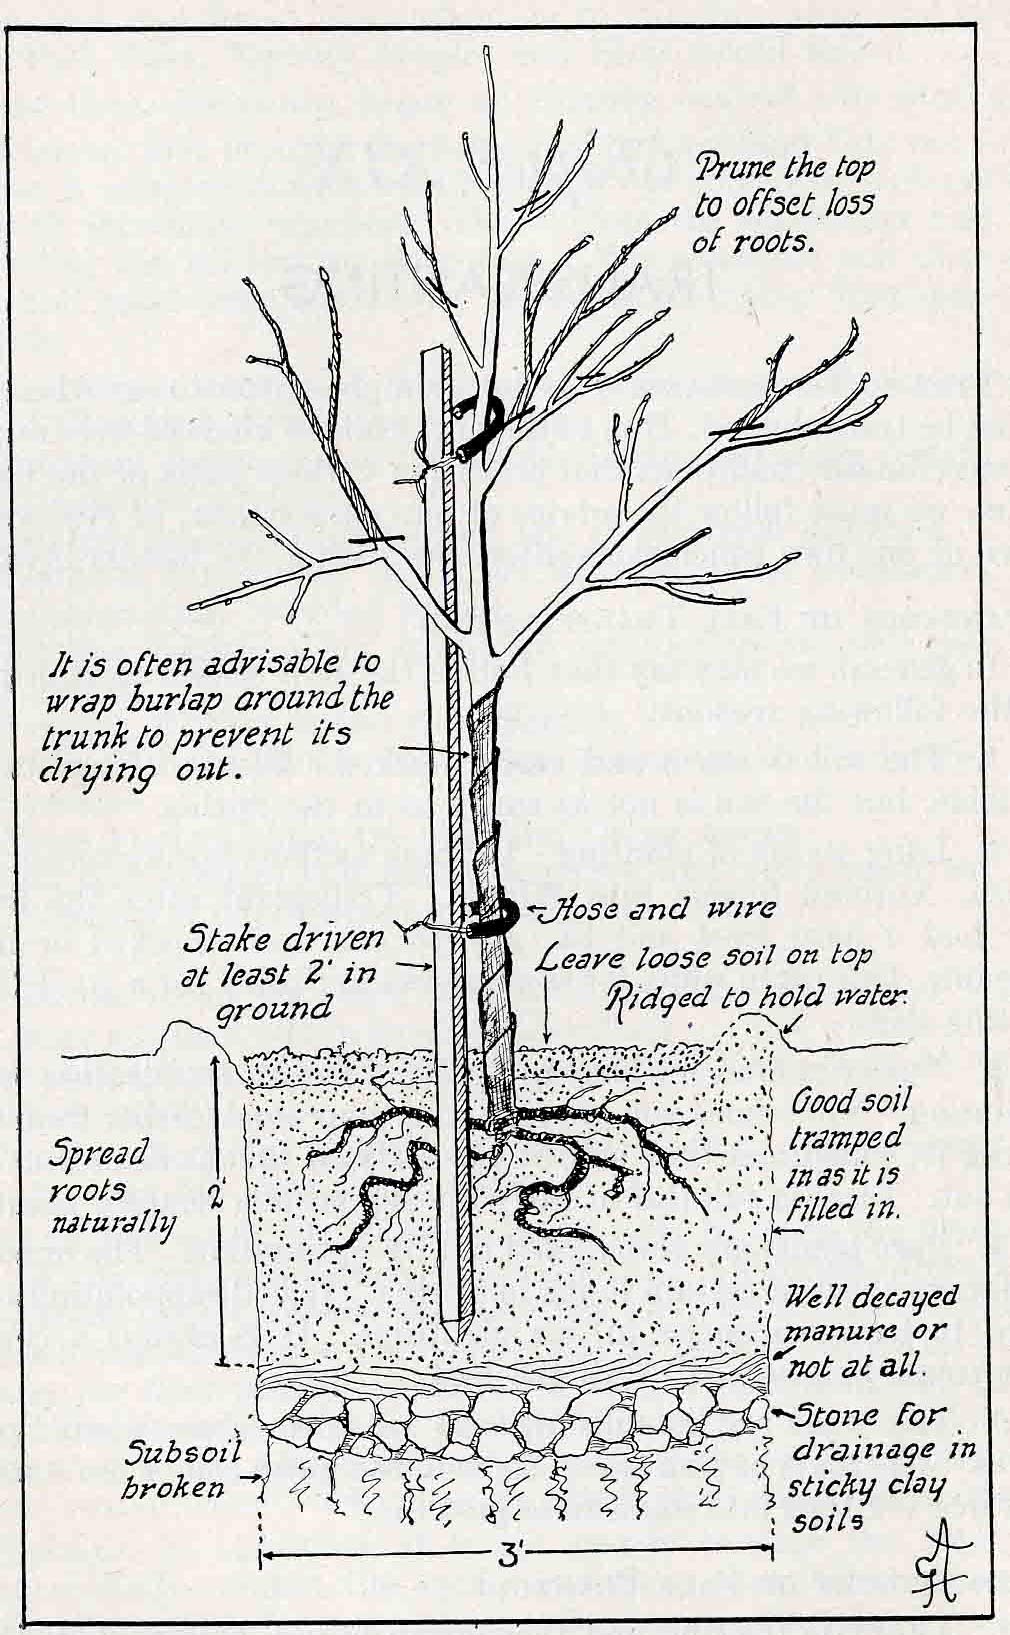
An old planting detail from “a book of trees” . Several myths here: rocks at the bottom of the hole, amended hole, nursery stake still there when it does not need to be, etc.
I guess this rant comes from the variety of tree planting specifications I have seen over the years used by municipalities, landscape architects, nurseries and others. There seems to be a need to use the latest product, method or modification to site soils in order to make a fancy planting detail. Simpler is better and research by Universities has not verified most of the “innovative” approaches seen in planting details.
The first step in planting a tree is to chose the tree you want to plant. While this seems simple there is a lot that goes into tree selection. Setting aside personal choices, it comes down to selecting a tree that is healthy and free of defect. The potential candidate tree should have no signs or symptoms of disease, a naturally developed canopy unfettered by nursery pruning (especially heading cuts), and has few or no root defects. Initial superficial examination of the root collar in the nursery can eliminate some trees with circling or girdling roots. However, when the tree is planted root washing will reveal the entire root system and as Dr. Linda Chalker Scott has shown in this forum, root washing allows for rapid establishment in site soil. When at all possible chose the youngest tree you can for the new site. Young trees have fewer root defects, and we have the advantage of training them (structural pruning) from an early age. Young trees establish rapidly and will often outgrow older, boxed trees. The larger the specimen that you plant, the more chance for establishment problems such as settling, drying out, root rot or just slow growth. Planting trees from seed is ideal but most gardeners don’t have the patience to wait and seedlings, and seedlings do not give the option of using cultivated varieties that impart horticultural value, such as predetermined flower color, disease resistance, and known form (canopy shape and size).
Once the tree is selected, purchased and root washed, it is time for setting it in the ground. The first step is choosing a good planting site. A good site for a tree is somewhere that provides adequate soil volume for its roots to expand and for its canopy to expand. Many trees in urban settings fail to achieve their potential because they have restricted spaces to grow in. Chose a location in full sun. Unless you are planting a species that grows well in shade or needs protection from the environment, most trees will grow best in a sunny location. While trees are forgiving of most soil conditions, they will not grow well in compacted soils. If this is all that is available, break up compacted soils before planting. Consider the ultimate size of the tree you are planting, and imagine it attaining that size in your planting site. Avoid sites that have close proximity to buildings or hardscape. One of the most frequent problems with trees is that as they attain mature size they conflict with the infrastructure at the site.
Dig the hole for your tree so that the roots are very slightly above the grade. Do not double dig! While double digging has its proponents, there is no research-based reason for destroying soil structure– it is a disaster for tree planting. When a hole is dug too deeply soil will always settle after planting and irrigation resulting in the tree being planted too low in the ground. The root collar is buried and this is a predisposing factor for disease. The hole should have undisturbed soil under the roots. The hole only needs to be as wide as the root system. While many planting details show wide holes these are not necessary in most garden sites. If the site is compacted, wide holes can give temporary advantage to a newly planted tree, but the width of the hole will be the size of the “pot” the tree will have to grow in. So it is better to modify the site first to take care of compaction and then you will not need a wide hole.
Root barriers do not function well in most landscapes and lead to the development of landscape trash. They can also create root defects
Root barriers were very popular and are still specified today. They actually do not usually achieve thier goal of preventing surface roots and protecting infrastructure. Trees outgrow root barriers and they result in increases of landscape trash/pollution. Root barriers can also create root defects such as circling and girdling roots. Do not install root barriers, if you are tempted to do so you are likely not choosing a good site to plant a tree.
Cover the roots with backfill from the hole. Do not modify the backfill. Research does not support adding amendments to planting holes for trees. The native soil is what the tree will be growing in ultimately, and there is no reason to modify it. If the soil at your site is so bad that it needs to be changed, this should be a site-wide soil modification that will cover all the area the tree roots will explore up to its maturity. Most gardeners are not able to do this. Roots rapidly expand beyond the planting hole within months, so the time and benefit derived from an amended planting pit is minimal. Adding amendment, especially organic amendments to backfill can also be disastrous for trees. The organic material may utilize nitrogen in the soil and lead to a deficiency in the newly planted tree, worse, it may break down and cause anaerobic conditions in the bottom of the planting pit. Avoid amending planting holes! Never place rocks in the bottom of the hole—this does not create drainage, but creates an interface that prevents it.
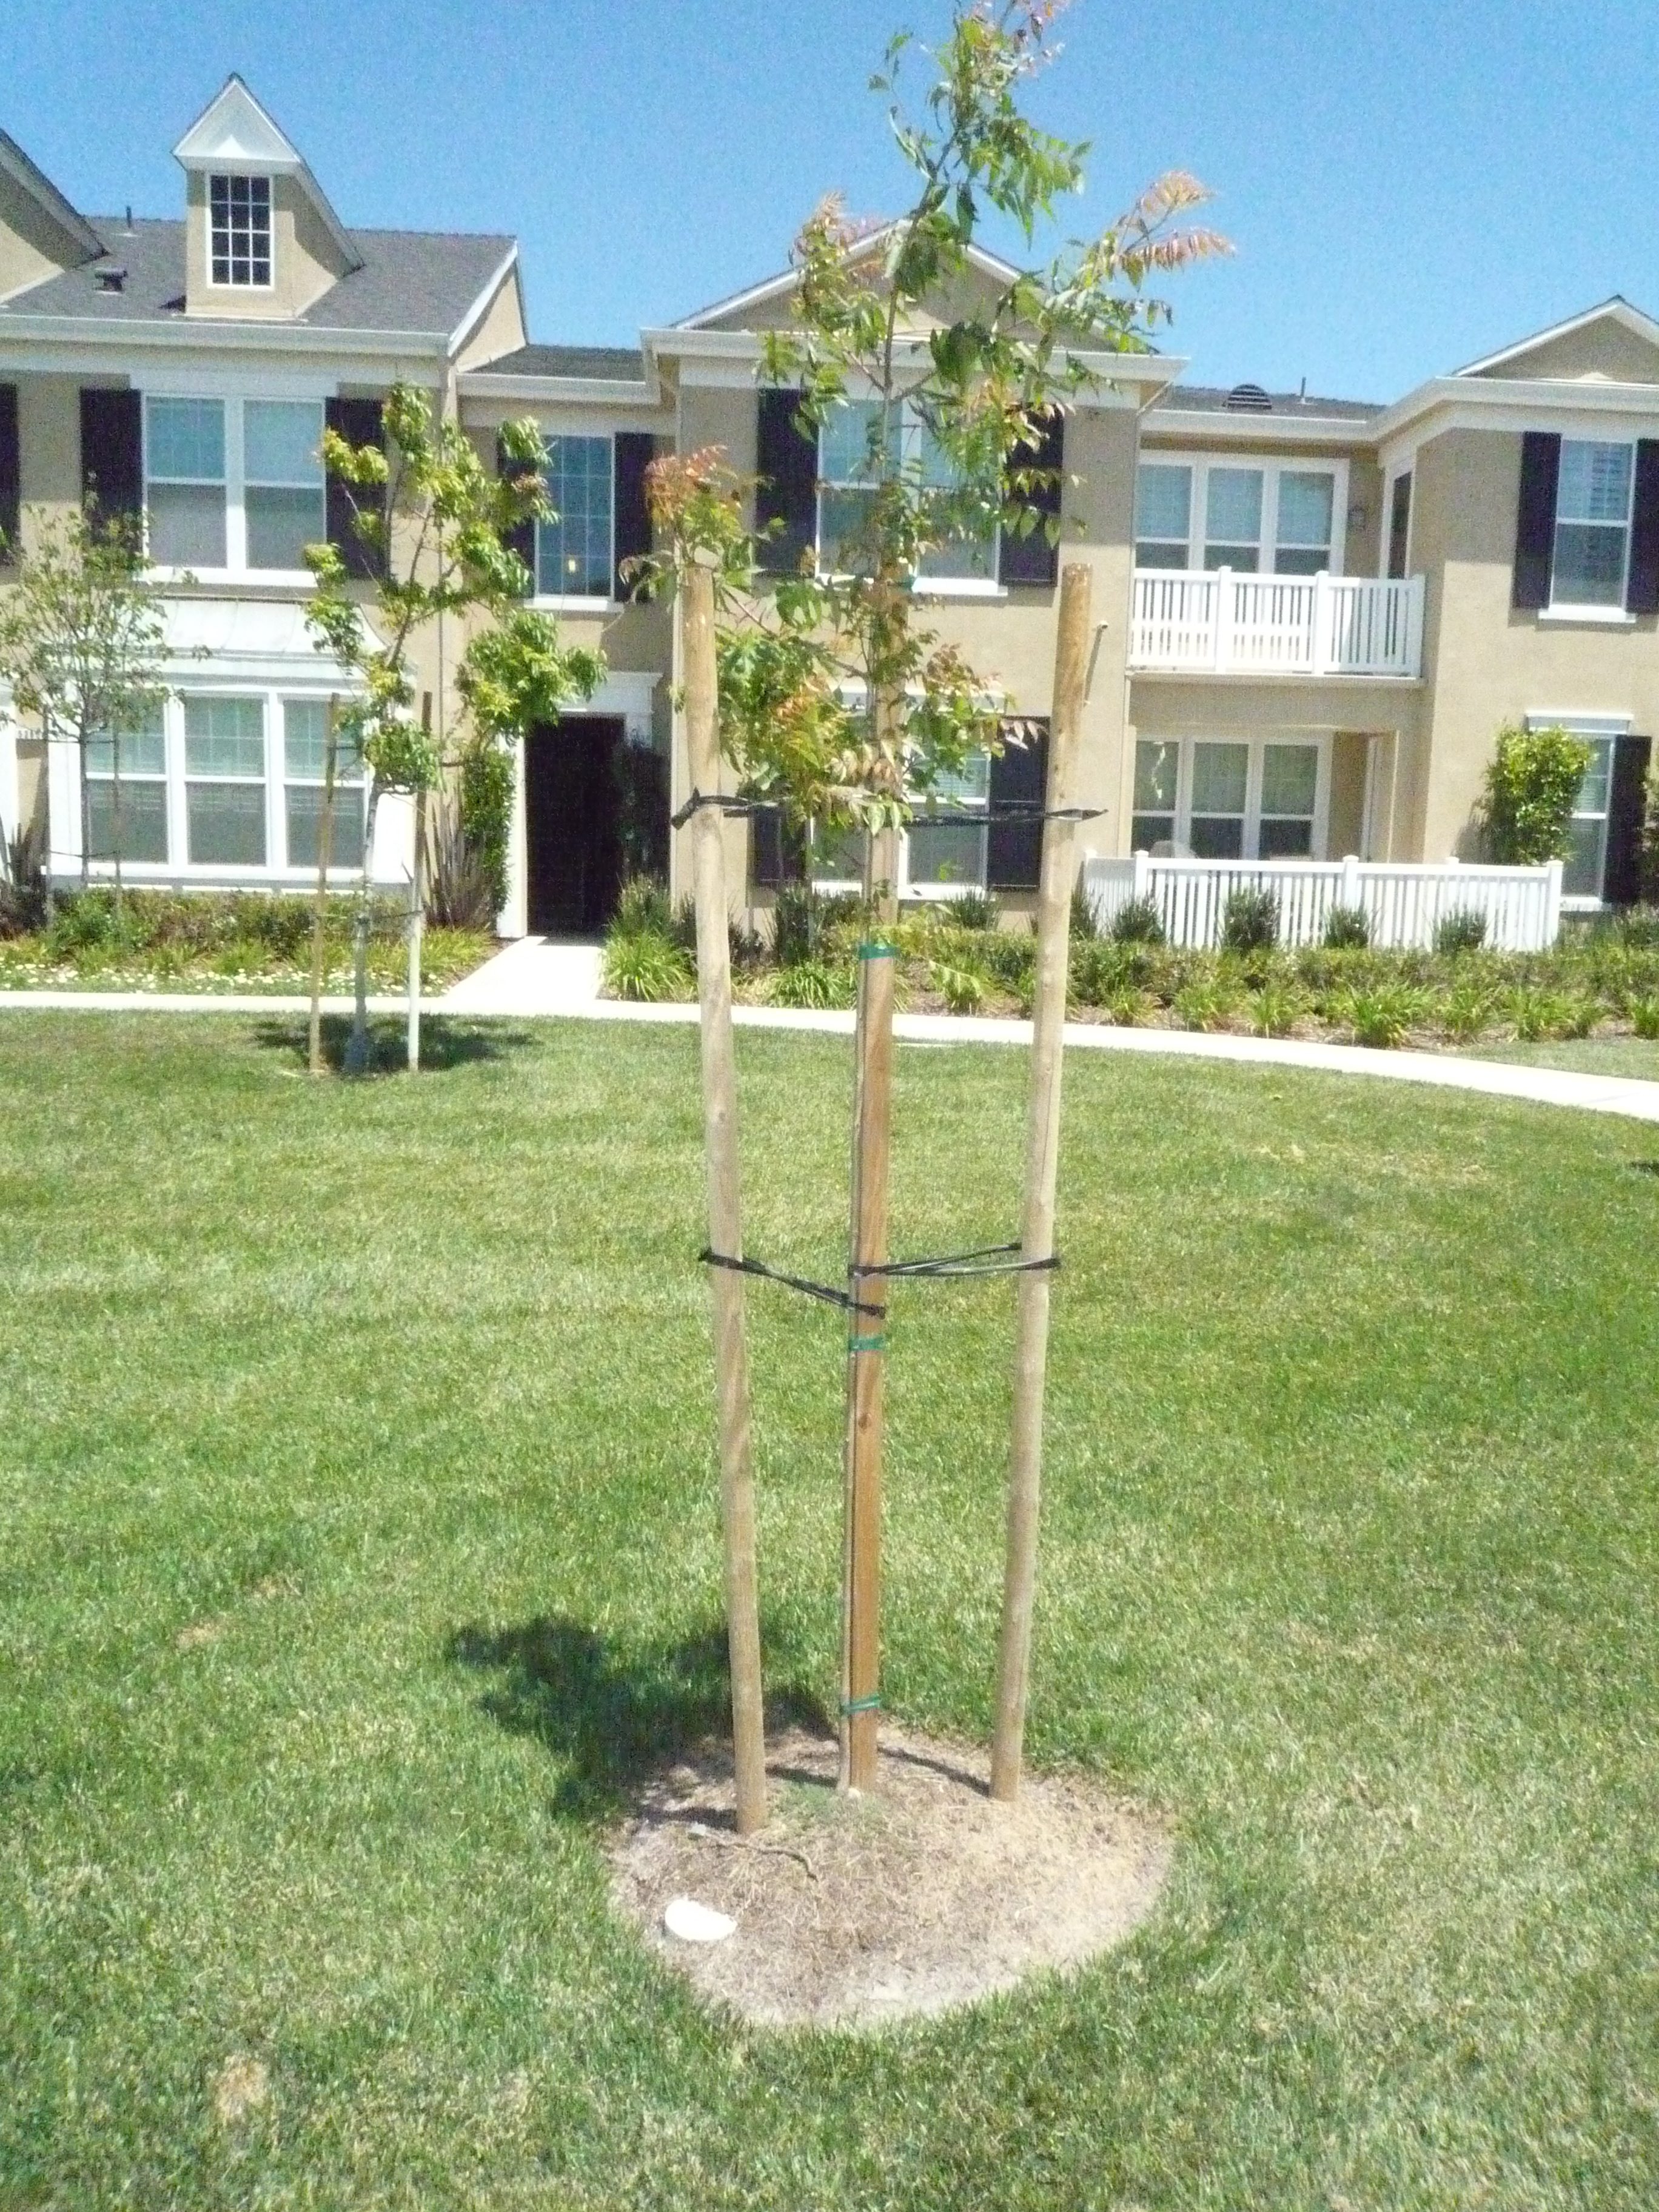
A “lollipop” Tree. Note the very skinny un-tapered stem, lack of temporary lateral branches and retention of the nursery stake–all bad…. Also note the tree snorkel lurking to the left. Kudos for keeping turf away but not far enough away.
If you have selected a good tree, it will stand without staking. There are three reasons for staking: support; anchorage; and protection. Support is sometimes necessary when a tree is cultivated with a long un-tapered trunk and a lollipop crown. Lollipop trees are often sold in nurseries as they resemble small trees. Trees trained in this manner, will not stand without staking. Loose staking allowing trunk movement will foster development of caliper so the tree can eventually stand without supportive staking. Anchor staking is used for trees that experience high winds and “staked out” with guy wires and a non-constrictive collar. Protective staking is analogous to placing bollards around a tree prevent impact from machinery or cars. Always remove the nursery stake at the time of planting and provide any additional support the tree may need. Many Cooperative Extension services have publications on how to stake a shade tree.
Providing a No Turf Zone around trees will aid in their establishment
Avoid planting trees in lawns. Turfgrass and trees conflict with each other. Trees shade turfgrass which results in a thinning sward and increased disease prevalence. Turfgrass slows the growth of trees in an attempt to limit their shading effects. Turfgrass is a very competitive water user and trees will be deprived of moisture and nutrients if turfgrass is present. If trees must be planted in lawns, maintain at least a 1 yard radius around them with no turfgrass.
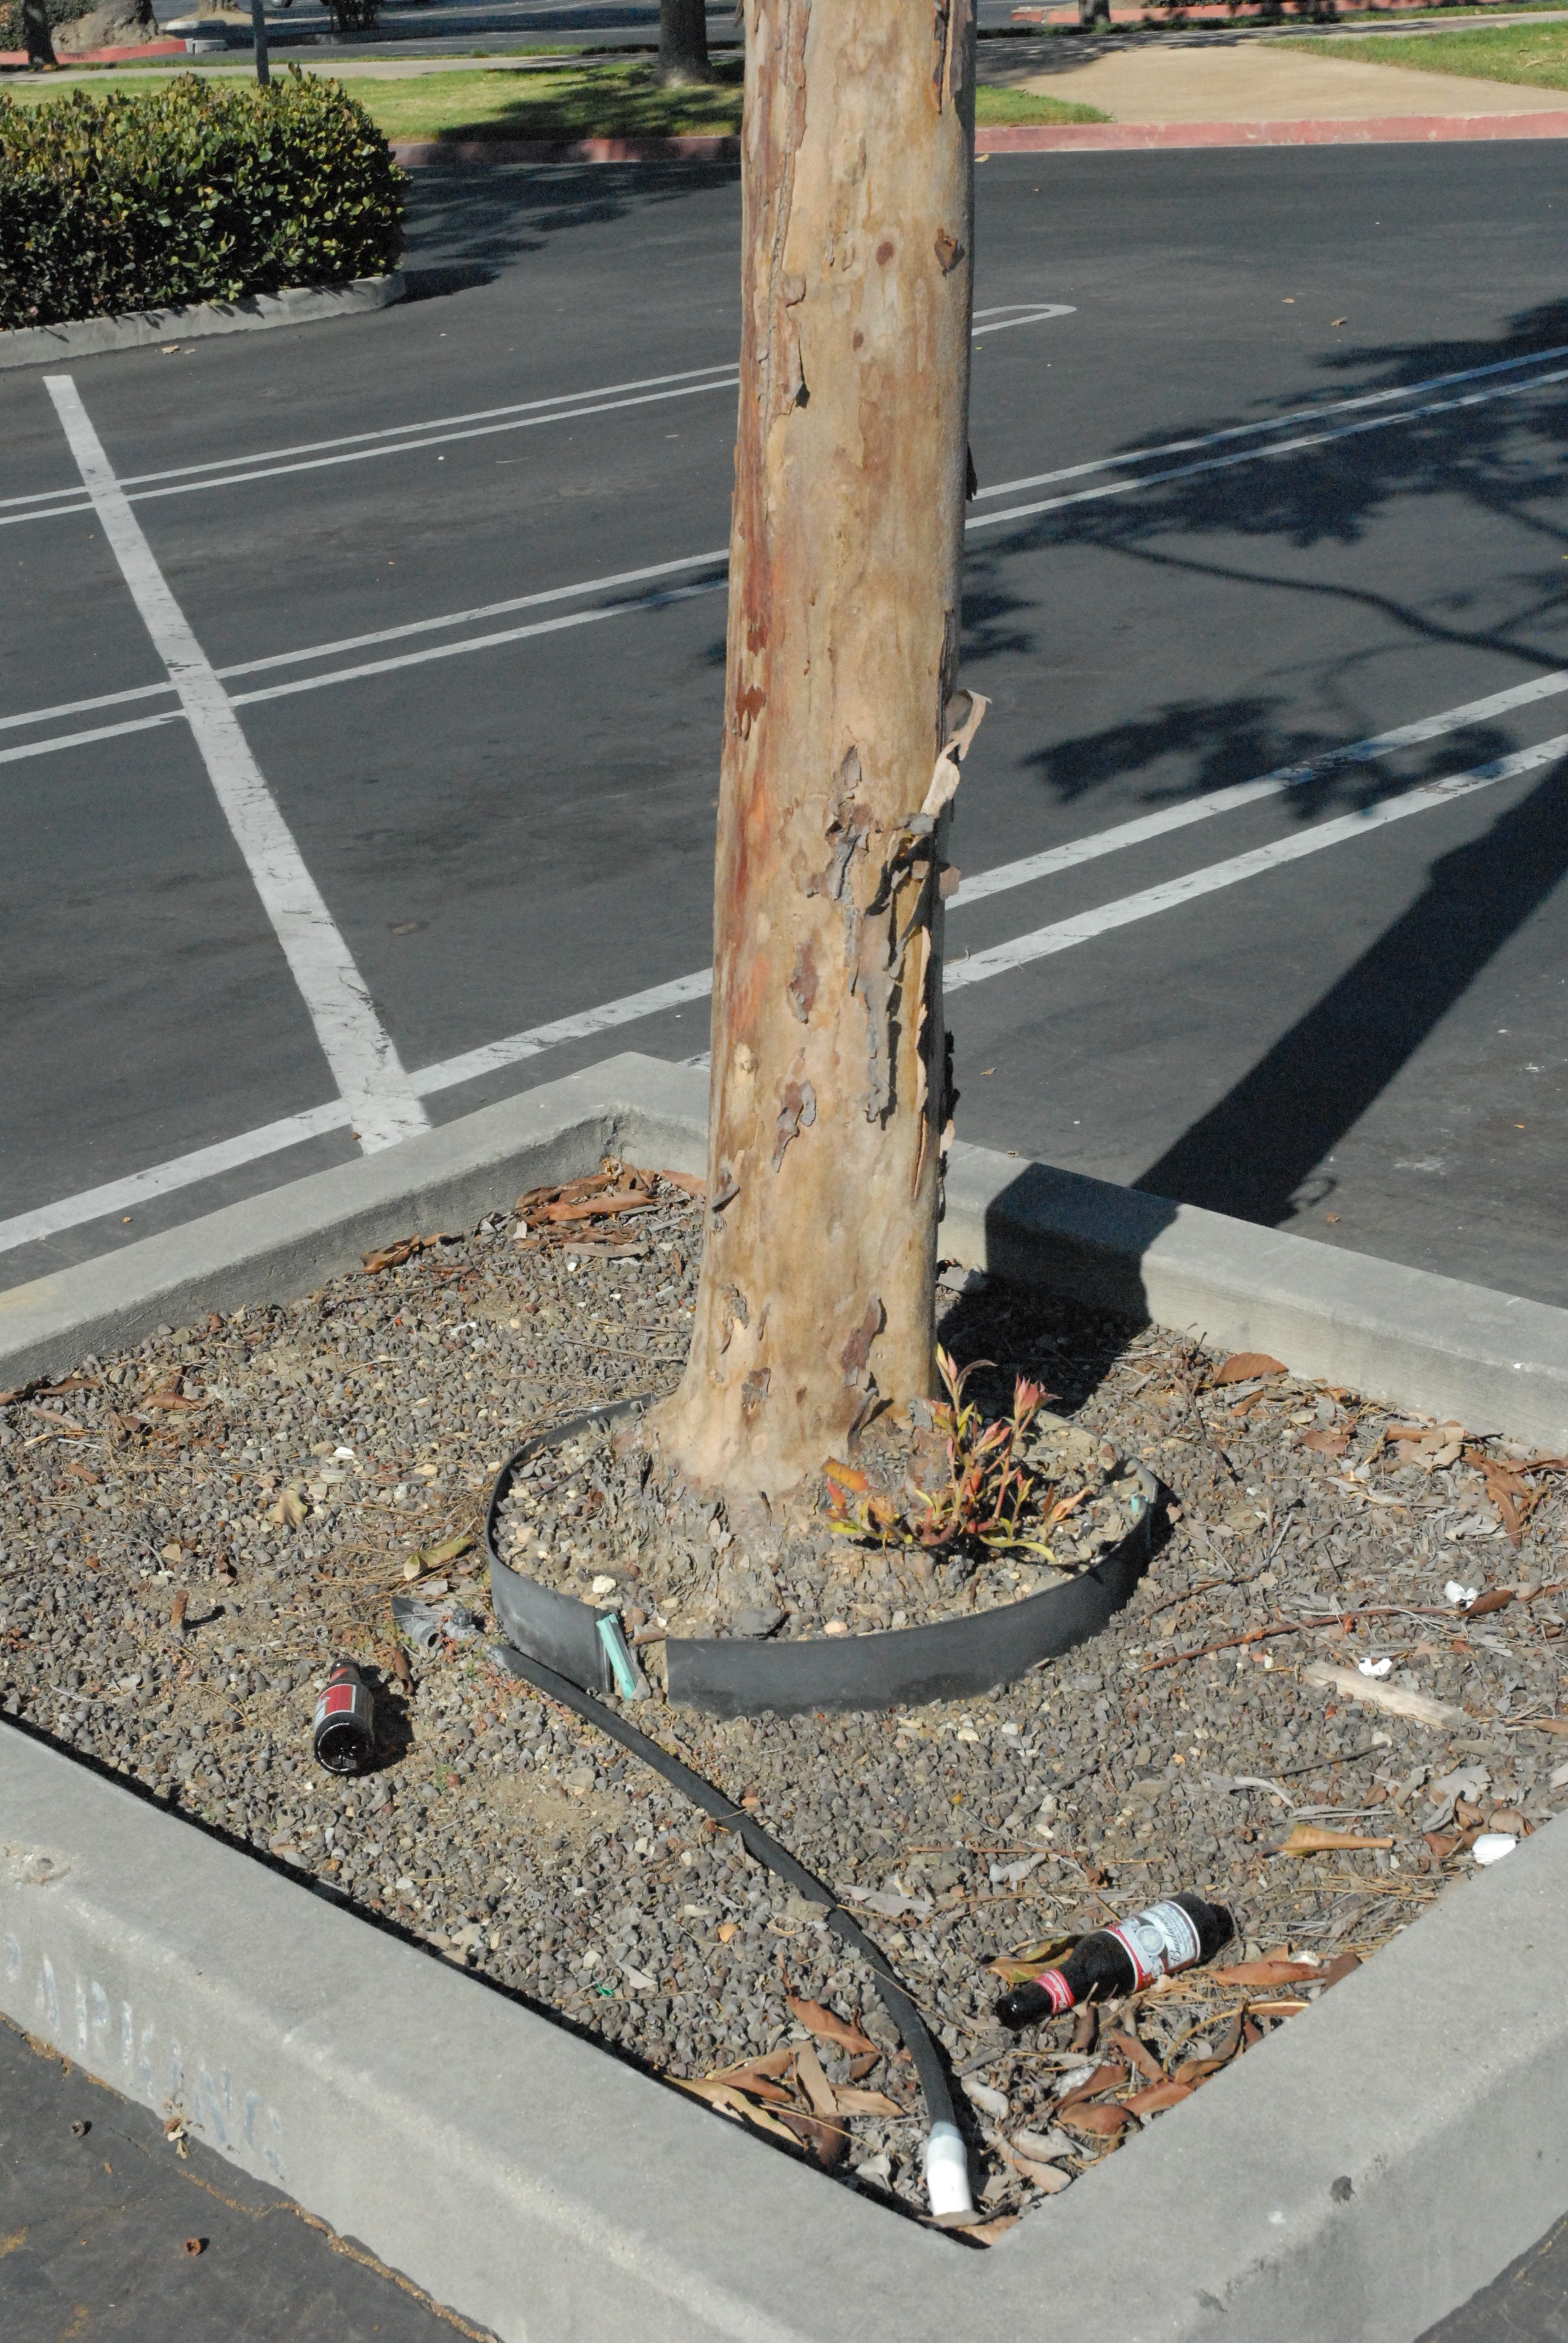
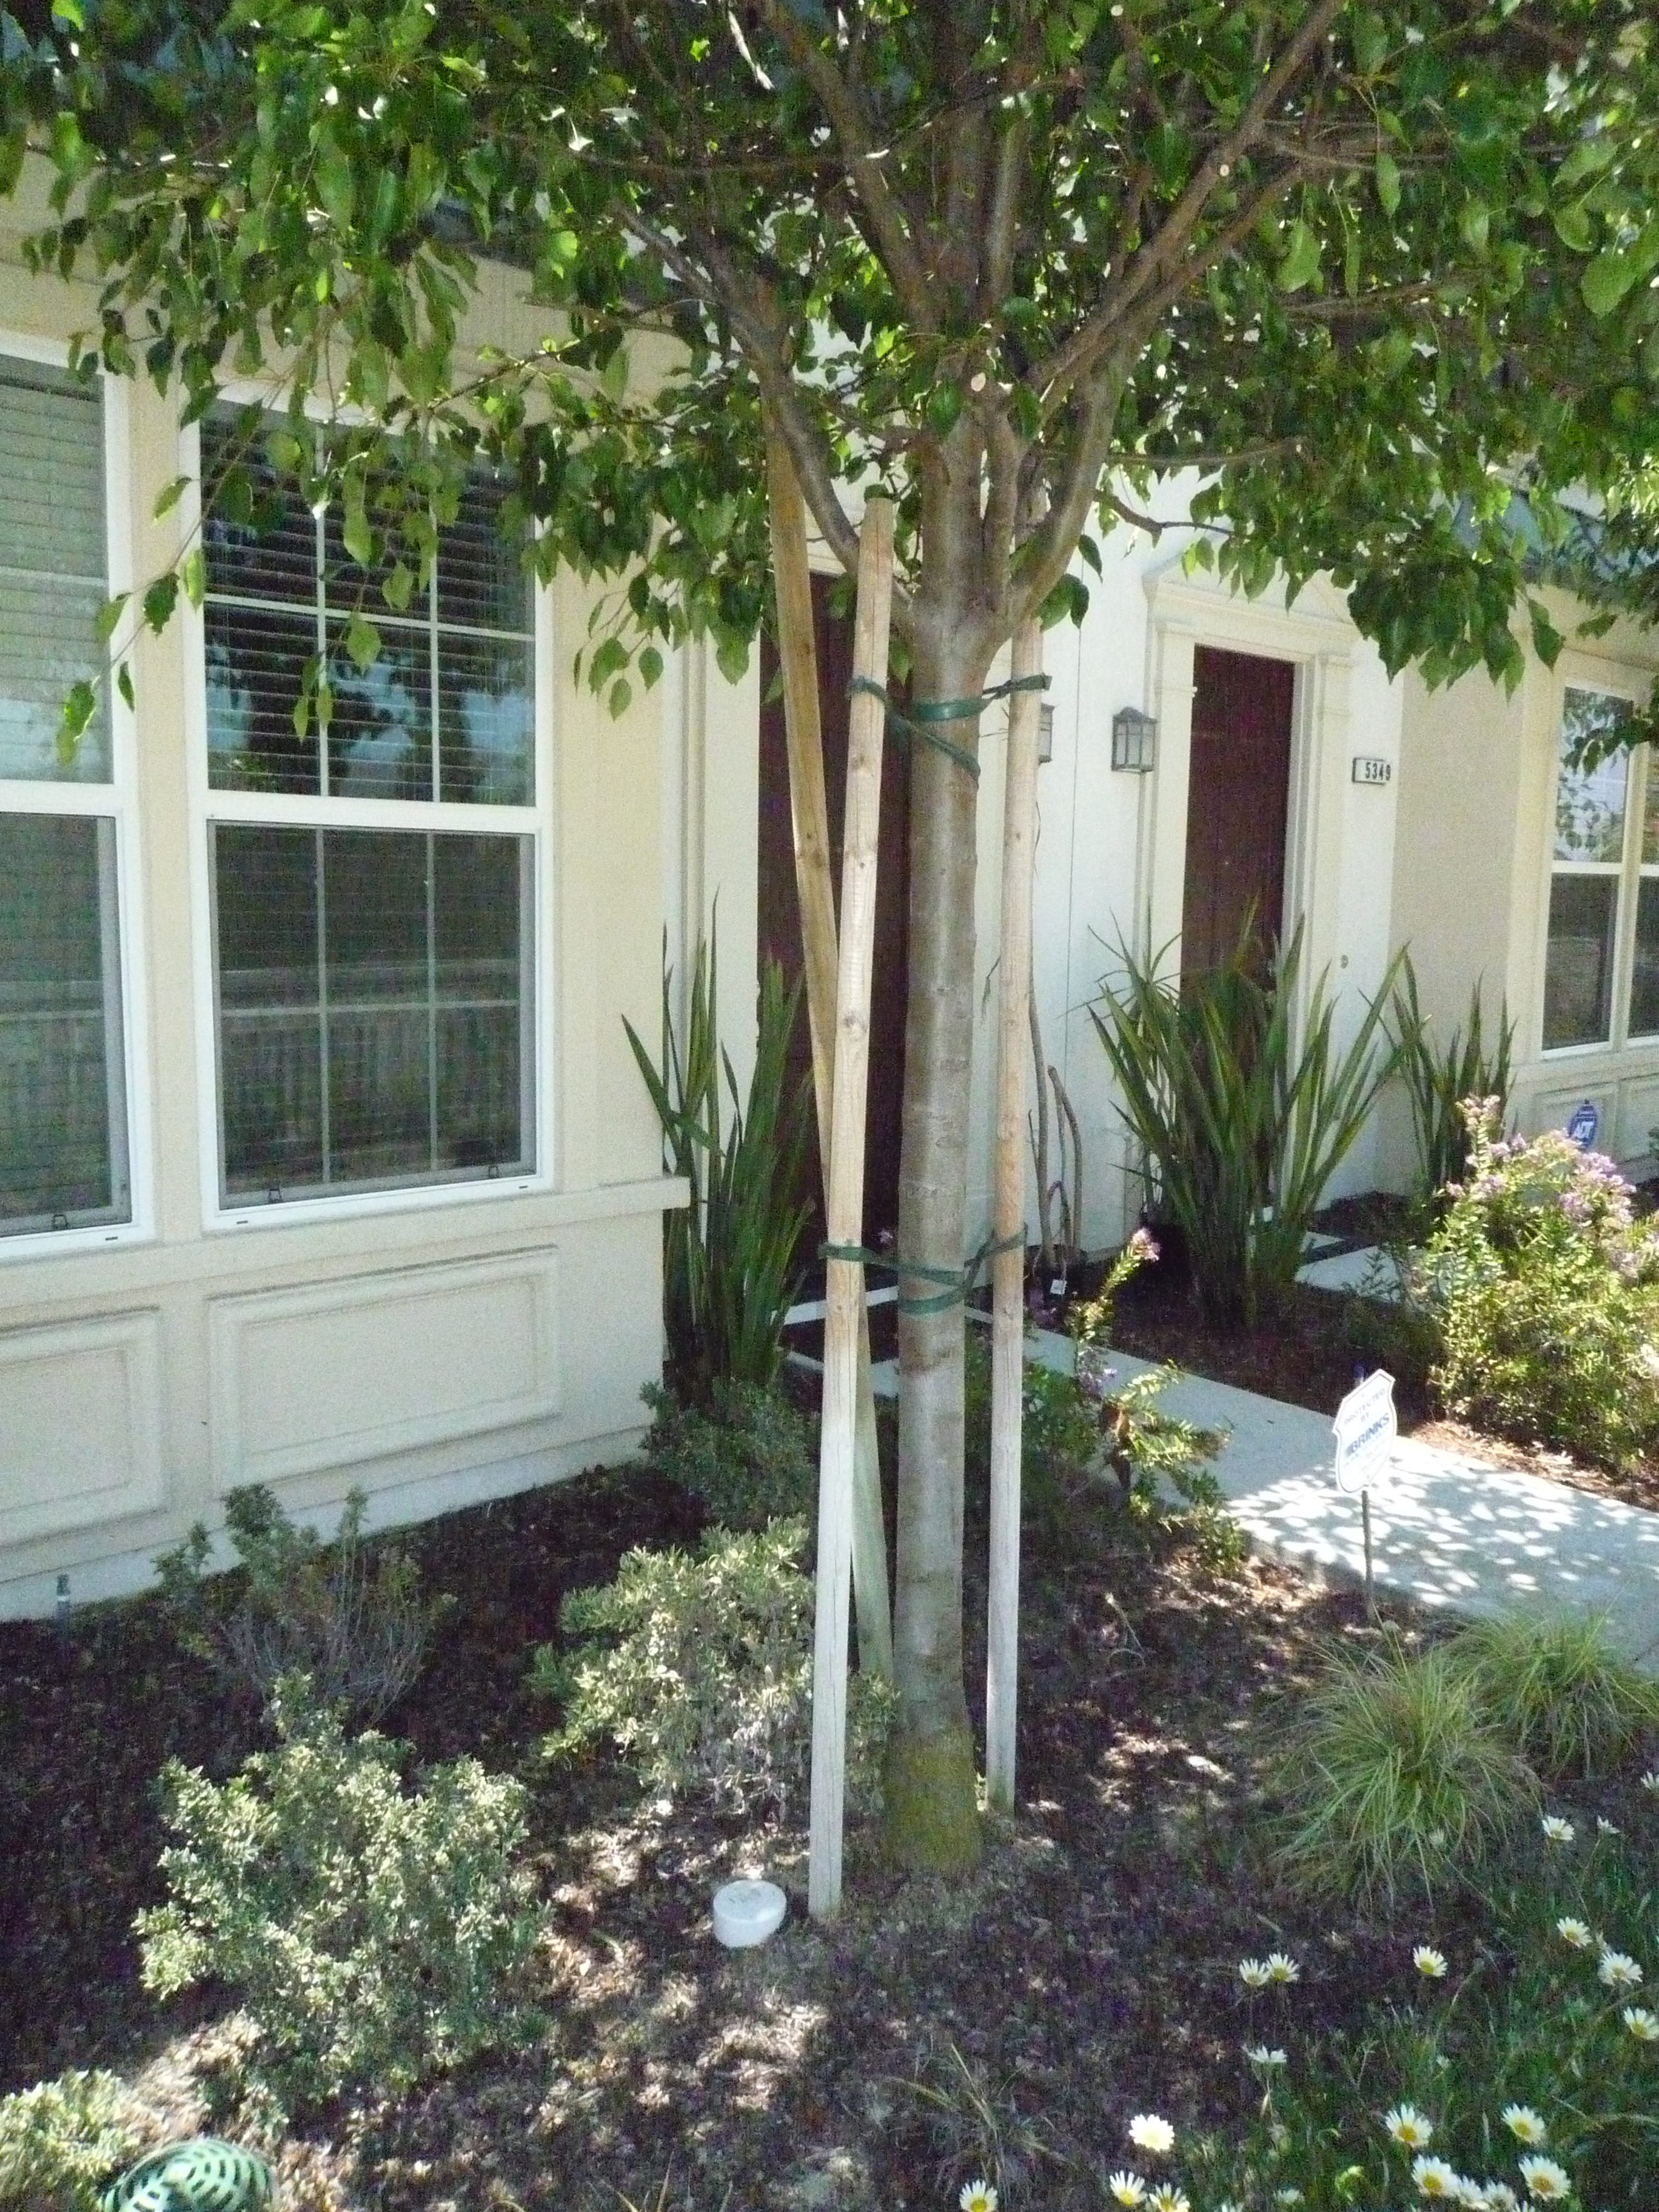
Aeration/Irrigation snorkel tubes do not help trees and result in landscape pollution. Note the original nursery stake still in place and the supportive stakes should have been removed long ago. Mulch needs to be replenished.
It has become a common practice to add irrigation or aeration devices to tree plantings. Sometimes called a tree snorkel these plastic 4 inch U tubes are buried below the root zone. Kits can be purchased from Box stores, and architectural details have been drawn specifying their use. Work by UC researchers showed that oxygen does not diffuse far from aeration tubes. So utilizing tree tubes to increase air flow is suspicious. Some planting details specify adding irrigation to the tubes to force a deep rooted condition in the tree. This places water below the root system, which can dry out and compromise establishment—not a good idea… Worse of all tree snorkels are sometimes installed with no purpose at all other than that was what the planting plan indicated. This is a needless practice and results in landscape pollution. Long term, tree snorkels are ugly, easily broken and provide no useful function to an establishing landscape tree. It is not in the nature of trees to proliferate absorbing roots deep in soil and snorkels will not change a tree’s genetics.
After the tree is set in its hole, and backfill settled in with water, apply a 4 inch layer of arborist chips as far out from the trunk as feasible—at least several feet. The chips will modify the soil improving, chemical, physical and biological properties while conserving moisture from evaporation, preventing runoff, and germination of annual weeds. Generally trees thrive under mulch as it simulates litterfall, or accumulation of organic matter under their canopies. Replenish the mulch as it deteriorates. Finally apply irrigation as needed through the mulch from the surface of the soil. This will help establishing roots, leach salts, and move mulch nutrients into the soil profile. Avoid companion plantings near the main stem of the tree and avoid piling mulch around the tree stem. Following these guidelines will lead to a healthy and useful shade tree that provides its many services for decades.
“Can I use manure to fertilize my garden?” That’s a common question we get in Extension and on the Garden Professors page. The answer is absolutely, but there’s a “but” that should follow that answer that not everyone shares. And that is…but for fruits and vegetable gardens the manure you apply could be a potential source of human pathogens that could make you or your family sick. There are procedures and waiting periods you should follow to reduce the potential risk to human health from pathogens in manure and other animal products.”
Why manure?
First, application of manures to garden and farm production spaces is a good use of nutrients and provides a way to manage those nutrients to the benefit of growers and the environment. Using the concentrated nutrients in the manures to grow crops reduces what washed downstream in the form of pollution. In addition to adding nutrients to the soil, application of manure and other animal byproducts (bone meal and blood meal, for example) add organic matter to the soil, which improves soil texture, nutrient retention and release, and supports beneficial microorganisms.
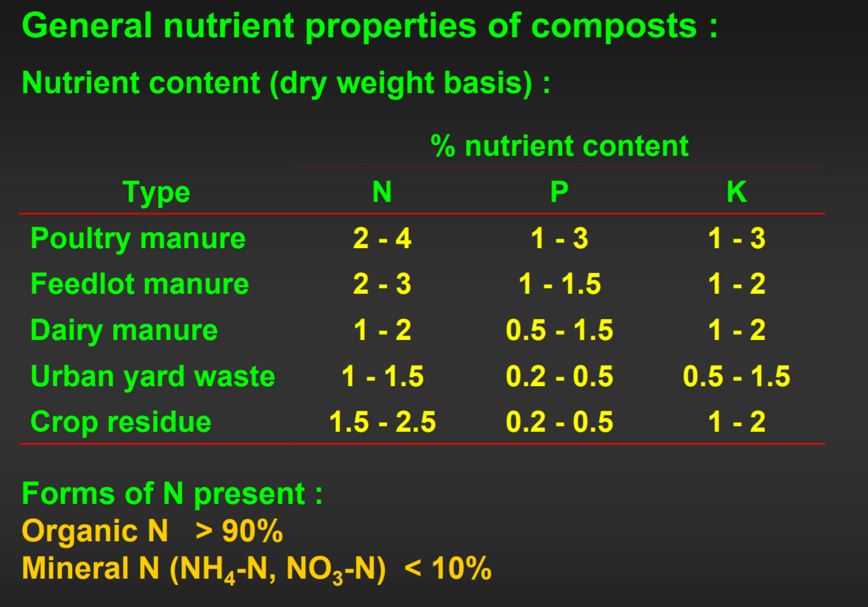
Typical N-P-K composition for some manures and composts. Source: UC Davis
For organic production, both in home gardens and on farms (certified organic or not), manure and animal products are an important input for fertility. For the most part, manures offer a more concentrated (higher percentage) of nutrients by weight than composts composed only of plant residues, so less is usually needed (by weight) than plant composts to apply the same amount of nutrients.
While the nutrient levels of manures and composts can be highly variable, there are some general ranges that you can use to plan your application based on the needs you find in your soil test. (And you should be doing a soil test, rather than just applying manure or compost willy-nilly. Just because the nutrient concentrations are lower than a bag of 10-10-10, you can still over-apply nutrients with composts and manures).
So what are the hazards?
As you’ve probably realized from bathroom signs and handwashing campaigns, fecal material can carry a number of different human pathogens such as E. coli and Salmonella. The major risk around application of manures to edible crops is the possible cross-contamination of the crop with those pathogens. The number one hazard leading to foodborne illness from fresh produce is the application of organic fertilizers – mainly manure, but also those other byproducts like blood meal and bone meal. Add in the fact that the consumption of raw fruits and vegetables has increased over the last decade or more, and you’ll soon understand why Farmers who grow edible crops must follow certain guidelines outlined in the Food Safety Modernization Act (FSMA, which you’ll hear pronounced to as fizz-mah) to reduce the potential risk that these pathogens pose to people who eat the crops. Right now, only farms with a large volume of sales are required to follow the guidelines, but smaller producers are encouraged to follow them as best practice to reduce risk and liability. And while there isn’t a requirement for home gardeners to follow the guidelines, it is a good idea to understand the risks and incorporate the guidelines as best practice. It is especially a good idea if the produce is being eaten by individuals who are at higher risk of foodborne illness – young children, the elderly, or those who are immunocomprimised.
The recommendations are also suggested when there’s contamination from unexpected or unknown sources like when vegetable gardens are flooded (click here for a recent article I wrote to distribute after the flooding in Nebraska and other midwestern states).
Recommendations to reduce risk
As previously stated, while these recommendations have been developed for produce farmers, research showing the potential hazards of applying manures means that it is a good idea for home gardeners to understand and reduce risks from their own home gardens.
The set of guidelines outlined by FSMA cover what are called Biological Soil Amendments of Animal Origin (BSAAO – since we government types love our acronyms). Here’s the “official definitions” used in the rules for produce farming:
A Biological Soil Amendment is “any soil amendment containing biological materials such as stabilized compost, manure, non-fecal animal byproducts, peat moss, pre-consumer vegetative waste, sewage sludge biosolids, table waste, agricultural tea, or yard trimmings, alone or in combination”.
A Biological Soil Amendment of Animal Origin is “untreated: cattle manure; poultry litter; swine slurry; or horse manure.”
Now that’s a pile of crap!
For BSAAO (we’ll call it raw manure), manure should only be applied to the soil and care should be taken not to get it on the plants. There’s also a waiting period between applying the manure and when you should harvest the crop. The length of the waiting period depends on whether the edible part of the crop comes in direct contact with the soil. Right now the USDA is still researching the appropriate waiting period between application and harvest, so the general recommendation until then is to follow the standards laid out in the National Organic Program (NOP) standards. Research shows that while pathogens may break down when exposed to the elements like sun and rain, they can persist for a long time especially in the soil.
For now, here are the recommendations:
For crops that contact the soil, like leafy greens (ex: lettuce, spinach, squash, cucumbers, strawberries) the suggested minimum waiting period between manure application and harvest is 120 days.
For crops that do not contact the soil (ex: staked tomatoes, eggplant, corn) the suggested minimum waiting period between manure application and harvest is 90 days.
For farmers following FSMA, the waiting periods could change when the final rule is released – some early thoughts are that it could increase to 9 – 12 months if the research shows a longer period is needed.
What about composted manure? Is it safe? The guidelines indicate that there isn’t a waiting period between application of manure that has been “processed to completion to adequately reduce microorganisms of public health significance.” But what does that mean? The guidelines lay out that for open pile or windrow composting the compost must be maintained between 131°F and 170°F for a minimum of 15 days, must be turned at least 5 times in that period, must be cured for a minimum of 45 days, and must be kept in a location where it can’t be contaminated with pathogens again (animal droppings, etc). Farmers have the added step of monitoring and thoroughly documenting all of the steps and temperatures. Now we know that that’s a bit of overkill for home gardeners, but suffice it to say that the cow manure that’s been piled up to age for a few years that you got from the farm down the road doesn’t meet that standard.
Failure to maintain proper temperature on composted manure could mean that your goose is cooked, though this thermometer doesn’t have that setting.
“Aged” manure ≠ “processed to completion to adequately reduce microorganisms of public health significance.” So unless you know for sure that you’ve reached and sustained the appropriate temperatures in your compost, you should assume that it would be considered a BSAAO subject to the 90/120 waiting period. Bagged manure you buy at the garden center is likely to be composted “to completion” or may even have other steps to reduce pathogens like pasteurization. Sometimes the label will indicate what steps have been taken to reduce pathogens, or even state that it has been tested for pathogens.
The recommendations also specifically mention compost teas and leachates (a topic we handle with much frequency and derision here at the GPs, since there’s not much science to back up their use and I mention here with much trepidation). For the sake of food safety, any tea or leachate should only be applied to the soil, not the plant. And for home compost that doesn’t even contain animal manure the 90/120 day waiting period should still be observed in most cases since some of what goes into home compost is post-consumer. Since we put pieces of produce in there that we’ve bitten from or chewed on (post-consumer), plus some animal origin items (eggshells) there’s the potential that we could contaminate the compost with our own pathogens – and the environment is perfect for them to multiply.
The Bottom Line
While these guidelines and rules for farmers may just be best practice recommendations that we can pass on to home gardeners, common sense tells us that taking precautions when applying potential pathogens to our edible gardens. An ounce of prevention is worth a pound of cure, especially when were talking about poop.
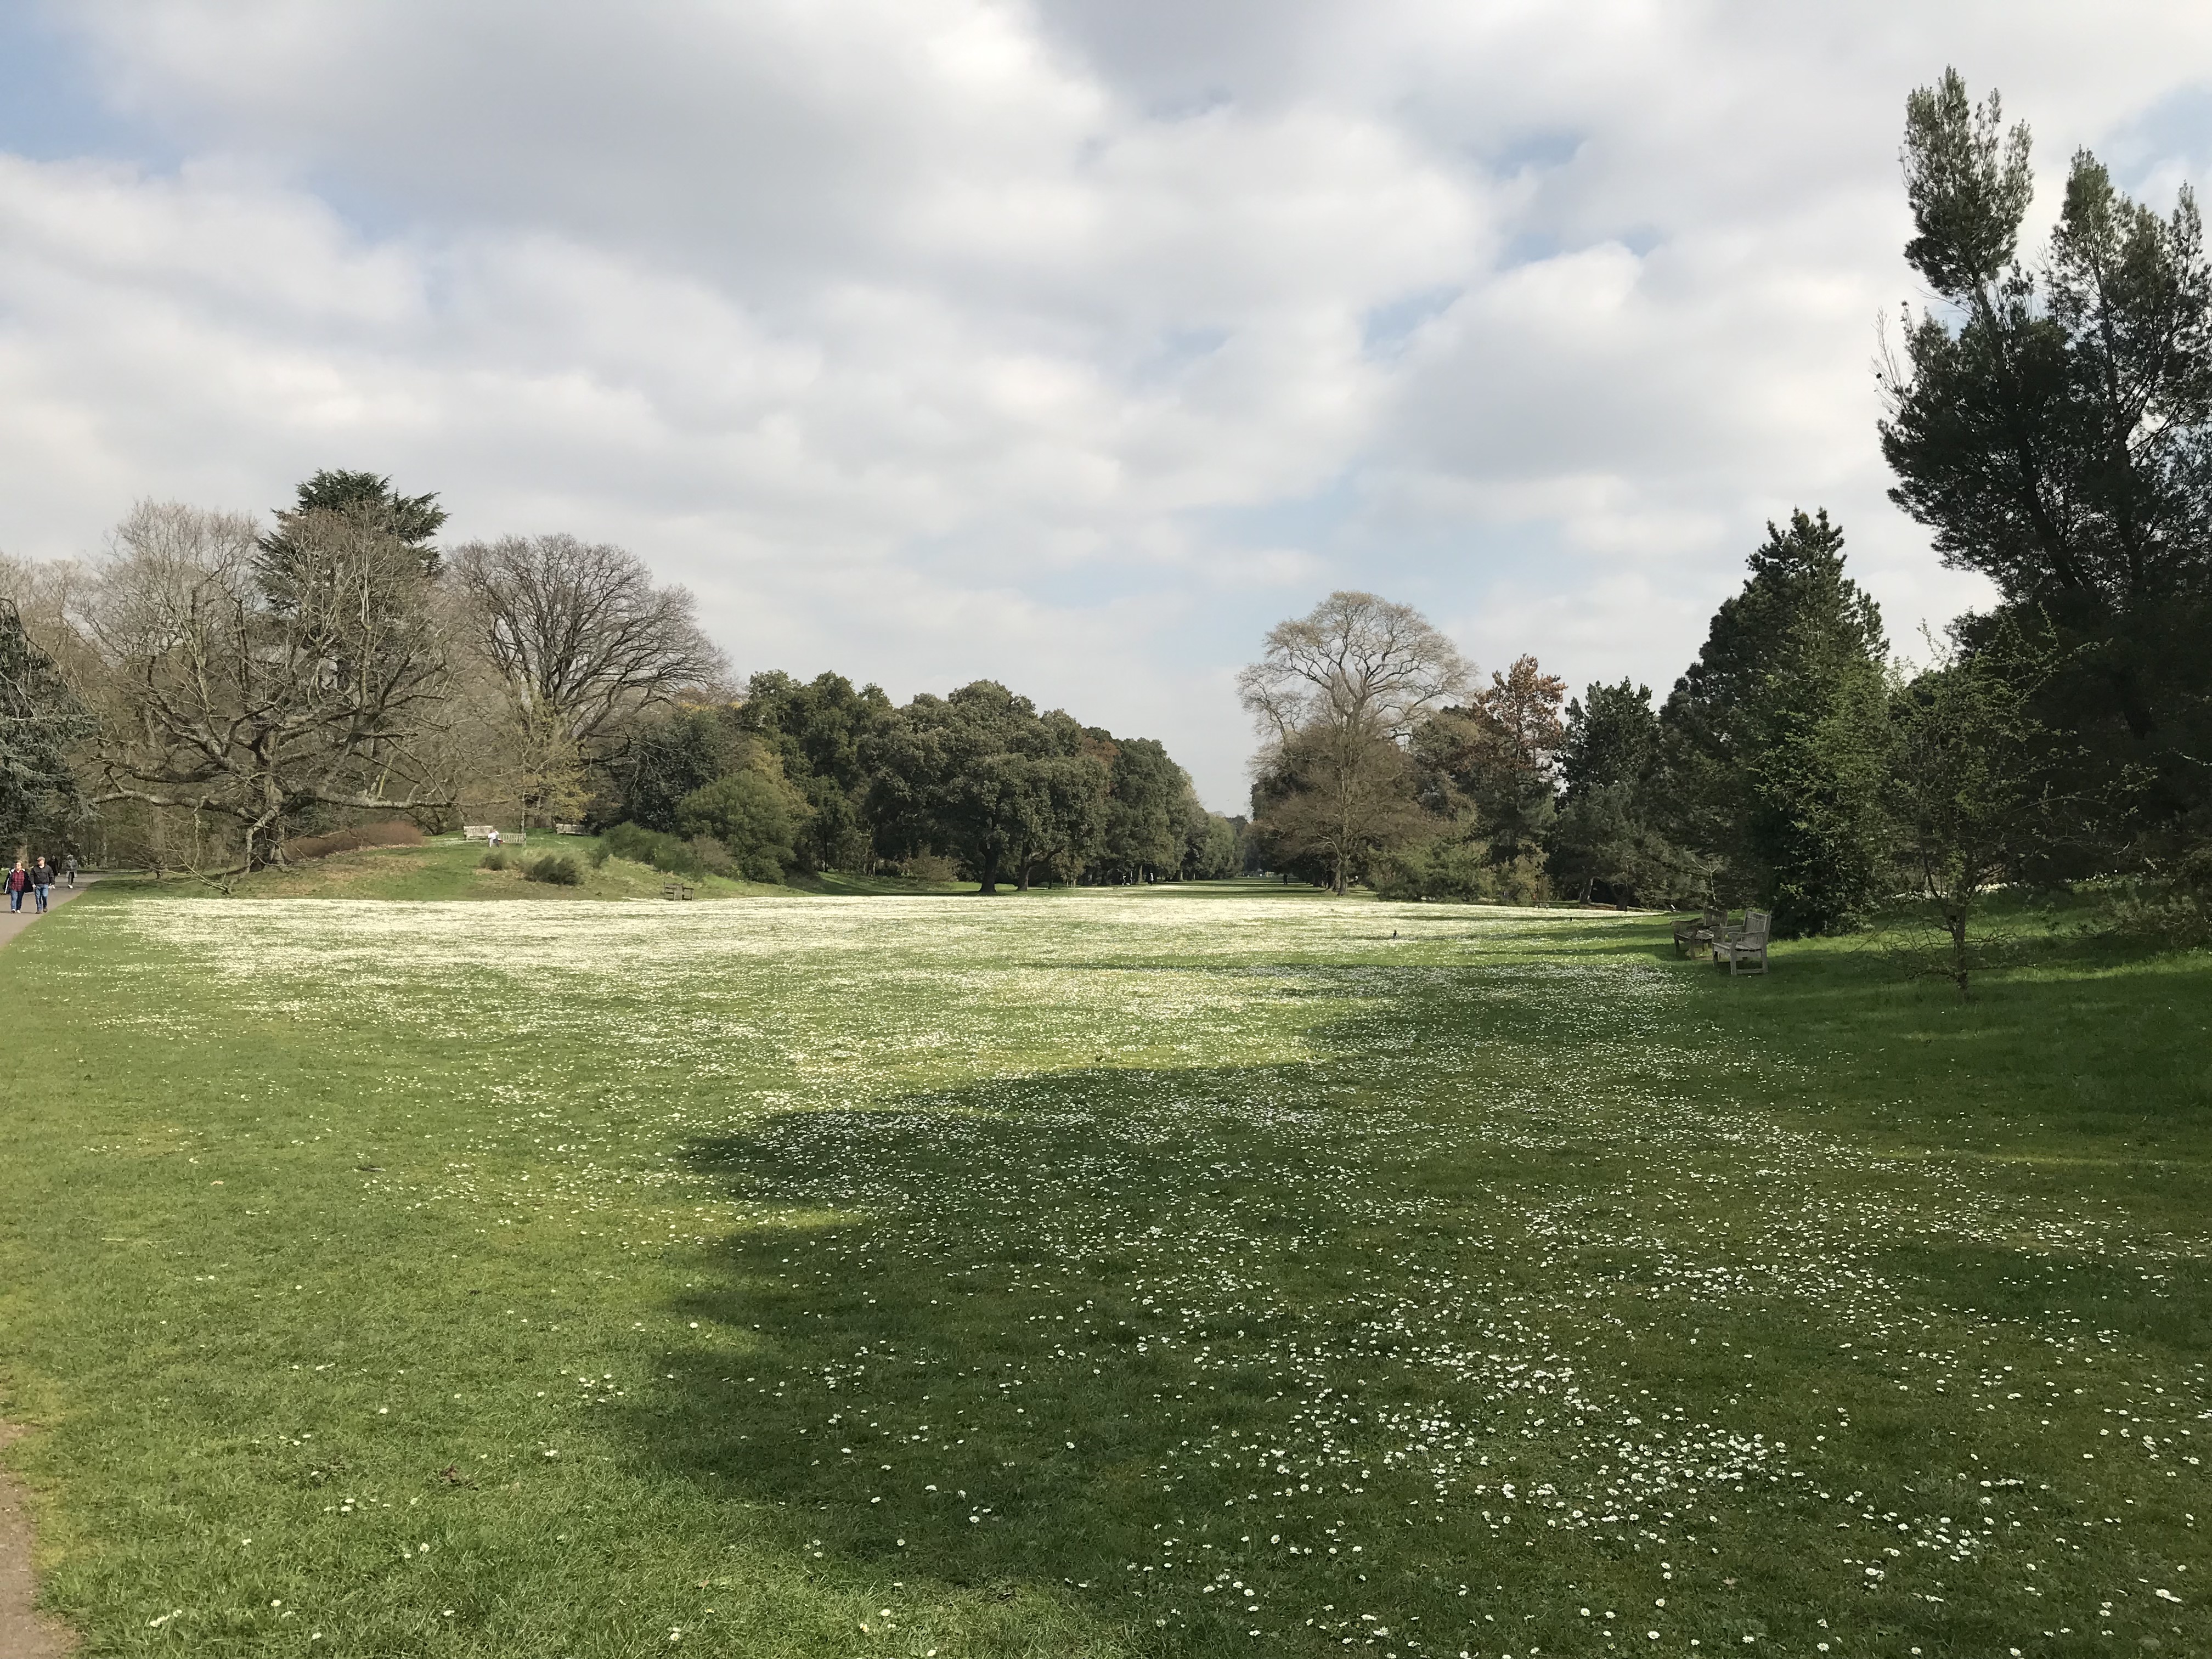
Over the last couple of weeks I’ve been in London having some unforgettable garden experiences. Thanks to the generosity of my UK colleagues Glynn Percival and Jon Banks I was treated to Kew Gardens, RHS Wisley Gardens, and Windsor Castle. I hope to construct several blog posts from these visits, but today’s post is an homage to the English garden meadow. Instead of monocultural turf lawns, mowed and sprayed into submission, why not consider a more biodiverse and visually pleasing approach to groundcover?
RHS WIsley meadow. Photo by Charlotte Scott.
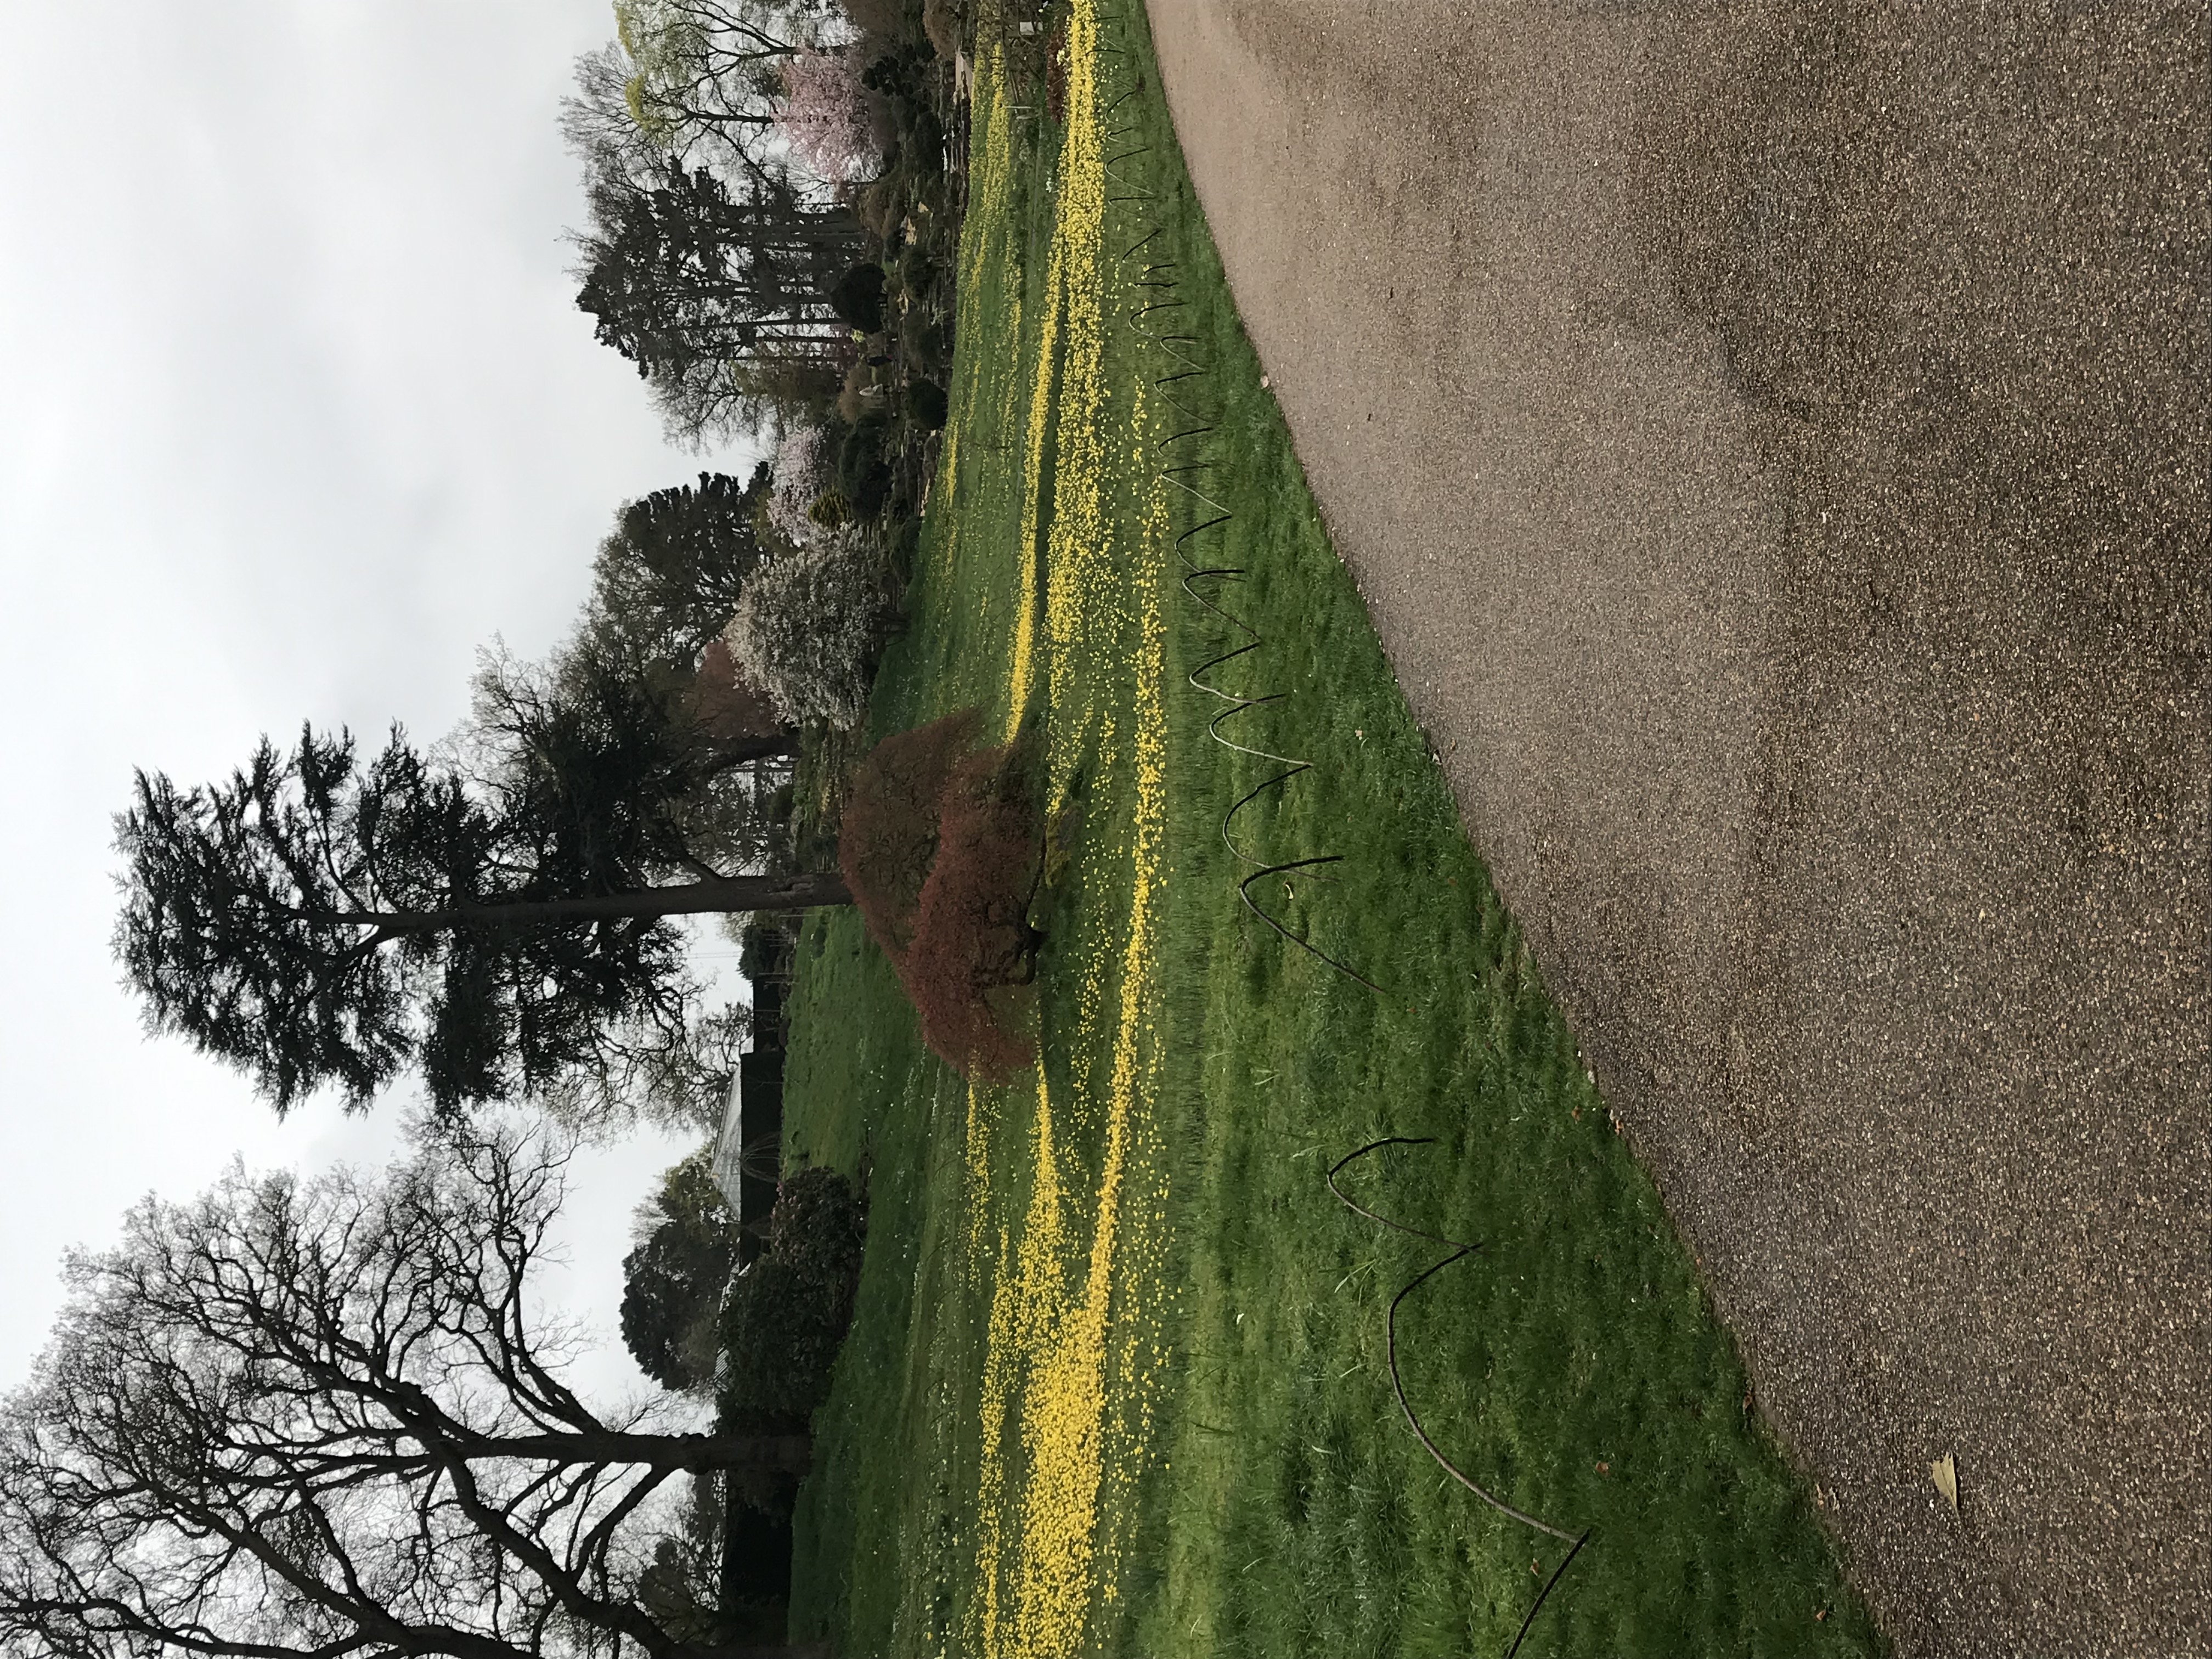
As the title of this post suggests, this is not a new topic in our blog. (You can read other related posts here, here, and here.) What was so stunning about these garden meadows (meadow gardens?) was the scale and effortless beauty. For instance, consider this tree-lined parkway at Kew, covered with English daisies.
Kew Gardens parkway. Photo by Charlotte Scott.
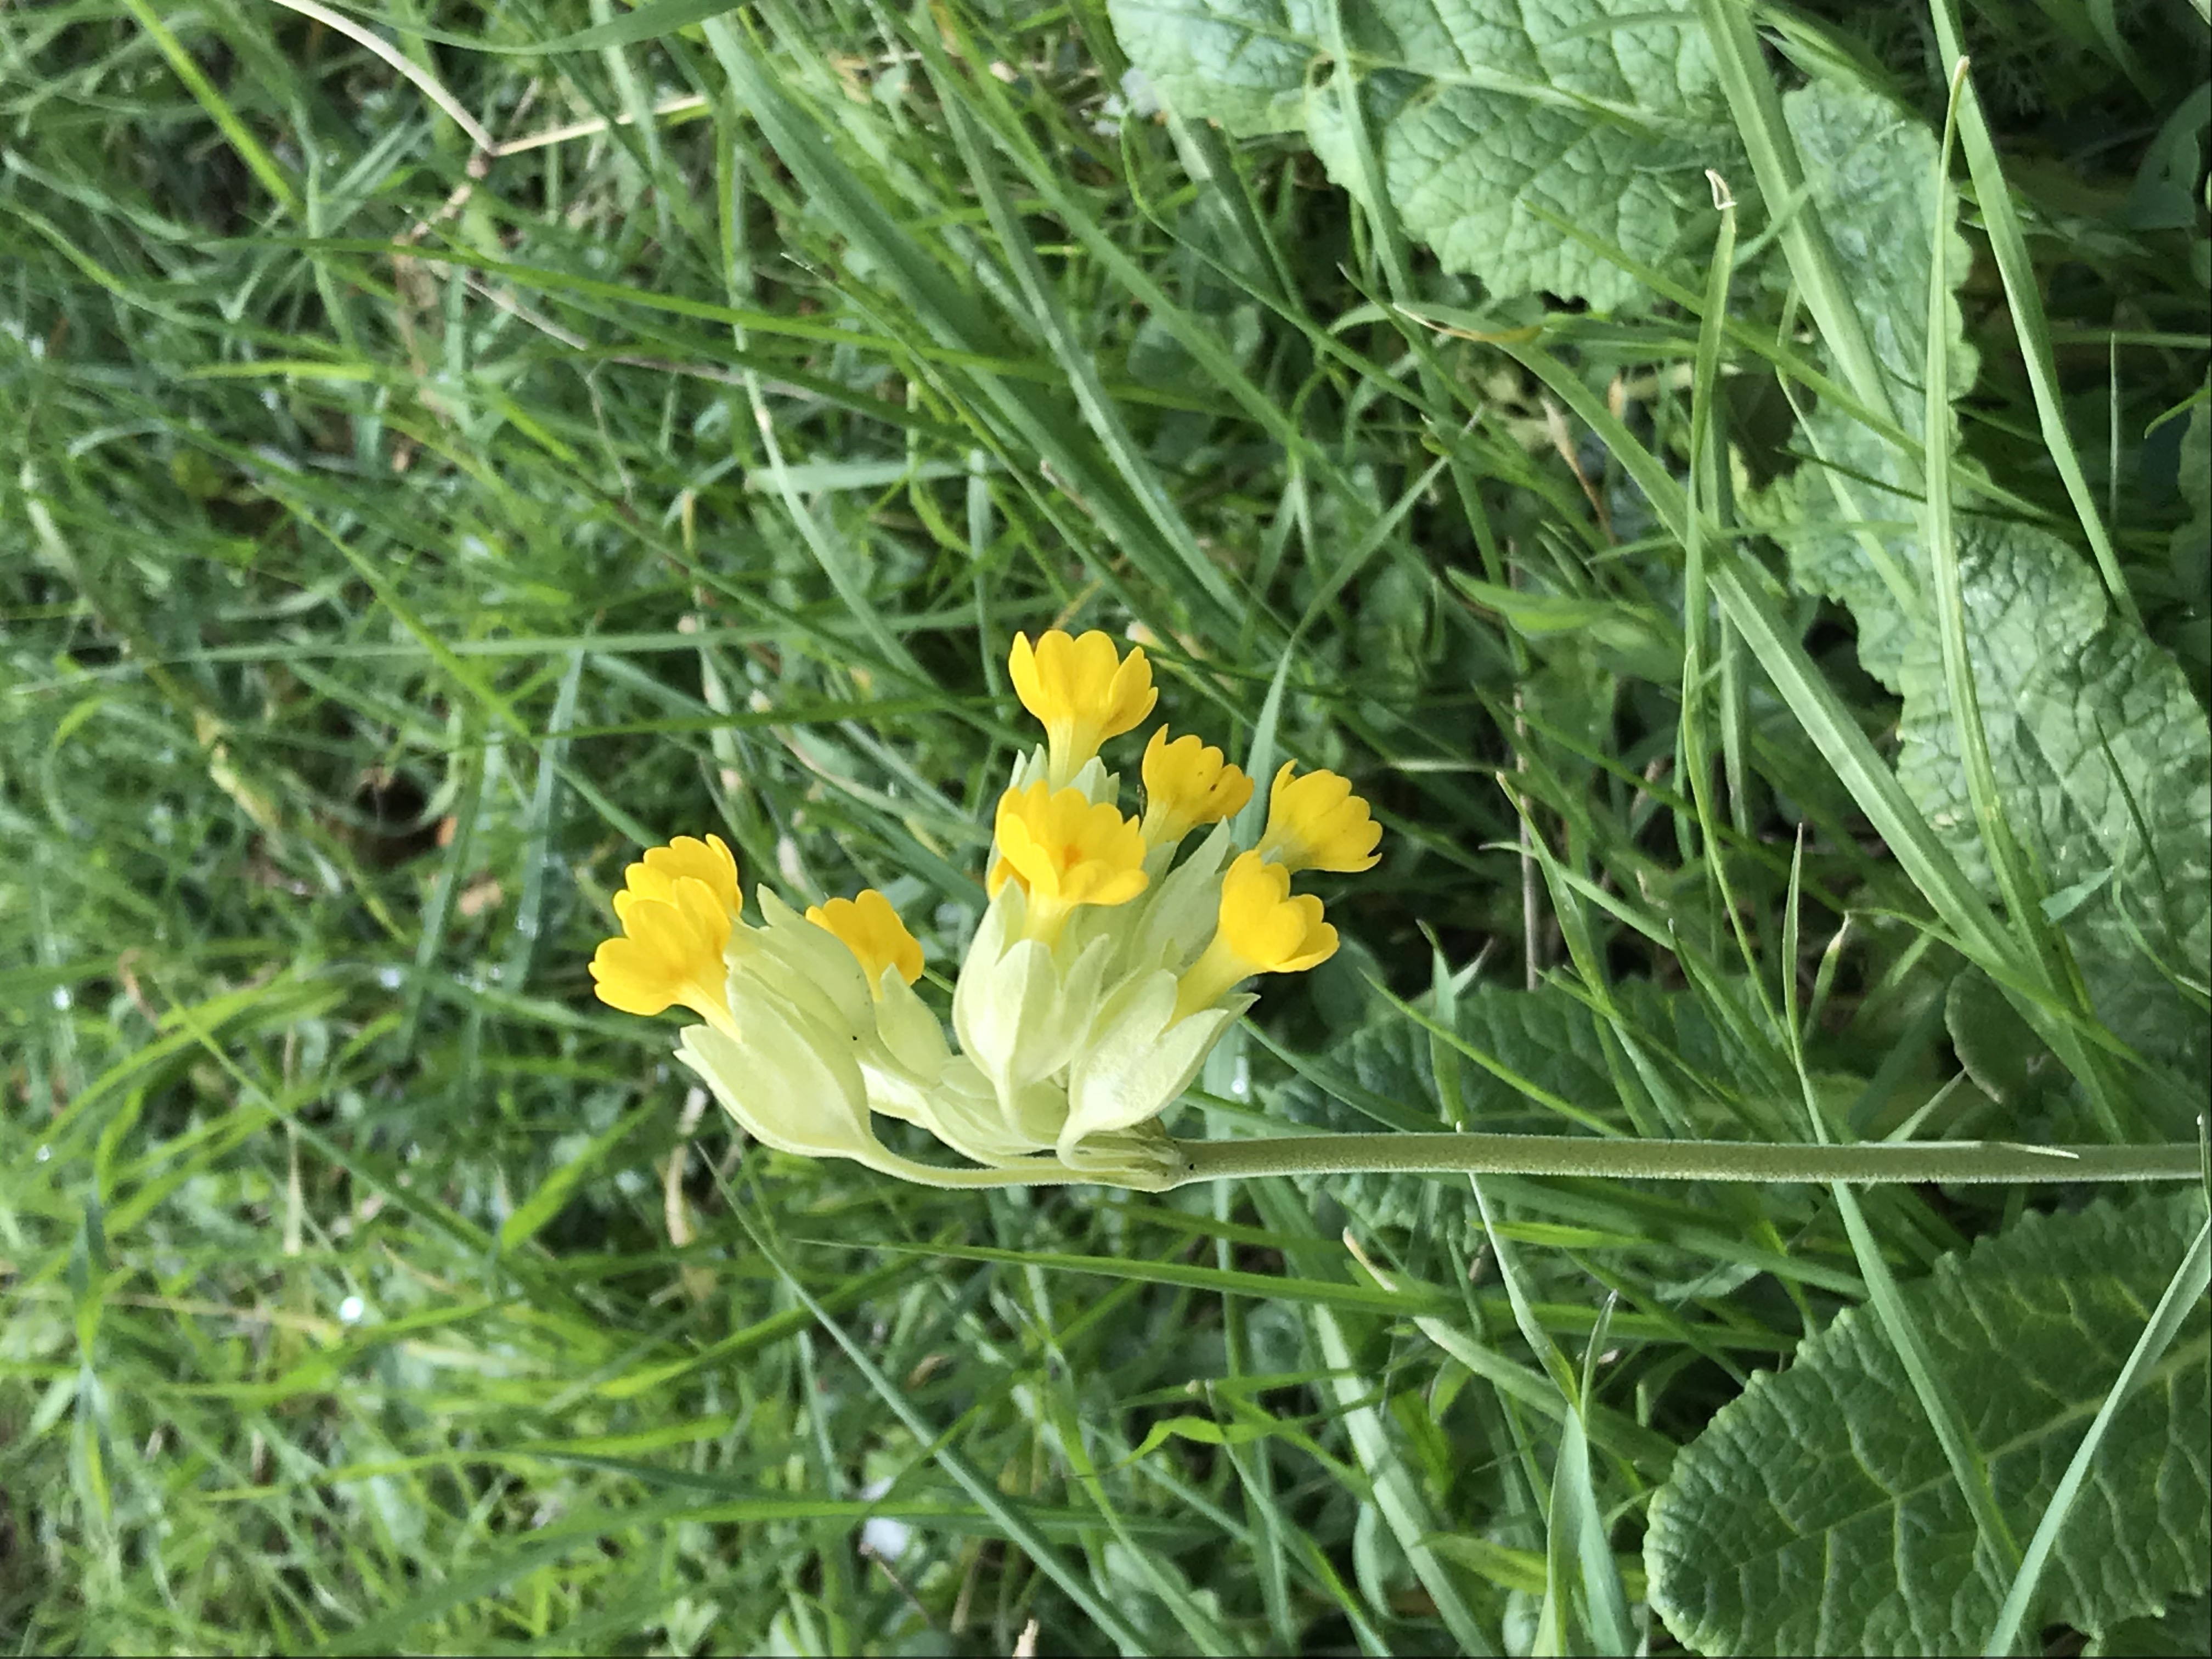
I saw my first honest-to God cowslip in a meadow garden at the British Museum of Natural History.
Primula veris (cowslip). Photo by Charlotte Scott.
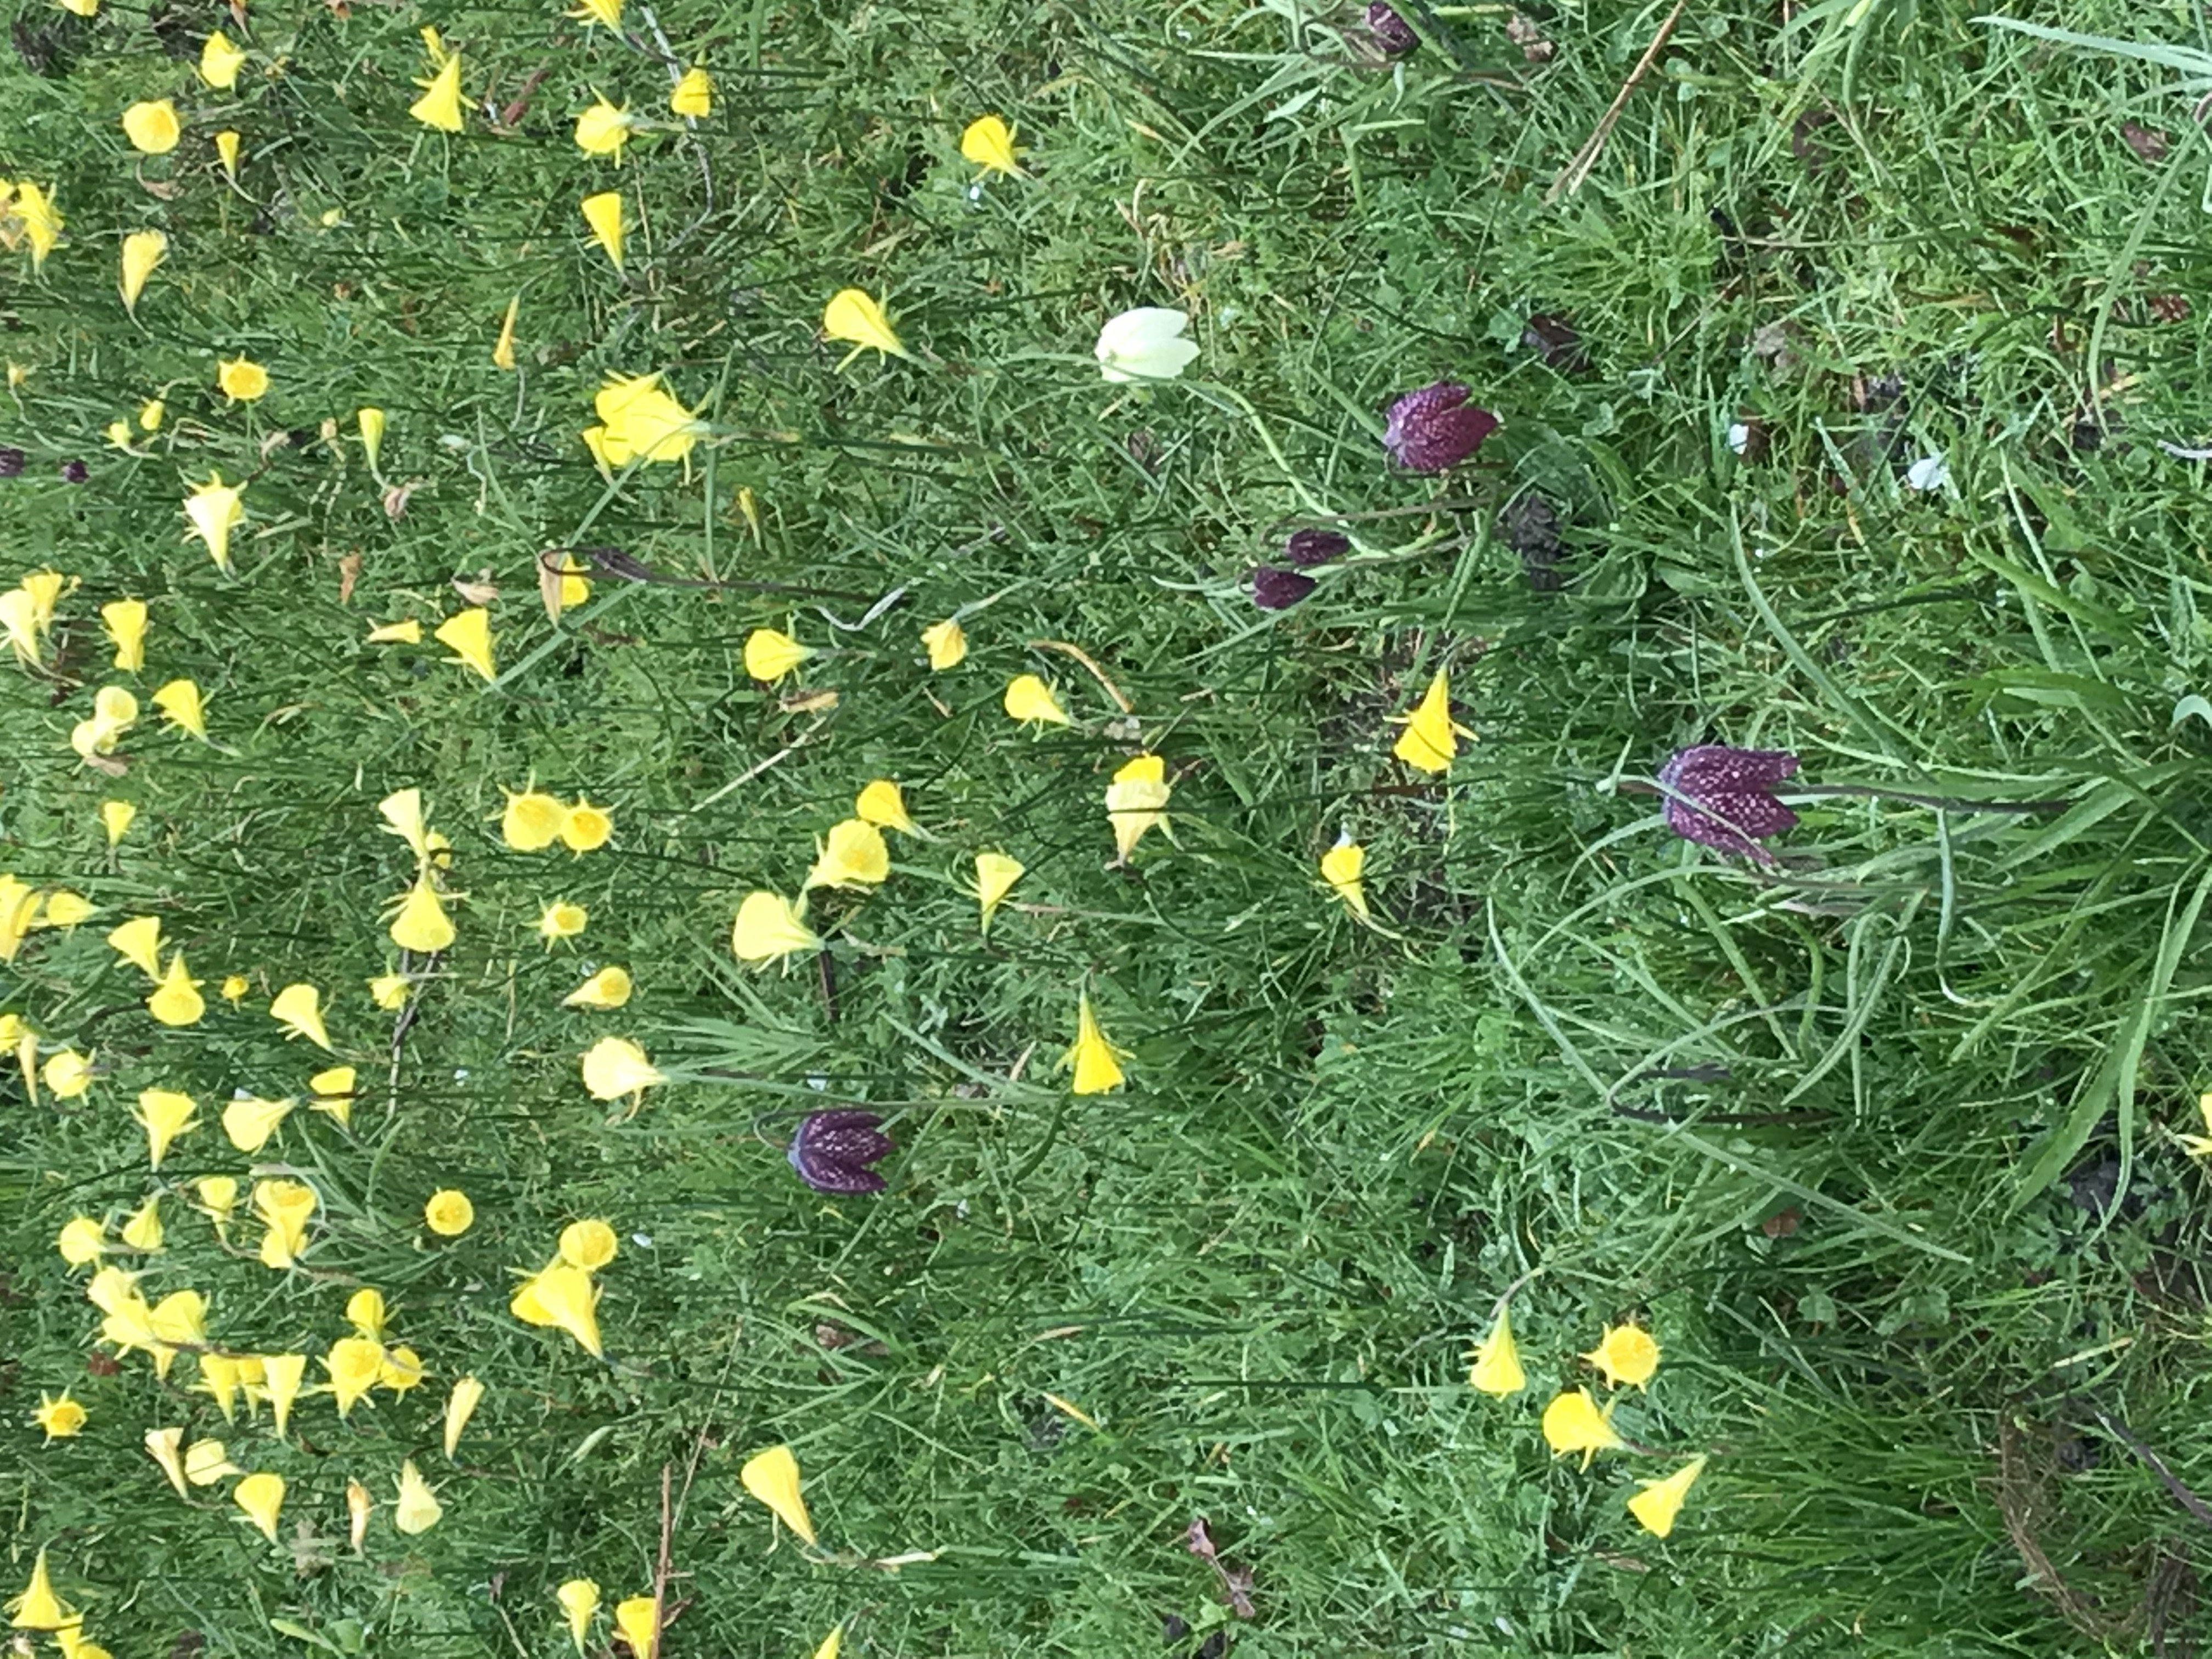
How about these adorable tiny daffodils and checker lilies?
Daffodils and Fritillaria. Photo by Charlotte Scott.
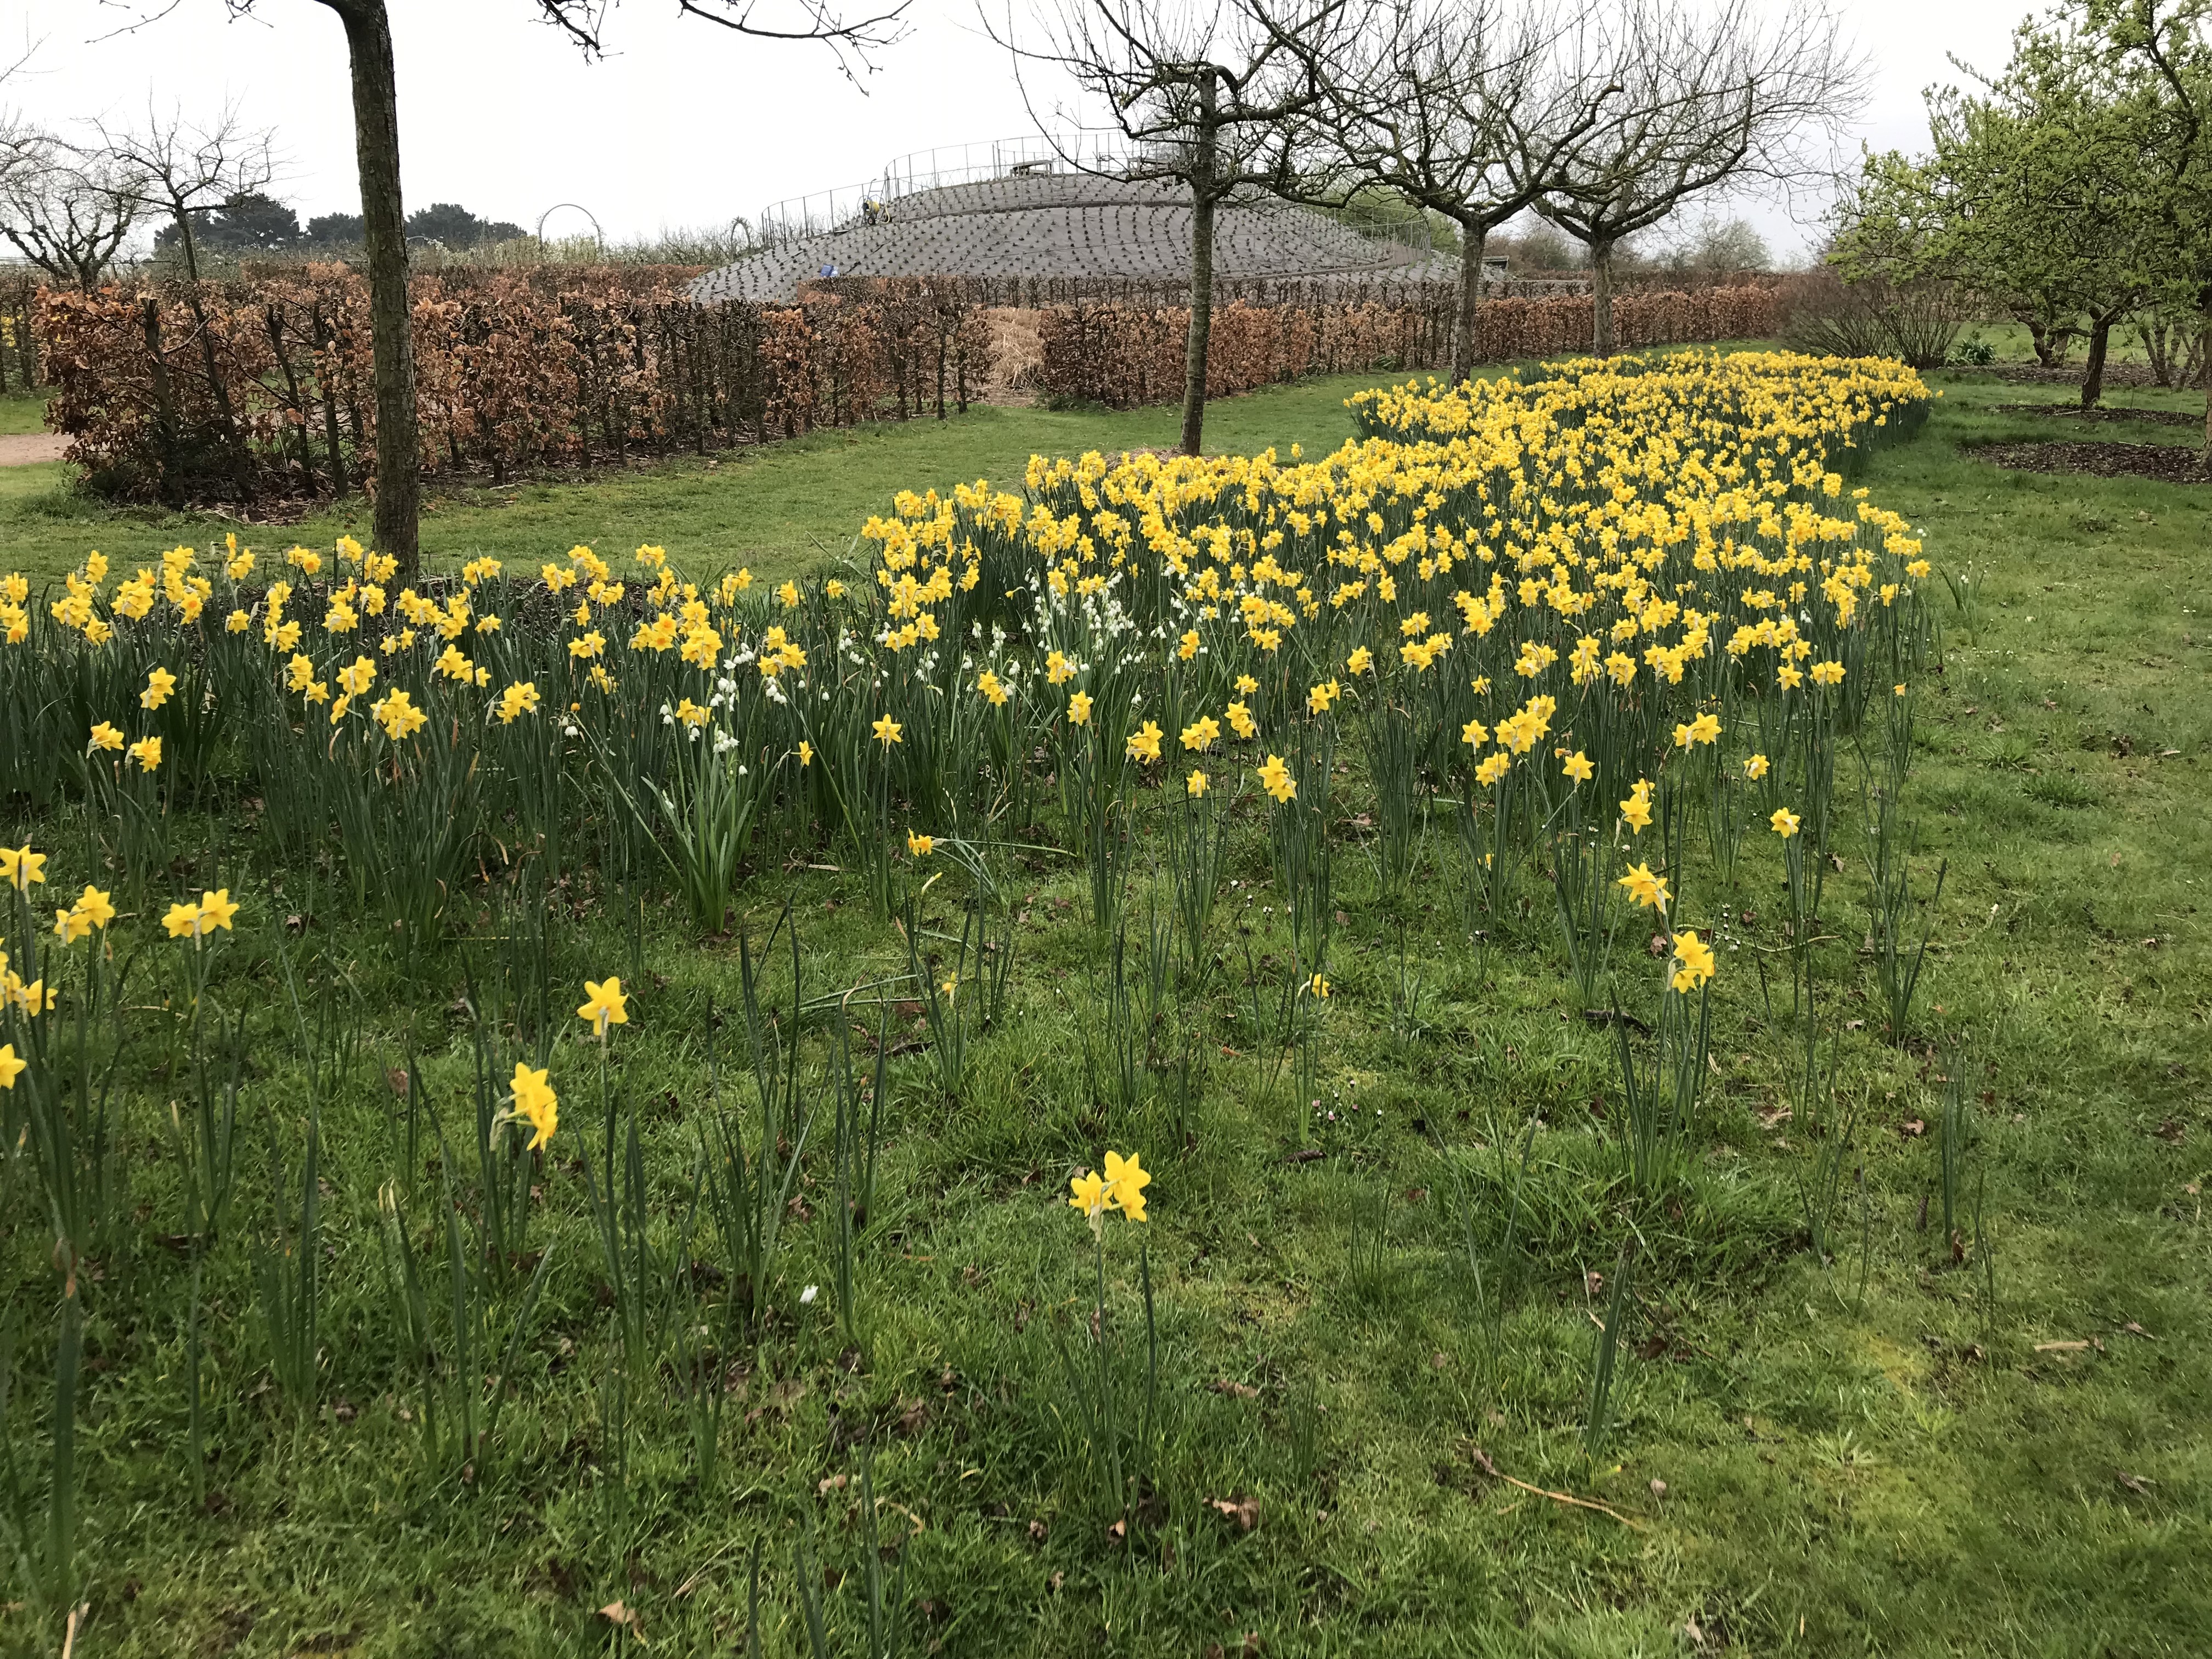
And here they are en masse.
Masses of spring bulbs transform this lawn. Photo by Charlotte Scott.
This isn’t to say that the formal lawn isn’t a thing in England, It is.
Windsor Castle. Photo by Charlotte Scott.
But unless you have a castle, a baseball diamond, or a putting green to manage, why not consider something more appealing, not only to the eye but to your beneficial wildlife?
Rivers of daffodils bisect more traditional grass lawn. Photo by Charlotte Scott.