Terrariums

Glass bowls make excellent closed terrariums. This one has been planted for about three years. Episcia cupreata. and Begonia luzonensis dominate this planting.

Terrariums are are contained environments that allow culture of plants. They take many sizes, shapes and dimensions and can be sealed or open. At the least terrariums are just plants in a bottle, in their highest form they are cultivated landscapes in miniature. Closed terraria create a unique environment and opportunity for plant growth. The transparent walls of the container allow for both heat and light to enter the terrarium while maintaining high relative humidity and preventing system water loss. Sealed containers combine retained moisture and heat which allows for the creation of a small scale water cycle. This happens because moisture from both the soil and plants evaporates in the elevated temperatures inside the terrarium. Water vapor then condenses on the container walls and eventually drips back onto plants and soil below. A sealed terrarium is ideal for growing some kinds of plants due to the constant supply of water, thereby preventing them from becoming dry. Lowland jungle plants from warm climates will do well. Some cloud forest plants, orchids and bromeliads will not fare well in sealed environments because they require more air movement and/or cooler temperatures. Terrarium culture can allow growth of plants difficult to cultivate even in greenhouses. Terrariums can be displayed to great effect and are an easy method of indoor gardening. Success with a terrarium garden requires an understanding of the container, light, media, and the plants themselves.

My favorite terrarium fern Lemmaphyllum microphyllum (center). On the very bottom is the vining Peperomia prostrata and at the top is a runner of Ficus minima ‘Quercifolia’.

A Word about the Plants
A contained environment is not for all plants. When in a sealed environment, certain plants such as cacti or succulents will grow poorly or in a manner not suited to their habit (lanky or etiolated growth). Problems arise when plants not suited to a small contained environment are used. Plants such as Syngonium, Diffenbachia, and the larger Peperomia spp. look good when planted initially, but will soon outgrow their space–they are not suitable for closed terrariums. The classical “florist” terrarium planted with very young houseplants looks good at first but is completely unsustainable for months or years. A well designed terrarium should grow for multiple years before a complete tear down and replant is necessary. Thus it is necessary to select truly miniature and high-humidity-loving plants for closed terrarium culture. Ferns, sellaginellas, gesneriads, begonias and some peperomias are suited for these conditions. Obtaining truly miniature and humidity loving plants is difficult. Online vendors are the most accessible sources, but also other hobbyists or plant societies can be sources at their annual sales. Nurseries carry some of these plants but the vast array and diversity of rare plants are found on Ebay and Etsy. Many nurseries list plants under the ‘terrarium plants’ search words that are not really suitable, so take care to look for truly small or miniature plants. Perhaps start with the list I have provided at the end of this article for some of the tried and true plants that will work well. Terrarium gardens are not sustainable if you make bad plant choices, you will eventually end up removing plants that outgrow their containers.

The Container
Once you have your plants, you are ready to start. Or you can start before getting your plants and set up your terrarium now to plant later, or in stages, as you acquire new specimens to add into your contained garden. The first consideration is a suitable container. The larger the container the easier it will be to plant, grow and maintain your garden. Larger containers will also allow for a greater diversity of plant types. Fish aquariums may not be the most attractive, but are the most practical in many ways. Because they are rectangular they allow for placement of a light on the lid and they are easy to cover and place on square surfaces such as tables or window sills. Glass containers are preferred over plastic because they maintain transparency better over time. While bottles are attractive, if you can not get your hand inside they can be very difficult to plant and maintain.

Small containers are not optimal but if the plants are small, they can work well. This sundew has been in this container almost for a year

The Media
Lowland, humid jungle plants grow in decomposing organic matter. For our purposes peatmoss is the best medium. It can be amended with fine horticultural perlite (20-30%) or sand. Sand will make a heavier mix, and, if you are doing a large terrarium, mix weight is important. If not, sand is ideal. Also, since terrariums are contained, they may become disease gardens if you are not careful. Therefore I recommend sanitizing your media in a microwave until the media temperature exceeds 160F. Keep the bag closed until the media cools. A turkey roasting or other microwave safe bag works well. Media can be sanitized in a conventional oven–it just takes longer. Media should be moist but not wet when microwaved. Distilled water can be added later to moisten the media after planting. Commercial mixes can be used for terrarium media but care should be taken. Search the blog for my article on potting soils.

Since terraria are sealed environments, you need a reservoir for the water and a filter. Create the reservoir with coarse horticultural perlite (#3) up to an inch thick (the bottom most layer) depending on size of the container –the bigger container, the thicker the layer. Cover the perlite with activated charcoal. Fish aquarium charcoal or horticultural charcoal from the nursery is fine, but NOT charcoal briquettes. The charcoal layer just covers the perlite. Now add soil. Slope the soil from thin in the front to thicker in the back. You can also add wood, sticks, and rocks to make interesting landscapes. They should all be sanitized in the dishwasher or boiled or microwaved until sterile. After placement of soil, rocks and sticks are ready to plant. Place larger growing plants in the center and rear and small vines up front.
Your container should be sealed either with “cling tight” plastic wrap or glass. I prefer glass for most applications.

Light
While terraria can grow in window light, especially north light, it is not optimal for most plants and they will grow slowly. You can’t place terraria in direct sunlight or the plants will “cook” because closed terraria can’t dissipate heat that rapidly. The old standard for light sources is fluorescent tube fixtures, but they have been supplanted by Light Emitting Diode (LED) technology. Grow-light LED fixtures are expensive, but provide some performance differences. Terrariums are not crops and we don’t want them to grow too fast so find an affordable light source that works for you. LED sources are nice because they are not bulky and do not add large amounts of heat. A bit less light or less optimal wavelengths of light are ok because we want to sustain plant growth for a long time, not grow the plants to the edge of the container real fast and have to prune or start over. The Costco brand shoplight LED fixture is perfect, but it is four feet long. Smaller LED fixtures would be appropriate for smaller containers. The Costco fixture is perfect for a 60 gallon fish tank. White light works well and looks best. Red and blue LED fixtures change the way we see the plants and are not best for viewing. Light should come from above so plants will appear to be growing normally. If the terrarium is placed near a window it will need to be rotated to keep plant growth even.

Moisture
Moisture is critical in terraria. The growing medium should hold a shape when squeezed but not be saturated when you plant. After the terrarium is planted, you can “water it in” with a dilute -1/4-strength fertilizer solution mixed into distilled water. Watering amounts will vary by container size. Water should penetrate soil to the depth of roots and some should enter the reservoir. No more watering is necessary again until some time later when plants have grown considerably—usually months later. I usually water the glass to clean it from the initial planting with a turkey baster. At some point in the future, months not weeks, the soil may dry as growing plants use up water. When this occurs, water again with another dilute fertilizer solution. Do not over water your terrarium or bad things will happen. Also resist misting or spritzing as this will cause leaves to rot and is not necessary in a sealed environment.

Pruning, Replanting and Maintenance
Some of your chosen plants may outgrow their space. Some like Ficus minima ‘quercifolia’ will just overgrow everything, the same can happen with common Sellaginella sold in nurseries such as S. brownii. You should plan on pruning back the plants and making cuttings or planting other terrariums with the prunings. Cut begonias below a node or along the rhizome. Rhizomatous ferns can be clipped or dug and planted elsewhere. If you have to remove a really big plant it will leave a hole. New sterilized mix should be added to fill the hole along with the new plant occupant. Removal of flowers, mushrooms (should they form) and dying leaves is important. They will cause rots on plants they fall on. Sticks are usually always a problem since it is very difficult to kill mushroom fungi living in them. Mushrooms are mostly non-toxic to plants, but they drop spores and these lead to rot on sensitive begonias and ferns. Clip back Begonia, Episcia Sellaginella, Peperomia or Ficus to prevent them from overgrowing other plants.

Recommended Plant List
If you can find them, here are some recommended plants for terrariums.
Begonias
B. prismatocarpa
B. prismataocarpa variegata
B. versacolor
B. ‘Raja’
B. ficicola
B. exotica
Ferns
Edanoya spp.
Humata parvula
Lemmaphyllum microphyllum
Microgramma spp.
Pecluma pectinata
Tectaria spp.
Quercifelix zelanica
Others
Peperomia prostrata
Sininngia pusila and all its variants
Episcia spp. (there are many, I like the pink ones)
Saintpaulia (african violets-only miniatures)
Sellaginella erythropus
Sellaginella spp. (there are many kinds, S. brownii is most common)
Ficus minima ‘quercifolia’

California “Big Trees” under threat

It’s not my week to post on the blog, but this is a PSA for California residents. Having visited the Capitol grounds in Sacramento, I find it important to make others aware of the plans to remove a number of large and historically important trees for the purpose of building a parking garage and expanding the Capitol building space.

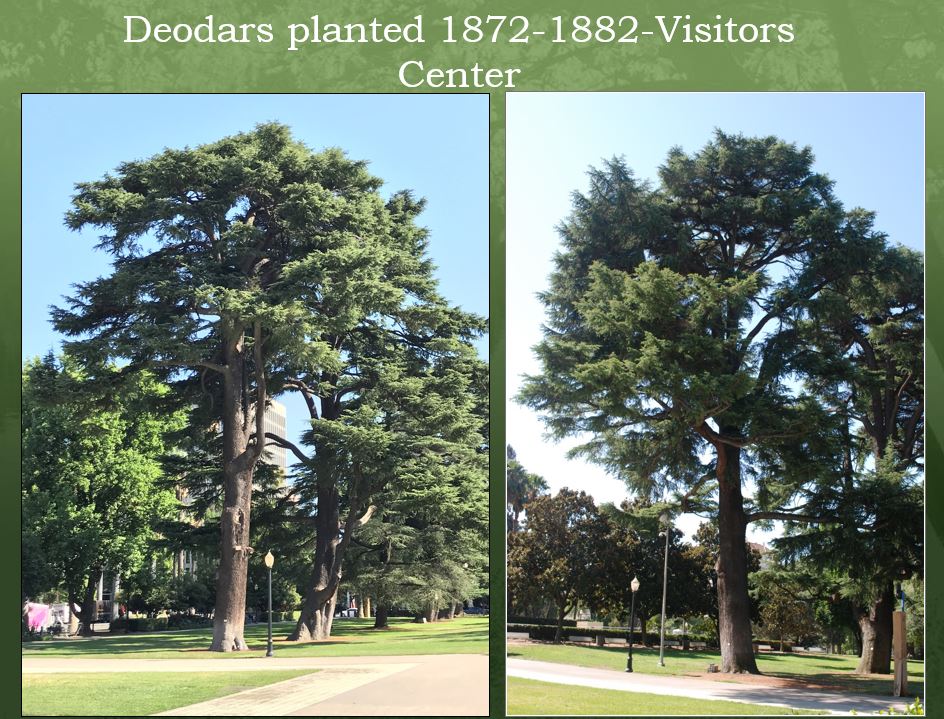
I’m not a California resident, so in a sense it’s none of my business. But I am an urban horticulturist, and an arborist, and committed to preserving trees especially in urban environments. These trees are irreplaceable unless you want to wait a few hundred years. The plans to “relocate” some of these large trees are probably not realistic given the size of the specimens.

More importantly, this is public space and the public should be actively involved in discussions. But the process has been secretive and under the radar of a public more concerned, and rightly so, about COVID-19 and all the associated fallout from the pandemic. But it’s not too late.

Please share this post with California residents who have should have a say in how their land should be managed.

For those Californians interested in supporting the effort to save the trees at Capitol Park and call for the development of a Park and Tree Management Plan, you can sign the petition at https://www.change.org/p/california-state-legislature-save-california-state-capitol-park.

More importantly, you should call AND write to your own California legistator at this website findyourrep.legislature.ca.gov, as well as the two Legislative leaders who can really pause the project and guide its re-planning:
Senator Toni Atkins, President pro-Tempore of the Senate, 916 651 4039 and senator.atkins@senate.ca.gov. UPDATE: This email does not appear to work. Try using this form.
Assembly Member Anthony Rendon, Speaker of the Assembly, 916 319 2063 and speaker.rendon@assembly.ca.gov

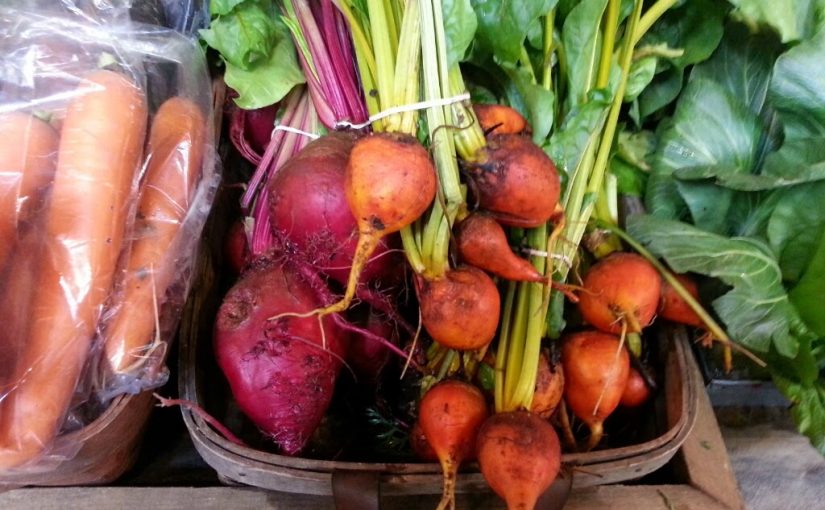
Falling forward: Time to plan and plant the fall veggie garden

While most of the country is in the middle of a heat wave and the mercury is creeping past 100F on many thermometers, lets do a little exercise to help you feel cool as a cucumber (though not straight out of the garden, those cucumbers would likely be hot).  I want you to think about a crisp September morning.  You’re out walking through your vegetable garden and you stop to appreciate a big, emerald green head of broccoli.  Just a few feet away, stalks of Brussels sprouts, those miniscule cabbages that have somehow overcome years of revulsion to become sexy and desirable (they must have a good agent) shoot up like skyscrapers around the rest of the plants.  Lush lettuce fills in a bed nearby, and some cucumbers and beans that you planted late are looking as fresh as a newborn chick. 

Sounds beautiful, doesn’t it?  Well I’m here to tell you that you can actually make this a reality.  You can have a super productive garden this fall, and for most areas of the country the time to start planning and planting is now.  Right now, when a cool refreshing fall morning seems as far away as a trip to the moon.  Of course, the exact timelines and planting schedules differ by region due to the length of growing season, but most places in the US (and the northern hemisphere) can start thinking now about planting crops for the fall.  For exact timing in your area, you may want to connect with your local extension system for gardening guides. 

While many experienced gardeners may know this and practice fall garden planting, there’s a lot of people out there who have yet to have the pleasure.  And given the huge number of first time (or first time in a long time) gardeners, these garden basics might be helpful to get the most out of those pandemic plantings. 

In fact, fall is one of the best times of the year to garden.  Aside from cooler temperatures making it more pleasant to garden, there’s often less pressure from diseases and insects to ruin crops.  In addition, many of those cool season crops, like the ones I mentioned above, actually are more productive in the fall than if planted in the spring.  Even though they get a hot start in mid- to late- summer, the cooling temperatures of fall around the time many of the crops come into maturity extends the harvest period and improves overall quality of the produce.  You also have the benefit of removing some of those spent and diseased warm season plants and swapping them out for something fresh and new– a garden revival of sorts. 

Swiss chard and leafy greens are great additions to the fall garden

Unfortunately, since fall vegetable gardening isn’t as widespread as planting summer gardens, plants and seeds can often be hard to find when it is actually time to plant (so planning ahead is helpful).  Mid-summer is usually the time for most regions to start seeds for those slower growing cool season crops like broccoli, cabbage, cauliflower, and their kin. They can be started indoors, but the need to do so isn’t as great as it is for those warm season crops we start indoors in late winter.  You can start them in pots/flats outdoors as long as you have somewhere that isn’t so hot and sunny that they’ll be continually drying out (some shade would help).  They should be ready to transplant by late summer.  You can skip the seed starting/transplanting if you want to try direct seeding into the garden, but as they say “your mileage may vary”. 

Some of the fast maturing warm season (frost tender) crops are also good candidates for a mid-summer planting as a way to refresh the garden if you have space for it.  Beans are a good candidate for late-summer planting, but you’ll need to make sure they are a fast-maturing variety (there’s a wide range of maturity times in beans). Bush beans are usually the quicker growers. Pole beans and lima beans usually take a longer period, so those don’t do as well later in the season for places that have frost and freezes. 

It is also a possibility to squeeze in a late crop of cucumbers or summer squash as well. This can be good if your cukes and squash succumb to disease, squash vine borers or cucumber beetles. Planting late can often mean that you are missing the primetime for specific pests. For example, squash vine borer adults actively lay eggs in the early season but largely disappear later on.  A late planting means you could miss them entirely. 

Fall is the best time to grow leafy green vegetables.  Lettuce, which does not fare well in the summer, thrives in the cooling temperatures of the fall.  Other leafy greens, such as chard, spinach, and kale are also winners in the fall garden.  Many of the root vegetables, such as turnips, carrots, beets, and radishes are also part of the fall garden revival.  You’ll want to wait until temperatures have chilled a little to get these started, but not so late that the season ends before you get good growth. 

You gotta know when to sow ‘em

The key to fall planting is to know how many days it takes for the crop to mature. Check out the seed package or the plant tag — there should be a time to maturity on there. Just count backward from the first frost date. Be sure to add a few weeks to account for slower growing in cool weather and to allow for a reasonable harvest time.

For example, if I wanted to plant a late crop of beans, I might select the cultivar ‘Contender’ which matures in about 55 days.  I want to add at least a few weeks onto that for maturity and harvest time, so lets say I need 75 days (I can go shorter if I want to accept the risk of an early frost).  Let’s also say that my first frost date in the fall is October 20.  Counting back 75 days from October 20, I get August 6 – I should plant my beans no later than that date to get a harvest.

Most of the cool season crops can tolerate a frost (and some even a freeze) so their growth dates can extend beyond the first frost date.  You’ll just want to have them mostly grown and close to maturity before it gets cold enough to stop their growth.  I covered frost and freezes and which crops can survive those cold temps in this previous GP article

You can give yourself a little more time if you plan on incorporating a season extension practice in the garden. Using a row cover or constructing a low tunnel can give you several more weeks of growing time. It can be possible to enjoy a fresh tomato or green beans straight from the garden on the Thanksgiving table, or some fresh broccoli or kale at Christmas even in some of our colder regions. But it all starts with a little planning in the heat of summer.

And if you choose not to plant a fall crop, I would suggest using a cover crop in garden beds as you remove this year’s plants.  A cover crop will help keep weeds to a minimum and preserve soil structure and nutrients through the winter.  Winter wheat, rye, and crimson clover are good winter cover crops.  Next spring you just cut them down and till them in if you’re not practicing no-till (and you should be if at all possible). For annual cover crops, you can usually cut them down or break them over and leave them in place as a mulch. You can also pull them up and compost them to add directly back to the garden, especially if (since it is hard to till or mow in a raised bed).  This GP article is an oldie but goodie for using cover crops in the vegetable garden. 

Update on our bare-rooted perennial garden

Our south-facing pollinator garden.

Two years ago I installed a pollinator garden in early July. This goes against my recommendation to install plants in the fall, when roots have longer to get established and less stress is felt on the rest of the plant. But I wanted to see what would happen if I was careful to mulch well and keep it irrigated. Oh, and did I mention I was going to root wash every one of them? (Be sure to look at that process in the link from 2018.)

I reported on progress last year, and this year shows even more vigorous growth by nearly all the plants. Two of the three ‘Bandera Purple’ lavender died over the first winter, as they were marginally hardy (USDA 7-10) for our area. One straggler remains in the lower right hand corner of the photo below. The Agastache ‘Acapulco Red’ and the Verbena ‘Homestead Purple’ were planted near the front of the beds on both sides and while they survived the first year, they are now gone. My guess is that our cold snap in February 2019 wiped out those plants that were in less protected locations. Perhaps we’ll fill those spots in later with something more cold hardy, or just let the escaped Viola tricolor continue to colonize bare spots.

Overall, the garden is wildly successful in attracting hummingbirds and a variety of native bees and other insects.

The southwest garden is being colonized by violets that have hopped out of a nearby container. Wood chip mulch keeps the soil cool and moist.
The southeast garden with its invading strawberries (soon to be relocated). The tiny lavender in the back right corner is a rescue plant.

I still have a little work to do – I’m relocating the strawberry adjacent to the southeast garden so it stops invading the perennial bed. But after that I’m calling this garden finished.