A Super Simple Salad in Stor(age): A DIY Home Hydroponics Example

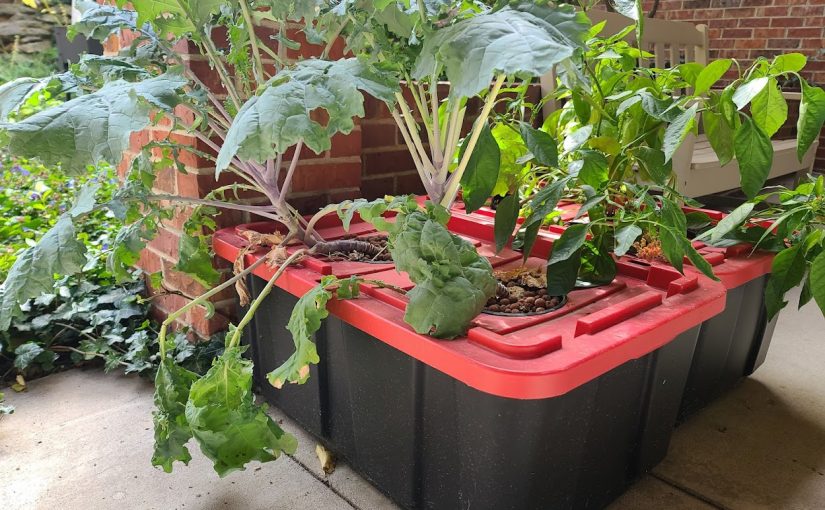
Say the word “hydroponics” or the even more mysterious sounding “controlled environment agriculture” and the image that most people conjure in their minds is of large greenhouses or artificially lit rooms filled with complex hoses and tubes using all manner of technological gizmos to pump water and nutrients to plants.  True, modern ag technology does allow for some pretty amazing and technical production of food but hydroponics can be super simple and so easy that just about any home gardener can do it. 

Why grow hydroponically at home?

Growing vegetables can be pretty easy and straightforward for outdoor production – seeds, soil, water, and wait (sure, there’s a few other steps in there), so why complicate things by growing hydroponically?  Aside from the challenge and the novelty that delights many gardeners, intensive growing with hydroponics can allow gardeners with the smallest of spaces to grow impressive amounts of produce in a short amount of time.  Most of these systems also do well for winter production indoors with the use of grow lights or some good-sized south facing windows.

Hydroponic or similar-type production systems are the “craze” right now for folks wanting to grow some of their own produce at home, usually in smaller indoor spaces, but these systems can run into the hundreds or thousands of dollars making production less than economical.  Plus, most of these systems require the use of pre-made plant/seed plugs that add to the expense.

Why is hydroponic production important?

On a larger scale, hydroponic and controlled environment agriculture has a few benefits that will help in feeding a growing population on a warming planet.  Hydroponic production can be pretty intensive, meaning that it can grow a large amount of food in a relatively small amount of space.  This makes it ideal for production in urban areas, which is important as most countries become more urbanized.  It also cuts down on transportation needs to get food to consumers. This not only reduces fuel consumption but also, as we can see, makes it easier to get food to large populations when distribution becomes an issue.  And as the term “controlled environment agriculture” implies crops can be grown using hydroponics in greenhouses or indoor farms no matter what the season or climate making it ideal for year-round production in areas where it is too cold or too hot part of the year to do so.  This also means that hydroponics and controlled environment agriculture can be important mitigation strategies for climate change. When the temperatures or precipitation are no longer favorable for growing outdoor crops in certain areas, controlled environment ag can provide a stable source of produce with indoor production. 

And as ironic as it sounds, growing hydroponically drastically reduces the amount of water used for production.  Closed systems, which either recirculate water or grow in enclosed containers, use much less water than field production systems relying on irrigation.

A simple system example

Earlier this year I build some super simple enclosed hydroponic systems for demonstration at our Extension office and at the county fair.  My goal was to show how easy hydroponic production can be – no need for pumps, tubes, or expensive equipment.  The system was so simple that I built it with my non-horticultural interns as an onboarding/team building exercise. 

The system we built utilizes the Kratky method of hydroponic production – a simple system where the plant is suspended on top of a container full of nutrient solution.  In a typical recirculating hydroponic system where water is moved around air is introduced into the water that then provides oxygen to the roots to avoid hypoxic conditions that damage roots.  Some static systems rely on introducing air (like using aquarium air stones) to introduce oxygen but the Kratky method is even simpler than that.  Instead of introducing air into the solution, the level of the solution is reduced (usually through use and evaporation) as the roots grow keeping a section of roots exposed to open air.  The setup is super simple and low maintenance – no moving parts, no electricity (unless I need to use lights for indoors). Just plants, a medium to hold them, a container and a nutrient solution.

How To Start Growing With The Kratky Method - Upstart University
The Kratky Method, Source

I’ve seen the systems made with all kinds of containers but we chose 25 gallon storage totes because they are inexpensive and pretty easy to come by.  Having a lid that is relatively easy to cut/drill also makes these kinds of containers ideal to make multi-plant “beds” but I’ve also seen lidded buckets used as a single-plant system. 

To hold the plants we used plastic net pots that you can find at garden centers that sell pond or aquarium plants (or order) that are also now common at hydroponic supply stores, if you’re lucky enough to have one in town.  You can also use plastic orchid pots or standard nursery pots, perhaps adding extra holes for roots to grow out.  We used 6 inch and 2 inch pots to plant a variety of sizes.

Net pots in the system, with holes made slightly smaller for them to fit and not fall in.

Next we cut holes in the lid slightly smaller than the diameter of the pots so that they sit on top and don’t fall through.  You can do this by tracing and cutting with a sharp object, or use a drywall hole saw that you use with a drill to cut a perfectly round hole. We used one with adjustable sizes, rather than buying individual sizes. 

And now, to plant!

The pots were then filled with an inert, soil-less medium to support the plants.  We used a puffed clay stone called LECA, but you can use rockwool or hemp fiber blocks made for hydroponic starts, large particle perlite, or even something like a poly fiber filling (like used in sewing) – just something that won’t break down to hold the plants in place. 

Some of the plants I had started in fiber cubes so those easily went into the LECA, but we did end up buying a few transplants.  Since these were started in some sort of potting soil we had to wash as much of the soil off as we could.  We placed larger plants like peppers and kale in the large pots and smaller plants like herbs in the small pots. 

As for plant selection, leafy greens and herbs like basil and parsley are easiest and can use smaller containers and pots. Plants like tomatoes and peppers will need bigger containers and pots and will also require more light and heat if you are growing them indoors.

A solution for easy nutrient solutions

And last but not least – the nutrient solution.  Since we are growing without soil we have to provide basically all macro and micro nutrients. We are used to supplying nutrients like nitrogen and phosphorous, but not so used to supplying things like manganese and molybdenum. This one is probably the scariest to those new to hydroponics, but there are some easy options out there for small scale production that are “off the shelf” solutions.  Rather than worry about mixing up nutrients by hand, these pre-made mixes make it easy for home growers to try hydroponics.  They come in two or three part sets of either liquid or solid fertilizers, because some of the chemicals used will react and precipitate out into a sludge if kept together in concentrated form.  Just mix according to package directions and you’re good to go.  If you are growing anything like tomatoes or peppers that require flowering and fruiting, you’ll want to make sure the formula is for flowering plants. Regular water-soluble fertilizers might do in a pinch, but for long term growth you’ll want to invest in something with all micronutrients. 

Storage tote hydroponic system, sitting in the office courtyard.

If you’re planning on refining your technique, you might want to invest in a pH meter or TDS (total dissolved solids) meter to fine tune the solution based on the minerals dissolved in your water.  And if you have really hard water you can usually get an additional nutrient product to account for the pH and calcium levels to balance things out. 

So now we just filled the totes with the solution all the way up until the bottom few inches of the pots were covered.  We kept watch on the solution and added water as needed, keeping in mind that as the roots grow out of the pot the nutrient solution level needed to be low enough to expose around 2/3 of the roots to air. 

The nutrient solution is only a few inches deep in the bottom of the tote at this time, allowing roots to be exposed to air for oxygen uptake.

As the plants grow, you’ll just want to keep an eye for signs of nutrient deficiency and add nutrients to the water as needed.  The solution should be completely dumped and replaced every 6-8 weeks, as the plants rapidly deplete some nutrients, allowing some to build up to toxic levels.  You can typically just pour the solution out on the garden or lawn, as it only contains plant nutrients. However, you’ll want to make sure not to keep dumping in the same spot to avoid build up of salts in the area. Spraying the area with a bit of water from the hose can help wash it off of plants and start diluting it into the soil, rain and weather should do the rest of the job. But if you are in an area with little precipitation, you may also want to take care since there won’t be a lot of water to dilute the nutrient build up over time. And just remember, if you harvest and completely remove crops, pull apart and clean the system with some good soapy water and a sanitizer (bleach works well).  You should do this every few months if you have a long-lived crop in the system. 

In a nutshell…..

A simple system like this one can be a great way to explore a new growing technique, even for beginner gardeners.  After these were set up, we basically left them in our courtyard all summer with little to no maintenance, except adding water earlier in the season and changing out the nutrient solution once.  If you need a bit more info, or want to try something a little more complex, there are some great resources out there for small systems that I’ll share below.   

Resources:

Growing Lettuce in Small Hydroponic Systems – Univ of FL Extension

How to grow with the Kratky Method – Upstart Farms

Small-scale hydroponics – Univ of Minn Extension

Home Hydroponics – Illinois Extension

SUPER Thriving Lettuce?

The Garden Professors have previously written about the ubiquitous garden center product, SUPERthrive, here and here. The manufacturer claims a plethora of beneficial uses for SUPERthrive —everything from Christmas tree care to turf to hydroponics. They claim SUPERthrive will “revive stressed plants and produce abundant yields” and that it “encourages the natural building blocks that plants make for themselves when under the best conditions” thus “fortifying growth from the inside out,” but I know of no body of rigorous, peer-reviewed literature to support any of those claims (1, 2, 3, 4). In fact, I’m not entirely sure what those claims really mean, but I’m encouraged on their website and bottle to use it on every plant, every time I water, to receive these amazing benefits!

A test case

The hydroponics claim intrigued me because during the winter months I grow plants hydroponically under lights. One of the benefits the manufacturer claims is “restores plant vigor” and “works with all hydroponics systems.” As a plant scientist, and knowing something about the ingredients, I was skeptical to say the least, but I thought that if SUPERthrive was going to show any beneficial effect it would surely be in hydroponics since that is a more uniform environment than outdoors. So, I shelled out my $11 for 2 oz (the things we do for science!) and set off to design a simple experiment.

The hypothesis

A typical experiment like this starts with what we call the null hypothesis (denoted “H0”). The null hypothesis is defined prior to the experiment and often states that we think there will be no difference between the treatment and control. In this case, my null hypothesis is that the SUPERthrive treatment will have no effect on the mean fresh weight of the harvested lettuce relative to the control lettuce. Note that I haven’t made any hypotheses about other parameters that might be important, e.g., flavor, compactness, number of leaves, color, disease incidence, survival rate, etc. For this experiment I am interested in only one thing: total harvested weight as a signifier of healthier plants.

After the data is collected and analyzed, we decide whether to accept or reject the H0 by running an appropriate statistical test. If there is no statistically significant difference, then we cannot reject the H0—that is, we accept the H0 that there is no difference between treatment and control. If there is a statistically significant difference between treatment and control, then we say we reject the H0 and conclude that the treatment did have an effect. Keep in mind, sometimes no difference between treatment and control is a good thing, e.g., in toxicity studies.

Experimental design

With my skeptical spectacles on, I set up my experiment to test my hypothesis. I made a six-gallon batch of hydroponics nutrients suitable for leafy greens. I split the batch in half and added SUPERthrive, per the manufacturer’s dilution recommendation, to one of the three-gallon aliquots as the treatment. I then divided the control and SUPERthrive treatment each into six individual, identical, two-quart containers. I thus had six independent replicates of a treatment and a control. (See Figure 1 below for a schematic of the experimental design.)

Figure 1. Outline of experimental design

To further avoid any experimenter bias, I had my wife assign numbers randomly to each container, record which were SUPERthrive treatment and which were untreated control, and then re-sort all the containers. I had no idea which containers contained which nutrient mix. I did not open the “secret decoder envelope” until after all measurements were complete!

Figure 2. Identical 2 quart containers randomized on day 1 in the hydroponics solutions. This kind of hydroponics is called “Kratky” or passive. Enough nutrient solution is supplied at the beginning to last the plant for its entire life-cycle.

Into each of the 12 containers I placed a 12-day-old lettuce seedling, taking care to select plants that were of equal size and leaf number. The containers were then placed under my lights (cool white T8 fluorescent) for the remainder of the experiment. I rotated the rows of plants several times to try to control for any edge effects in my grow area. After 30 days in the containers, I harvested and weighed each plant.

Figure 3. Plants after 30 days of growth.

What did my experiment show?

The graph below is a box and whisker plot that shows the spread of the data and the mean for each group in grams of harvested fresh weight of the plants (roots were removed). In my experiment, the SUPERthrive treatment showed a clear drop in harvested fresh weight! In fact, the heaviest SUPERthrive plant weighed less than the smallest control plant, and the SUPERthrive set was much more variable in harvested weight. These results surprised me a bit.

Figure 4. Box and whisker plot of lettuce plant fresh weight. Master Blend: Master Blend nutrients; Master Blend + ST: Master Blend nutrients plus SUPERthrive (0.9 ml/gal.)

A standard statistical test (Student’s T-test, unpaired, two-tailed) was performed to show that that there was in fact a statistically significant difference (p<<0.01) between the two groups. Thus, we can reject the H0 (remember our null hypothesis is that there will be no treatment effect) and conclude that there is a difference between treatment and control harvested weights, with the treatment mean plant weight being significantly smaller than the control mean plant weight.

What can we make of this experiment?

Well, we need to keep in mind a few things.

1) Six replicates is a very small sample size; this could be a spurious, unlucky result. There is always some distribution of growth rate, even in a uniform genotype. Did I get unlucky and happen to put six plants that would always be on the smaller end of that distribution into SUPERthrive?

2) After analyzing the data, I discovered that four of the SUPERthrive plants ended up in the same row and were the smallest heads in the experiment (sometimes you flip a coin and get four heads in a row!). Could this be the reason for the unexpected results? The other two treated plants were in the other two rows, but neither was as large as the smallest control plant.

3) I do not have a perfectly controlled environment like one would find in a lab or even in a larger growing facility. However, something marketed with such aggressive claims of amazing plant health benefits and vigor should give a noticeable effect under a variety of imperfect, real-world conditions, such as those one would find in a home garden situation, don’t you think?

4) Perhaps my plants were already growing at their maximum potential and there was nothing for SUPERthrive to “improve.” Afterall, hydroponics indoors is already a relatively stress-free environment, as the SUPERthrive manufacturer also points out. Then what do they think their product is improving in hydroponics? Would I have seen an effect under less-than-ideal or more stressful conditions then? This could certainly form the basis of other testable hypotheses.

Conclusions

What I think we can conclude is that in this experiment, with this genotype of lettuce, and under these hydroponics conditions and environment, SUPERthrive had no positive effect whatsoever and may have even had a negative effect. Under other conditions would one see a positive effect? Possibly. Would different plants or genotypes respond to the SUPERthrive differently? Possibly. We must always be careful of over-extrapolating both positive and negative results from a single experiment.

But, because the individual ingredients have not been shown to provide any beneficial effect, and no plausible mode of action is given by the manufacturer for their broad general claims, we should remain highly skeptical. As pointed out in the previous post, the SUPERthrive manufacturer has certainly had plenty of time to scientifically demonstrate efficacy of their product, since they proclaim to be “always ahead in science.”

Because the results showed a clear and unexpected negative effect, the experiment surely needs to be repeated. Repetition is a central tenet of science. I hope to share additional results with you in a post later this spring—after all, I have a whole bottle of SUPERthrive and we love salad!

References

  1. Banks, Jon & Percival, Glynn. (2012) Evaluation of Biostimulants to Control Guignardia Leaf Blotch (Guignardia aesculi) of Horsechestnut and Black Spot (Diplocarpon rosae) of Roses. Arboriculture & Urban Forestry. 38(6): 258–261
  2. Banks, Jon & Percival, Glynn. (2014) Failure of Foliar-Applied Biostimulants to Enhance Drought and Salt Tolerance in Urban Trees. Arboriculture & Urban Forestry 40(2): 78–83
  3. Chalker-Scott, Linda. (2019) The Efficacy and Environmental Consequences of Kelp-Based Garden Products.
  4. Yakhin Oleg I., Lubyanov Aleksandr A., Yakhin Ildus A., Brown Patrick H. (2017) Biostimulants in Plant Science: A Global Perspective. Front. Plant Sci., 7:249