Mitchella repens … Partridge Berry … an Evergreen Native Groundcover for Shade

NaturalSetting1

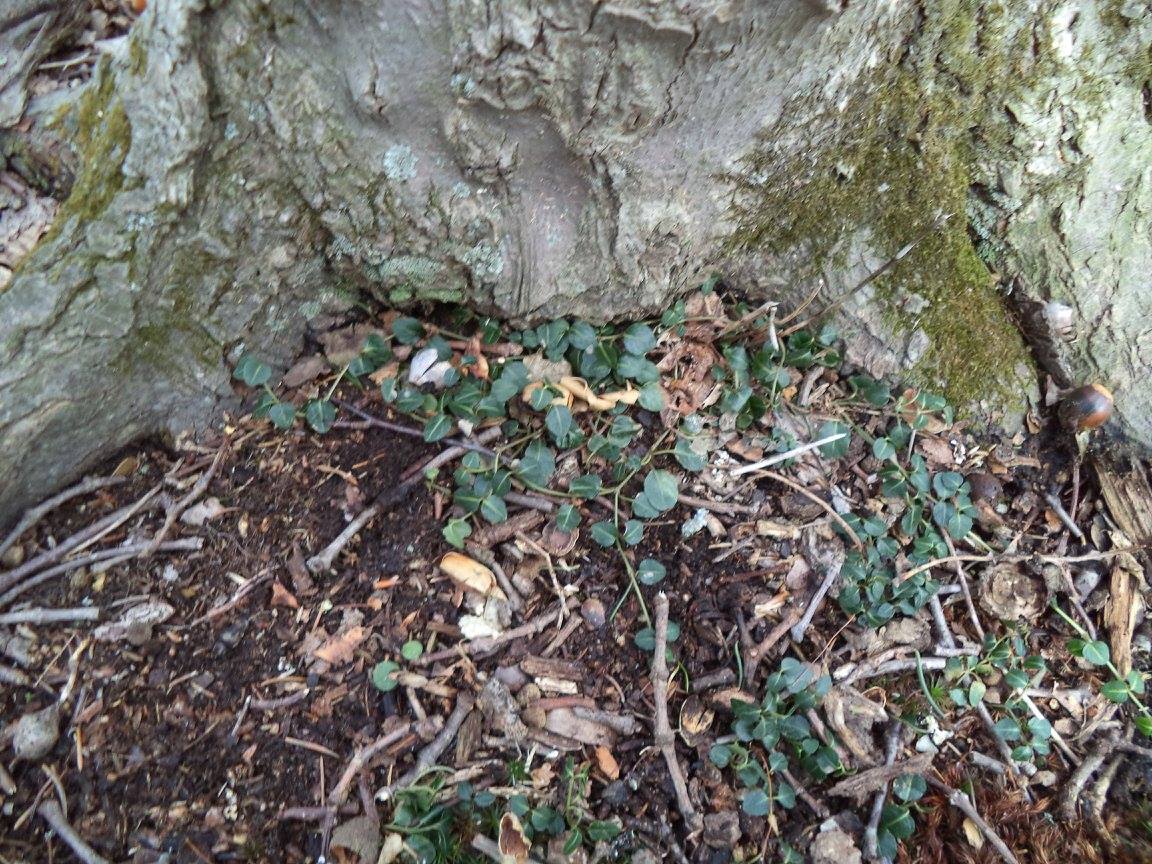
Partridge Berry in its Natural Setting

One of the questions that came up regularly when I was working the hotline at the local county Extension office, is a recommendation for an evergreen ground cover for shady spots.  I had the same issue when I created my own shade garden … something that would have year round interest, but complement my desire to emphasize native species, although that was only one consideration.

The solution was literally right next to me, as a walk in my woods revealed with the lovely plant Partridge Berry, or Mitchella repens.

Not only is Partridge Berry (Mitchella repens ) beautiful, evergreen, shade-loving, and native to Eastern North America, but there’s also a fascinating aspect about its flowers and fruit, from a botanical, and evolutionary point of view.

According to the U.S. Forest Service Celebrating Wildflowers website, the “… genus name Mitchella was given to this plant by Linnaeus for his friend John Mitchell, a physician who developed a method of treating yellow fever. The species name repens refers to its trailing or creeping habit.”

Berry1

Here’s the part I found fascinating: The plant is dimorphous, meaning “occurring in two forms”:

In late spring, two beautiful white flowers (with one calyx) each open their four petals to entice insects to collect their nectar. Each blossom has one pistil and four stamens. The pistil in one is short and the stamens are long. In the other it is just the opposite. … Because of this no flower can fertilize itself–all flowers must be cross-pollinated by insects, and both flowers must be pollinated to get a single healthy berry. A berry will stay on the vine until after the blooms appear in the spring unless a hungry bird finds it nestled among the fallen winter leaves.

How cool is that?  The twin flowers produce, together, only one berry.

Berry2

Here’s a closeup, where you can see residual evidence of the fusion.  The berry is edible, and persists through the winter, assuming it is not consumed by “ruffed grouse, northern bobwhite, sharp-tailed grouse, and prairie chicken.

The fruit is also “frequently eaten by raccoons and red fox” and it has been reported that “partridgeberry made up 2.9 to 3.4 percent (dry weight) of the summer and fall diets of white-tailed deer.”

June2014Bloom1

Here’s a picture of the two flowers in bloom.

It’s easiest to spot the plant in its natural setting while hiking in late Fall, or early Winter before snowfall, or early Spring after snowmelt.

Back to the Forest Service article:

Some gardeners consider Partridge Berry a must for winter gardens. During the cold days of late winter Partridge Berry is a treat to the eyes with its deep, dark-green leaves and occasional scarlet berries. In a garden setting this evergreen prefers shade, accepting the morning sun. Partridge Berry is extremely difficult to propagate from seed.

The best way to introduce this native into your garden is through 1 year old cuttings or by division. In the garden situation they will form a thick, substantial ground cover. Once established they are relatively trouble free with the only required maintenance of keeping garden debris from covering the mats.

As always, do not wild collect plants from public lands and only from private lands when the landowner grants permission. Partridge Berry is a commonly available plant from native plant nurseries especially those who specialize in woodland plants.

I love the symmetrical variegation in the evergreen leaves, a bright, light yellow line bisecting each leaf, and the delicate, less visible veins.

It’s a great alternative to Vinca, an introduced species from Europe that appears on invasive species lists in our area.

A Google search will reveal many potential on-line sources for buying Partridge Berry plants, or check with a local nursery, or independent gardening center in the native plant section.

Building Healthy Soils in Vegetable Gardens: Cover Crops Have Got It Covered Part IV: Planting and Managing Cover Crops in Vegetable Gardens

Megan M. Gregory, Blog Contributor, Cover Crop Nerd, and Graduate Research Assistant, Cornell University
Email: meganmgregory1@gmail.com
Website: http://blogs.cornell.edu/gep/

This article is part of a four-part series about cover cropping in vegetable gardens.  Stay tuned for Part III next week. 

Once you’ve chosen cover crops that fit your vegetable rotation, management goals, and garden site (See Part III: Selecting Cover Crops for Vegetable Gardens), it’s time to plant! This article contains tips on sourcing seed, and planting and managing cover crops using hand tools.

Read more…  Part IV: Planting and Managing Cover Crops in Vegetable Gardens

Building Healthy Soils in Vegetable Gardens: Cover Crops Have Got It Covered Part III: Selecting Cover Crops for Vegetable Gardens

Megan M. Gregory, Blog Contributor, Cover Crop Nerd, and Graduate Research Assistant, Cornell University
Email: meganmgregory1@gmail.com
Website: http://blogs.cornell.edu/gep/

This article is part of a four-part series about cover cropping in vegetable gardens.  Stay tuned for Part III next week. 

As I outlined in Part I and II of this series, cover crops can serve many purposes in small-scale vegetable gardens, including soil quality improvement, nitrogen (N) fixation, weed suppression, and habitat for beneficial insects.  To achieve maximum benefits from cover crops, it’s important to select appropriate species (or species mixtures) for each garden bed.  In this article I’ll highlight promising annual cover crop species for different seasonal niches, management goals, and environmental conditions.  Much of this information is based on preliminary results from two seasons of cover crop research in Brooklyn, NY community gardens.1

Read more in Part III: Cover Crops III – Selecting Cover Crops

Building Healthy Soils in Vegetable Gardens: Cover Crops Have Got It Covered Part II: Types of Cover Crops – Non-legumes, Legumes, and Mixtures

Megan M. Gregory, Blog Contributor, Cover Crop Nerd, and Graduate Research Assistant, Cornell University
Email: meganmgregory1@gmail.com
Website: http://blogs.cornell.edu/gep/

This article is part of a four-part series about cover cropping in vegetable gardens.  Stay tuned for Part III next week. 

Vegetable gardeners are turning to cover crops to improve soil quality, add nitrogen (N) to the soil through legume N fixation, suppress weeds, and attract beneficial insects in their gardens.  In this article I’ll introduce several groups of cover crops.  Cover crop species can be broadly grouped into non-legumes (those that do not fix N, but take up and recycle nutrients left in the soil) and legumes (which fix N).   Mixtures of non-legumes and legumes may offer the benefits of both types of cover crops.

Non-legume cover crops

Non-legume cover crops include species in several plant families:

Fig. 1.  Examples of non-legume cover crops used in vegetable gardens (Photo credits: M. Gregory)
 pic 5  pic 6  pic 7
Fig. 1a.  Oats (Avena sativa) is a winter-kill cover crop in USDA Zones 7 and cooler.  It is usually planted in late August, and dies with the first hard frosts.
Fig. 1b.  Winter rye (Secale cereale) is a hardy over-wintering cover crop.  It can be planted in September or October, and produces large amounts of biomass by May.
Fig. 1 c.  Buckwheat (Fagopyrun esculentum) is a fast-growing summer cover crop, suitable for planting between spring and fall vegetable crops.

Benefits of non-legumes: 1, 2

  • Prevent erosion – Non-legumes establish and grow quickly, provide rapid soil cover, and have dense, fibrous root systems that hold soil in place.
  • Build soil organic matter – Non-legumes produce large amounts of biomass, which contributes to soil organic matter.3
  • Retain and recycle nutrients – Non-legumes take up nutrients left in the soil after vegetable harvest, which prevents them from being leached out of the garden during heavy spring rains.
  • Suppress weeds – With their vigorous growth and high biomass, non-legumes can successfully compete with weeds, even in fertile soils. Some non-legumes (winter rye, sorghum-sudangrass, and Brassicas) also release chemicals that inhibit weed germination and growth.  Residues of grass cover crops also provide a weed-suppressive mulch that lasts much of the growing season.
  • Disease management — Some Brassicaceae cover crops also release chemical compounds that may help control soil-borne pathogens and parasites(e.g., fungi, nematodes) upon incorporation. Winter rapeseed (Brassica napus) greatly reduced Rhizoctonia damage and Verticillium wilt in potato crops.1, 2

Drawbacks and constraints of non-legumes:

  • Slow nutrient supply and/or N immobilization — Non-legumes have lots of carbon (C) relative to N during growth, which causes them to decompose slowly after mowing or incorporation. As a result, nutrients in non-legume residues may not be available to vegetable crops quickly. If non-legume residues are incorporated into the soil, they may actually immobilize (“tie up”) N for a few weeks as decomposer microbes take up soil N to balance the large amount of C in the plant residues they’re breaking down.1  For this reason, it’s best to wait several weeks after incorporating a non-legume before planting vegetable crops.

Legume cover crops

Legume cover crops include field peas (Fig. 2a) crimson clover (Fig. 2b), hairy vetch (Fig. 2c), and cowpeas.  They provide many of the same benefits of non-legumes, with the additional benefits of nitrogen fixation and feeding pollinators.

Fig. 2.  Examples of legume cover crops used in vegetable gardens  (Photo credits: M. Gregory)
 pic 8  pic 9  pic 10
Fig. 2a.  Field peas (Pisum sativum) can be planted as a winter-kill or early spring cover crop.  It should only be planted in full sun, as this legume performs poorly in shaded areas.4 Fig. 2b.Crimson clover (Trifolium incarnatum) over-winters in Zones 7 and up, and can be used as a summer or winter-kill cover crop in cooler zones.  Crimson clover is a high biomass producer and is quite shade-tolerant.4 Fig. 2c.  Hairy vetch (Vicia villosa) is the hardiest legume, and will over-winter in even the northernmost parts of the US.  It is an excellent legume for adding fixed N to the soil.4


Additional Benefits of legumes:

pic 11
Figure 3. A bumblebee visits a crimson clover flower in a community garden. Photo credit: M. Gregory.
  • Nitrogen fixation – Legume cover crops add ‘new’ nitrogen (N) to the soil through N fixation, which occurs when N-fixing bacteria in legume roots take N from the air and convert it to a form the plant can use. When legume residues break down, this N is added to the soil for food crops.5
  • Build soil organic matter and soil quality – While legumes don’t usually produce as much biomass as non-legumes, they also help build soil organic matter.6, 7 Legumes are also excellent soil conditioners, because legume roots ooze sugars that stick soil particles together in larger crumbs, or aggregates.8, 9  This helps the particles fit together loosely, making for a soft, porous soil.
  • Attract beneficial insects – Many legume species provide resources for beneficial insects. Crimson clover provides pollen and nectar for native pollinator bees (Fig. 3), and both crimson clover and hairy vetch host predators such as lady beetles, which eat many pest insects.1


Drawbacks and constraints of legumes: 1, 3

  • Slow growth, lower biomass — Legumes establish and grow more slowly than non-legumes, and usually produce lower biomass.
  • Less weed suppression — Legumes may not suppress weeds as effectively as non-legumes, particularly in soils with high N fertility. In Brooklyn gardens, legumes suppressed weeds in soils with low to moderate N fertility, but not in soils with high N fertility.4  Legume residues break down quickly, so weed control by legume mulch may be short-lived.
  • Seed cost — Legume seeds are more costly than non-legumes.


Cover crop mixtures

Mixtures of non-legumes and legumes often combine the benefits of both types of cover crops.

Benefits of nonlegume/legume mixtures:

  • Produce large biomass and suppress weeds effectively — In many cases, cover crop mixtures provide more complete soil cover, greater biomass production, and more effective weed suppression than plantings of just one species.1, 3  This is because mixtures of grasses and legumes use water, nutrients and sunlight very efficiently due to complementary root systems and growth habits.  Grasses (like rye) also provide support for viny legumes (like hairy vetch), which allows the legume to access more light.
  • Increase N fixation — Planting legumes with grasses may enhance N fixation. Grasses out-compete legumes for soil N, forcing the legume to rely on N fixation.  As long as the grass doesn’t suppress legume biomass (see below), this can increase the total amount of N fixed.  Promising grass/legume mixtures for N fixation include rye/vetch and Japanese millet/cowpea.10
  • Optimize nutrient cycling and nutrient supply to crops — Mixtures provide the benefits of N ‘scavenging’ by non-legumes and N additions by legumes.1 At maturity, grass-legume mixtures often have an ideal C:N ratio of 25:1 – 30:1, which promotes a steady release of N for vegetable crop use as the cover crop plants decompose.  N-rich legume residues prevent N tie-up that can occur when incorporating pure grass residues, while C-rich grass residues slow the breakdown of legume residues such that N is released at a rate that vegetable crops can use through the growing season.2, 11
Fig. 4.  Examples of grass/legume mixtures used in vegetable gardens  (Photo credits: M. Gregory)
 pic 12  pic 13
 Fig. 4a.  Oats/ Field peas is a common winter-kill or early spring mixture.  It should only be planted in full sun.  Since oats may suppress field pea biomass and total N fixed,4 try seeding the field peas at a higher rate. Fig. 4b.  Rye/ hairy vetch is an excellent over-wintering mixture.  The hairy vetch ‘climbs’ the rye, which allows the legume to access more light.  In Brooklyn gardens, rye/vetch mixtures produced the highest biomass of any cover crop combination.4

Drawbacks and constraints of nonlegume/legume mixtures:

  • Reduced N fixation if nonlegume out-competes the legume – Mixing a non-legume with a legume may decrease the total amount of N fixed if the non-legume suppresses legume growth and biomass. This occurs in mixtures of: oats/field peas,4, 12 rye/crimson clover,4 and sorghum-sudangrass/cowpea.10  Seeding the legume at a higher rate may result in a more even distribution of nonlegume and legume biomass – gardeners can experiment to find the relative seeding rate that works best in your soil.


*     *     *     *     *     *     *     *     *     *     *     *     *

Understanding the benefits and limitations of non-legumes, legumes, and mixtures is a great starting point for selecting cover crops to plant in your garden.  For guidance on choosing specific cover crops based on your vegetable crop rotation, management goals, and soil and light conditions, see Part III: Selecting Cover Crops for Vegetable Gardens.


References

(1) Clark, A.  2007.  Managing cover crops profitably, 3rd ed. Sustainable Agriculture Network, Beltsville, MD.  Accessed online at: http://www.sare.org/Learning-Center/Books/Managing-Cover-Crops-Profitably-3rd-Edition, 7 December 2014.

(2) Treadwell, D., N. Creamer, and K. Baldwin.  2010.  An introduction to cover crop species in organic farming systems.  Accessed online at: https://www.extension.org/pages/18542/an-introduction-to-cover-crop-species-for-organic-farming-systems, 7 December 2014.

(3) Snapp, S. S., S. M. Swinton, R. Labarta, D. Mutch, J. R. Black, R. Leep, J. Nyiraneza, and K. O’Neil.  2005.  Evaluating cover crops for benefits, costs and performance within cropping system niches.  Agronomy Journal 97(1):322-332.

(4) Gregory, M. M., L. E. Drinkwater.  In preparation.  Developing cover cropping practices to improve soil quality, nutrient cycling, and weed suppression in urban community gardens.

(5) Drinkwater, L. E.  2011.  It’s elemental: How legumes bridge the nitrogen gap.  The Natural Farmer, Summer 2011, pp. B-1 – B-6.  Northeast Organic Farming Association, Barre, MA: Accessed online at: http://www.nofa.org/tnf/Summer2011B.pdf, 6 December 2014.

(6) Sainju, U. M., B. P. Singh, and W. F. Whitehead.  2002.  Long-term effects of tillage, cover crops, and nitrogen fertilization on organic carbon and nitrogen concentrations in sandy loam soils in Georgia, USA.  Soil & Tillage Research 63(3-4):167-179.

(7) Kong, A. Y. Y., J. Six, D. C. Bryant, R. F. Denison, and C. van Kessel.  2005.  The relationship between carbon input, aggregation, and soil organic carbon stabilization in sustainable cropping systems.  Soil Science Society of America Journal 69(4):1078-1085.

(8) Puget, P., L. E. Drinkwater.  2001.  Short-term dynamics of root- and shoot-derived carbon from a leguminous green manure.  Soil Science Society of America Journal 65(3):771-779.

(9) Haynes, R. J., M. H. Beare.  1997.  Influence of six crop species on aggregate stability and some labile organic matter fractions.  Soil Biology & Biochemistry 29(11-12):1647-1653.

(10) Drinkwater, L. E.  2011.  A holistic view: Leguminous cover crop management in organic farming systems.  The Natural Farmer, Summer 2011, pp. B-20 – B-24.  Northeast Organic Farming Association: Barre, MA. Accessed online at: http://www.nofa.org/tnf/Summer2011B.pdf, 6 December 2014.

(11) Teasdale, J. R., A. A. Abdul-Baki.  1998.  Comparison of mixtures vs. monocultures of cover crops for fresh-market tomato production with and without herbicide.  HortScience 33(7):1163-1166.

(12) Schipanski, M. E., L. E. Drinkwater.  2012.  Nitrogen fixation in annual and perennial legume-grass mixtures across a fertility gradient.  Plant Soil 357(1-2):147-159.


Building Healthy Soils in Vegetable Gardens: Cover Crops Have Got It Covered Part I: Introduction to Cover Cropping

Megan M. Gregory, Blog Contributor, Cover Crop Nerd, and Graduate Research Assistant, Cornell University
Email: meganmgregory1@gmail.com
Website: http://blogs.cornell.edu/gep/

This article is part of a four-part series about cover cropping in vegetable gardens. Stay tuned next week for Part II

What are cover crops, anyway?

cover crop
Figure 1. Rye and vetch cover crop in a community garden plot in May, just before it was cut down and mulched in preparation for planting vegetables. Photo credit: M. Gregory. 

Cover crops are close-growing plants sown in rotation with food crops, or inter-seeded between food crops to cover bare ground.  They are not harvested, but rather are planted to improve soil quality and provide other benefits for crop production and the environment.  Before planting the next vegetable crop, most cover crops need to be cut down.  The shoots can be chopped (or mowed) and left as mulch on the soil surface, or incorporated into the soil.

There is a large body of research supporting the use of cover crops on organic and sustainable farms.1  However, vegetable gardeners can successfully plant and manage cover crops with hand tools, and reap the benefits of this practice for their soil and crops.2

Why should I plant a crop that I’m not going to harvest?

Cover crops provide many benefits for future vegetable crop production, and for the garden agro-ecosystem as a whole.  Incorporating cover crops in vegetable rotations may:

  • Increase soil organic matter levels, and therefore improve soil quality. As cover crop roots and shoots decompose, they build soil organic matter.  This improves soil structure and water-holding capacity (Fig. 2), and increases slow-release nutrient reserves.3  Fresh cover crop residues also nourish beneficial soil fauna (bacteria, fungi, worms, etc.) that improve soil tilth and aeration, recycle plant and animal wastes, and release nutrients for crops to use.
  • Provide nitrogen for future food crops through legume nitrogen fixation. Cover crops in the legume family (e.g., beans, peas, clovers, and vetches) add “new” nitrogen (N) to the soil.  Legumes host N-fixing bacteria in bumps on their roots, also called nodules (Fig. 3).  These bacteria take N from the air and convert it to a form the legume can use .  When the plant decomposes, the fixed N also becomes part of the soil organic matter.  Eventually, this N is released by microbes for crop uptake.4
  • Improve nutrient retention and recycling. Over-wintering cover crops take up extra nutrients at the end of the growing season, which would otherwise be lost to leaching (when nutrients dissolve in rainwater and drain below the root zone, making the nutrients unavailable for plants).  Over-wintering grasses like rye reduce N leaching by about 70% compared to bare soil.5
  • Suppress weeds. Growing cover crops reduce weed growth through competition (e.g., for space, light, moisture, and nutrients) and allelopathy (releasing chemicals that inhibit other plants).  After , the cover crop mulch can prevent weed seedling emergence through the growing season.6
  • Attract beneficial insects. Cover crops often provide important resources (such as nectar and pollen and over-wintering habitat) for beneficial insects, including pollinator bees and natural enemies of insect pests like ladybugs and lacewing.1
  • Increase or maintain crop yields with less inputs. Well-managed cover crops can improve vegetable crop yields, or reduce the amount of fertilizer needed to obtain good yields.7-10


pic 2
Figure 2. Demonstration illustrating the effect of soil organic matter (SOM) on water-holding capacity. Photo credit: Megan Gregory
  • On the left is soil from an urban garden that received a rye/vetch cover crop for more than five years, and therefore has high SOM.
  • On the right is soil from a garden that never received cover crops, and has lower SOM.
  • This photo was taken 30 minutes after pouring equal amounts of water through the soils. The high-OM soil held most of the water, while much water drained through the low-OM soil. Since both soils were of similar texture, the difference in water-holding capacity can be attributed to the SOM.


nodules on roots of cover crops
Figure 3. Nodules on the roots of legume cover crops: crimson clover (left) and hairy vetch (right). The nodules host nitrogen-fixing bacteria in the genus Rhizobia, which convert atmospheric nitrogen into plant-available forms. Photo credits: M. Gregory.

pic 3


*     *     *     *     *     *     *     *     *     *     *     *     *

Vegetable gardeners have a number of cover crop options suited to different seasonal niches, management goals, and environmental conditions.  To learn about the main groups of cover crops and how to select cover crops for your garden, see Part II (Types of Cover Crops) and Part III (Selecting Cover Crops).

References

(1) Clark, A.  2007.  Managing cover crops profitably, 3rd ed. Sustainable Agriculture Network, Beltsville, MD.  Accessed online at: http://www.sare.org/Learning-Center/Books/Managing-Cover-Crops-Profitably-3rd-Edition, 7 December 2014.

(2) Gregory, M. M. and L. E. Drinkwater.  In preparation.  Developing cover cropping practices to improve soil quality, nutrient cycling, and weed suppression in urban community gardens.

(3) Snapp, S. S., S. M. Swinton, R. Labarta, D. Mutch, J. R. Black, R. Leep, J. Nyiraneza, and K. O’Neil.  2005.  Evaluating cover crops for benefits, costs and performance within cropping system niches.  Agronomy Journal 97(1):322-332.

(4) Drinkwater, L. E.  2011.  It’s elemental: How legumes bridge the nitrogen gap.  The Natural Farmer, Summer 2011, pp. B-1 – B-6.  Northeast Organic Farming Association, Barre, MA.  Accessed online at: http://www.nofa.org/tnf/Summer2011B.pdf, 6 December 2014.

(5) Tonitto, C., M. B. David, and L. E. Drinkwater.  2006.  Replacing bare fallows with cover crops in fertilizer-intensive cropping systems: A meta-analysis of crop yield and N dynamics.  Agriculture Ecosystems & Environment 112(1):58-72.

(6) Schonbeck, M.  2011.  How cover crops suppress weeds.  Accessed online at: https://www.extension.org/pages/18524/how-cover-crops-suppress-weeds, 6 December 2014.

(7) Abdul-Baki, A. A., J. R. Teasdale, R. Korcak, D. J. Chitwood, and R. N. Huettel.  1996.  Fresh-market tomato production in a low-input alternative system using cover-crop mulch.  HortScience 31(1):65-69.

(8) Abdul-Baki, A. A., J. R. Stommel, A. E. Watada, J. R. Teasdale, and R. D. Morse.  1996.  Hairy vetch mulch favorably impacts yield of processing tomatoes.  HortScience 31(3):338-340.

(9) Abdul-Baki, A. A., J. R. Teasdale, R. W. Goth, and K. G. Haynes.  2002.  Marketable yields of fresh-market tomatoes grown in plastic and hairy vetch mulches.  HortScience 37(6):878-881.

(10) Abdul-Baki, A. A., J. R. Teasdale.  1997.  Snap bean production in conventional tillage and in no-till hairy vetch mulch.  HortScience 32(7):1191-1193.

Managing Diseases without Fungicides: A Focus on Sanitation (A Visiting Professor feature)

Submitted by:
Nicole Ward Gauthier,
University of Kentucky Extension Plant Pathologist
PEOPLE: University of Kentucky Department of Plant Pathology Website
Kentucky Diseases of Fruit Crops, Ornamentals, & Forest Trees on Facebook
Amanda Sears, Kentucky Extension Horticulture Agent
Madison County Cooperative Extension Website

Alternatives to Fungicides

When diseases occur in urban landscapes, it is often presumed that fungicides are the most important and effective disease management tools available. However, a good sanitation program can help reduce the need for chemical controls and can improve the effectiveness of other practices for managing disease. This often-overlooked disease management tool reduces pathogen numbers and eliminates infective propagules (inoculum such as fungal spores (figure 1c) , bacterial cells; virus particles; and nematode eggs) that cause disease.

fig 1b marigold botrytis 1525420 (MC Shurtleff, UIll bugwd) (640x412)
Figure 1a. Marigold blossom infected with Botrytis
  Figure 1b. Pathogen levels can build up on marigold flowers if diseased tissue is left in the landscape

Figure 1b. Pathogen levels can build up on marigold flowers if diseased tissue is left in the landscape
close up of infecting spores
Figure 1c. Infecting spores on plant surface

Certain foliar fungal and bacterial leaf spots can become prevalent during rainy or humid growing seasons. When disease management is neglected, pathogen populations build-up and continue to increase as long as there is susceptible plant tissue available for infection and disease development (Figures 1a-c). Infected plant tissue infested soil and pathogen inoculum all serve as sources of pathogens that can later infect healthy plants.

3
Figure 2. Fallen leaves can serve as a source of inoculum (fungal spores) for additional infections. Many pathogens overwinter in fallen debris and then produce infective spores the following spring.

Reduction of pathogens by various sanitation practices can reduce both active and dormant pathogens. While actively growing plants can provide host tissue for pathogen multiplication, dead plant material (foliage, stems, roots) can harbor overwintering propagules for months or years (Figure 2).

These propagules can travel via air/wind currents, stick to shoes or tools, or move with contaminated soil or water droplets. Thus, prevention of spread of pathogens to healthy plants and the elimination of any disease-causing organisms from one season to another are the foundations for a disease management program using sanitation practices.

Sanitation Practices

Elimination and/or reduction of pathogens from the landscape results in fewer pathogen propagules. The following sanitary practices can reduce amounts of infectious pathogens:

5
Figure 3a. Cankers are common overwintering sites for disease-causing pathogens
  • Remove diseased plant tissues from infected plants. Prune branches with cankers (Figure 3a) well below the point of infection (Figure 3b). Cuts should be made at an intersecting branch. Rake and remove fallen buds, flowers, twigs, leaves, and needles.
4
Figure 3b. Remove infected branches, making cuts well below points of infection
  • Disinfest tools used to prune galls and cankers.  Cutting blades should be dipped into a commercial sanitizer, 10% Lysol disinfectant, 10% bleach, or rubbing alcohol between each cut.
  • If using bleach, rinse and oil tools after completing work, to prevent corrosion.
  • Discard perennial and annual plants that are heavily infected and those with untreatable diseases (e.g. root rots, Figure 4; and vascular wilts).  Dig up infected plants to include as much of the root system as possible, along with infested soil.

infected plant                           imag

Figure 4. Heavily infected plants or those with untreatable diseases, such as black root rot (images left and right), should be removed from the landscape.   

  • Trees and shrubs infected with systemic diseases (e.g. Dutch elm disease, Verticillium wilt, bacterial leaf scorch) that show considerable dieback should be cut and the stump removed or destroyed (e.g. by grinding).
  • If infected plants are to be treated with fungicides, prune or remove infected tissue (flowers, leaves) and debris to eliminate sources for spore production or propagule multiplication.  This should be done before fungicide application. Fungicide effectiveness may be reduced when disease pressure is heavy, which can result when pathogen levels cannot be reduced sufficiently by chemical means (fungicides).
  • Discard fallen leaves, needles (Figure 5), prunings, and culled plants. Never leave diseased plant material in the landscape, as pathogens may continue to multiply by producing spores or other propagules.  Infected plant material should be buried, burned, or removed with other yard waste.

pathogen 1       pathogen 2

Figure 5.  Black fruiting structures of the pine needlecast pathogen contain spores (images left and right). Removal of infected plant tissue helps reduce amounts of inoculum in the landscape.

  • Do not compost diseased plant material or infested soil because incomplete composting (temperatures below 160˚ F) may result in survival of propagules.
  • Homeowners should be cautious about storing diseased limbs and trunks as firewood or using the woodchips as mulch.  For example, wood from trees infected with Dutch elm disease should be debarked before placing in a firewood pile.
  • Remove weeds and volunteer plants to prevent establishment of a “green bridge” between plants.  A green bridge allows pathogens to infect alternate hosts until a more suitable one becomes available.  Be sure to remove aboveground parts AND roots.
  • Soil from container-grown plants should not be reused from one season to the next because pathogens can survive in soil.

Additional Resources:

University of Kentucky Extension Plant Pathology Publications

Photo credits:

R.K. Jones, North Carolina State University (Fig. 1A), courtesy Bugwood.org
M.C. Shurtleff, University of Illinois (Fig. 1B), courtesy Bugwood.org
David Cappaert, Michigan State University (Fig. 1C), courtesy Bugwood.org
Theodor D. Leininger, USDA Forest Service (Fig. 2), courtesy Bugwood.org
Joseph O’Brien, USDA Forest Service (Fig. 3, right), courtesy Bugwood.org
Elizabeth Bush, Virginia Tech (Fig. 4, left), courtesy Bugwood.org
Bruce Watt, University of Maine (Fig. 4, right), courtesy Bugwood.org
Andrej Kunca, National Forest Centre, Slovakia (Fig. 5, left), courtesy Bugwood.org
Robert L. Anderson, USDA Forest Service (Fig. 5, right), courtesy Bugwood.org
John R. Hartman, University of Kentucky (Fig. 3, left)

 pdf  Managing Diseases Without Fungicides

Harvesting, Curing and Storing Sweet Potatoes (A Visiting Professor feature)

Submitted by Ray Eckhart

Introduction
Sweet potatoes (Ipomoea batatas) are warm-season plants in the morning glory family (Convulvulaceae). The part we eat is the fleshy storage root of the plant, which is a little different than the regular Irish, or white, potato (Solanum tuberosum), a plant in the family Solanaceae. In that case, the part we eat is a fleshy underground stem of the plant, called a tuber.

Although sweet potato roots continue to grow until frost kills the vines, an extremely hard frost can cause damage to the ones near the surface. Chilling injury also results when soil temperatures drop to 50°F or lower, and this can result in internal decay in storage. The greatest danger from delayed digging is the risk of cold, wet soil encouraging decay. So the best time to dig is around the time of first frost in your area, or shortly thereafter. The vines can be clipped approximately 5 days before digging to improve skin-set or reduce the incidence of skinning the roots during harvest. To avoid exceptionally large sweet potatoes, a few hills should be dug in advance of the anticipated harvest date to determine the size of the sweet potato roots.

Puerto RicoFreshly dug sweet potato ‘Puerto Rico’

You can cook newly dug sweet potatoes right away, but their flavor, color and storage quality is greatly improved by curing at warm temperatures immediately after harvest. It is during the curing process that starch is converted to sugar.

Cure sweet potatoes by holding them for about 10 days at 80-85°F and high relative humidity (85-90 percent). Commercial producers have temperature and humidity controlled housing to guarantee good results, but for the home grower, they can be cured near a furnace or heat source to provide the necessary warmth. If the temperature near your furnace is between 65-75°F, the curing period should last 2-3 weeks. To maintain the required high humidity (85-90 percent relative humidity), stack storage crates or boxes and cover them with paper or heavy cloth.

CuringSweet potatoes curing

Once the sweet potatoes are cured, move them to a dark location where a temperature of about 55-60°F can be maintained, like an unheated basement, or root cellar. Sweet potatoes are subject to chilling injury, so don’t refrigerate them. Outdoor pits are not recommended for storage because the dampness encourages decay. Good results can be obtained by wrapping cured sweet potatoes in newspaper and storing them in a cool closet. Sweet potatoes can also be stored in sand.

Ornamental Sweet Potatoes
Have you ever wondered what, if any, is the difference between the ornamental sweet potato vines grown as a season-long ground cover, or, as “spillers” in container arrangements, and the vegetable we grow as food? The answer is – not much. They are just different cultivars of the same plant species, Ipomoea batatas. The ones we grow for food are selected and bred to produce large, uniform, good tasting roots, high in nutrients for eating, whereas the ones we grow ornamentally are selected for the striking shapes and colors of their leaves. Plant breeders introduce new variations every year. If you dig up the earth around your ornamental vines, you’ll find the same fleshy roots (different colors, perhaps) as the familiar ones we grow, or buy, for food. So, can you eat them? Well, technically, yes – but there’s no guarantee how they’ll taste. Most ornamental varieties are pretty bland. However, if you dig, cure, and store them as above, it’s possible they can stay viable until spring, when you can try to continue their growth for another season.

PropagationPropagating new plants (called slips) the following spring

References:
http://waynesword.palomar.edu/ww0804.htm
http://urbanext.illinois.edu/bulbs/bulbbasics.cfm
http://content.ces.ncsu.edu/ornamental-sweetpotatoes-for-the-home-landscape.pdf

Ray Eckhart is a former Penn State Extension Educator and avid home vegetable grower, with a weakness, bordering on obsession, for home grown tomatoes.