Is there a “Deathstar” in your garden?

If you follow national news, you may have noticed that Sudden Oak Death disease caused by Phytophthora ramorum has been found again in a new state and has escaped into retail commerce and thus into gardens. This is news because the disease is a killer of rhododendron, oak, camellia and many other ornamental plants. Yesterday I was measuring trees in a research plot here in California and I found that one of my subjects had turned brown and lost all its leaves. On checking, I discovered a Phytophthora collar rot was the cause of the symptoms. Phytophthora diseases kill woody plants, often our cherished specimen plantings. This blog post is to introduce you to Phytophthora collar rots, their diagnosis and treatment.

A Phyotophthora crown rot canker on ghost gum
This Eucalyptus suddenly collapsed from a Phytophthora basal canker. All the leaves remain on the tree and turned brown
Planting too deep is predisposing to Phytophthora infection. Note the aeration tubes could not save this tree–they serve no function in landscapes. Avoiding over-wet conditions, proper planting and irrigation timing would have prevented this Phytophthora death.

Phytophthora means plant destroyer in Latin. It is the “deathstar” of plant destroyers and once it has infected, death is the usual outcome. All Phytophthoras are Oomycetes. These are organisms that form an Oospore. Oospores are usually produced when two strains of Phytophthora join and the sexual organs form resulting in this spore. It is thick walled and can live for years in soil without a host. Phytophthora used to be considered a fungus but this was changed some years back to put all Oomycetes in groups that are more closely allied with brown algae. Phytophthoras are not in the kingdom fungi but rather the SAR supergroup of organisms. One main difference between these microbes and fungi is that Phytophthora has cellulose in its cell walls just as plants do. There are hundreds of species of Phytophthora, most affect flowering plants especially woody plants. Very few affect grasses and monocots. There are some that affect palms and others, vegetables and herbacious plants. The late blight fungus Phytophthora infestans caused the Irish Potato famine that resulted in millions of deaths (of people and potatoes) and migration (of people not potatoes) to the United States to avoid starving further.  caused the famous Jarrah (a Eucalyptus spp.) die off in Australia, one of the largest known forest epiphytotics. Phytophthora species occur worldwide and affect plants in almost every garden.

Why are Phytophthoras so successful and how do they get into gardens? I think the answer is that they are cryptic. You can not see any of the spore stages, even with a microscope. There is no “mold-like” growth of the pathogen that you can see either in soils or on the plant. This is because the organism lives inside plant tissues and is very reduced in soils where is survives as spores. Unlike many fungi, you can’t see the mycelium of most Phytophthora species. In plants, Phytophthora usually grows in the vascular cambium of roots or stems and kills those tissues. Plants react to Phytophthora by producing phenols and other phytochemicals turning tissues brown. Brown roots or spreading brown cankers on the main stem are common. When Phytophthora kills the tissues on the main stem this often causes a basal stem canker near the soil line. Usually the plant collapses rapidly with all the leaves turning brown or falling from the plant suddenly. Sometimes basal cankers are associated with deeply planted trees and shrubs or where soil has been added over the root collar. Since basal cankers are under the bark they may not be visible while active and need to be revealed with a knife to expose the brown tissue.

Phytophthora diseases are increased by excess water in soil or on plants. Overly wet situations are predisposing to these diseases if the pathogen is present. Other conditions like reduced oxygen in the rootzone (from compaction), increased salts in soil, very dry conditions followed by very wet circumstances all promote Phytophthora. There are also some groups of plants that seem to be very susceptible—these include: rhododendron, camelia, oaks, cyclamen, most plants in the Ericaceae (madrone, manzanita, blueberry etc.), cedars, pines, and the list goes on. It is hard to avoid susceptible plants because there are so many of them.

Phytophthora species are not native everywhere but have been distributed far and wide by people. Nurseries are prime disseminators of Phytophthora infested plants. Fungicides “subdue” the pathogen but do not eradicate it. So a plant can look healthy while still being infested with Phytophthora. When the fungicide wears off, the plant may become sick if conditions are right for the Phytophthora to grow. Another reason why this type of pathogen is so successful is that a plant can have 50-75% of its roots killed before symptoms begin to show on above ground plant parts. Wilt and collapse only occur very late in the progress of the disease. Because of this, it is important to inspect plants before bringing them home. Never purchase a plant with brown feeder roots, or this could be the starting point for Phytophthora in your garden.

If you are an avid gardener who likes to try new plants all the time, then your future encounter with Phytophthora is likely inevitable. You can do things to limit its development.

Mycelium of Phytophthora exposed to cellulase (left) and healthy mycelium (right)

-Plant on berms or mounds while avoiding planting in low or poorly drained places
-Use wood chip mulches from freshly chopped tree parts
-Add gypsum to soils as part of your mulching protocol
-If you irrigate your garden allow drying out periods between irrigations
-Plant “high” so that the root crown is clearly exposed
-Do not volcano mulch or cover the root crown with anything at all
-Avoid planting woody perennials in turfgrasses or lawns

Fresh wood chips are often broken down by fungi that release cellulase, this enzyme is toxic to all Phytophthora’s, and the reason why FRESH mulches are so important to create soils with cellulytic enzymes that destroy this pathogen. As gypsum dissolves it provides a slow release source of calcium ions which are also toxic to the swimming spores of Phytophthora. While fungicides can also help limit Phytophthora development, the cultural practices listed above will be just as important in preventing and limiting root and crown rot disease in your garden.

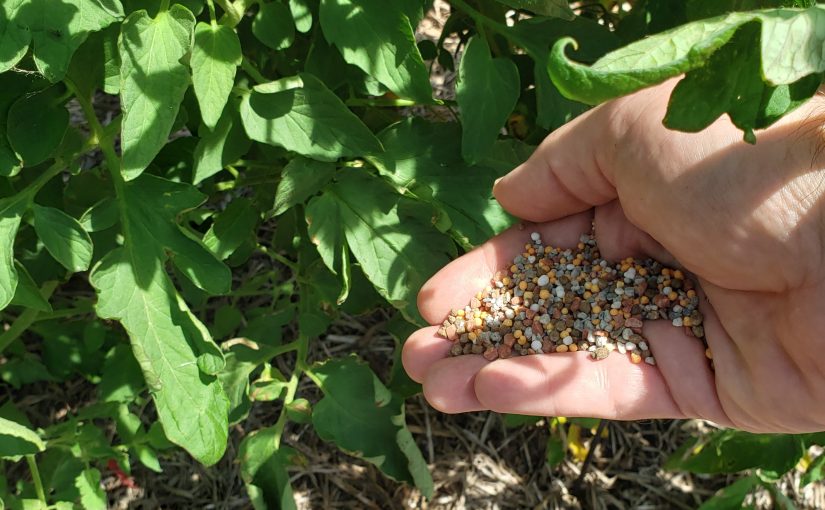
To Fertilize, or Not to Fertilize, that is the question

You see a bright shiny package at the garden center saying that it can help you have the most bountiful garden ever, the greenest lawn in the neighborhood, your plants will have miraculous growth, or it will supply every element on earth to make sure that your plants are living their best life. It’s got what plants crave….It’s got electrolytes! You reach out to grab that package and ……. Woah!  Pump the brakes!  Do you know if your plants even need to be fertilized?  Are you just falling for that shiny marketing, or do your plants really need added fertility to grow?

It turns out that many gardeners add fertilizer out of habit or because a shiny package or advertisement told them they needed to do it.  The fact is, though, that you may or may not need to add fertilizer to get your plants to grow healthy.  It is actually more likely than not that the level of nutrients in soil is perfectly adequate for healthy plant growth. And guess what, there really is a way to know what plants crave…or at least are lacking: A soil test.

We here at the Garden Professors (and those of us who work in extension) often get questions or hear comments about gardeners adding fertilizer or random household chemicals and items to their plants and soils with no idea what they do or even supply.  They’ll throw on the high powered 10-10-10, the water soluble fertilizer, rusty nails, or even (shudder) the oft mentioned Epsom salts because it is just what they’ve been told to do.

A few months ago, my GP colleague Jim Downer talked about why to amend soil– focusing mainly on organic material and a little bit of fertility.  In this article, I’m going to share some how and what: what plants need in terms of nutrients, how to determine what nutrients you need to add, what you can use for increasing fertility (conventional and organic), and how to calculate how much fertilizer to add.

What plants really need

Plants have a number of essential plant nutrients that they need from the environment in order to properly grow and function. Hydrogen, carbon and oxygen are all important, but are not something that gardeners have to supply since they are taken in by the plant in the form of water and carbon dioxide (unless you forget to water your plants, like I sometimes do — but death will occur from dehydration well before lack of hydrogen).

There are six soil macronutrients, which means that they are used in larger amounts by the plants. These include nitrogen, phosphorous, and potassium, which form the basis of most common fertilizers that have those magic three numbers on them (example: 10-10-10). Those three numbers indicate that the fertilizer contains that percentage of the elemental nutrient in it. For this example, the fertilizer contains 10 percent nitrogen, 10 percent phosphorous, and 10 percent potassium.  The other three soil macronutrients are magnesium, sulfur, and calcium.  Depending on your location, your soil may be abundant or deficient in these nutrients, especially magnesium and calcium.  Sulfur is commonly released during decomposition of organic matter, so it is usually present in sufficient amounts when soil is amended with (or naturally contains) organic matter.

If a soil is deficient in a nutrient that a plant requires it is usually a macronutrient since plants use them at higher levels.  However, deficiency is still unlikely in most soils unless there is a high volume of growth and removal, such as in vegetable gardens and annual beds (or if you’re growing acres of field crops like they do here in Nebraska).  These are also the nutrients that are most common on soil tests, since they are the ones that are used the most by plants.

Soil micronutrients are needed in much smaller amounts. Those nutrients are boron, copper, chlorine, manganese, molybdenum, and zinc (remember the periodic table?). These are also usually supplied from organic matter or from the parent soil material so deficiency is even less likely than for macronutrients.  Tests for these aren’t usually part of a basic soil test, so if you suspect you might have a deficiency you might have to get a specialized test.  There are some basic physiological signs of deficiency that plants might exhibit in response to specific deficiencies, but their similarity to other conditions make it an imprecise tool for diagnosing a deficiency.

Compost is a good source of nutrients, especially micronutrients (as we’ll read later).  Using compost alone may be sufficient for many gardens, such as perennial beds.  However, higher turnover and higher need areas like vegetable gardens may need supplemental fertilization beyond compost.  That’s where the soil test comes in.

What’s on the menu….interpreting soil test results

If you’ve had your soil tested by a lab (which is recommended, since it is much more precise than those DIY test kits), you’ll get results back that give you the level of nutrients in your soil and usually recommendations for how much of each nutrient you need to add to the soil for basic plant health.  This is a general recommendation that is common for most plants, which is generally sufficient for average growth.  If the test says that the nutrient levels are normal, you don’t have to add anything….I repeat….YOU DON’T HAVE TO ADD ANYTHING.  If it says you need one nutrient of the other you’ll need to add it to your garden or around the plant.  As we’ve said before, disturbing the soil as little as possible is best, so if you’re using a fertilizer product aim for one that you can broadcast on top of the soil or is water soluble.  This goes for compost as well – try to apply it to the top of the soil and it will incorporate over time.

Image result for soil analysis reportYour soil test results will usually tell you to add nutrients in pounds per a certain square footage.  In the example pictured, there’s a recommendation of 3.44 lbs of Nitrogen per 1000 square feet.  That number is for the actual nitrogen, and since different nutrient sources have different amounts of nitrogen you’re going to have to do some math to figure out how much fertilizer you need per 1000 square feet and then multiply that by how many thousands of square feet you have.

I’ll note here that soil labs do not usually test for nitrogen due to the variable nature of nitrogen in the soil and the lack of affordable or reliable tests.  Nitrogen fluctuates widely over a short period of time and is not as persistent in the soil as other elements due to plant take-up, microbial action, and weather conditions.  Nitrogen recommendations are usually made based on the crop indicated for the test and may be informed by the levels of other nutrients.

Let’s say that I’m using an organic fertilizer product I purchased at the garden center and the nutrient analysis is 4-3-3 (these numbers are standard for organic nutrient sources, which have lower nutrient levels than conventional fertilizers).  That means that for every 100 lbs of that product, 4lbs are nitrogen, 3 are phosphorous, and 3 are potassium.  My (hypothetical) garden is 10ft by 20ft, which is 200 square feet.

So we divide 200 by 1000 to get .2, which represents that my area is 20% of the area listed on the recommendation.  If my garden were 3500 square feet, then that number would be 3.5.

Next, multiply the Nitrogen recommendation of 3.44 lbs by .2.  This give me 0.688.  This tells me that I need .688 lbs of nitrogen to amend my 200 square feet.

So I just need to weigh out .688 lbs of the fertilizer, right?  Nope – we have to account for the fact that my fertilizer is only 4% nitrogen- only 4 lbs out the 100 lb bag.  We can estimate amounts by figuring out how much nitrogen is in smaller amounts of the fertilizer.  Since we know that 100lbs has 4lbs of N, then 50lbs has 2lbs of N, and 25lbs has 1lb of N.  If I want to get a more precise amount of fertilizer poundage to get my .688 lbs of N, then we divide the pounds of N needed by the decimal percentage of N in the fertilizer.  So that would be .688 / .04, which gives us 17.2 lbs of fertilizer.

Now, considering that the bagged product that I bought is $25 for 8lbs, I may want to reconsider using it for this application…unless I enjoy throwing my pearls before swine or I’m fertilizing my money tree.

If you do the math, you’ll note that this fertilizer will add more than the recommended amount of phosphorus and potassium.  You’ll either need to decide if that is acceptable or if you need to find another source of nutrients.

If you’re not using a prepared fertilizer product but rather an organic source of nutrients, you can still calculate how much to add to get to the recommended amount.  The following are some good lists of nutrient ranges of organic materials:

https://extension.psu.edu/using-organic-nutrient-sources

https://vegetableguide.usu.edu/production/soil-nutrient-water-management/organic-nutrient-sources

A note about pH

Another thing your soil test will tell you is the pH of the soil.  In general, plants prefer a soil pH just on the acidic side of neutral (between 6.0 and 7.0).  There are plants that prefer different pH levels – such as blueberries and azaleas and their need for a more acidic soil between 4.5 and 5.2.  Changes in pH affect the availability of nutrients to plant by affecting ionic bonds of the elements.  For the most part, the nutrients are more available at that neutral pH.  You’ll note that iron is more available at lower pH levels, which is why those acid-loving plants grow better at lower pHs – they’re heavier iron feeders.

If your pH is extreme in one way or the other, you’ll either need to find plants that thrive at that level or adjust the pH if that isn’t possible.  To raise pH in acidic soils the most common method is application of lime.  To lower pH, you’ll need something high in sulfur.  For more information, visit https://articles.extension.org/pages/13064/soil-ph-modification .

Having a philosophical moment in the garden

Give me your huddled root masses yearning to breathe free

About this time last year I posted photos of the installation of my new pollinator gardens (all perennials). As you can tell from the photos below, all of these plants have not only survived but thrived with their midsummer rootwashing.

Garden 1. Robust perennials! Except for the the sad, tiny lavender in the lower right hand corner (discussed below).
Garden 2 is just like the other, except the strawberry groundcover is replacing the wood chips.


The only ones that didn’t make it were the six Lavandula stoechas ‘Bandera Purple’ (see above). They did fine through the summer and well into winter. But with our surprise snowstorm in February (along with a 20-degree temperature drop in one night – from 33 to 14F), all but one of these marginally hardy plants (USDA zones 7-10) gave up the ghost. I won’t make that mistake again. But I will continue to root wash ALL of my perennials before I plant.

It’s pretty easy to excavate this tree (planted months ago) since there is NO root establishment.

And since it’s Independence Day here in the US, I thought I’d continue with the “free your roots” theme and discuss the medieval torture system that passes for recommended B&B tree installation practices. I’m talking about the burlap, the twine, and the wire baskets that are left on the root ball and cunningly hidden underground to do their damage over the years.

THIS is what should be planted.
Not this.


There is a great deal of disagreement about what to do with all the foreign material that’s used to keep tree root balls intact during shipment. To be clear, that is the ONLY thing they are intended to do. There is no research that shows leaving them on benefits the tree at all. The reason they are left on is because it’s more economically feasible for the installation company to do it this way. Personally I think that’s a pretty crappy reason, particularly when you are looking at trees that can cost hundreds or thousands of dollars.

Does anyone seriously think this is a good way to plant trees?

Most studies that have addressed the issue have been short term: two or three years, rarely longer. Irreversible damage to roots can take years to develop. It’s useful, therefore, to look at the landscape evidence to see what happens with all these barriers to root growth and establishment.

Death row.

Arborist and landscape designer Lyle Collins recently excavated the remains of trees that had been installed in 1991. The trees had died years ago and certainly hadn’t grown much as evidenced by their trunk size.

Not much trunk growth in this tree.

But while the trees didn’t survive, the burlap, wire basket, and webbing were all still there almost 30 years later.

Basket and webbing are clearly visible (after washing)…
…as is the burlap (before washing)


The clay rootballs are nearly intact as well. That’s not what you want to see. Roots must establish outside the rootball into the native soil, or they won’t survive.

Intact rootball after 28 years
The same rootball after washing


Eventually I’m convinced long-term research will show the folly of leaving foreign materials on the rootballs of B&B trees. In the meantime, I’ll continue to plant trees in a way that ensures their roots are in contact with the native soil and free from any unnatural barriers to growth.