In this People and Plants blog post we’re taking a look at the German botanist Adam Lonicer.
Theodor de Bry engraving, published 1652-1669
Adam Lonicer, also known as Lonitzer, Lonicerum, Lonicerus, or Loniceri, was born on October 10, 1528 in Marburg, Germany. He studied in Marburg and Mainz before becoming professor of mathematics at the Lutheran University of Marburg. In 1554 he received his medical degree and he later pursued a medical career as the city physician of Frankfurt. His true interest though was herbs and the study of botany. In 1554 he married Magdalena Egenolph and worked as a proofreader for his father-in-law, a German printer who specialized in producing herbals.
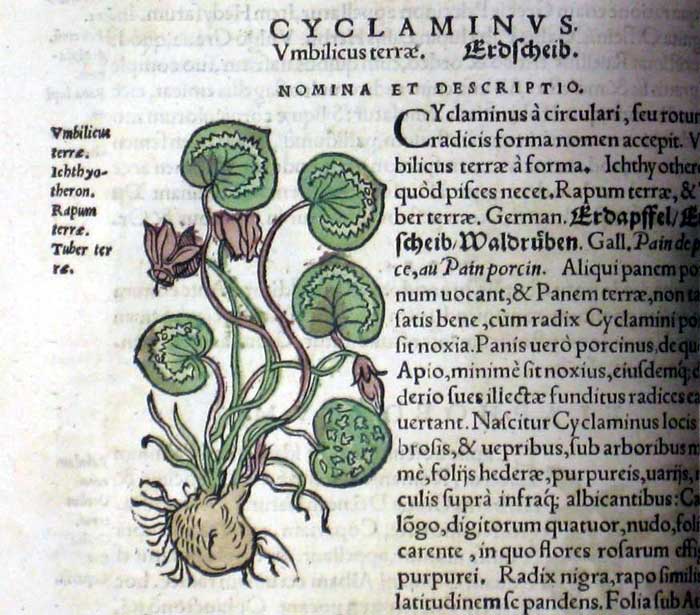
Adam Lonicer, Naturalis historiae opus novum (Frankfurt, 1551), fol. 258, Cyclaminus.
Lonicer soon decided to produce an herbal of his own, the Kreuterbuch, published in 1546. As the original full title makes clear, Naturalis historiae opus novum : in quo tractatur de natura et viribus arborum, fruticum, herbarum, Animantiumque terrestrium, uolatilium & aquatilium … (Frankfurt, 1551), the herbal did not solely focus on plants but also included some descriptions of animals, birds, fish and metals. The emphasis throughout the book is on how one uses animal, vegetable, and mineral substances in the production of medicinal, gastronomical, and household preparations.
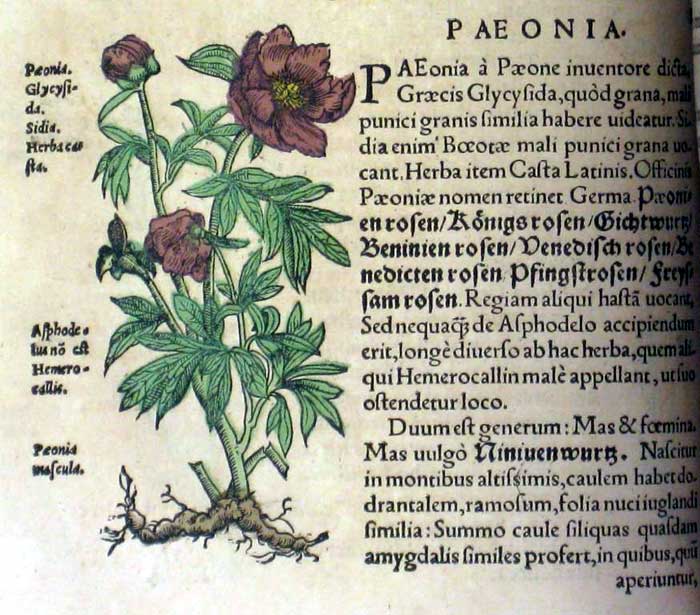
Adam Lonicer, Naturalis historiae opus novum (Frankfurt, 1551), fol. 184, Peony.
Although much of the work was not original to Lonicer it proved to be the greatest printing success of the Egenolph firm. It was one of the most enduring publications of its kind and was still being produced in Germany in 1783. The text covers much of the known natural world at the time and had a wide audience that included physicians, apothecaries, and both rural and urban householders. Lonicer provides us with one of the early descriptions of local flora and he is one of the first to distinguish deciduous trees from conifers. That seems obvious to us but at the time it was unconventional.
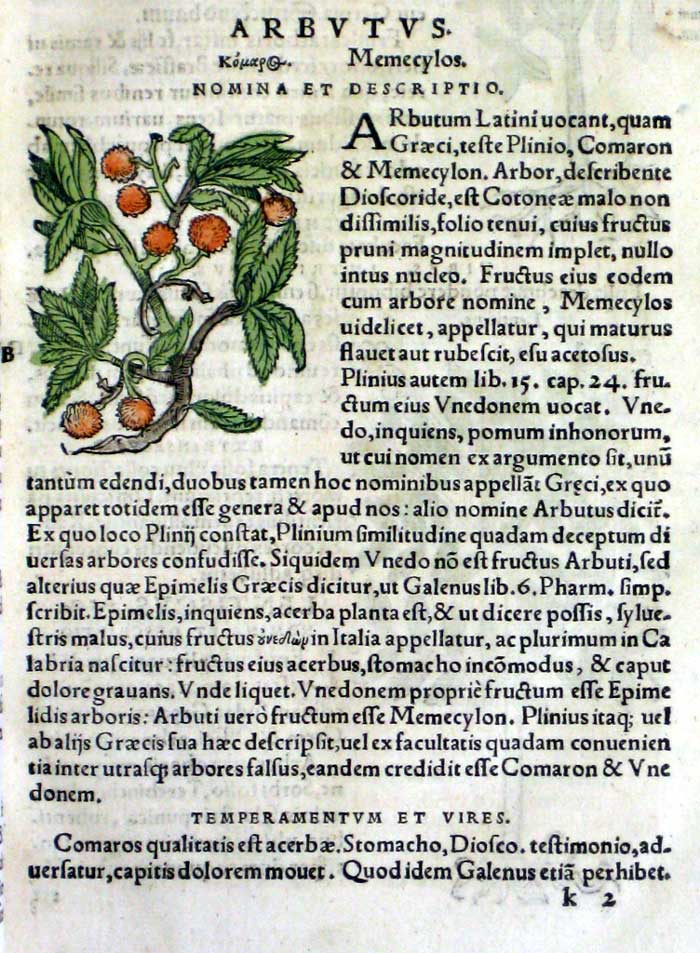
Adam Lonicer, Naturalis historiae opus novum (Frankfurt, 1551), fol. 56, Arbutus.
The most striking features of this book are its hundreds of hand-colored woodcuts. As you can imagine coloring in each image is an intensive task and would have greatly increased the cost of the book. Colored herbals were relatively rare since they were very costly to produce therefore many early printed herbals were unpainted. There’s the story of the coloring of a Flemish edition of L’Obel’s herbal for the Duke of Prussia, it took three months to color. By the time it was finished it was too expensive for hard-working botanists to buy.
Lonicer took over the publishing firm after his father-in-law died in 1555. He went on to publish no fewer than four editions of his Kräuterbuch between 1557 and 1577. This Renaissance botanist died at Frankfurt-am-Main on May 29, 1586.
So, what plant genus is Lonicer’s name associated with? A few hints: It’s in the Caprifoliaceae family and native to North America and Eurasia. There are about 180 species identified in North America and Eurasia. It’s a widely cultivated ornamental garden plant.
If you guessed Lonicera, you’re correct! Members of the genus are commonly known as honeysuckle, named for their sweet nectar. Lonicera are prized for their fragrant flowers with some bearing edible fruit. Many creatures, both day and night feeding, use them as a nectar source. While honeysuckle is a favorite landscaping plant many species can be invasive or grow so heavy they overpower their supports or trellis. Choose varieties wisely and monitor their growth.
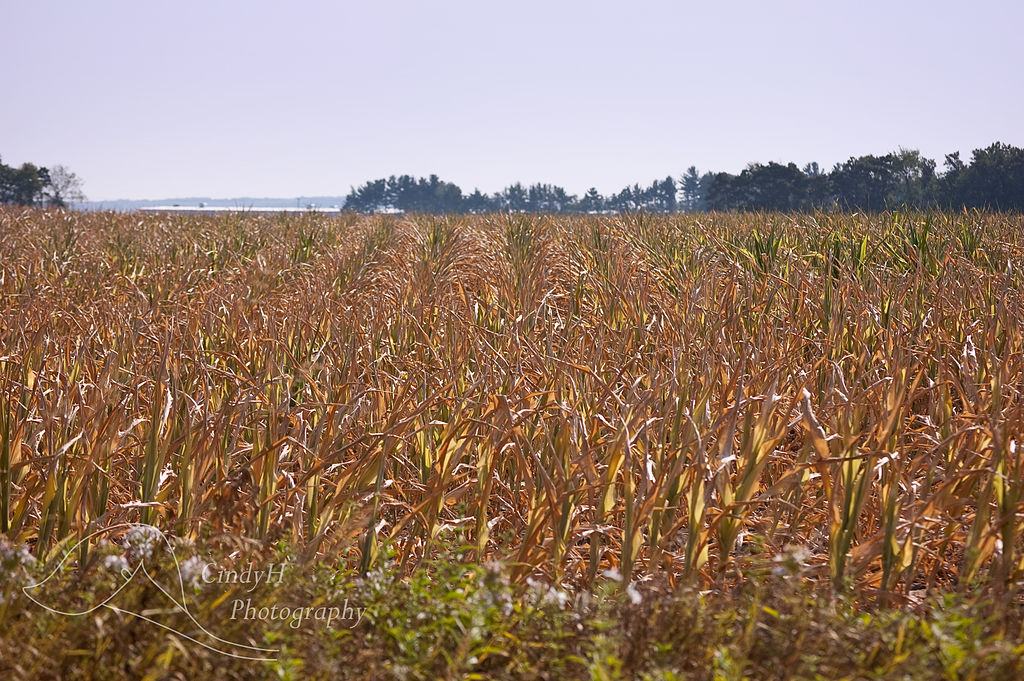
This week is the end of 2021 and the start of the new year. What a year 2021 has been! Without even talking about politics, COVID-19, sports, or the economy, it was certainly one to remember from the standpoint of weather and climate. No matter where you live, you probably saw some extreme weather during the past 12 months.
Exploding flower bed fireworks, Eric Kilby via Commons Wikimedia.
Extreme weather in 2021
In the United States, the map below shows just the 2021 billion-dollar disasters through October 8. That does not include the tornadoes that ravaged the Midwest, including Mayfield KY, in early December or the fires that burned through the suburbs between Boulder and Denver CO, earlier this week, since those losses have not yet been tabulated. This also does not include the terrible disasters that happened in other parts of the world, such as the devastating spring frost in France’s wine country or the awful flooding in parts of Germany and Belgium last summer. While there is no doubt that a warming climate is partially to blame for many of these disasters, we are also putting ourselves in harm’s way by building in areas that are prone to flooding, wildfires, and other natural hazards that can lead to human disasters. Even if the climate were not changing, we are making matters worse by putting ourselves at higher risk in the way we build and develop land.
Looking back over last year’s climate
Climatologists are generally very busy this time of year,
since everyone (especially the media) wants to know how the year that just ended
compared to previous years. While it usually takes a few days for the
preliminary data to be complete, and a few months before the final
quality-controlled data are available, we can take a quick look at the past
year using online tools like the High Plains Regional
Climate Center’s ACIS Maps that compile climate information into simple displays.
The map below shows the percentage of normal rainfall for 2021 across the contiguous
United States. As usual, there are areas with very wet conditions and areas
that received less than a quarter of their expected precipitation. Sometimes
those areas are not very far apart—just compare southern California with
Arizona right across the border. Does the map agree with what you experienced?
If we look at the temperature map below, it shows that very few areas in the United States were colder than normal temperature. What makes this particularly concerning is that our normals were just updated this year, as I discussed in an earlier blog post. Because the temperature trend across the United States is upward, not flat, we can expect to see more years above than below normal in the future. This is leading to concerns about increased water and heat stress on gardens and gardeners who are working outside as well as damage to natural ecosystems not adapted to the warmer temperatures.
Reviewing your garden in 2021
New Year’s is a great time to evaluate the past year and plan for the next twelve months in your garden, too. If you have the chance, take a walk through your garden and see how it looks (of course, that assumes it is not covered by snow). How did your plants, shrubs, and trees do this year? Are new plantings well established, or do they need to be moved or replaced? Are your new trees correctly planted and growing well? Are you maintaining soil health and moisture with appropriate surface cover? If not, there is plenty of advice on how to correct problems in this blog—just do a search to find information that is based on current science, not hype. It’s also a great time to think about what you will be doing with your garden in the coming year. Perhaps the warmer temperatures will allow you to try new plants that you have not been able to grow before. I know many of you are already looking at the new seed and garden catalogs for next year, so dream away!
Don’t forget to prepare for bad weather, too
In addition to your planning for next year’s garden, don’t forget to prepare for extreme weather, too. Have a plan for where to go when severe weather threatens, and how to contact each other if you are away from home when it strikes. Keep an eye on weather forecasts so you know when conditions are likely to threaten. Have multiple ways to get severe weather warnings, including a NOAA weather radio and a cell phone that is charged and ON with the volume turned up and an appropriate warning app or two loaded. Don’t count on an outdoor siren to wake you up—they are not designed to warn people indoors. Get helmets to protect your heads from falling or flying debris if you can. Make an inventory of your household goods and store it somewhere safe (a good idea for any disaster, not just a weather event).
See you in 2022!
I’ve enjoyed sharing some of my weather and climate
knowledge with you over the past few months and look forward to continuing this
in 2022. I’ve also learned a tremendous amount from my co-authors and know that
you have, too. Enjoy the rest of your winter holidays! I hope that your 2022 is
beautiful, safe, and productive for all of you and your gardens too.
Auntie Mame was on to something when she told her orphaned nephew Patrick to “Haul out the Holly, Put up the Tree Before My Spirit Falls Again” (I just sang this in a concert with my community chorus. I’ve been hauling out the holly since August, so I’m done.)
Plants play a big part in our holiday traditions this time of year. When it comes to decorating for the holidays, needless to say I prefer a simpler, natural approach. The best inspiration — and materials — come from nature and sometimes from your very own landscape. It is no secret that the celebration of Christmas was timed by early church leaders to coincide with other ancient winter festivals that predate Christianity. It made it easy to get everyone to join in the celebrations.
Saturnalia was a Roman festival that celebrated Saturn, the
deity of agriculture, and the harvest. Yule was a 12-day midwinter festival
celebrated by Germanic pagans into which Pope Julius I inserted Christmas in AD
336 (there was no celebration of Christmas until then), giving rise to the
12-day Christmastide festival (or Yuletide, depending on where you are). The
celebration of the winter solstice is also of pagan origin, a celebration of
the darkest, or shortest, day of the year (in the Northern Hemisphere) and the
rebirth of the sun.
Many of these festivals included the bringing of evergreens
and natural elements indoors to celebrate the connection between humans and
nature. They were a sign that life would return after the cold, harsh winter.
And also a way to bring a little cheer indoors to brighten up the home during
the cold, dreary winter.
If you look at many of the more traditional elements of Christmas, you’ll notice their connection with nature, and specifically plants — evergreens, holly, amaryllis, poinsettias and more. Of course, the star of the show is the Christmas tree. Christmas trees as we know them didn’t debut until the 16th century in Germany.
A prickly holiday tradition
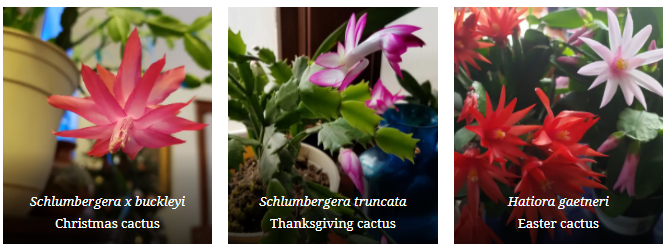
I’ve written about several holiday plant traditions over the years, each a different way to look at a plant that or plants that bring tradition and cheer into the home. Perhaps the most popular of these articles is about one of the most recent additions to the holiday plant family – cacti. The interest in this holiday plant is surging thanks to the interest in houseplants at the moment. This is making an issue I pointed out several years ago in the article A Cactus by Any Other Name: A Case of Mistaken Holiday Cactus Identity about the mis-naming of cacti even more important. There’s a Christmas cactus, but there’s also a Thanksgiving cactus (and an Easter one, too).
Thanks to years of marketing and selling Thanksgiving cacti as Christmas cacti (since they bloom early enough for the Christmas shopping season and actual Christmas cactus bloom closer to Christmas), many people confuse the two. This isn’t a big issue for the casual holiday plant shopper, but for those that “collect” the plants it can be an issue trying to sort out which is which. For example, someone recently posted in a local plant group that they were looking for a Christmas cactus. Half the responses were telling them where they could buy a Thanksgiving (more commonly called Zygo cactus after the zygomorphous shape of the flower) cactus and the other half were asking if they meant that they wanted a true Christmas cactus or a Thanksgiving cactus.
As romantic as poop on a stick
As holiday plant traditions go, the hanging of mistletoe has to be both the most interesting and weirdest. As tradition goes, if two people meet beneath the mistletoe they’re supposed to kiss. How did kissing become associated with a toxic plant that parasitizes trees and whose name translated from the Anglo-Saxon means “poop on a stick” from the fact that the seeds are spread by bird droppings?
Mistletoe: the romantic parasite (Source: Wikimedia commons)
As I shared in The Myth, the Legend, the Parasite: Romance, Lore, and Science beneath the Mistletoe, Norse legend has it that the goddess Frigga (Frig, or Fricka) made everything on earth promise to not hurt her beloved son Baldr, but she forgot to ask mistletoe since it was so small and innocent looking. Baldur’s brother, the trickster Loki (you know, the one in all the movies these days) made a spear of mistletoe and that ended up killing Baldr. The white berries of mistletoe represent Frigga’s tears, and she decreed that the plant should represent love and that no harm should befall anyone standing below it. And there you have it.
The flower that’s really just a bunch of overachieving
leaves
Most recently, I shared a bit of history and lore around poinsettias, that common but prissy holiday plant that most people can’t keep alive more than a few weeks. I mean, the original Aztec name for the plant, cuetlaxochitl (ket-la-sho-she), can be translated as meaning “flower that withers” or “mortal flower that perishes like all that is pure”, so the reputation fits. The actual flowers of the plant are the ugly little greenish-yellow bits in the center, which are highlighted by leaves, called bracts, that change colors to bright red (and more colors now) as the flowers develop.
The flower and the bright red represented a gift from the gods for the sacrifices that the Aztecs would make to them. You can read a bit about the history, and how to save them and get them to rebloom from year to year (if you dare) in my festive little ditty Poinsettias: from ditch weed to holiday super star (history, lore, and how to get those d@!% things to rebloom next year). Of course, there’s been recent discussion on how the story of the poinsettia is similar to the pagan traditions associated with Christmas – a plant tradition of the Aztecs was changed as a way to fit with the Christmas story and work as a conversion tool. It is good to know a bit about the original tradition of the plant to understand its importance throughout history.
Haul out the holly….and the magnolia….and the
rhododendron…..
Holiday plant traditions don’t stop at those finicky plants
we grow in greenhouses- the original traditions of Solstice and Yule consisted
of bringing in all different types of plants for the season. Sometimes you have
to look no farther than your yard to find natural elements fit for a holiday
celebration. If you have evergreen trees or shrubs in your landscape, they can
easily be incorporated into holiday arrangements indoors or out.
While you can readily purchase live Christmas greenery at
many retailers and markets (except for this year, with all the supply issues
going on), what you can harvest from your own yard or nearby woods (where permissible)
will be much fresher and last much longer. Remember that harvesting branches
from your own trees and shrubs is actually pruning them, so you can kill two
birds with one stone.
Both white and Virginia pine make excellent decorating choices as they are long-lived and retain their needles well. Junipers, cedars and firs all have interesting foliage and wonderful evergreen scents. Junipers can sometimes be found with berries and cedars sometimes have tiny cones. Spruce is a great choice for wreaths, as it is bristly and holds its shape.
Decorating doesn’t have to be left to the needled
evergreens, though. Holly is a classic choice, but mountain laurel,
rhododendron, boxwood and magnolia and many others can provide beauty and
elegance in holiday displays.
You don’t even need to stick with green things in your
decorating, either. Attractive bare branches, plumes from ornamental grasses
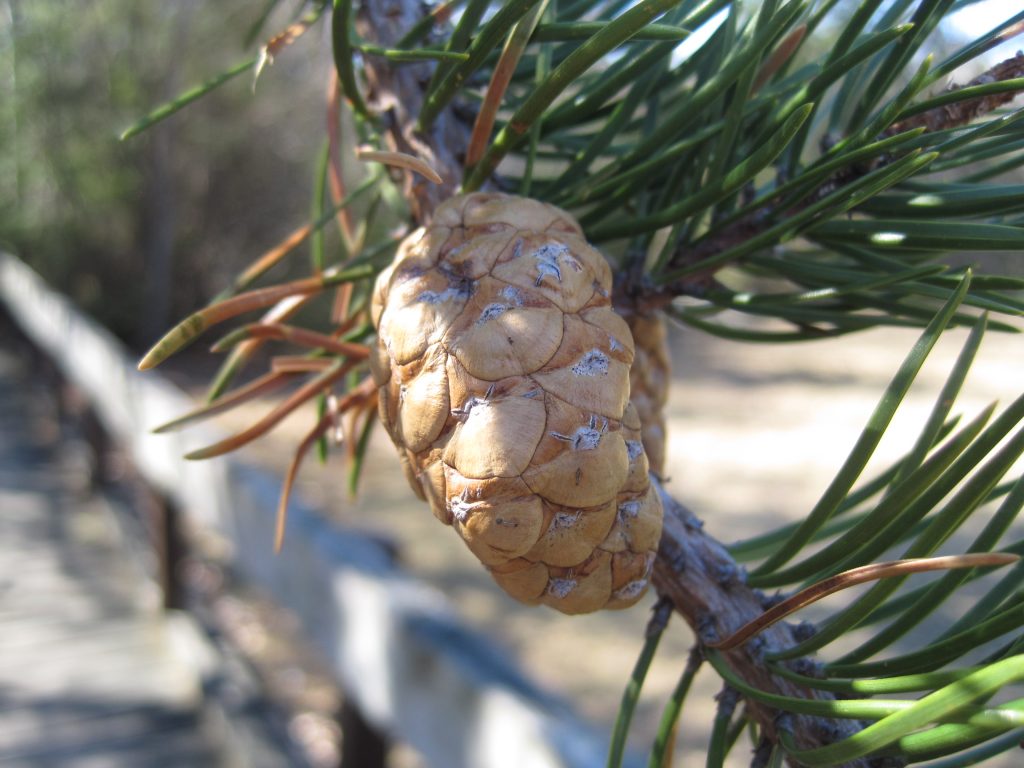
and other “brown” things can add contrast. Other natural items, such as fruits,
nuts and pinecones can also be incorporated for color and interest. Just take a look around your yard or
neighborhood to find those natural elements to bring indoors.
To keep your greenery fresh, there are some basic tips that
you can follow:
Use sharp pruners to make cuts, and keep the
ends of branches in water until ready for use.
Soak evergreens in water overnight to absorb
moisture and extend shelf life.
Keep arrangements in a cool location until use.
Keep evergreens out of sunlight to reduce
moisture loss.
Use an anti-transpirant spray to keep in
moisture.
Don’t decorate too early — live plants have a
limited lifespan.
If purchasing plant materials, select healthy,
green plants and flexible needles/leaves.
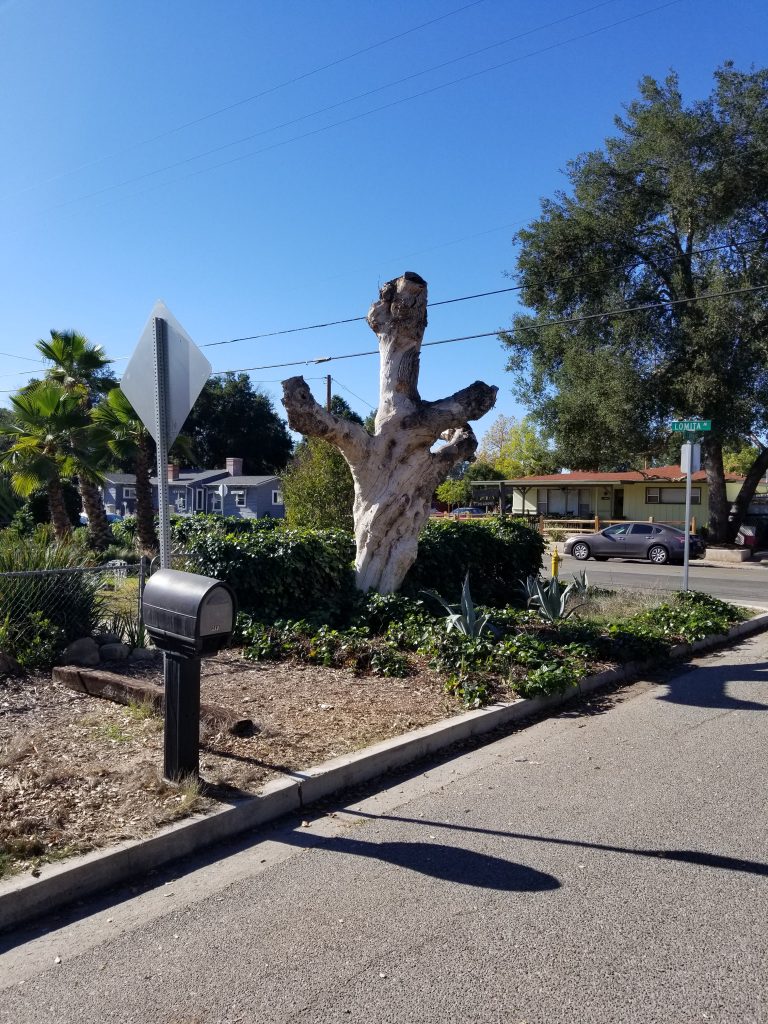
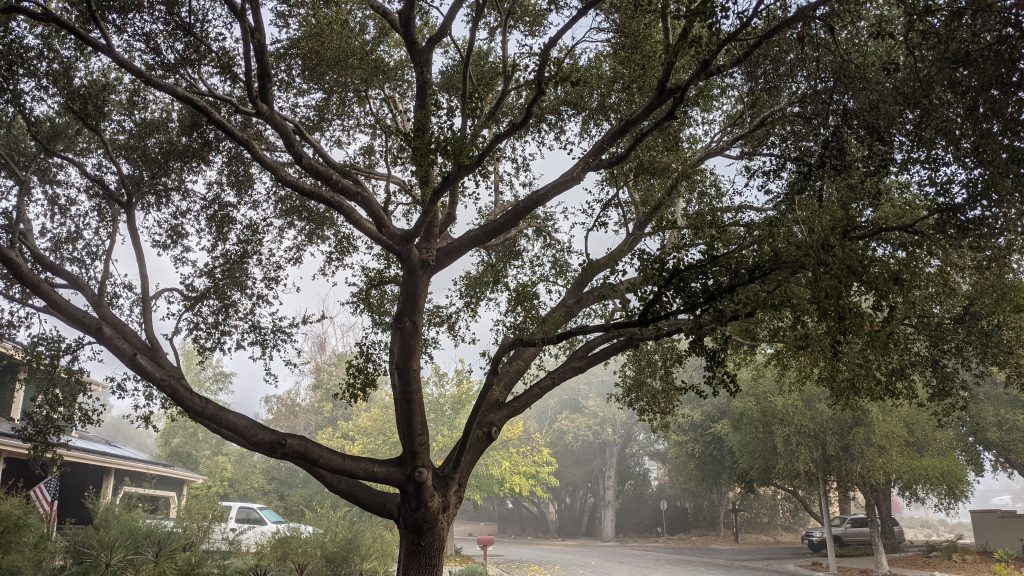
Large trees bear the burden of their insults over the years. From injury to pruning wounds these assaults add up. Keep in mind mature trees need all their leaves to sustain their energy balance. This tree needs little or no pruning at this time.
Very large and old trees don’t often attain size and splendor free of defect and disease. A mature tree may have accumulated some damage, injury or disease along its path to grandeur. It can contain hazardous branch attachments that have not failed yet, large sections of dead wood or it may bear the burden of an assemblage of cables and other devices installed over the years to sustain it. Very old mature trees have endured perhaps multiple human lifetimes of exposure to storms, droughts, pests and, perhaps worst, early pruning practices. Trees gain age and majesty when they don’t fall down or fail multiple large branches. To do this trees defend their wood biochemically from invading fungi. Trees also cover over decayed wood with new wood that is fairly impervious to the old infection. High vigor trees with adequate resources (water, soil, sunlight) should be able to contain decay that would shorten their lives otherwise.
Chart from Shigo (2003). P is % of either living (L) or dead (D) wood pruned. Y is a young tree, M is a mid age tree and OM is an over-mature tree. A is age of the tree. So as trees age we should remove less living and more dead tissues.
Dr. Alex Shigo (2003) devised a chart showing the amount of pruning over a tree’s life time. Young trees have all living cells and most of the wood is sapwood, therefore the trimmings in young trees are of living tissues. As trees grow older and shade themselves heartwood develops in the canopy. It’s not living, doesn’t conduct water and minerals but does provide support to branches and strength to the canopy. Heartwood is also more resistant to decay than sapwood. The pruning of a mature tree removes a combination of living and dead cells. An over mature or ancient tree has much more dead cell tissue and only deadwood should be removed with an attempt made to preserve all stems with leaves.
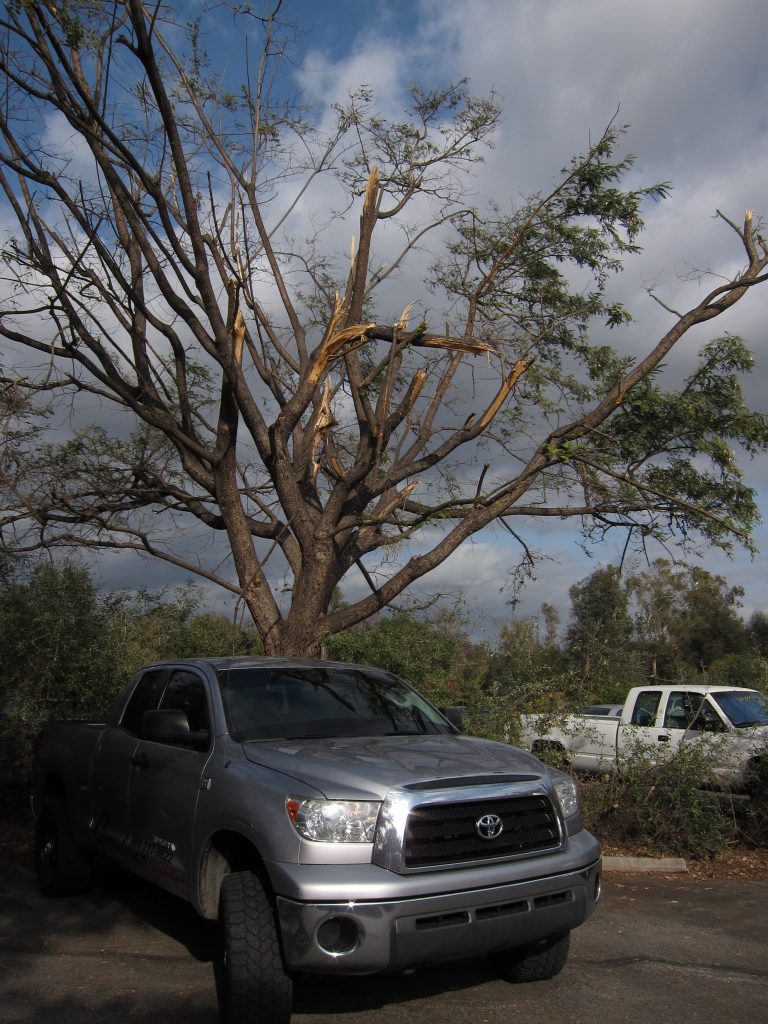
This tree was severely headed back a few years ago and did not have enough stored energy to regrow new scaffold branches. The tree is now dead.This tree was “topped” by an unprofessional trimmer who left 4-5 foot bark peels behind on the remaining leaders. All the shoots are epicormic (an epicormic shoot grows from an epicormic bud which lies underneath the bark of a trunk, stem or branch of a plant) and will become poorly attached branches which may fail if not kept reduced by further pruning. This sort of pruning creates a need for more pruning to correct the bad branch faults.
Large trees have large branches and the temptation is to remove large branches to achieve pruning objectives. This would get more done and we would then have to prune less, right? But this is a flawed strategy and the results are the opposite of what the tree owners are trying to achieve. As trees get large, pruning cuts should be smaller and occur frequently. Guidance can be given to branch growth by many small cuts rather than large ones. This approach directs growth without causing rampant regrowth of dormant or latent buds. Latent buds have a purpose, they rescue trees from death should there be a catastrophe. They are preformed along large branches and will sprout when exposed to sunlight or when the terminal buds are removed. Large topping or heading cuts typically activate latent buds and the tree subsequently grows back too many branches in one place. These require selection and careful removal over time and can involve quite a bit of repair pruning to fix the tangle cause by massive heading cuts. Aging trees develop an extensive heartwood that is easily exposed to decay from large pruning wounds so large cuts should be avoided.
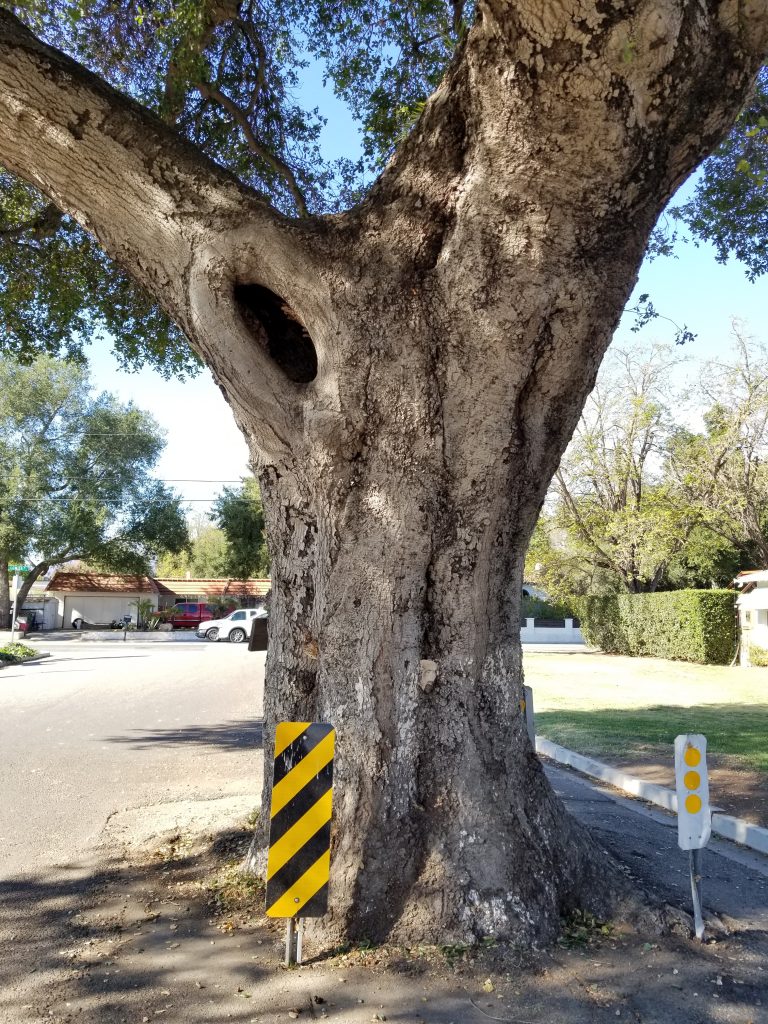
Large trees develop decay and cavities. This oak pictured above also has active Ganoderma spp. fruiting bodies indicating that decay is active in the tree (white spot in the mid trunk just to the right of the sign). Presence of decay does not mandate pruning or removal but rather monitoring and assessment for risk for the tree in its environment.
Larger trees develop more sapwood which needs energy for respiration relative to the amount of leaves in the canopy. The first duty of the leaves is to provide energy to keep all the cells in the young phloem and sapwood metabolically active. A typical tree only utilizes a few growth rings of sapwood for water transport and energy storage. As these rings age they narrow and there is less tissue from which to store and retrieve energy. Despite the subtle balance between canopy and energy utilization trees continue to grow throughout their lives at more or less the same rate. As trees age the amount of non-functional wood increases, this may be heartwood or deadwood in the canopy. At the end of their lives trees have nearly no living sapwood and the energy of the tree is mostly depleted. Over pruning causes further energy depletion. Removing leaves and buds that give rise to leaves from old trees reduces the amount of energy stored. This forces the tree to utilize sapwood reserves to recover from the pruning losses of the photosynthetic part of the tree. Severe pruning in old trees ultimately depletes them of stored sugars and leaves them without energy to make defensive compounds. This can exacerbate conditions by allowing disease or decay organisms to enter the sapwood.
This Liquidambar was headed and never grew back sufficiently. It suffered with bacterial leaf scorch and yet is still alive. Note the acorn wood pecker habitat on the right leader. The tree is not likely to fail and is providing habitat for small owls. While it is not dignified or healthy it still has value in the landscape.
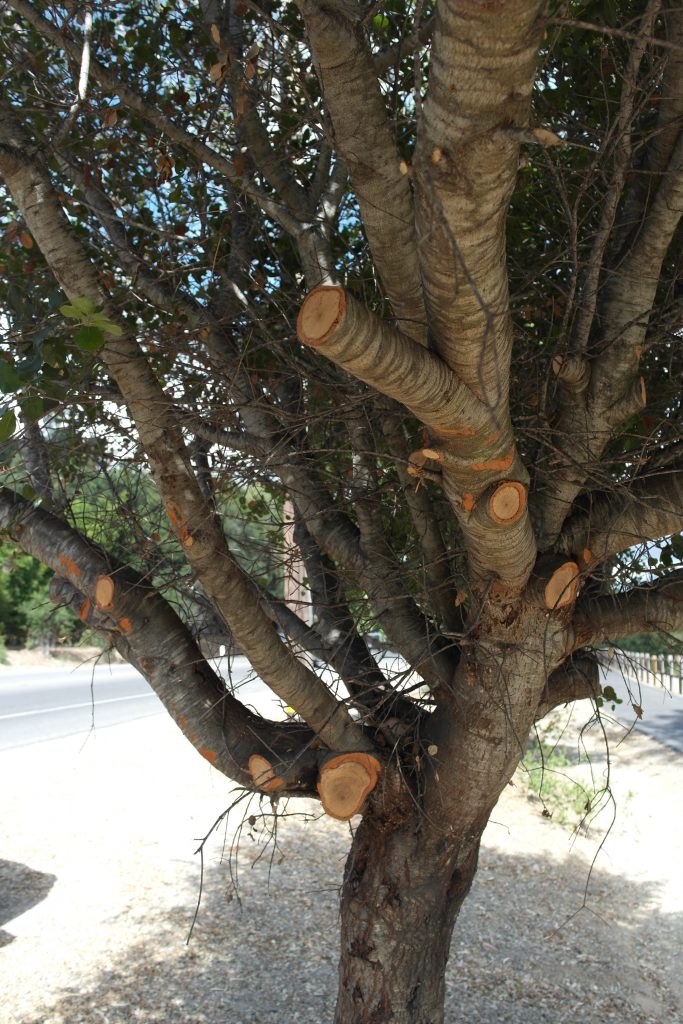
What if your large tree was never structurally pruned and has branch faults or you have concerns for failure? You should always consult a certified arborist with training in Tree Risk Assessment. The health of the tree is important but the safety of those living around it is more important. Sometimes targeted pruning can be used to shift the balance of growth in a tree and strengthen branch attachments. This can take years of careful pruning with small or modest cuts. When large branches must be removed they should be left as long as feasible and the cut should be circular not an oval shape to decrease exposed surface area. Large pruning wounds should be limited to the fewest number required to achieve the pruning goal. Pruning paints and wound dressings are not recommended.
Large trees accumulate deadwood during natural senescence of inner branches or due to injury, disease or insect attack. Common practice has suggested removing deadwood from old trees but as arborists become more sensitive to urban ecology issues we realize that deadwood is prime habitat for cavity nesting birds and other life. Deadwood serves a purpose and, if it does not pose a threat to those living under or around the tree, it should be retained especially if evidence of utilization is present.
Caring for large trees is tedious because there is a lot at stake. Old trees are valuable and provide many benefits to their owners. Always seek expert opinions and be willing to pay for them, preferably from the arborist who does not do the pruning. Then act on those opinions with care and consideration and always closely supervise any pruning being done to your trees. Use the following pointers from Gillman for mature tree pruning strategies: -Evaluate your tree for health, strong branch structure and evidence of decay -Remove dead branches as needed but retain some for wildlife if needed -Perform structural pruning when feasible -Shorten or remove branches with cracks swellings or deformities -Remove parasites such as mistletoe or canker infested branches -Retain as much live tissue as possible while achieving pruning objectives -Keep cuts small (2inches) or moderate (4″) if the tree is a good decay compartmentalizer
References: Gillman, E.F. 2012. An Illustrated Guide to Pruning 3rd ed. Delman Cengage Learning, Clifton Park, NY. Manion, P.D. 1991. Tree Disease Concepts. 2nd ed. Prentice-Hall, Englewoood Cliffs, N.J. Shigo, A.L. 2003. Modern Arboriculture A systems approach to the care of trees and their associates. Shigo and Trees Associates Durham, NH. 3rd ed.
Welcome to the first People and Plants GP blog post. These posts, which will be on a random basis, will take a behind the scenes look at the namesake people behind many plant names. This first one will be about Andrew Jackson Downing.
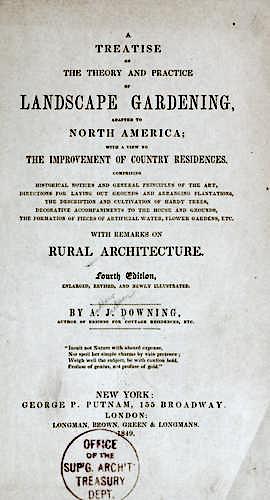
Andrew Jackson Downing was born October 30/31, 1815 in Newburgh, New York to Samuel Downing and Eunice (née Bridge) Downing. His father was originally a wheelwright but later became a nurseryman. After he finished his schooling Andrew worked in his father’s nursery and was soon bitten by “the plant bug”. I’m sure many of us can identify with that “affliction”. Over time he became more interested in landscape gardening, architecture and the relationship between them. He began writing articles about botany and landscaping but soon realized he needed to know more about both topics and so began a course of self-education. By the 1830’s he was producing pieces for newspapers and hort journals and in 1841 his first book, *A Treatise on the Theory and Practice of Landscape Gardening, Adapted to North America, met with great success. It was the first book of its kind published in the United States.
Downing continued to write on the importance of linking landscaping and architecture and was well thought of in the industry. What really put him on the public gardening radar was a book he and his brother Charles wrote. The 1845 book, The Fruits and Fruit Trees of America, was the most complete one of its kind to date and led to Downing’s becoming the editor of a new periodical, the The Horticulturist and Journal of Rural Art and Rural Taste. The journal came to be his strongest influence on society and operated under the premises of horticulture, botany, entomology, pomology, rural architecture, landscape gardening, and ideas dedicated to public welfare, specifically public parks and what we now call “open space”. As an example he argued for a New York City park, which in time became Central Park, in this journal. It was also in this publication that Downing repeatedly pushed for state agricultural schools. He held the position of editor until his death in 1852.
Downing was greatly influenced by the British “picturesque” landscape theories of the era. By the time he published the second edition of his Treatise he was a firm believer in the advantages of the picturesque landscape movement. He embraced the use of local landscape features especially “the raw materials of wood, water, and surface” and, when possible, the blending in with the local terrain instead of creating an artificial, out-of-place one. He became the mid 19th century champion of natural style landscapes and helped steer American gardeners away from the more formal, geometric lines that had dominated the 18th and early 19th centuries.
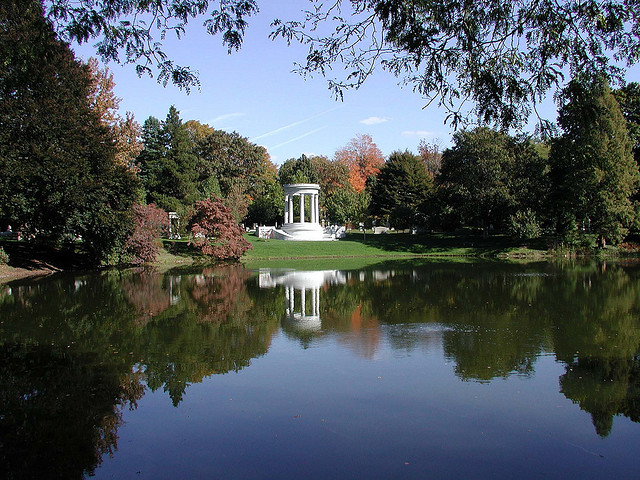
Mt. Auburn Cemetery is in the Picturesque style – photo courtesy of Friends of Mt. Auburn
As an editor, Downing repeatedly addressed the importance of urban and suburban public gardens and parks. He felt such spaces would aid in the fostering of moral and civic virtues in the American public. In the October 1848 Horticulturist editorial “A Talk about Public Parks and Gardens,” Downing wrote that public parks would play an important role “in elevating the national character.” He also believed interacting with nature had a healing effect on mankind, wanted all people to be able to experience nature and felt city parks were vital in helping maintain a healthy community. Downing had a wide audience through his books and editorials in the Horticulturist but his influence went beyond the readership of his publications. Private and public gardens and city parks that proliferated through out the USA during the mid 1800’s owed their existence to his ideas.
Downing did much more than this blog post will discuss so let’s move on to the plant.
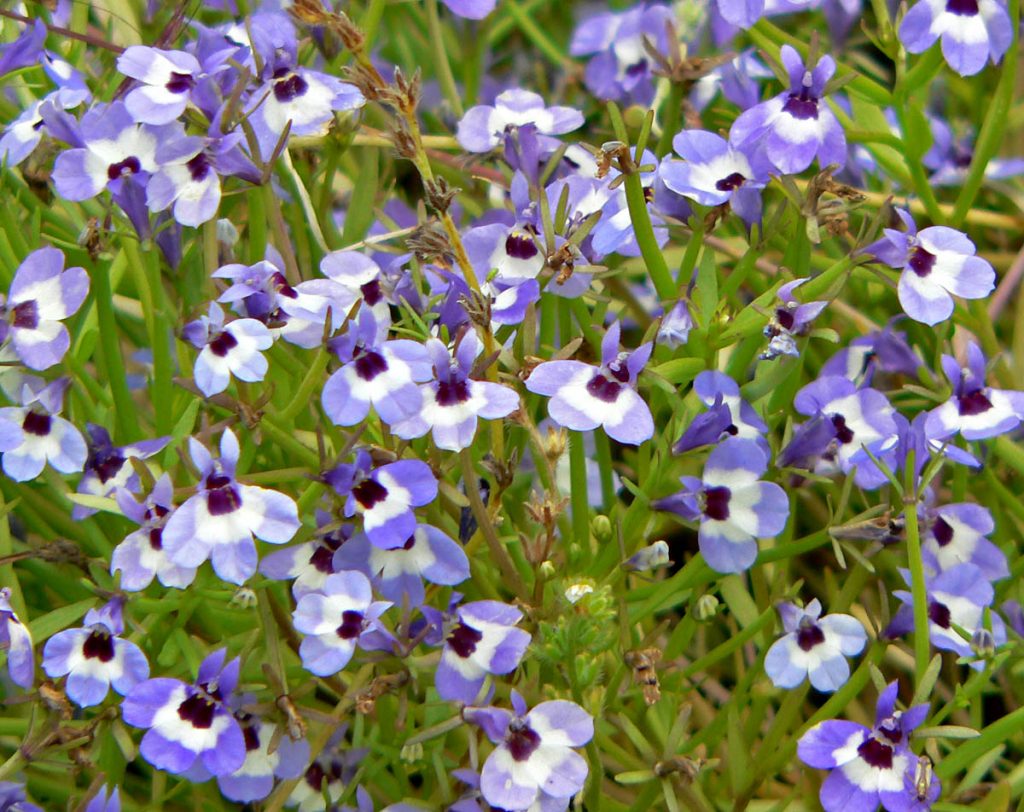
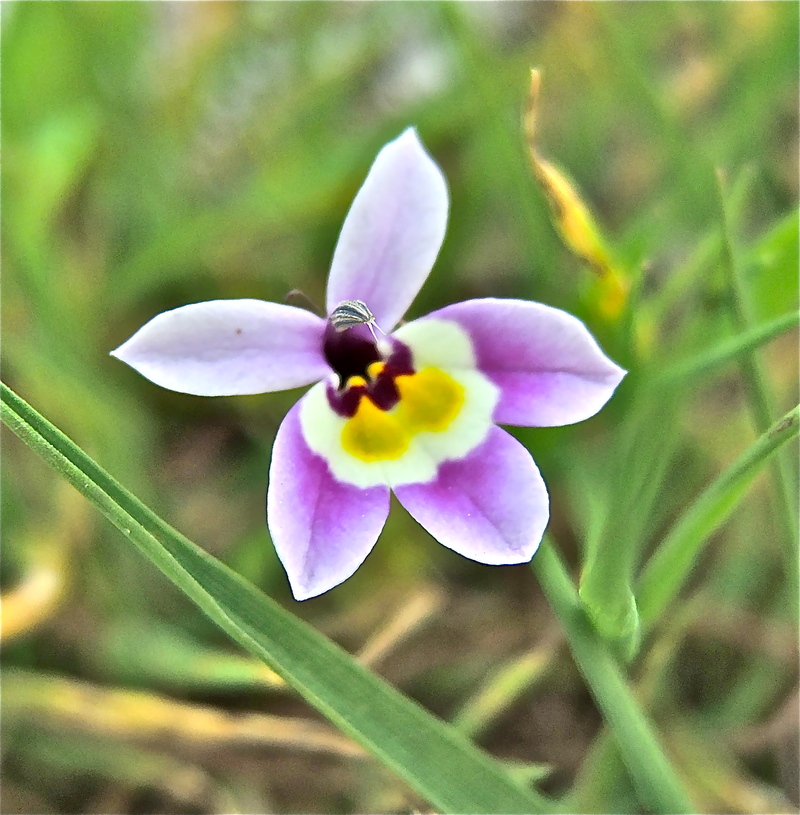
Downingia concolor
The genus **Downingia is named after Andrew Jackson Downing. It contains 13 annual plants which are native to the western USA and Chile. Commonly known as calico flowers, they are noted for forming large displays of small colorful blooms around seasonal or ephemeral pools of water. Interestingly each pool will usually only host one or two species of Downingia even in areas where multiple species exist. It’s a member of the bellflower family and the plants are 3-10″ tall. Flower size varies but each flower has five corolla lobes or petals. The two upper petals are smaller than the three lower ones. Coloration is mainly blue/purple/pink with a little white, yellow, and black. Downingia must cross-pollinate. To prevent accidental self-pollination, the flowers mature in stages, they go from male to female. This change is time coordinated across each patch of flowers. How this is done is still unknown. The species is pollinated by native solitary bees.
Downingia pulchella Photo by John Doyen Downingia bacigalupii Photo by Gary A. Monroe
Linda’s post last week about “drought-resistant” plants made
me think about drought and how different types of drought affect gardeners in
different ways. In her article,
she defined drought as “an unusual lack of rainfall”. This is one of four
different kinds of drought that climatologists talk about, and I thought it
might be interesting for you to hear about how the four (or maybe five) types
of drought differ and how they affect gardeners in diverse ways. A great source
of drought information across the U.S. is https://www.drought.gov/.
The first type of drought, the one Linda described last
week, is what climatologists consider a meteorological drought. A
meteorological drought is related to how much rain you get compared to usual
conditions at your location. I like to think of it as “too many days of nice
weather in a row”, since in these dry conditions, the sun is shining and it is
a great time to garden, play golf, or do construction. Of course, if you don’t
get rain for a long time, you start to see impacts on plants, water bodies, and
wells, but meteorological drought is usually not identified in terms of
impacts, just on the amount of precipitation measured over weeks, months or
years. Meteorological droughts look different depending on where you are. It is
possible to have drought even in a desert if rain does not fall over an
unusually long time. Droughts in the Pacific Northwest might look quite
different since the frequency and amount of rain looks a lot different there. In
the Southeast, drought can be hard to identify by looks since even when rain
does not fall for a long time, things tend to stay relatively green because in
our worst droughts we still get 35 inches of rain a year. Most gardeners can
cope with meteorological drought by watering their plants at appropriate
intervals and reducing impacts of the dry conditions by mulching to help keep
moisture in the soil.
Iowa County Drought 2012, source: WxMom , Commons Wikimedia.
Agricultural drought
I spend a lot of time talking about agricultural drought
to the farmers and extension agents I work with, because agricultural drought
is always on their mind. Agricultural drought is defined by a negative water
balance that can be related to both lack of rainfall and/or high temperatures
that increase evaporative water stress on growing plants. It occurs mainly in
the growing season because that is when the crops are actively growing and
impacts are most noticeable. A 3-week dry spell may not be a problem for most
gardeners that water their plots, but if you are a dryland farmer without
irrigation, you can lose an entire crop of corn for the year if the dry spell
occurs when the corn is pollinating and the silk dries out before the pollen
can stick to it. Often agricultural drought can occur even when there are no
other impacts to us because it is subtle; most people don’t see the impacts
until months later during harvest. If you have limited access to water for
irrigation or very sandy soil in your garden, then you are more likely to be
affected by agricultural drought since it will be harder to maintain plant
health when the soil is dry.
Agricultural droughts are often related to flash droughts.
Flash droughts are characterized by very rapid development or intensification
over a short time period, and crops are often the first things affected because
of their need for frequent watering. Flash droughts are often characterized by
a lengthy dry spell coupled with very high temperatures, something that is common
when you have a persistent area of high pressure right over your location.
Ladybower Reservoir during the drought of 1989, source: Lynne Kirton, Commons Wikimedia.
Hydrological drought
Where agricultural drought is related to a shortage of water
over time periods as short as a week to a month, hydrological drought is
related to a shortage of water over months or years. Climatologists measure
hydrological drought as precipitation deficits over periods that range from
three months to multiple years. You can see hydrological drought in dropping
stream, lake, and reservoir levels and in dropping groundwater levels if the
deficit lasts long enough. A hydrological drought can occur even if no
agricultural drought is observed when you get rain at frequent intervals but it
is less than normal over a long time period, as long as the rainfall is enough
to sustain the crops (or if it is winter, when there are not many crops
growing).
Hydrological drought tends to affect gardeners’ access to water for irrigation because the long-term water deficits lead communities to enact water conservation measures to protect drinking water supplies. Most local and state governments have tiered conservation measures that get more strict as the water supplies get lower and lower. They may start by merely providing educational materials on water conservation and then progress to even-odd watering by dates or watering during overnight hours only (since there is less loss of water due to evaporation in cooler night-time temperatures). In the worst droughts, they may cut off the use of water for establishing new lawns and gardens (often with an exception for gardens that are used for food production). If a drought lasts for many years or even decades, then it is considered a megadrought, such as the one that is occurring now in the Southwest U.S. Megadroughts are related to long-period shifts in global atmospheric patterns and can lead to the abandonment of cities because of the loss of water to keep their citizens alive over time.
Socio-economic drought is a little different than the
other kinds of drought mentioned above. It is drought caused by a lack of water
due to overuse, hoarding, or war. An example of a socio-economic drought might
be one caused by one country damming a major river in their country to create a
reservoir, keeping the river water from flowing downstream to other countries
that depend on the water for agriculture or water supply. In the United States,
disagreements between who is allowed to use available water often end up in
court as cases like the Georgia-Florida “water war” that was recently adjudicated
in the U.S. Supreme Court. Locally, disagreements about who is allowed to use
the water sometimes result in tiered water pricing, where the more water you
use, the higher the price. This affects gardeners who have plots that use a lot
of irrigation because of the use of water features, plants with significant
water needs, or lack of mulching or other methods of protecting soil moisture.
Recently, a fifth type of drought called ecological drought has been identified, since a lack of rainfall can affect natural ecosystems in ways that are distinct from gardens, farms, or watersheds. I won’t address it further here, but if you are interested in how natural ecosystems are affected by dry conditions, you will no doubt read about ecological drought in publications in the future.
Drought is a naturally occurring part of the climate across the world, and gardeners must understand the nature of drought in their area to recognize how it affects the weather and climate where they live. Linda’s article last week gives some good guidelines for how to make your garden work in your climate.
Nothing drives me crazier than simplistic solutions to
complex problems. Given our changing climate, there has been an explosion of
“drought tolerant” and “firewise” plant lists in the gardening world. Most of
these lists are devoid of science and all of them are removed from reality. The
fact is that taxonomy plays a minimal role in determining whether a plant will
tolerate environmental extremes.
Lack of irrigation and mulch guarantees a drought-stressed landscape regardless of the selected species.
Let’s start with the most obvious problems with these lists.
The goal isn’t to have plants that require less additional water – it’s to have
a landscape that requires less additional water. Similarly, the relative
flammability of plants is less important than whether the landscape surrounding
those plants is protected from fire. Plants don’t exist in vacuum and unless
you are strictly a container gardener a single plant’s impact on water use or
fire resilience is negligible. So a gardener’s questions should be “How can I
make my landscape more drought tolerant? How can I reduce the likelihood of
wildfire damage?” And these are questions that can be addressed with knowledge
gleaned from applied plant and soil sciences.
Drought Tolerance
Arborvitae can tolerate droughty summers, but they don’t tolerate improper planting and management.
First of all, let’s think about what “drought” really means:
it’s an unusual lack of rainfall. It doesn’t mean no irrigation, and it doesn’t
mean dry soil. Drought is a climatological term, not one associated with soil
water management. Fine roots and their root hairs require water to function. Without
sufficient soil water plants will go dormant or die, particularly during
establishment. Plants that are drought tolerant can tolerate seasonal lack of
rainfall, but they can’t tolerate chronically dry soil conditions.
Even “drought tolerant” species like Sempervivum will die if there’s not enough soil water.
So we need to look at the landscape factors that allow
plants to survive droughts. This includes
Root systems that are well established. This means no barriers between the roots and the landscape soil system. Barriers include soil amendments and any materials left on roots during transplant (like soilless media, clay, and burlap). Obviously proper planting is key.
Adequate water movement into and within the soil environment. Anything within the soil environment that creates a textural barrier, like soil amendments, prevents water movement. Anything on top of the soil environment that creates a physical barrier, like sheet mulches or compacted layers, prevents water movement into the soil. Sheet mulches include plastics, fabrics, cardboard, and newspaper.
Adequate irrigation to support all plants in the landscape. The easiest way to determine whether there is enough soil water is to focus on one or two well-established indicator plants that you notice are the first to show wilt in the summer. That’s when the irrigation should be turned on. For our landscape in Seattle, it was a south-facing hydrangea.
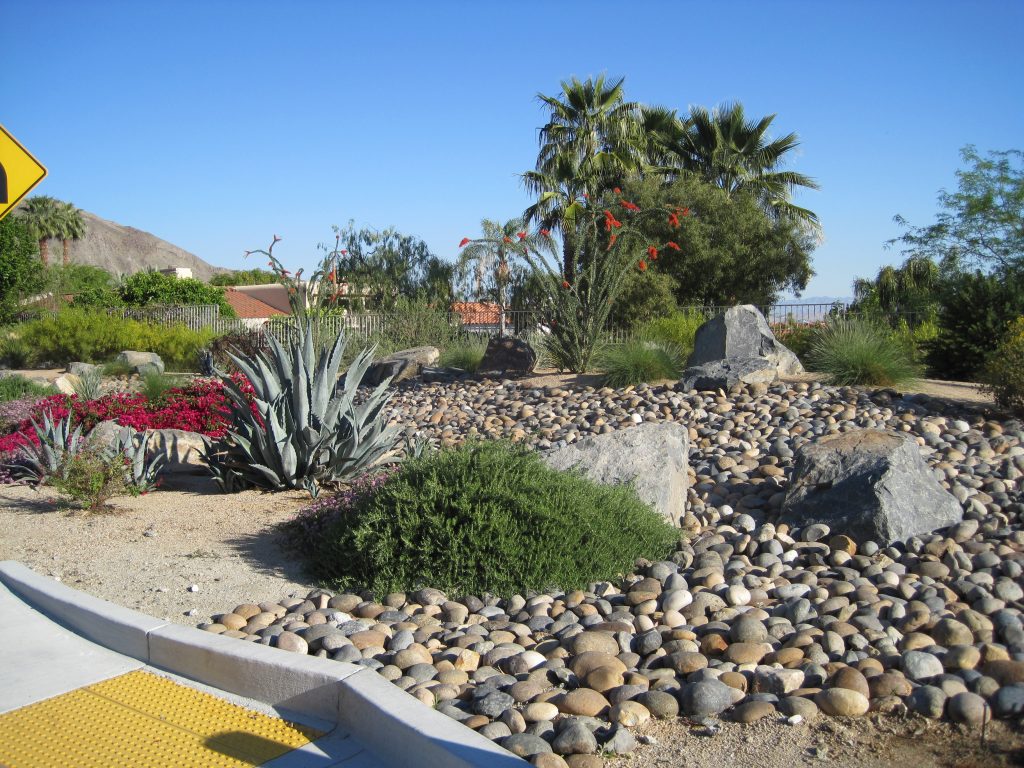
Properly mulched soil. Mulch is crucial for soil and plant health, especially in terms of soil water retention and temperature moderation. The best choice for a tree- and shrub-dominated landscape is arborist wood chips. The best choice for arid landscapes is stone mulch – but if this landscape is dominated by trees and shrubs, you need the wood chip mulch. Trees and shrubs, by and large, are not the dominant plant form in arid environments. If you are going to grow plants out of place, you need to include the mulch that matches.
The broad, thin leaves of hydrangeas lose water rapidly and make a good indicator plant for water stress.
These four environmental conditions are key to maintaining a
drought-resistant landscape. In terms of appropriate plants, just realize that
plants with small, thick leaves lose less water than those with broad, thin
leaves. If you want a landscape that conserves water, by all means choose
plants whose evaporative water loss is the least.
Firewise Landscapes
Jack pine (Pinus banksiana) produces cones that require fire to open and release their seeds.
I’m not crazy about the term “firewise” as it’s not really a science-based concept. There are natural landscapes that routinely experience fires, and plants native to these landscapes have evolved mechanisms to survive moderate fires. Trees with thick bark, for example, can survive fires that are low to the ground and quick to move through. Other plants may perish in a fire, but leave behind fire-resistant seeds that are able to germinate after the next rainfall. This is not what’s meant by a firewise landscape. Instead, the premise appears to be selecting plants that are low flammability. (Jim Downer tackled this one a few years back but the message just isn’t sinking in.)
Failing trees of any species are more flammable than living trees of any species.
Once again, the focus of this approach is mistakenly
directed to plant selection rather than landscape resilience. The best way to
reduce the risk of fire is to have a landscape filled with healthy, hydrated
plants and a soil protected by the least flammable mulch. The two mulches
recommended for drought tolerant landscapes also happen to be the least
flammable: stones and arborist wood chips.
Bark mulch is hydrophobic and flammable in the landscape.
Arborist wood chips are hydrophilic and nonflammable in the landscape.
All wood-based mulches are not created equal.
Despite published evidence that arborist wood chips are not very flammable when compared to all other organic mulches, many governmental groups specifically recommend against them. This is a problem. Stone mulches are great choices IF the plants in question are native to arid zones. Trees and shrubs that are not from arid zones generally require the presence of woody debris to enhance mycorrhizal and root health. Without the proper mulch, these woody plants are less healthy and likely less hydrated than their counterparts under arborist chip mulches. That makes them more, not less, susceptible to fire damage.
A stone mulch in a southwestern desert landscape.
Most of the confusion around arborist chip mulches is probably the result of regulatory agencies confusing bark mulches with wood chip mulches. Bark mulches ARE flammable as they contain waxes and are not great choices for root and soil health. They should be avoided. Agencies associated with fire control methods need to be better informed about the significant differences between these two types of mulches and how they affect plant resilience.
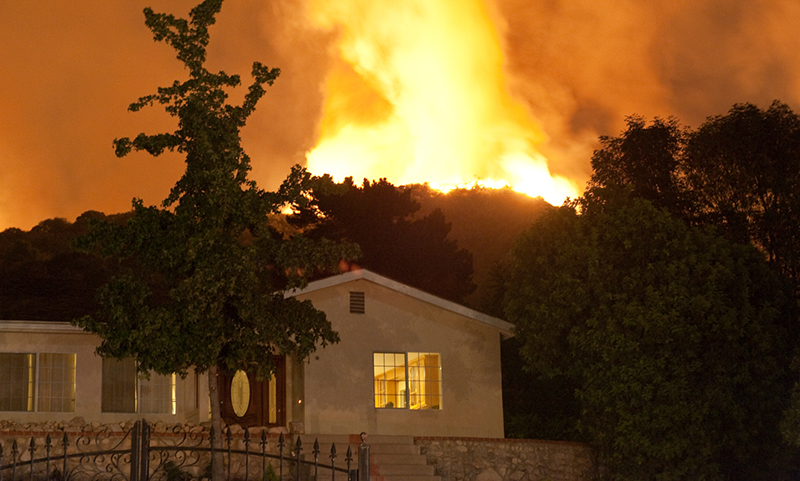
The wildland-urban interface faces the risk of extreme fire danger. [Photo byAnthony Citrano]
And finally, it is important to understand that major
wildfires are going to burn anything that’s organic. If you live in such an
environment, the best thing you can have in your landscape is no plant material
of any sort. A buffer of stone mulch is the only logical option.
The holiday season creeps earlier and earlier each year, at least here in the US. Decorations, trinkets, and more start filling store shelves before summer is even over. But some holiday traditions can’t be rushed, like live holiday plants. Many of these picky plants have to be bought and cared for closer to the holidays, else they likely won’t look so festive once the holiday finally arrives. Since the origins of many of the holiday traditions are pagan and druid in nature, it stands to reason that plants are a major theme for the holidays. I’ve written before about the origins of using the plant parasite mistletoe as a holiday decoration and invitation for lip locking. And also about how what most people call a Christmas cactus is actually a Thanksgiving cactus and they are actually two different things (and there’s also a Spring/Easter cactus as well. We have amaryllis, paperwhites, cyclamen, Norfolk Island pines, pine-shaped rosemary plants, and more that make up our usual holiday decor. But none are so vibrant and indicative of the holiday as the poinsettia. So let’s talk a little about the history and lore of this plant and also about how day length affects its colorful holiday display. Just in case you want to try saving one from year to year.
Poinsettias take center stage as a 25 ft tall tree at Lauritzen Gardens in Omaha, NE each holiday season.
What is a poinsettia, anyway? It doesn’t really look like other plants.
This plant is a standout in the mostly weed-filled and much-maligned spurge family Euphorbiaceae. This family includes lots of different plants that take on a variety of forms. It does include many weeds, but also many houseplants that have much more of a cactus form than poinsettia. Relatives you might find as houseplants include a cactus-like plant with leaves on its margins (mainly just called Euphorbia), a plant called crown of thorns and a sticklike plant called pencil cactus. It is a weird family. Most of them do have a sap that can cause dermatitis in the skin or a stomach ache if ingested. But poinsettia has earned an incorrect reputation as being poisonous and a plant to steer clear of if you have kids or pets. Sure, ingestion might cause a tummy ache and associated symptoms, but the amount of poinsettia one would have to eat to actually have life-threatening symptoms is astronomical.
These ugly bits in the center are the actual flowers of the poinsettia.
While we enjoy poinsettias for their bright colors, it would be incorrect to say that poinsettias have large, colorful blooms. The colors that we see are called bracts — brightly colored leaves. These bracts change color much the same way leaves change color in the fall: They lose their green chlorophyll to expose the color beneath. This happens when the flowers, those ugly little yellowish lumps in the middle of the bract, mature.
While the classic red poinsettia (pronounced poin-SEH-tee-uh, not poin-SEH-tuh, by the way) lends itself to the classic colors of Christmas, it might be hard to figure out how this weed from Mexico found its way to the top of the list of traditional holiday plants. After all, it is a much more recent addition to the holiday decoration arsenal than the evergreens borrowed from ancient pagan rituals. And while we most often think of red poinsettias, there are hundreds and thousands of different cultivars and colors – and we’ve even taken to spraying them with dye and glitter (shudder).
Poinsettias these days come in all shapes and sizes and colors.
Poinsettias are famous for having a difficult blooming process. The plants are considered short day plants, thought the more accurate description would be a long night plant. This means that in order to set blooms, the plant needs a few weeks where it receives at least 12, and preferably 16, hours of uninterrupted darkness each night. This creates physiological and chemical cues that allow for development of floral structures, which in turn result in development of the colorful bracts. Even a few seconds of light in the middle of the night can stop, interrupt, or delay the process. This often makes saving poinsettias from year to year difficult, and can even make it difficult for commercial growers to provide darkness in our ever (artificially) brighter night sky.
How did a weed get associated with Christmas?
The poinsettia (Euphorbia pulcherrima) is a native plant (and can grow as a fairly large shrub or tree) in Mexico. The original name used for the plant, prior to Americanization, was cuetlaxochitl. I’ve seen them in several places around the world, including one as big as a tree in Kigali, Rwanda (other Euphorbia, like the pencil cactus also grow there). A local Mexican legend from the 14th century explains that a young girl on her way to Christmas Eve mass was upset that she had no gift for the baby Jesus and picked a handful of weeds on her way to church. As she placed the humble bundle of weeds on the altar, they erupted into brilliant red, and all those around exclaimed that it was a Christmas miracle.
Aside from the miracle legend associated with the flower, there are other connections between the plant and the holidays. The traditional red of the poinsettia is cited by many as a representation of a blood sacrifice and the shape of the flower as the Star of Bethlehem. Before poinsettias became a worldwide symbol of the holidays, Franciscan friars included the vivid plants in Christmas celebrations in the 17th century. In Mexico, the plant is also known as Flor de Nochebuena, or Holy Night (Christmas Eve) Flower.
From ditchweed to international holiday superstar
The poinsettia really didn’t come into its current fame until it was introduced to the United States in 1825, at the hands of a politician. It just so happened that the first U.S. minister to Mexico (this was before we had ambassadors) was an amateur botanist. He brought the plant back to his private hothouses in South Carolina, and then shared it with friends (including renowned botanist John Bartram) who introduced the plant to the nursery trade. It filled an empty spot in the nursery calendar, so nurseries were quick to embrace the plant.
This is the guy who brought you the poinsettia, and so much more.
The plant quickly was renamed Poinsettia (it was originally sold under its botanical name) in honor of the man who brought it to the country — Joel Roberts Poinsett. His contribution to the plant’s history and the nursery business in the U.S. was honored by Congress, which has declared Dec. 12 National Poinsettia Day. A date which, oddly, commemorates the date of Minister Poinsett’s death.
Aside from his botanical triumph and service as minister to Mexico, Poinsett was also an “agent” to Chile and Argentina, a state representative, a member of the U.S. House of Representatives and secretary of war. Most people would be surprised to learn that the man who brought you the poinsettia also oversaw the removal of Cherokees from North Carolina to Indian Territory in 1838 and the military during the second Seminole War. But he was also involved in the Columbian Institute for the Promotion of Arts and Sciences and a co-founder of the National Institute for the Promotion of the Sciences and Useful Arts.
This national institute, composed of politicians, promoted the use of the Smithson bequest to form a national museum. While they were defeated in their efforts, the institute went on to become part of the result of the Smithson bequest — the Smithsonian Institution.
The poinsettia didn’t become common holiday fair for the general masses until Paul Ecke Sr., a German immigrant living in California started growing them on a large scale. Ecke and family were also responsible for breeding poinsettias, turning them in to a weedy plant in to the more robust, bushy form we see today. While the Ecke family has moved a lot of production overseas, they are still responsible for 70% of the poinsettias sold in the US and nearly half of all poinsettias sold worldwide.
Paul Ecke Sr, the Poinsettia King (1895-1991)
So, how can I save my poinsettia and get it to rebloom next year?
But if you do want to save your poinsettia from year to year, here’s how to do it:
Keep your poinsettia in a bright but cool spot to keep it colorful longer. When the leaves start to yellow, or you are done with it for the season, slowly reduce watering until it loses all leaves (and colorful bracts, which will be last to go) and goes dormant.
Store the plant in a cool (50-60 F), dry, and dark area. Keep the soil on the dry side, but water just enough to keep the stems from drying out.
After the danger of frost has passed, or in April or May (if you don’t have frost), remove the plant from storage and repot. Use a good quality and light soil mix – poinsettias do not do well with heavy soils. And it turns out that since poinsettias are typically sold as disposable plants, the soil they come in is crap (even high end houseplants these days come in cheap, crappy soil). Practice root washing to remove all the old soil and pot up to a larger size if the plant seems root bound.
Place the plant outside if possible after the danger of frost has passed, or grow in a bright, sunny window. Keep humid, well watered, and fertilized throughout the growing season.
As the danger of frost approaches, move the plant indoors in a bright, sunny window (if it isn’t kept indoors). Ideal temperatures are 75F during the day and 60-65F during the night.
In late September or early October, move the plant to an area that receives no light at night, even from outdoor street lights. The easiest way to provide exact light and dark needs would be in a dark room with lights on a timer. Provide no fewer than 12, and preferably 14-16 hours of uninterrupted darkness and 8-12 hours of light per day. Alternately, you can move the plant to a dark room or closet for its dark period.
After flowers begin to form and bracts start to change color, move to a preferred place in the home for the holidays. Continue to keep the plant well watered, and regularly fertilized through the holiday season.
This month I continue the series on pruning with a look at pruning established landscape trees. These are trees in the prime of life, growing well, starting to shade the garden beneath them and expanding their canopies. Various reasons can prompt the call for tree care professionals.
What reasons would we have to prune a healthy vigorous mid-aged tree? For those we have to examine what may have happened in the past. The fact that a tree is growing well does not always mean it was “selected” well. After a few years time, that cute little nursery tree is flexing its branches and spreading out and, more worryingly, upward. One of the prime reasons for pruning is to reduce the size or expansion of a tree canopy. There may be impending interference with power transmission or other utility lines. The tree may be blocking a view, it may just be frightening in its shear mass or size and pose a psychological threat to its owner. Size reduction is a frequent object of tree pruning operations.
The tree is too large for my comfort
If you find that you want to reduce size of a tree you should ask yourself is it possible and is it sustainable? Ultimately, do I have the right tree for this spot? Size reduction pruning is a battle with tree genetics. The tree wants to achieve a designated height and the tree owner wants to limit that height. Terminal or leaders can be pruned back to a lateral branch to reduce the length of stems and branches. This kind of “thinning” is effective as long as the branch that a leader is trimmed to is large enough to resume the hormonal role for that portion of the tree. Arborists have a 1/3 rule that suggests the branch you trim back to should be at least 1/3 the diameter of the stem it is attached to. That is, you don’t trim back to a twig otherwise it is a heading cut and re-sprouting will be abundant and require more pruning. The problem with the 1/3 rule is that trees don’t respond consistently to pruning on this basis. Some will re-sprout at the cut, others will not. In any event if you embark on size reduction pruning you will likely be maintaining that strategy over the life of the tree and this may not be sustainable. Removal and replanting with a smaller tree species that can be cultivated with little or no pruning would be a more sustainable approach.
Deadwood, I see Deadwood
Deadwood, especially large stems provides habitat for woodpeckers and other cavity nesting birds.
Deadwood is not the end of a tree or necessarily a reason to call the tree trimmer. Deadwood can serve as habitat for cavity nesting birds and is an important part of tree ecology. But dead branches that hang down and have broken from the canopy pose hazards and should be carefully removed. A dead leader can be pruned back and retained especially if woodpeckers have excavated nests that other cavity nesting birds, such as owls, will subsequently use. Of course if the deadwood is part of the active pathology of an ongoing tree disease, its removal may be warranted to prevent disease progress. This diagnosis would involve consultation with your state extension specialist or agent and or qualified arborist with training in tree diseases.
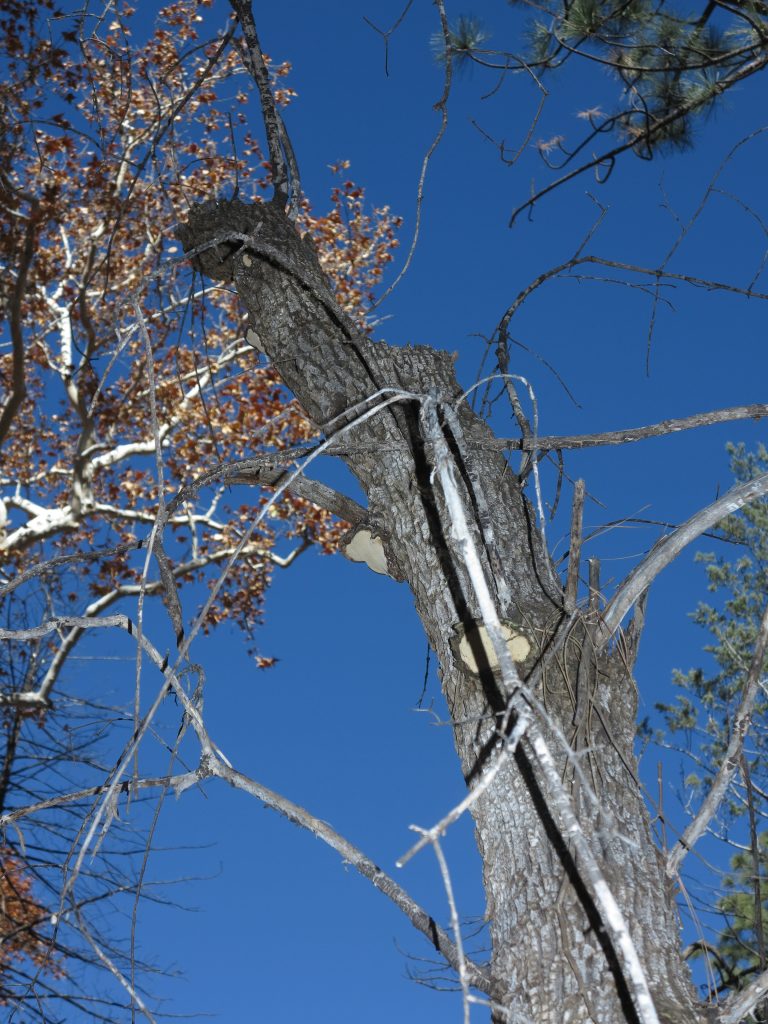
I have a tree with uncorrected branch faults
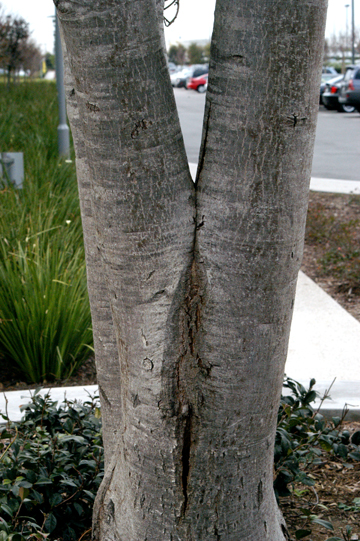
Codominant stems are likely to fail. The bulge and crack indicate the presence of included bark.Codominant stems often develop included bark (dark area) and later fail as the stems push each other apart.
Perhaps after careful study you realize your tree has co-dominant stems or too many branches coming from one place on the main stem. Both are important branch faults that precede branch failures. Co-dominant stems look like a “slingshot for giants”, two big stems both the same size. Often they are accompanied by included bark that separates the stems. The problem is often that when the stems are large, pruning one will leave a big wound that can let in decay and decrease the life of the tree. If a codominant is 6 inches or larger, it may be best to not remove it. Or remove the entire tree thus fixing the issue. If you want to keep the tree you should choose one stem to thin and prune rather aggressively (not topped) and leave the other stem unpruned. Over time the thinned out stem will grow slower and the unpruned one faster and the codominance will decline. This strategy will require year over year pruning to achieve your goal of shifting the codominants.
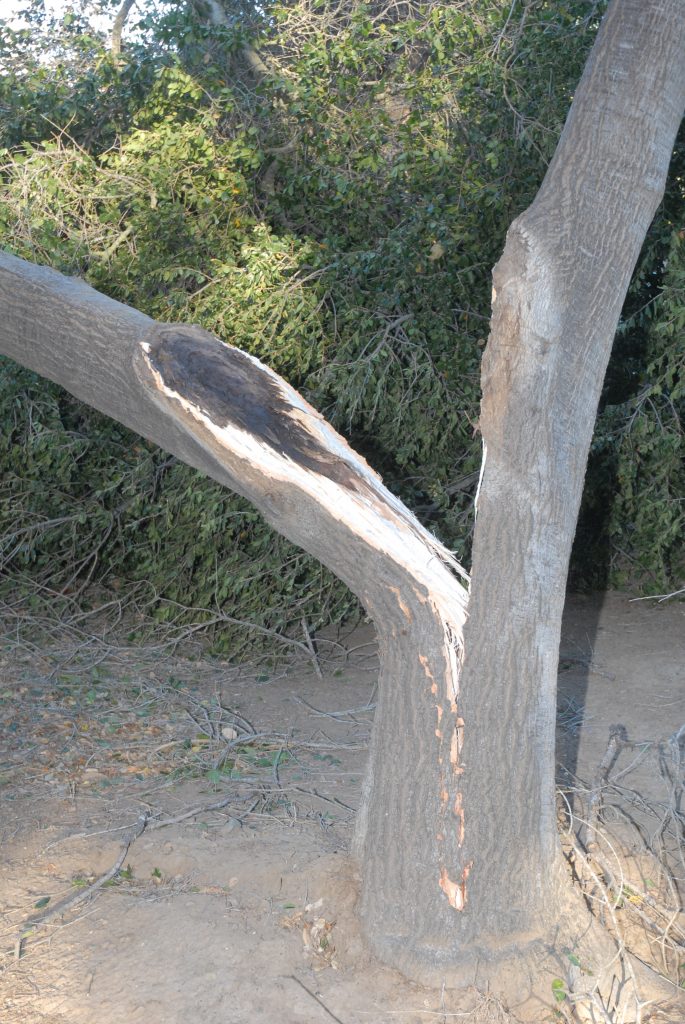
All branches from one point. Note large branch that failed at the attachment. This tree is too large to sustain. It could have crown reduction to prevent more failures and reducing the end weights of other branches. But, given the situation, it would be best to completely remove it. The same tree as above. Note large branches from the same point on the main stem. Instead of crown reduction, “Lion’s tailing” pruning was conducted as the canopy was cleaned on the inside. This will force more weight to the ends of branches and stress at their attachments, hastening failures.
If the problem is multiple branches coming from one point the correction is far more difficult. Removing branches from a cluster again provides decay entry and potentially can weaken the attachments of the other branches. Large trees (especially if a branch has already failed) with multiple attachments at the same point are likely to have a failure. The only correction for some cases is tree removal. If there is no or low risk to people or property the tree can remain as such and or pole braces installed to prevent failure. Again, failure likelihood depends greatly on the species. Elms, Oaks, Acacia, Carob, etc, all are at risk of rapid failure.
What if my tree is storm or wind damaged and needs repair?
Storm damaged trees require pruning to repair broken branches and may require several years of pruning cycles to recover a stable crown architecture.
The occurrence of severe weather events is on the rise. Intense winds, increased rain, high temperatures are all commonplace now. Trees that withstood the elements in the past can now be damaged in these storms. In every case a professional opinion on the salvage of storm damaged trees is important. Expectations for restoring an acceptable crown that is safe for the site and those that use it is highly variable. A qualified consulting arborist can guide you in working with storm damaged trees or providing an opinion on removal vs restoration. It is best to contract an arborist who has no interest in a trimming/removal operation since they do not stand to gain from an easy and profitable removal job.
I realize my tree was harmed by previous tree trimming and I want to make it better
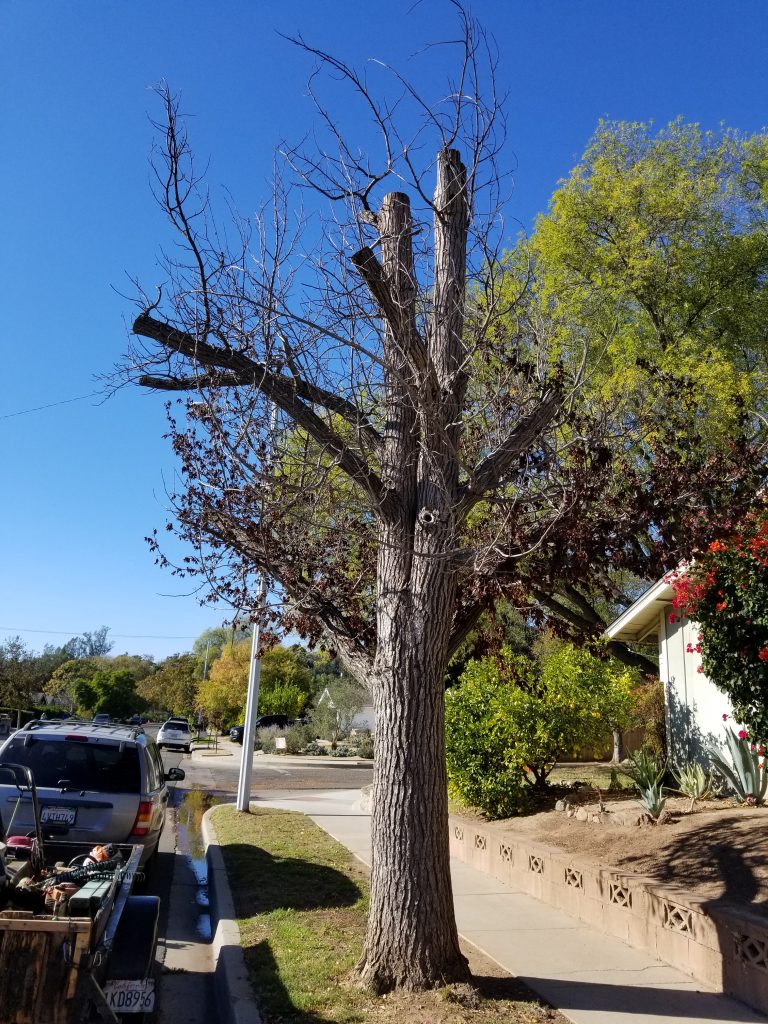
This pruning job did little to correct branch faults (too many branches from one point), left stubs and injuries on the main stem. It will take additional pruning over a period of years to correct this damage. Because the tree is young it can still be trained effectively.
Much like the other scenarios, growth patterns and targeted branch work can fix or resolve past insults to trees from inferior pruning . However, don’t expect to resolve all the issues in a single pruning. Often it takes years of careful work to restore the canopy of an abused tree.
I just want to have my tree thinned
Thinning trees is no longer considered a legitimate pruning objective. The recent trend of thinning Canary Island Pines in Southern California is unnecessary and destructive.
If your goal is to get more light into the garden and the tree is a variety that responds well to thinning, this is great. If you don’t have a reason then this is not a legitimate pruning need. Trees don’t need to be thinned and thinning is actually detrimental to some oak species, depriving them of the inner canopy of leaves that they rely upon. Thinning slows the overall growth of trees and reduced stored carbohydrates. Extreme thinning on a regular basis can predispose trees to some fungal pathogens.
At the end of the day….
Mid size, mid life trees require no pruning. People may have reasons to prune when the tree is too large for the site, has been damaged or needs further training to develop its architecture. Trees don’t require pruning if they grow according to their genetic program. Pruning the maturing tree really seeks to undo damage or correct issues that arise in its culture. Branch faults and tree branching structure may not be apparent to every gardener so seeking a professional opinion is always worth the money if you want to be sure of your tree’s pruning needs.
I got a Facebook message early this week from a friend in Sacramento CA that said after over 200 days with no rain, she got 4.83 inches in a 24-hour period from the latest extreme rainfall that occurred over northern California. Others have reported up to a foot of rain in three days. If you follow the news, you may have heard the term “atmospheric river” used to describe the torrential rains and flooding that have occurred this week in San Francisco and other parts of Northern California. In this post, I want to explain what atmospheric rivers are and how they affect rain climatology in the Western U.S. as well as other parts of the United States and the world.
The term “atmospheric river” first appeared in the modern scientific literature in the early 1990s. Since it was first used, there has been a lot of discussion about what the term actually means. Commonly, it is seen as a band of very moist air flowing into a coastal area, bringing the potential for a lot of rain to the region that is at the downwind end of the flow. In some respects, it is like being on the receiving end of a firehose streaming high-intensity water right towards you! After a lot of discussion by meteorologists (described in this Bulletin of the American Meteorological Society article) the official definition in the Glossary of Meteorology became:
Atmospheric river – A long, narrow, and transient corridor of strong horizontal water vapor transport that is typically associated with a low-level jet stream ahead of the cold front of an extratropical cyclone. The water vapor in atmospheric rivers is supplied by tropical and/or extratropical moisture sources. Atmospheric rivers frequently lead to heavy precipitation where they are forced upward—for example, by mountains or by ascent in the warm conveyor belt. Horizontal water vapor transport in the mid-latitudes occurs primarily in atmospheric rivers and is focused in the lower troposphere. Atmospheric rivers are the largest “rivers” of fresh water on Earth, transporting on average more than double the flow of the Amazon River.
Source: NASA Earth Observatory
Why do atmospheric
rivers produce so much rain?
The strong flow of moisture into a region provides an excellent source of water vapor for the development of heavy rain, especially if it is moving into an area with flow up mountain slopes that can help storms develop vertically. That enhances the rain-producing process. The West Coast of the United States provides a perfect location for the occurrence of atmospheric rivers since there is a broad expanse of ocean to provide the water vapor, dynamic storms that concentrate the flow into bands that can stretch all the way from the Hawaiian Islands to California (which explains an alternate name, “Pineapple Express”), and mountains near the coast to provide lifting for the moist air once it comes onshore. Cliff Mass of the University of Washington often discusses them in his blog on the weather of the Pacific Northwest.
Do atmospheric rivers
occur in other places?
The short answer is Yes! While historically they are discussed most often when talking about weather on the West Coast, atmospheric rivers (ARs) can and do occur in other places as well. Anywhere that has a good source of moisture plus dynamic storms with strong airflow can experience ARs. In the Southeastern U.S., we get them when strong flow from the Gulf of Mexico or the Atlantic Ocean feeds into our region, usually ahead of a strong low pressure center that provides the necessary dynamics to create a narrow band of moisture feeding into the region. According to research by University of Georgia researchers, they occur most often in the cold months of November through March but can occur in any month of the year. In the Southeast, we get about 40 events per year that are classified as ARs. I was surprised to read that there are slightly more events on the East Coast than along the Gulf of Mexico, but anywhere along the Southeast coast can be affected. No trend towards more or fewer events was seen in the 1979-2014 period.
NOAA’s Physical
Sciences Laboratory’s page describing ARs says that on average, about 30-50% of annual precipitation in the west
coast states occurs in just a few AR events, thus contributing to water supply.
ARs move with the weather and are present somewhere on the Earth at any given
time. This site
has some great resources for tracking and forecasting ARs around the world.
Of course, atmospheric rivers are not the only source of heavy rain events, but they are one of the primary sources for the West Coast. In other areas, tropical systems like slow-moving hurricanes or stalled fronts can also drop a lot of rain. You can also get very heavy rains from small local systems of thunderstorms if conditions are right, especially if the storms “train” or move one after another over the same area like cars on a freight train. We saw this in the Nashville area a few weeks ago, where the heavy rains resulted in significant flooding over a few counties.
Rain garden in the Allen Centennial Gardens on the campus of the University of Wisconsin-Madison. Source: James Steakley, Commons Wikimedia.
How do atmospheric
rivers and other heavy rain events affect gardeners?
If you are a gardener in the Western United States, you are already well aware of the long dry season over the summer followed by bouts of rain that can occur over the winter months. The timing of the switchover from dry to wet conditions depends on how far north you are on the coast, with the summer dry spell coming earliest in southern California and moving northward with the position of the jet stream as the summer progresses. Dealing with the effects of an AR is like any other attempt to protect your garden against heavy rainfall, and can mean proactive action to make sure that water-sensitive plants and trees are not located in low-lying areas where rain collects. This 2013 article from the Garden Professors blog on-site assessment is still good advice for planning ahead for soggy conditions by walking through your property in the rain. Designing for erosion control, such as rain gardens, can also help divert water in high-intensity rainfall.
In spite of the heavy rain that fell in this last atmospheric river event, the rainfall barely made a dent in the long-term drought that is present across a lot of the Western U.S. Drought will continue to be a part of the hydrologic cycle that affects gardeners, farmers, and water managers across that region and across the world.