Toxic mulch: When shredded bark goes bad

We typically think of mulching landscape beds as a good thing.  And it usually is; helping to conserve soil moisture, reducing soil temperatures and contributing to soil organic matter.  Recently, however, I received an e-mail from a local landscaper that reported severe damage to annuals and perennials in a landscape bed immediately after applying hardwood mulch.  The problem, sometimes referred to as ‘sour mulch’ or ‘toxic mulch’, occurs when mulch is left is large piles and undergoes anaerobic conditions.  This results in the production of acids and other compounds that can volatilize when the mulch is placed in beds, especially during hot weather.  These vapors can quickly damage annuals and other sensitive plants.  Mulch in this condition is often characterized by a ‘sour’ smell.  If you suspect your mulch has gone sour, spread it out before use to allow toxins to dissipate and water thoroughly either before or immediately after application.  The University of Arkansas Extension has a nice fact sheet in the subject “Plant injury from ‘sour’ wood mulch.http://www.uaex.edu/Other_Areas/publications/PDF/FSA-6138.pdf


Fried Gerber daisy


Sedums are usually pretty tough…

And, yes, I did steal the title of this post from one of my all-time favorite ‘Far Sides’…


What to do when it’s still raining?

It’s almost May…and it’s still raining. Even for our normally wet spring climate, this has been an unusually soggy year. I’m also blaming the weather on my 3rd or 4th cold so far this year, which has knocked me flat for the last 6 days (which was why I had no Friday puzzle posted). So in between blowing my nose, hacking my lungs out, and generally feeling sorry for myself, I started looking over 10 years’ worth of photos of our home landscape.

You’ve seen bits and pieces of this before in some of my postings. But one of the spots I’m most proud of is the tiny east-facing side yard that originally contained lawn, a lilac, and a border of arborvitae. Within the first few years the lawn came out and plants started going in. In 2004 I’d installed some small rhododendron, a redbud (left foreground), and a whole lot of woodchips:

Since then we removed the lilac (it had been planted too close to the garage and was a powdery mildew magnet), put in an arbor and wisteria (on the right), and added a few more plants (ferns, bleeding hearts, various bulbs and tubers, etc.).  Here it is two (2006) and five (2009) years later:

This year we’ll finish off the area with some flagstone pavers.

One of the main reasons I’m so pleased with this area is that it was inexpensive to redo and it established quickly. We bought the redbud, the wisteria, and the bulbs, but the rest were donations from friends’ gardens, or volunteers that popped up elsewhere in the yard, or plants that someone else wanted removed (like the larger rhody in the far left corner and the dogwood in the right foreground, 2006 photo). The chips were free; the flagstones were a major score from craigslist (free to whomever would pry them up and lug them out).  All the purchased trees and shrubs were barerooted; and root-pruned if needed before planting. Upkeep is minimal except for a bit of pruning and spot watering during the hottest summer months; we’ve lost no plants other than the occasional bulb poaching by squirrels.

It’s just a little bitty sideyard…but I enjoy walking through it every time I’m outside, even in the rain.

Mortal Kombat – garden version

Soil solarization is regarded as an environmentally friendly alternative to pesticides for controlling nematodes, weeds and disease.  Sheets of plastic (generally clear) are spread over the ground and solar energy heats the soil underneath to temperatures as high as 55C (or 131F).  Since the soil environment is usually insulated from temperature extremes, the organisms that live there are unlikely to be resistant to heat stress.

This is a practice best suited to agricultural production, where monocultures of plants have attracted their specific diseases and pests.  Decades of research have shown success in controlling pests in greenhouses, nurseries, and fields.  But there’s a down side to this chemical-free means of pest control.

It shouldn’t be surprising that beneficial soil organisms, in addition to pests and pathogens, are killed by solarization.  Studies have found that soil solarization wipes out native mycorrhizal fungi and nitrogen-fixing bacteria.  One expects that other beneficial microbes, predacious insects, and parasitoids living in the soil (but so far unstudied) would be eliminated as well.

This may be an acceptable loss to those who are producing crops; soil can be reinoculated with mycorrhizal fungi, for example.  But for those of us caring for our own gardens and landscapes, this is literally overkill.  (And consider that most of us probably have trees and shrubs whose fine roots extend over our entire property.)

So this spring, instead of solarizing your soil, consider some less drastic measures of pest and disease control. Minimize soil disruption to preserve populations of desirable microbes. Plant polycultures (more than one species) in your vegetable garden, or at least practice crop rotation.  Protect and nourish vegetable gardens with compost.  Use coarse organic mulches, which provide habitat for beneficial insects and spiders, in landscaped areas.  Above all, try to treat your soil as the living ecosystem it is, rather than a war zone.

Mulch much?

[Try to say post title three times fast. Heh.]

Here on the GP blogski, we’ve discussed both the merits and shortcomings of many non-traditional forms of mulch; rather, stuff that covers the ground that is referred to as mulch. Shredded rubber, marble chips, lava stone, dyed lava stone (ick), etc.

But this is a new one on me:


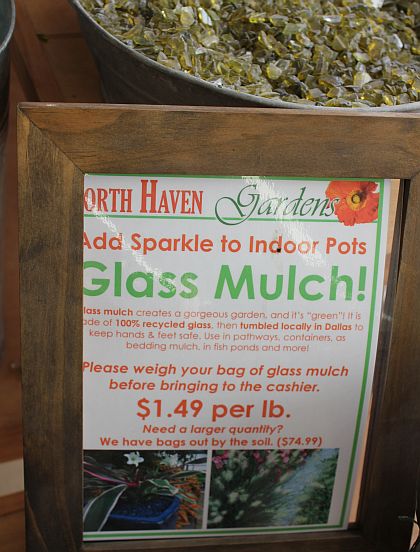
Naturally, I immediately shoved my hand in the biggest tub of glass (part of the Scientific Method). It was not…super smooth. A couple of pieces stuck, and there was a bit of sparkly-dust residue. I tried to remember not to rub my eyes for the rest of the day. Not sure I’m buying the recommendation to “use in pathways.”

"Aaargh! My Eyes!"

Pretty colors…soooo shiny. And recycled!

What’s this? A warning label on the aqua mulch: “Parents, please watch your children’s hands around the glass mulch.”Whoops.

Aargh! My eyes!

Is “lasagna gardening” really worth the effort?

This week I got a complimentary copy of Urban Farm, dedicated to “sustainable city living.”  The cover story is Lasagna Giardino – follow this recipe for a lasagna garden that grows perfect plants – Italian or not.

This is not a new idea, but was popularized several years ago as a way of preparing soil for planting.  The article relates the steps:

1)  Prepare the ground by mowing the lawn
2)  Dig up the first 12″ of soil (double digging)
3)  Place a layer of “noodles” (paper and cardboard are popular) – the low nutrient material
4)  Place a layer of “sauce” (the green material)
5)  Repeat as often as you like and “let it cook”

I like the first step of this.  But my second step would be:
2)  Add a thick layer (12″) of arborist wood chips and “let it cook.”

Double digging the soil 12″ isn’t necessary: we do it because it’s hard work, and we think we need to put elbow grease into the project.  Making layers of noodles and sauce isn’t necessary: we do it because appeals to us -lasagna is a tasty comfort food.

There’s a lot of damage that this “recipe” can cause.  Double digging the soil 12″ destroys soils structure. Don’t do it. The layers of noodles and sauce (especially the sauce) can create an overload of plant nutrients. Furthermore, the “noodle” layers – the sheet mulches – impede water and air movement.  They’re not needed to keep the grass from growing through. Wood chips do this just fine on their own.  And don’t worry about that initial 12″ of chips.  Within a few weeks it will settle to about 8″.  Let it sit for several weeks.  Then pull aside some of the chips and take a look.  If the process is done, the grass and/or weeds will be dead and decomposing – a natural compost layer.  You can then plant whatever you like.  Reuse the chips somewhere else in your garden.

It doesn’t look like lasagna, but it’s a heck of a lot easier and more closely mimics a natural mulch layer than lasagna does.

Keep Calm and Carry On: Part II

Recently I posted that many of the “rules” that gardeners cling to so tightly regarding tree planting (i.e., dig the planting hole 3 times the width of the root ball, always amend the backfill with organic matter) are probably better considered ‘suggestions’ than rules.  While these practices won’t hurt, there are much better ways to spend time and effort to ensure long-term survival when planting a tree.  Here are the top four:

Irrigate.  No matter how much time and effort goes into the ‘perfect’ planting hole; for most parts of the country, trees that are not irrigated after planting are doomed.  Linda advocates watering in several small sips during the week; I still stick to the old school notion of one long soak per week.  In the final analysis, logistics will probably dictate which approach you use.  Either way, the key is to provide trees with water during the establishment year and even into the second year after planting, if possible.

Mulch.  Organic matter placed properly on top of the planting hole will do more good than organic matter placed in the planting hole.  Study after study demonstrates that mulch conserves soil moisture by reducing evaporation from the soil surface, controls weeds, and moderates soil temperature.  Oh, and that business about wood-based mulches ‘tying up’ or ‘stealing’ nutrients from landscape plants?  Maybe for bedding plants, but not for trees and shrubs.  Our research and other studies indicate that, for the most part, the type of organic mulch makes little difference compared to not mulching at all.  Hence, my motto “Mulch: Just do it.”

Proper planting depth.  Width of the planting hole may not matter, but planting trees too deep is a recipe for disaster.  Burying roots too deep reduces oxygen levels around the roots and starts a series of unfortunate events for the tree.   Find the root collar flare and keep it visible.

Bad move.  The contractor was going to install drain tile but decided not to at the last minute to save money. Ouch.

Right tree, right place. In my experience, the number one reason newly-planted trees fail in the first year is lack of watering and aftercare.  After year one, improper tree selection takes the top spot.  Here in the Upper Midwest, poor drainage and heavy soils take their toll year after year.  Lack of water can usually be addressed, but once a tree is planted in a spot that is too wet for that species, it’s usually a long, slow, and agonizing decline.  And it’s amazing how often people will ignore obvious red flags in selecting trees.  Our Dept. of Transportation recently planted 25 eight-foot B&B eastern white pine, which are notoriously salt sensitive, about 30’ from I-96 at a rest area between Lansing and Detroit.  Predictably, after one winter’s exposure to deicing salt spray all the trees were dead or wishing they were dead.  Right tree, right place.  This ain’t rocket science, folks.

Sheet mulching – benefit or barrier?

Alert reader Matt Wood pointed out a recent article in the NY Times on mulching with newspaper and wondered about my take on the topic.

For use on landscapes, I do not like sheet mulches of any stripe.  They tend to hinder to air and water movement, most especially in unmanaged landscapes like restoration sites.  A classic example is the use of cardboard or newspaper covered with wood chips.  The chips are easily dislodged, exposing the sheet mulch which quickly dries out and becomes hydrophobic.  Thus, the roots of desirable trees and shrubs lose out on the water, while the weeds surrounding the edges of the mulch benefit from the runoff:

Published research on sheet mulching in landscape settings confirms the drawbacks of sheet mulching.  But the article in the NY Times is about vegetable gardens.  This is a different situation – more akin to agricultural production than to landscape horticulture.  Vegetable gardens are routinely managed during planting, thinning, weeding, and harvesting.  Newspaper sheet mulches in these situations rarely dry out and, when kept buried and moist, do break down quickly.

So – keep the sheets on the (vegetable garden) bed where they belong!

Another W.O.W.

We’ve been beating up nurseries over Why-Oh-Why (W.O.W) do they sell things like Scot broom.  Here’s one of my  favorite W.O.W’s from the landscape side (Homeowner division).

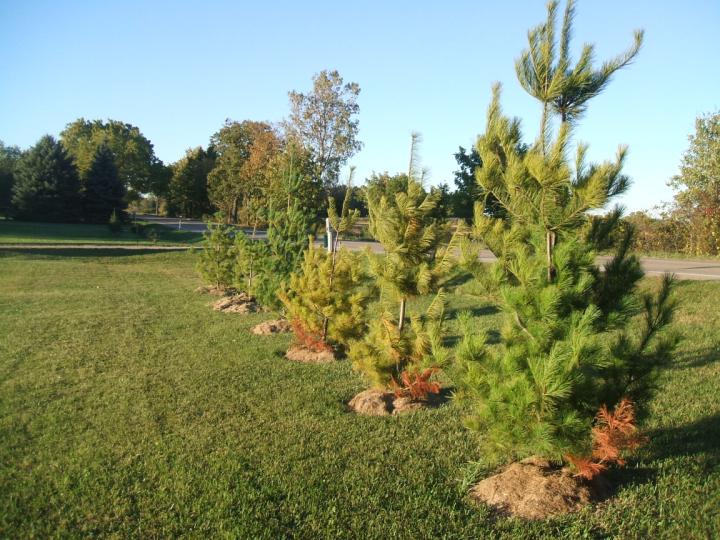
Why-oh-Why do people think grass clippings make a good mulch?!  This photo comes from near my home.  The homeowner put the clippings down about two months ago.  All the trees were dark green and healthy before the clippings were put down.  Note how chlorotic the trees in the middle have already become and the dead lower limbs where the trunks were covered.   We’re all for mulch but this ain’t it!

Rubber mulch – the discussion continues

Almost a year ago I posted my complaints about rubber mulch (you can find the posting here).  This week I was contacted by Jesse, a purveyor of rubber mulches.  We’ve had a very civil discussion about the topic, and he asked me to review his fact sheet.

Which leads me to today’s assignment. I have no personal experience with rubber mulch, so I’d like to hear from you about your experiences with this product.  Specifically:

1) Have you seen fungi growing on rubber mulch?

2) Have you had issues with the heat captured by the product – either to your feet or to your plants?

3) Does the mulch continue to smell, especially when hot?

4) How quickly do you notice degradation of the product?

Obviously this is anecdotal, not scientific, evidence.  But the scientific literature regarding rubber mulch is thin, and anecdotal evidence can often indicate directions that science should explore.  Perhaps this can be the beginning of such a study.