Regular blog readers will remember that we moved to my childhood home a few years ago. With an acre or so of landscape I finally have enough room to put in a vegetable garden. My husband built a wonderful raised bed system, complete with critter fencing, and we’ve been enjoying the fresh greens and the first few tomatoes of the season.
Jim puts on the finishing touches to our first raised bed garden.
We filled these raised beds with native soil. During a porch addition I asked the contractor to stockpile the topsoil near the raised beds. The house was built almost 100 years ago and at that time there were no “designed topsoils” (thank goodness) – soil was simply moved around during construction. Some of this soil had been covered by pavers and the rest had been covered with turf. [You can read more about designed topsoils in this publication under “choosing soil for raised beds.”] There had been no addition of nutrients for at least 7 years so I was confident that this was about as natural a soil as I could expect.
Our native soil, ready for adding to our raised beds.
I’ve always advised gardeners to have a soil test done whenever they embark on a new garden or landscape project, so before I added anything to my raised beds I took samples and sent them to the soil testing lab at University of Massachusetts at Amherst (my go-to lab as there are no longer any university labs in Washington State for the public to use).
What I already knew about our soil was that it’s a glacial till (in other words it’s full of rocks left behind by a receding glacier). The area is full of native Garry oak (Quercus garryana), some of which are centuries old. The soil is excessively drained, meaning it’s probably a sandy loam. And that’s about all I knew until my results came back.
Some of our massive, centuries old Garry oaks.
Because nothing has been added to this soil for several years, and because I had removed all of the turf grass before filling the beds, I assumed that the organic matter (OM) would be quite low. Most soils that support tree growth have around 3-7% OM. Hah! Ours was over 12%! All I can figure is that centuries of leaf litter has created a rich organic soil.
I never expected this level of OM.
So here’s lesson number one: Don’t add OM just because you think you need it. Too much OM creates overly rich conditions that can reduce the natural protective chemicals in vegetation. This means pests and diseases are more likely to be problems.
I think these may be the lowest P levels I’ve seen in home garden soils.
I was pleased to see our P level was low. First soil test I’ve ever seen in my area where P was below the desirable range! Does that mean I’m adding P? No – because there is no evidence of a P deficiency anywhere in the landscape. And my garden plants are growing just fine without it.
No sign of any nutrient deficiencies here (though the mesclun mix got out of control).Or here either.
Lesson number two: Just because a nutrient is reportedly deficient, look for evidence of that deficiency before you add it. It’s a lot easier to add something than it is to remove it.
Likewise, our other nutrient values are just fine, and I was pleased to see that lead levels were low. Given that this is an older house that had lead paint at one time, and given the fact that the soil being tested was adjacent to the house, I was prepared for lead problems.
Surprisingly low lead given the original location of this soil next to an older house.
However – we do have high aluminum in the soil. Exactly why…I don’t know. Perhaps the soil is naturally high in aluminum? There’s no evidence that aluminum sulfate or another amendment was ever used. In any case, that was an unexpected result that does give us some concern for root crops. I’ll be doing some research to see what vegetables accumulate aluminum.
The aluminum levels may bear some watching if I’m growing root crops.
Finally, note our pH – 4.9! This is completely normal for our area, which is naturally acidic. In addition, the tannic acid accumulation from centuries of oak leaves has undoubtedly pushed the pH even lower. Are we going to adjust it? Again, no. There is no evidence of any plant problems, and even our lawn is green. Why would we adjust the pH if there is no visual evidence to support that?
No, this is not a typo.
Which leads to lesson number three: Don’t adjust your soil pH just because you think you should. If your plants are growing well, the pH is fine. Plants and their associated root microbes are pretty well adapted to obtaining the necessary nutrients. If you have problems, don’t assume it’s a pH issue. Correlation does not equal causation! You’ll need to eliminate all other possibilities before attempting to change your soil chemistry. And remember it is impossible to permanently change soil pH over the short term. Permanent pH changes require decades, if not centuries of annual inputs (like our oak leaves).
The cat agrees – no pH issue with this lawn.
Will I test my soil again? Probably not. I have the baseline report and since I don’t plan to add anything I don’t expect it to change much. If I had a nutrient toxicity I would retest until the level of that nutrient had decreased to normal levels. But with everything growing well, from lawn to vegetables to shrubs and trees, there really is nothing to be concerned about.
Viburnum plicatum (I think) is one of many established shrubs on the property.
Lesson number four: Unless you have something in your soil to worry about, don’t.
This is the first post in a series in which we will explore the world of professional credentials and designations, highlight disciplines related to gardening with certification or licensing programs, and outline potential services professionals from each of those disciplines can provide to gardeners.
Professional designations are designed to help clients identify experts within specific disciplines. In upcoming posts I will highlight professional designations relevant to various aspects of gardening. Professional certifications, licensures, and credentials related to gardening include:
Board Certified Entomologist (BSE)
ISA Certified Arborist
Certified Crop Advisor (CCA) and Certified Professional Agronomist (CPAg)
Certified Horticulturalist (CH)
Certified Professional Forester (CPF)
Certified Professional Soil Scientist (CPSS)
Professional Landscape Architect (PLA)
Registered Consulting Arborist (RCA)
Before I highlight each of those professions and credentials in future posts, I want to first provide context and explain the purpose of professional certification and licensing.
A registered nurse checks a newborn’s reflexes. Photo by Jacob Sippel courtesy of the U.S. Navy.
Most of us encounter professional designations on a daily basis without noticing. For example, you’re likely familiar with credentials such as Certified Public Accountant (CPA), Registered Nurse (RN), or Doctor of Medicine (MD). Such credentials are often identified with postnominal letters in the form of an acronym listed after someone’s name in print. In some cases these postnominal letters indicate both an academic degree and a professional certification or licensure, such is the case with medical doctors (MD). In some disciplines the degree and designation can be separate. I’ll use myself as an example (not as a humble brag, but as a convenient example). My business card says “Colby Moorberg, PhD, CPSS”. The PhD refers to the highest academic degree earned (Doctor of Philosophy, PhD), while the CPSS refers to the Certified Professional Soil Scientist professional certification. There are countless professional designations in current use, each of which comes with postnominal acronyms. That alphabet soup can become confusing. Yet to further complicate the matter, details vary greatly from one professional designation to the next. Such differences include the type of professional designation, education requirements, qualifying exams, codes of ethics, continuing education requirements, professional experience, and designating bodies.
Types of Professional Designations
Professional designations can take the form of professional licenses or certifications. According to Knapp and Knapp (2002), licenses are granted by government agencies and are required for people to practice or engage in their profession. The process ensures that licensed individuals have met the minimum education and experience required to be competent in their field without risk to themselves or the public. For example, engineers and physicians are required by law to have a license issued by a state licensing board before they can practice in their respective profession. Such professional licenses are somewhat analogous to the requirement that people operating a motor vehicle have a driver’s license – it’s illegal to drive without one.
An arborist tends to trees at the US Capital. Photo courtesy of the Architect of the Capital.
Knapp and Knapp go on to contrast professional certifications from licensing by stating that certification is a voluntary process administered by an organization (not a government agency) to recognize individuals that have met predetermined qualifications or standards. Such certifications help establish the credibility of a professional within a specific discipline when a license is not required. Consider a certified public accountant (CPA). Many people might think twice about trusting an accountant with their finances or tax preparation if that accountant was not certified, even though a license is not required for someone acting as an accountant. Professional certifications are typically administered by professional societies, and are usually used in professions where the immediate health and safety of the general public is not impacted by a professional in the respective discipline.
Education Requirements
Education requirements are put in place in most certification or licensing programs to ensure that the professional has the knowledge base necessary to be successful in their field. Certification and licensing programs often require an associate’s or bachelor’s degree in a related major, but not always. For example, a Certified Professional Forester is required to have at least a bachelor’s degree in forestry or a related major (Society of American Foresters, 2019), while a ISA Certified Arborist could become certified without a college degree if such an individual meets additional professional experience requirements (International Society of Aboriculture, 2019). Licensing boards or certifying bodies typically have panels of professionals within a discipline that review college transcripts of those applying to become licensed or certified in order to ensure each person with a credential meet the program’s minimum education requirement.
Qualifying Exams
All licensing boards and most certification programs have an exam that someone must pass in order to become licensed or certified. Similar to degree requirements, such exams help ensure the professional has the minimum level or expertise necessary to be proficient in their field. In some cases, professionals must pass two exams, one when they start their professional career fresh out of college, and a second after they’ve worked professionally for 3-5 years.
A multiple choice answer card. Photo by Alberto G.
Code of Ethics
Many licensing and certification programs require licensees or certificants to abide by a professional code of ethics. This is a useful feature for clients (gardeners wishing to hire a professional) because it provides a mechanism to report a professional if they are acting unprofessional or unethically. Such codes of ethics are also useful to licensed or certified professionals because it gives them an “out”, should they be asked to do something unethical by a client or an employer.
Continuing Education
Most licensing and certification programs require a minimum number of documented hours (continuing education units, or CEUs) dedicated to staying up-to-date. These hours are documented and must be met within a 1-, 2-, or 3-year cycle. Such continuing education requirements benefit gardeners hoping to hire a professional, because it ensures that professional is staying current in their field and is learning the newest technologies and techniques. Programs that require professionals to abide by codes of ethics often require professional ethics training for each cycle as well.
Books. Photo by Abhi Sharma.
Professional Experience
Certification and licensing programs often have a minimum number or years of professional experience required in order to become certified or licensed. Usually during the period in which someone is gaining experience, they are working under the wing of someone fully licensed or certified. Such requirements help ensure that fully certified or licensed professionals have documented professional experience, and have had the opportunity to apply academic knowledge to real-world applications.
Soil scientists inspect soils in a Christmas tree farm in North Carolina. Photo by David Lindbo via SoilScience.info.
Designating Bodies
Professional certificates or licenses often vary by the group, organization, or licensing board that bestows the professional credential on an individual. In some cases there are competing organizations that offer competing certificates.
Summary
The primary way in which gardeners benefit from hiring certified or licensed experts in their fields is that professional credentials ensure a minimum knowledge and competency by the professional. In addition, these professionals are often bound by their respective professional codes of ethics. As the old adage goes, you get what you pay for. In the case of certified or licensed professionals, this often means it will cost you more for the services of a certified professional. As we explore the different professions and professional credential programs relevant to gardening in future posts, I will discuss gardening-related services that can be provided by each type of certified or licensed professional, and scenarios where spending the additional money to hire a certified professional might be worth the added cost. I hope this information enlightened you to professional designations, certifications, and licensing. Hopefully it will help start a conversation between you and gardening experts to determine how they might be of service to you.
Have you encountered certified or licensed professionals in the gardening world? Discuss your experience in the comments, or suggest certification or licensing programs I may have missed in my list above.
Disclosure: I am a Certified Professional Soil Scientist (CPSS), and I am a member of the Soil Science Society of America (SSSA) Soils Certifying Board which oversees the CPSS program.
References
Knapp, L., and J. Knapp. 2002. The Business of Certification: Creating and Sustaining a Successful Program. 2nd Revised edition edition. Association Management Press,U.S., Washington, D.C.
If you follow national news, you may have noticed that Sudden Oak Death disease caused by Phytophthora ramorum has been found again in a new state and has escaped into retail commerce and thus into gardens. This is news because the disease is a killer of rhododendron, oak, camellia and many other ornamental plants. Yesterday I was measuring trees in a research plot here in California and I found that one of my subjects had turned brown and lost all its leaves. On checking, I discovered a Phytophthora collar rot was the cause of the symptoms. Phytophthora diseases kill woody plants, often our cherished specimen plantings. This blog post is to introduce you to Phytophthora collar rots, their diagnosis and treatment.
A Phyotophthora crown rot canker on ghost gumThis Eucalyptus suddenly collapsed from a Phytophthora basal canker. All the leaves remain on the tree and turned brownPlanting too deep is predisposing to Phytophthora infection. Note the aeration tubes could not save this tree–they serve no function in landscapes. Avoiding over-wet conditions, proper planting and irrigation timing would have prevented this Phytophthora death.
Phytophthora means plant destroyer in Latin. It is the “deathstar” of plant destroyers and once it has infected, death is the usual outcome. All Phytophthoras are Oomycetes. These are organisms that form an Oospore. Oospores are usually produced when two strains of Phytophthora join and the sexual organs form resulting in this spore. It is thick walled and can live for years in soil without a host. Phytophthora used to be considered a fungus but this was changed some years back to put all Oomycetes in groups that are more closely allied with brown algae. Phytophthoras are not in the kingdom fungi but rather the SAR supergroup of organisms. One main difference between these microbes and fungi is that Phytophthora has cellulose in its cell walls just as plants do. There are hundreds of species of Phytophthora, most affect flowering plants especially woody plants. Very few affect grasses and monocots. There are some that affect palms and others, vegetables and herbacious plants. The late blight fungus Phytophthora infestans caused the Irish Potato famine that resulted in millions of deaths (of people and potatoes) and migration (of people not potatoes) to the United States to avoid starving further. caused the famous Jarrah (a Eucalyptus spp.) die off in Australia, one of the largest known forest epiphytotics. Phytophthora species occur worldwide and affect plants in almost every garden.
Why are Phytophthoras so successful and how do they get into gardens? I think the answer is that they are cryptic. You can not see any of the spore stages, even with a microscope. There is no “mold-like” growth of the pathogen that you can see either in soils or on the plant. This is because the organism lives inside plant tissues and is very reduced in soils where is survives as spores. Unlike many fungi, you can’t see the mycelium of most Phytophthora species. In plants, Phytophthora usually grows in the vascular cambium of roots or stems and kills those tissues. Plants react to Phytophthora by producing phenols and other phytochemicals turning tissues brown. Brown roots or spreading brown cankers on the main stem are common. When Phytophthora kills the tissues on the main stem this often causes a basal stem canker near the soil line. Usually the plant collapses rapidly with all the leaves turning brown or falling from the plant suddenly. Sometimes basal cankers are associated with deeply planted trees and shrubs or where soil has been added over the root collar. Since basal cankers are under the bark they may not be visible while active and need to be revealed with a knife to expose the brown tissue.
Phytophthora diseases are increased by excess water in soil or on plants. Overly wet situations are predisposing to these diseases if the pathogen is present. Other conditions like reduced oxygen in the rootzone (from compaction), increased salts in soil, very dry conditions followed by very wet circumstances all promote Phytophthora. There are also some groups of plants that seem to be very susceptible—these include: rhododendron, camelia, oaks, cyclamen, most plants in the Ericaceae (madrone, manzanita, blueberry etc.), cedars, pines, and the list goes on. It is hard to avoid susceptible plants because there are so many of them.
Phytophthora species are not native everywhere but have been distributed far and wide by people. Nurseries are prime disseminators of Phytophthora infested plants. Fungicides “subdue” the pathogen but do not eradicate it. So a plant can look healthy while still being infested with Phytophthora. When the fungicide wears off, the plant may become sick if conditions are right for the Phytophthora to grow. Another reason why this type of pathogen is so successful is that a plant can have 50-75% of its roots killed before symptoms begin to show on above ground plant parts. Wilt and collapse only occur very late in the progress of the disease. Because of this, it is important to inspect plants before bringing them home. Never purchase a plant with brown feeder roots, or this could be the starting point for Phytophthora in your garden.
If you are an avid gardener who likes to try new plants all the time, then your future encounter with Phytophthora is likely inevitable. You can do things to limit its development.
Mycelium of Phytophthora exposed to cellulase (left) and healthy mycelium (right)
-Plant on berms or mounds while avoiding planting in low or poorly drained places
-Use wood chip mulches from freshly chopped tree parts
-Add gypsum to soils as part of your mulching protocol
-If you irrigate your garden allow drying out periods between irrigations
-Plant “high” so that the root crown is clearly exposed
-Do not volcano mulch or cover the root crown with anything at all
-Avoid planting woody perennials in turfgrasses or lawns
Fresh wood chips are often broken down by fungi that release cellulase, this enzyme is toxic to all Phytophthora’s, and the reason why FRESH mulches are so important to create soils with cellulytic enzymes that destroy this pathogen. As gypsum dissolves it provides a slow release source of calcium ions which are also toxic to the swimming spores of Phytophthora. While fungicides can also help limit Phytophthora development, the cultural practices listed above will be just as important in preventing and limiting root and crown rot disease in your garden.
You see a bright shiny package at the garden center saying that it can help you have the most bountiful garden ever, the greenest lawn in the neighborhood, your plants will have miraculous growth, or it will supply every element on earth to make sure that your plants are living their best life. It’s got what plants crave….It’s got electrolytes! You reach out to grab that package and ……. Woah! Pump the brakes! Do you know if your plants even need to be fertilized? Are you just falling for that shiny marketing, or do your plants really need added fertility to grow?
It turns out that many gardeners add fertilizer out of habit or because a shiny package or advertisement told them they needed to do it. The fact is, though, that you may or may not need to add fertilizer to get your plants to grow healthy. It is actually more likely than not that the level of nutrients in soil is perfectly adequate for healthy plant growth. And guess what, there really is a way to know what plants crave…or at least are lacking: A soil test.
We here at the Garden Professors (and those of us who work in extension) often get questions or hear comments about gardeners adding fertilizer or random household chemicals and items to their plants and soils with no idea what they do or even supply. They’ll throw on the high powered 10-10-10, the water soluble fertilizer, rusty nails, or even (shudder) the oft mentioned Epsom salts because it is just what they’ve been told to do.
A few months ago, my GP colleague Jim Downer talked about why to amend soil– focusing mainly on organic material and a little bit of fertility. In this article, I’m going to share some how and what: what plants need in terms of nutrients, how to determine what nutrients you need to add, what you can use for increasing fertility (conventional and organic), and how to calculate how much fertilizer to add.
What plants really need
Plants have a number of essential plant nutrients that they need from the environment in order to properly grow and function. Hydrogen, carbon and oxygen are all important, but are not something that gardeners have to supply since they are taken in by the plant in the form of water and carbon dioxide (unless you forget to water your plants, like I sometimes do — but death will occur from dehydration well before lack of hydrogen).
There are six soil macronutrients, which means that they are used in larger amounts by the plants. These include nitrogen, phosphorous, and potassium, which form the basis of most common fertilizers that have those magic three numbers on them (example: 10-10-10). Those three numbers indicate that the fertilizer contains that percentage of the elemental nutrient in it. For this example, the fertilizer contains 10 percent nitrogen, 10 percent phosphorous, and 10 percent potassium. The other three soil macronutrients are magnesium, sulfur, and calcium. Depending on your location, your soil may be abundant or deficient in these nutrients, especially magnesium and calcium. Sulfur is commonly released during decomposition of organic matter, so it is usually present in sufficient amounts when soil is amended with (or naturally contains) organic matter.
If a soil is deficient in a nutrient that a plant requires it is usually a macronutrient since plants use them at higher levels. However, deficiency is still unlikely in most soils unless there is a high volume of growth and removal, such as in vegetable gardens and annual beds (or if you’re growing acres of field crops like they do here in Nebraska). These are also the nutrients that are most common on soil tests, since they are the ones that are used the most by plants.
Soil micronutrients are needed in much smaller amounts. Those nutrients are boron, copper, chlorine, manganese, molybdenum, and zinc (remember the periodic table?). These are also usually supplied from organic matter or from the parent soil material so deficiency is even less likely than for macronutrients. Tests for these aren’t usually part of a basic soil test, so if you suspect you might have a deficiency you might have to get a specialized test. There are some basic physiological signs of deficiency that plants might exhibit in response to specific deficiencies, but their similarity to other conditions make it an imprecise tool for diagnosing a deficiency.
Compost is a good source of nutrients, especially micronutrients (as we’ll read later). Using compost alone may be sufficient for many gardens, such as perennial beds. However, higher turnover and higher need areas like vegetable gardens may need supplemental fertilization beyond compost. That’s where the soil test comes in.
What’s on the menu….interpreting soil test results
If you’ve had your soil tested by a lab (which is recommended, since it is much more precise than those DIY test kits), you’ll get results back that give you the level of nutrients in your soil and usually recommendations for how much of each nutrient you need to add to the soil for basic plant health. This is a general recommendation that is common for most plants, which is generally sufficient for average growth. If the test says that the nutrient levels are normal, you don’t have to add anything….I repeat….YOU DON’T HAVE TO ADD ANYTHING. If it says you need one nutrient of the other you’ll need to add it to your garden or around the plant. As we’ve said before, disturbing the soil as little as possible is best, so if you’re using a fertilizer product aim for one that you can broadcast on top of the soil or is water soluble. This goes for compost as well – try to apply it to the top of the soil and it will incorporate over time.
Your soil test results will usually tell you to add nutrients in pounds per a certain square footage. In the example pictured, there’s a recommendation of 3.44 lbs of Nitrogen per 1000 square feet. That number is for the actual nitrogen, and since different nutrient sources have different amounts of nitrogen you’re going to have to do some math to figure out how much fertilizer you need per 1000 square feet and then multiply that by how many thousands of square feet you have.
I’ll note here that soil labs do not usually test for nitrogen due to the variable nature of nitrogen in the soil and the lack of affordable or reliable tests. Nitrogen fluctuates widely over a short period of time and is not as persistent in the soil as other elements due to plant take-up, microbial action, and weather conditions. Nitrogen recommendations are usually made based on the crop indicated for the test and may be informed by the levels of other nutrients.
Let’s say that I’m using an organic fertilizer product I purchased at the garden center and the nutrient analysis is 4-3-3 (these numbers are standard for organic nutrient sources, which have lower nutrient levels than conventional fertilizers). That means that for every 100 lbs of that product, 4lbs are nitrogen, 3 are phosphorous, and 3 are potassium. My (hypothetical) garden is 10ft by 20ft, which is 200 square feet.
So we divide 200 by 1000 to get .2, which represents that my area is 20% of the area listed on the recommendation. If my garden were 3500 square feet, then that number would be 3.5.
Next, multiply the Nitrogen recommendation of 3.44 lbs by .2. This give me 0.688. This tells me that I need .688 lbs of nitrogen to amend my 200 square feet.
So I just need to weigh out .688 lbs of the fertilizer, right? Nope – we have to account for the fact that my fertilizer is only 4% nitrogen- only 4 lbs out the 100 lb bag. We can estimate amounts by figuring out how much nitrogen is in smaller amounts of the fertilizer. Since we know that 100lbs has 4lbs of N, then 50lbs has 2lbs of N, and 25lbs has 1lb of N. If I want to get a more precise amount of fertilizer poundage to get my .688 lbs of N, then we divide the pounds of N needed by the decimal percentage of N in the fertilizer. So that would be .688 / .04, which gives us 17.2 lbs of fertilizer.
Now, considering that the bagged product that I bought is $25 for 8lbs, I may want to reconsider using it for this application…unless I enjoy throwing my pearls before swine or I’m fertilizing my money tree.
If you do the math, you’ll note that this fertilizer will add more than the recommended amount of phosphorus and potassium. You’ll either need to decide if that is acceptable or if you need to find another source of nutrients.
If you’re not using a prepared fertilizer product but rather an organic source of nutrients, you can still calculate how much to add to get to the recommended amount. The following are some good lists of nutrient ranges of organic materials:
Another thing your soil test will tell you is the pH of the soil. In general, plants prefer a soil pH just on the acidic side of neutral (between 6.0 and 7.0). There are plants that prefer different pH levels – such as blueberries and azaleas and their need for a more acidic soil between 4.5 and 5.2. Changes in pH affect the availability of nutrients to plant by affecting ionic bonds of the elements. For the most part, the nutrients are more available at that neutral pH. You’ll note that iron is more available at lower pH levels, which is why those acid-loving plants grow better at lower pHs – they’re heavier iron feeders.
If your pH is extreme in one way or the other, you’ll either need to find plants that thrive at that level or adjust the pH if that isn’t possible. To raise pH in acidic soils the most common method is application of lime. To lower pH, you’ll need something high in sulfur. For more information, visit https://articles.extension.org/pages/13064/soil-ph-modification .
About this time last year I posted photos of the installation of my new pollinator gardens (all perennials). As you can tell from the photos below, all of these plants have not only survived but thrived with their midsummer rootwashing.
Garden 1. Robust perennials! Except for the the sad, tiny lavender in the lower right hand corner (discussed below).Garden 2 is just like the other, except the strawberry groundcover is replacing the wood chips.
The only ones that didn’t make it were the six Lavandula stoechas ‘Bandera Purple’ (see above). They did fine through the summer and well into winter. But with our surprise snowstorm in February (along with a 20-degree temperature drop in one night – from 33 to 14F), all but one of these marginally hardy plants (USDA zones 7-10) gave up the ghost. I won’t make that mistake again. But I will continue to root wash ALL of my perennials before I plant.
It’s pretty easy to excavate this tree (planted months ago) since there is NO root establishment.
And since it’s Independence Day here in the US, I thought I’d continue with the “free your roots” theme and discuss the medieval torture system that passes for recommended B&B tree installation practices. I’m talking about the burlap, the twine, and the wire baskets that are left on the root ball and cunningly hidden underground to do their damage over the years.
THIS is what should be planted.Not this.
There is a great deal of disagreement about what to do with all the foreign material that’s used to keep tree root balls intact during shipment. To be clear, that is the ONLY thing they are intended to do. There is no research that shows leaving them on benefits the tree at all. The reason they are left on is because it’s more economically feasible for the installation company to do it this way. Personally I think that’s a pretty crappy reason, particularly when you are looking at trees that can cost hundreds or thousands of dollars.
Does anyone seriously think this is a good way to plant trees?
Most studies that have addressed the issue have been short term: two or three years, rarely longer. Irreversible damage to roots can take years to develop. It’s useful, therefore, to look at the landscape evidence to see what happens with all these barriers to root growth and establishment.
Death row.
Arborist and landscape designer Lyle Collins recently excavated the remains of trees that had been installed in 1991. The trees had died years ago and certainly hadn’t grown much as evidenced by their trunk size.
Not much trunk growth in this tree.
But while the trees didn’t survive, the burlap, wire basket, and webbing were all still there almost 30 years later.
Basket and webbing are clearly visible (after washing)……as is the burlap (before washing)
The clay rootballs are nearly intact as well. That’s not what you want to see. Roots must establish outside the rootball into the native soil, or they won’t survive.
Intact rootball after 28 yearsThe same rootball after washing
Eventually I’m convinced long-term research will show the folly of leaving foreign materials on the rootballs of B&B trees. In the meantime, I’ll continue to plant trees in a way that ensures their roots are in contact with the native soil and free from any unnatural barriers to growth.
Along with the trends of buying local food, buying organic, etc., there seems to be an increasing interest in the ultimate local food source – a garden. This includes in urban areas. Urban gardening is a great way to save money on food, a great source for fresh vegetables – especially in “food deserts”, and an easy way to introduce kids to where the food on their plate comes from. However, there are a couple potential obstacles you should consider first before starting your urban garden.
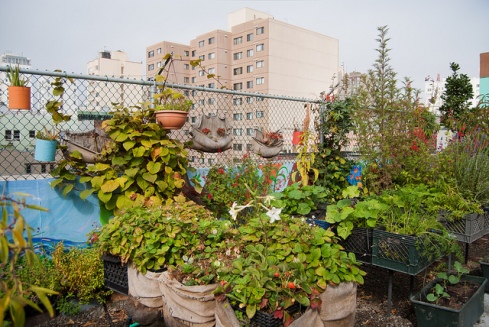
“Graze the Roof” by Sergio Ruiz
First, in urban environments the possibility that soil could have been contaminated with heavy metals, petrochemicals, etc. is pretty high, especially in older neighborhoods. Lead, which was once a common additive to gasoline and paint, is a common contaminant in urban soils. and can be absorbed by the roots of the vegetables you grow. Because of this, that lead can eventually end up in the food on your plate. Most lead poisoning comes from ingesting lead (like eating lead paint chips…), so it’s important to know that the soil you’re using for your garden is safe. You should take some soil samples and send them to a lab in your state that can test for heavy metals like lead. Usually the Land Grant university in your state (if you’re in the US) will have a soil testing lab where these tests can be performed for a nominal cost. Other forms of contamination are possible as well, such as chemicals from cars, asphalt , laundry-mats, etc. These chemicals are more difficult to test for, so your best bet is to find out the history of your garden plot. These records should be available from your local city government, perhaps even online. Read more about contamination in this post.
Second, urban soils are often compacted from foot, car, or perhaps machinery traffic. Compacted soils make it difficult for plants to grow, mainly because the plant roots are not strong enough to penetrate the compacted soil, and thus cannot gather enough water or nutrients for the plant to survive, let alone grow and produce vegetables. Compacted soils are especially common in newer housing developments where entire blocks of houses were built around the same time. The construction companies often remove all of the topsoil prior to building the houses. The soils are then driven over by construction machinery and compacted. Then sod is laid directly on top of the subsoil. This makes for soils with very poor growing conditions for both lawns and gardens.
A good alternative for areas with either contaminated or compacted soils is to use a raised garden bed with soil that was brought in from a reliable source. You can buy bags of potting soil from a local home and garden supply store, but a more economic alternative is to have a trailer full of topsoil trucked to your raised bed. When you build your raised garden, be sure to use untreated wood. Some of the chemicals used to for pressure treated lumber are designed to kill fungi that break down wood. These chemicals, some of which contain arsenic, can leach out of the wood and into the soil used for your veggies! However, untreated wood, though it might not last as long, will still last for decades and is probably cheaper anyway. There are lots of great designs and how-to sites that show you how to build a raised garden bed. Here’s an extension bulletin from Washington State University on raised bed gardening. The raised beds shown below are from when I first installed them in my community garden plot in Manhattan, Kansas. One is now a strawberry patch (the border helps contain the strawberries to a defined area), and the other is used for mostly cold season crops.
Raised garden beds in Colby Moorberg’s community garden plot.
Space is also another consideration. If you don’t have the space for a garden or a raised garden, then perhaps you need to think outside the box (raised garden pun intended) and consider container gardening. Container gardening is exactly what its called – growing ornamental or vegetable plants in containers. Containers can be traditional plant pots, buckets, plastic totes, or any other container with an open top.
The advantages of container gardening include:
Containers can be arranged to optimally use the space available, or rearranged if you like to mix things up sometimes
Potting soil can be used, and can be trusted to be lead/chemical-free
Work can be performed on a bench, thus avoiding working on your knees
Containers can be arranged to provide decoration for your outdoor space
Many objects found around the house can be cheaply converted into decent containers
Vertical Pallet Garden. Photo by Heather Foust
Vertical gardening is a version of container gardening that uses your available space efficiently. Much like using shelves to save space inside your home, vertical gardens use shelves, stairs, racks, etc. to make use of vertical space. The options for vertical gardens are only limited by your imagination. Here are a few extension bulletins on vertical gardening from Tennessee State University and the University of Nebraska.
In summary, the biggest obstacles to urban gardening are soil contamination, soil compaction, and space limitations. I’ve given you a few good alternatives to overcome those issues. Also, be sure to fertilize appropriately, lime as needed, and make sure the plants that you pick are appropriate for the sunlight that’s available. Your local garden supply store or extension agent can help you with suggestions on those issues.
If you know of an urban gardening obstacle that I didn’t address, please leave a comment and I’ll see if I can help out.
The dog days of summer are here and as we approach the longest day of the year (summer solstice is June 21st), we are also feeling the advance of high summer temperatures. Long days mean more evapotranspiration and water withdrawal from the soil. During these long days, plants photosynthesize more, grow more, and use the most water during the month of June. In fact evapotranspiration looks generally looks like a bell shaped curve when plotted by month (figure 1). Soils dry quickly and irrigation or rainfall may not keep
Figure 1. Evapotranspiration data by month. Image from US geological Survey
up with plant demands for water. This can bring some very real stress to garden plants and turfgrasses. If you live in a place that does not receive summer rainfall you will certainly need to increase irrigation to reflect day length at this time of year.
Transpiration is water loss through leaves and is not part of photosynthesis, but it is critical to cool the plant. As soils dry out, the level of abscisic acid produced in roots increases and translocates to leaves resulting in the closing of the pores called stomates. Closed stomata reduces transpiration, but only at a steep cost to the plant. That cost is heat build up. Since this is also the time of the hottest weather it is not long before leaf temperatures rise to lethal levels and sunburn results. Sunburn is always seen as damage in the middle of the leaf because that is the hardest spot to dissipate the heat. The edges that lose heat rapidly are usu
Figure 2. Sunburn occurs in the middle of leaves as in this Windmill palm (Trachycarpus fortunei)
ally not burnt (Figure 2).
Short of applying water properly, what else can be done? Mulches are a great way to avert drought stress since they reduce water loss from the soil surface. The effect is greatest where sun hits the soil. So in new gardens or gardens without a lot of shade, mulches are essential during hot weather to reduce plant stress. Wood chip mulches are particularly helpful in that wood does not reflect, hold or emit heat as much as soil, so it protects adjacent plant surfaces from heat.
How about water absorbing polymers or hydrogels? While much of the allure of these “water crystals” has worn off, it is still good to remind that polymers don’t change evapotranspiration rates of plants so even if they did all the things they claim to, they won’t get plants through a hot summer any better than if they were not present in the soil.
With the longest days come warming soil temperatures. Hot soil can affect plants especially perennials. Ground that is not mulched will radiate infrared onto plant surfaces, this can increase stress. This is yet another reason to employ wood chip mulches around perennials.
Figure 3. Impact sprinklers raise humidity on very hot days relieving plant stress
So when it is particularly hot and dry how can we get plants through this stressful time? Running sprinklers (where practical) will increase humidity and if soils are dry reduce stress (Figure 3). For annual plants, some shade is often helpful. Applying shade cloth to sensitive or newly planted/emerged plants can cut stress dramatically. As plants establish, the shade can be gradually removed. Keep irrigation even so moisture is always there to maintain transpiration — this is essential during warm weather and long days. For perennial plants there is not much to be done. While pruning will reduce the amount of surfaces that lose water, pruning (thinning) will also lead to temperature increases in the plant canopy since the evaporative surface area of the plant is decreased. So while soil water is saved, canopy temperatures may rise, this may be a poor trade off in the hottest months of the year. Over-pruning opens plants up for sunburn on stems which can lead to fungal canker infections by pathogens like Botryosphaeria. This is very common in Apples.
Another treatment you may have heard claims for are anti-transpirants. These are products that are sprayed on plants to create a film that will cut water loss from leaves. Taken from a recent Amazon search I found the following product description recently… “Product is a water-based, semi-permeable polymer coating that can minimize the damages from climate related stresses, such as frost and freeze, heat stress and sunburn, drying winds, and transplant shock. Applied as a foliar spray, Product provides a unique non-toxic, biodegradable, elastic membrane over the plant surface to reduce moisture loss and insulate the plant.” While there may be an application (such as freeze protection) that makes sense for this kind of product somewhere, I don’t see it in your garden during hot weather. Cutting transpiration (“reducing moisture loss”) will increase the heat on leaves, so one of the common side effects of using these products is hot weather is damage or phytotoxicity. Like polymers the fad is faded.
Sometimes the dog days of summer bring insurmountable challenges. In early summer of 2018 in California, temperatures reached record levels of 115-120. Even in irrigated situations plants were damaged, short of providing immediate shade, there was nothing to be done and many plants were injured, even native plants are not adapted to such high temperatures. If these conditions occur in your garden, you may not be able to limit damage, but there are considerations for after care when this kind of blitz occurs. Don’t prune anything immediately, let the leaves fall and buds form because stems may be intact. Prune away injured plant parts after regrowth begins. If injury is severe, cut back on irrigation. Injured plants don’t require as much water because there is less functional leaf area. This is why root root rot often follows this sort of severe injury. The summer solstice is here—I can already feel the shortening days of fall some distance away.
Reference
Costello, L.R., E.J. Perry, N. P. Matheny, M.J. Henry, and P.M. Geisel. 2014. Abiotic disorders of Landscape Plants. University of California Division of Agriculture and Natural Resources Publication #3420.
“Will my peppers continue to ripen? How about my eggplants?” It is common knowledge to most gardeners (and home cooks) that tomatoes will ripen on the kitchen counter, as will bananas and several other fruits. You know that one day your bananas look perfectly ripe and the next they’re a brown mush But does this work for all fruits? We often get questions about whether specific fruits will continue to ripen after picking. And the answer is….. it depends.
How green were my peppers…
One of these fruits is not like the other
The answer as to whether a fruit will continue to ripen after harvest depends on which one of two groups it falls into. These groups are climacteric and non-climacteric fruits. In short, climacteric fruits are the ones that will continue ripening after harvest and non-climacteric fruits are ones that don’t ripen after harvest.
This refers to the “climacteric phase” of fruit ripening where there is an increase in the gaseous plant hormone ethylene and an increase in respiration, which drives the ripening process. It is the climacteric fruits that will keep ripening once they’ve been harvested, thanks to ethylene. The only stage of maturity for non-climacteric fruits after harvest is…..compost.
As long as you’re green, you’re growing. As soon as you’re ripe, you start to rot. -Ray Kroc
Almost all fruits produce ethylene, but non-climacteric fruits produce them at much lower levels and do not rely upon it as the main driver of ripening. I’ll go into a bit more detail in a bit, but first – which fruits are climacteric and which are non-climacteric?
Common Climacteric Fruits
Common Non-Climacteric Fruits
Apple
Brambles (raspberry, blackberry, etc).
Apricot
Citrus (oranges, lemons, limes, etc.)
Avocado
Eggplant
Banana
Grape
Blueberry
Melon (including Watermelon)
Cantaloupe / Muskmelon
Pepper *
Cherry
Pumpkin
Fig
Squash (summer and winter)
Kiwi
Strawberry
Mango
Cherry
Papaya
Pawpaw
Peach
Pear
Plantain
Plum
Tomato
*Some evidence of climacteric ripening in hot peppers
The ripening process
Ripening is genetically programmed – meaning that it is highly dependent on processes that are regulated by genes and it specific to each species. Parts of the process are started and stopped due to the transcription and translation of genes, which are in turn controlled by signals such as chemical compounds, physiological stages of the plant, climate, and so on. These ripening processes have a lot of end results – sugars accumulate in the fruit, pigments develop, some compounds that have pleasant flavors develop while others that are unpleasant are broken down, some of the pectins in the fruit break down to make it softer, and on and on.
Tomatoes – the classic climacteric fruitGetting close…
Research shows that ethylene, the simple little gaseous hormone plays a crucial role in the ripening of climacteric fruits by altering the transcription and translation of genes responsible for ripening. Ethylene is the dominant trigger for ripening in these plants. Ethylene receptors in the cells are triggered by the presence of the gas which leads to cascade effect. This is why ethylene can be introduced from other fruits to trigger ripening in fruits that aren’t ready to ripen. If you’ve heard of the tip to put an apple in a bag full of some other fruit to get it to ripen, it actually works – as long as it is a climacteric fruit.
The same ripening processes happen in non-climacteric fruit as well, but they are not dependent on the presence of ethylene. In fact, these pathways are also present in climacteric fruits – the ethylene-dependent processes are just the dominant (and faster) way that they ripen.
Controlling ripening
The dependence on ethylene for a vast majority of fruits to ripen has been used by farmers and the food industry for a long time to keep climacteric fruit more stable for shipping. These fruits are harvested “green” before they ripen and shipped unripe since they are much firmer and much less likely to get damaged in transit. These days, bananas, tomatoes, and other climacteric fruits are likely to be given a treatment that temporarily inhibits the ethylene response before harvest or shipping to extend their shelf life further. Once they’re close to their final destinations they’ll either be allowed to ripen on their own or given a treatment of ethylene to speed back up the ripening process.
What we gain in shelf-life and reduced food waste we do lose in a bit of flavor. Since the fruits are no longer attached to the plant when they ripen they don’t have the chance to transport more sugars and flavor compounds from the mother plant. So “vine ripened” fruits do have a bit more sweetness and flavor than those that are picked green. Having just gotten back from Rwanda, a country where bananas are a common staple food I can attest that the ones that ripen on the plant are much sweeter than those we get shipped in to the US – you know, the ones that will ripen next week sometime if you’re lucky. There were even some in our group that don’t care for bananas here that loved the ones we had at breakfast every morning.
Grapes must stay on the vine to ripen
One possible direction for biotechnology is the engineering of plants to alter or eliminate the ethylene ripening response to reduce food waste and spoilage. Since many genes that are responsible for ethylene production such as enzymes that catalyze the production of ethylene precursors, or proteins that serve as ethylene receptors have been identified, work is being done to develop delayed ripening by altering or knocking out these genes in a variety of crops.
Way back in 2010 (and then again in 2012) I wrote about a bizarre belief that cornmeal could be used to treat fungal diseases, from lawn spot to athlete’s foot. Rather than rehash what’s already been written, I’ll invite readers to read those posts for background. And of course look at the comments, which are…interesting.The weird thing is that this post from 2010 is the single most popular post on the blog. (Our stats are only for the last two years since we migrated the web site – who knows how many there were before May 2017?)
Blog stats over two years
The consistent popularity for the topic spurred me to publish a university fact sheet on the use of cornmeal and corn gluten meal in home landscapes and gardens. This fact sheet reviews the pertinent literature, and makes recommendations that are pretty much the same as those I made almost 10 years ago. Nothing has changed in the research world to support cornmeal as a fungicide.
But wait, there IS something that’s happened since 2010! Now cornmeal is being touted as an insecticide! In fact, if you go to Google and search for “cornmeal” and “insecticide” you’ll find thousands of hits. As you might expect, there’s no research to support this notion: researchers in Maine, for instance, found no effect of cornmeal on fire ants. However, it is used as a bait to deliver actual insecticidal chemicals.
Way back in 1937.
But facts don’t get in the way of home remedies, such as Lifehacker’s eyebrow-raising advice.
Hmmm…
By refining the search to only include university websites (use “site:.edu” to do this), and swapping out “ants” for “insecticide,” you’ll find at least one Master Gardener group happily (and illegally) recommending cornmeal as an ant killer. The popular mode of action is either (1) they can’t digest cornmeal and starve or (2) the cornmeal absorbs water in their gut and they explode.
Boom!
This reminds me of yet another food product – molasses – recommended for killing ants. Since you’re already here, you might as well check out Molasses Malarkey parts 1, 2, and 3 too.
Might I recommend everyone use their cornmeal and molasses to make bread or cookies or pancakes? There are some delicious recipes on the internet.
What are these trees and do they look like this? Read on to find out!
Today’s blog post is courtesy of Mary Blockberger of Sechelt, BC. As you’ll see, Mary and I go way back. I thought it was important to our ongoing discussion to see how the industry can use the root-washing technique effectively and economically. Here’s Mary:
“Before I began managing the Sunshine Coast Botanical Garden in Sechelt, BC I had a small residential landscaping company. By small, I mean that I was the employee of the month every month of the year! One of our Garden’s mandates is to provide relevant and educational programs for our community. Dr. Linda Chalker-Scott has been one of our most popular speakers several times. One of her presentations dealt with the practise of bare-rooting perennials, shrubs, and trees prior to planting, and the tremendous advantages of following this method.
Root-washing and installing 36 Carpinus. November 2007.
“In November, 2007 I had a chance to try this technique out. My client wanted a ribbon of Carpinus betulus ‘Fastigiata’ planted that would eventually be pleached into an interesting pattern. [Pleaching is a formal tree training technique.] There was a total of 36 trees to be planted; most were container stock as I recall but there may have included a couple of B&Bs as well. Working with another local landscaper, into a wheelbarrow of water went every single tree one at a time. The dirt was clawed away from the root balls by hand with a final spray from the hose. Honestly, it was a cold and miserable job, and I believe a few curses directed at Linda ensued. However, once the roots were cleaned of all soil planting was a breeze. It’s a lot easier moving trees without moving the soil too.
Carpinus are well established and pleaching is underway. April 2009
“Flash forward 12 years, and every single tree has flourished. Bare rooting allowed us to identify and correct any problems before planting, and I’m sure this has a lot to do with the trees’ success. It’s a time consuming and at times messy method, but the reward of a healthy row of trees is well worth the effort, IMHO.”
Pleached Carpinus hedge May 2019
And let me add to Mary’s account that a ZERO replacement rate is going to pencil out to long term economic success. I was able to see these trees earlier this year – that’s my photo at the top of this post.


 Likewise, our other nutrient values are just fine, and I was pleased to see that lead levels were low. Given that this is an older house that had lead paint at one time, and given the fact that the soil being tested was adjacent to the house, I was prepared for lead problems.


 Your soil test results will usually tell you to add nutrients in pounds per a certain square footage. In the example pictured, there’s a recommendation of 3.44 lbs of Nitrogen per 1000 square feet. That number is for the actual nitrogen, and since different nutrient sources have different amounts of nitrogen you’re going to have to do some math to figure out how much fertilizer you need per 1000 square feet and then multiply that by how many thousands of square feet you have.
 Another thing your soil test will tell you is the pH of the soil. In general, plants prefer a soil pH just on the acidic side of neutral (between 6.0 and 7.0). There are plants that prefer different pH levels – such as blueberries and azaleas and their need for a more acidic soil between 4.5 and 5.2. Changes in pH affect the availability of nutrients to plant by affecting ionic bonds of the elements. For the most part, the nutrients are more available at that neutral pH. You’ll note that iron is more available at lower pH levels, which is why those acid-loving plants grow better at lower pHs – they’re heavier iron feeders.