If you live in a place where water falls from the sky during summer this blog is perhaps not so helpful. However, gardeners in much of the western United States will suffer this summer from hot days (sometimes record breaking) and will need to irrigate their gardens and trees in order for them to survive impending drought conditions. The ongoing drought has drained reservoirs and flows of rivers are down or, in some cases, dry entirely.… Continue reading this article “Water Woes”
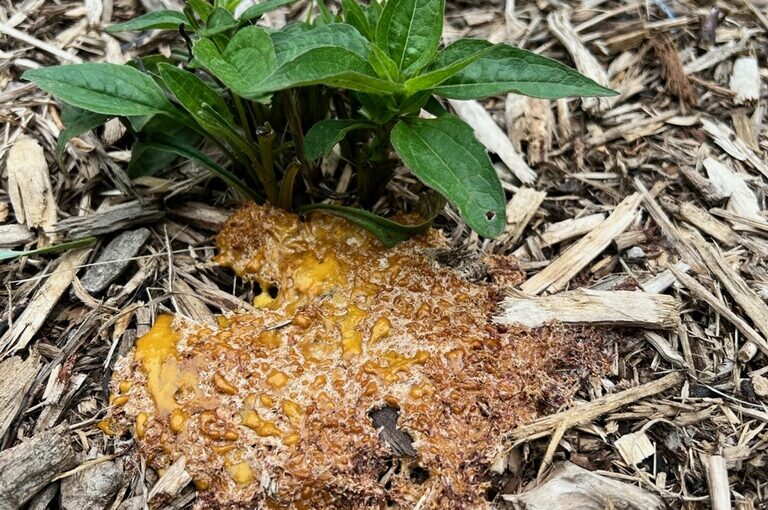
Barf! An ode to the fascinating life of slime mold
It may seem odd to sing the praises of a weird, sometimes gross, looking phenomenon that sometimes freaks gardeners out, but every summer I love educating gardeners about the fascinating lives of slime molds. Here in Nebraska we often get calls about “this weird thing that’s all over my mulch” after a rainy period in the summer and whether or not it will 1) hurt their plants, 2) poison them, or 3) some other horrible outcome they’ve dreamed up.… Continue reading this article “Barf! An ode to the fascinating life of slime mold”
People and Plants
This Independence Day weekend blog post is about John Bartram, the American gardener and botanist who revolutionized gardening.

John Bartram was born a third generation Quaker on a farm in Darby, Pennsylvania on March 23, 1699. While he had no formal education beyond the local school, he was interested in medicine and medicinal plants. Stymied by the lack of local medical schools, his interests gradually turned to botany and he became one of the first practicing Linnaean botanists in North America.… Continue reading this article “People and Plants”
How monsoons affect gardens
“Some people feel the rain. Others just get wet.”—Bob Marley
If you follow the weather news carefully, you might have noticed a little factoid in this week’s headlines: Mawsynram, Meghalaya, in northeastern India reported the highest all-time single-day rainfall in the month of June on the 17th. At 1,003.6 mm (39.5 inches), it eclipsed the previous highest rainfall of 945.4 mm (37.2 inches) recorded on June 7, 1966, according to the Guwahati-based Regional Meteorological Centre (RMC).… Continue reading this article “How monsoons affect gardens”
Tomato season is open!
Mmmmm, fresh summer tomatoes. They’re great sliced, diced or made into salsa or sauces. There’s nothing like picking one right off the vine, popping it in your mouth and splat! You now have tomato all over your shirt.
“No problem,” you think, “it’ll come out in the wash.”
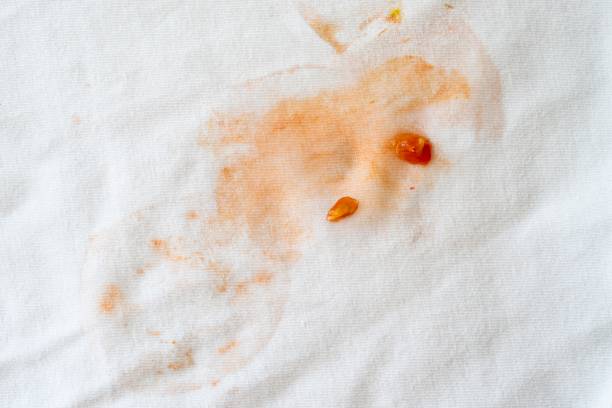
Fast Forward to Laundry Day…
As you’re putting your freshly washed and dried laundry away you notice that tomato stain is still there. So you toss it back in the hamper for next time.… Continue reading this article “Tomato season is open!”
Saving Your Trees From Drought!
Yikes!
Drought of epic proportion is imperiling many western states this year. For the first time some water districts have proposed curtailment of all exterior irrigation, no applied water will be allowed outside of residences. There are public forums are scheduled with experts and officials giving advice. Of great concern is the certain loss of turfgrass swards but far more concern is being expressed for the loss of trees.

Don’t assume your trees will die of drought!… Continue reading this article “Saving Your Trees From Drought!”
Creating artificial nesting structures for cavity nesting solitary bees
Pollinators, especially bees, are an important part of our agriculture, economy, and ecosystems. Gardeners are often well-versed in the importance of bees since we get the opportunity to see these incredible animals in action. We enjoy the results of their labor in the form of fruits, “vegetables”, and seeds which feed wildlife and create beauty and interest in our gardens. In North America alone, there is an estimated 4000 species of native bees, and an estimate of over 20,000 species around the world.… Continue reading this article “Creating artificial nesting structures for cavity nesting solitary bees”
Monitoring and reporting on drought conditions
While drought is part of the natural cycle of the climate and many native plants depend on drought to propagate, it is the bane of gardeners everywhere because of the increased need for water. I have previously written about the four types of drought. Today I thought I would focus on drought monitoring and a way that you, as a citizen scientist, can help report local conditions that the official drought monitor authors can use to fine-tune their depictions of drought.… Continue reading this article “Monitoring and reporting on drought conditions”
Maddening mulch myths

Long-time followers of this blog know that I’ve been researching, writing, and educating on the topic of landscape mulches for over 20 years. So whenever an article comes out in a newspaper or online that directly refutes our current understanding of mulch science, on-line and real-life colleagues quickly call it to my attention. Many times I choose to ignore the article, but when it’s from a highly regarded source with wide readership I feel the need to step in.… Continue reading this article “Maddening mulch myths”
Burlap, the fashion fabric of the gardening world.
Cheap, lightweight and easy to manipulate, burlap has become a popular way to protect transported B&B trees from the nursery to their planting site. To add justification for its use it’s also touted as biodegradable. “No need to remove it!” or “Leave it in place to protect the root ball.” and other such phrases are often tossed at the unknowing homeowner but are they laudable? Let’s investigate.
Hessian soldiers ca. American Revolutionary War – what do they have to do with burlap?… Continue reading this article “Burlap, the fashion fabric of the gardening world.”