Why root washing is important – an illustrated cautionary tale

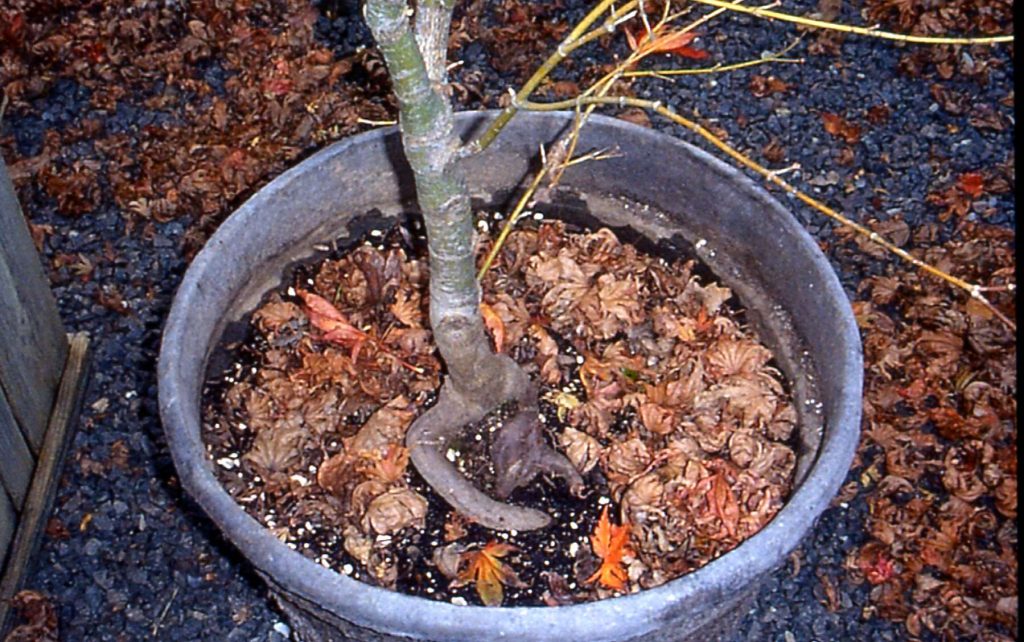
I’ve promoted root washing of containerized and B&B trees and shrubs for a few decades now. The experimental science is slowly coming along – it can take several years to determine if the practice is more successful in terms of plant survival than leaving the rootball intact. But we know how soils function in terms of water, air and root movement, and we understand woody plant physiology. So it’s pretty easy to predict what will happen when trees, whose roots are held captive in layers of stuff, are then planted, intact, into the landscape.

Maple newly purchased from nursery.

Early in spring 2021 I purchased a couple of Japanese maples to frame our garage. As always, I root washed these specimens. Here’s a play by play of what we did, and what we found.

Container removed, exposing fine roots. Some of the media has fallen away and is at the bottom of the wheelbarrow.
Since we can’t see the root flare, we mark the point at which the trunk and soil meet.
As we remove the container media, we find burlap and twine. And under that, a clay root ball. There is a root crown somewhere…
Some beating on the clay rootball helps create some cracks where water can then help with the process.
Into a nice soaky bath to loosen up that clay. The longer it sits, the more clay will slough off.
We speed the process along with a directional spray of water.
Jim gets his fingers into the wet clay to pry it away from the roots. Still no root crown, but you can see the Sharpie line on the trunk a couple inches above the clay.
Eureka! A root flare several inches below the original media level.

After more cleaning and untangling, we have a root system ready for planting. Well, almost.

We have roots, but we still have some problems.
It’s got some pretty crappy roots (from not being potted up properly at the nursery), and the remanent of a stake next to the trunk (about 4 o’clock). But there is a nice structural root to the left, with healthy fibrous branches.
“Knee roots” have to go (I call them “knee roots” because they are at 90 degree angles). They have poor structure and will only continue that downward growth pattern, rather than growing outwards. The easiest thing to do is sever them when they turn downward at 90 degrees – don’t worry about removing them if they are too tightly entwined. New root growth at the cut will be directed outwards.
We neglected to get “beauty shots” of our maples through the summer, but you can see one of them to the left of the New Zealand flax plant in the pot. Both maples established their root systems quickly and grew vigorously throughout the summer.
Now in late October, the maples are turning color. Note the distance between the trees and the garage – this ensures that we will have little branch/building conflict as the trees grow in height and spread.
Here’s one of our beauties getting ready to shut down for the winter. They thrived throughout the summer, even when we reached record high temperatures. We look forward to their continued success in years to come.

If you are still wondering why this is a cautionary tale, consider what would have happened if the rootball was planted intact:

  • The root flare would have been buried below grade.
  • There would be multiple layers of stuff between the roots and the native soil (i.e., clay, burlap, and media).
  • The twine circled around the trunk would girdle it eventually.
  • The poor structural roots would not create a stable support system.

Now, one can argue all they like that there isn’t a robust body of scientific literature to recommend this practice – and there isn’t, yet. But leaving rootballs intact creates textural discontinuities between the roots and the native soil, and poorly structured woody roots are not going to correct themselves. So why not embrace a practice that removes both the soil and root problems?

Caveat emptor!

Update on our bare-rooted perennial garden

Our south-facing pollinator garden.

Two years ago I installed a pollinator garden in early July. This goes against my recommendation to install plants in the fall, when roots have longer to get established and less stress is felt on the rest of the plant. But I wanted to see what would happen if I was careful to mulch well and keep it irrigated. Oh, and did I mention I was going to root wash every one of them? (Be sure to look at that process in the link from 2018.)

I reported on progress last year, and this year shows even more vigorous growth by nearly all the plants. Two of the three ‘Bandera Purple’ lavender died over the first winter, as they were marginally hardy (USDA 7-10) for our area. One straggler remains in the lower right hand corner of the photo below. The Agastache ‘Acapulco Red’ and the Verbena ‘Homestead Purple’ were planted near the front of the beds on both sides and while they survived the first year, they are now gone. My guess is that our cold snap in February 2019 wiped out those plants that were in less protected locations. Perhaps we’ll fill those spots in later with something more cold hardy, or just let the escaped Viola tricolor continue to colonize bare spots.

Overall, the garden is wildly successful in attracting hummingbirds and a variety of native bees and other insects.

The southwest garden is being colonized by violets that have hopped out of a nearby container. Wood chip mulch keeps the soil cool and moist.
The southeast garden with its invading strawberries (soon to be relocated). The tiny lavender in the back right corner is a rescue plant.

I still have a little work to do – I’m relocating the strawberry adjacent to the southeast garden so it stops invading the perennial bed. But after that I’m calling this garden finished.