Friday quiz – the tale of two clematis continues

A few weeks ago I showed you photos of iron toxicity in a Clematis planted in a soggy soil (perched water table).  Because this area is just not conducive to plants, we’re putting in a small deck.  This necessitated the excavation of two Clematis, which were both suffering from wet feet.  (Needless to say the root mass was very small and shallow on both plants.)  We decided to put them into large planters with conical trellises and use them as deck plants.

During our pond excavation we retained the topsoil and sieved it for uses just like this (for woody planting, not annuals).  The soil is a clay loam and has been stored in a garbage can to keep it dry.  Anyway, the first pot I filled with this good soil, added water, and worked the soil with my hands to ensure it was thoroughly hydrated.  As holes developed, I added more soil and continued to work it in by hand.  I then installed the first plant and watered it thoroughly.

After observing what happened during the next several hours with this plant, I installed the second plant differently – I watered the soil but did not work it by hand to hydrate it.  I added the plant as before and then watered everything thoroughly; I added soil where holes developed.  I then redid the first container in the same manner as the first.

What happened to the first container that caused me to change my installation technique?  And why didn’t it happen with the second container?  Answers and photos Monday!

Want an organic source of nitrogen that isn’t shipped from halfway across the world? Urine luck

There are lots of organic fertilizers out there:  Fish emulsions, corn gluten meal, guano.  Many of these fertilizers (all that I listed above with the exception of the guano) are by-products of some other industry.  Still, they need to be shipped from somewhere to somewhere to get to our garden and so they cost energy — and of course they cost us money.  But there is a high nitrogen fertilizer that you can use which doesn’t come from a long way away, and that’s pee.  Holly  mentioned using pee to help compost piles of stray a few months ago (you can find the news story on the right side of this blog), and I, for one, think it’s a great idea.  But really, pee can be used as a fertilizer without the compost.

Yesterday I was working on a project and decided to goof off a little by figuring out how much nitrogen was actually in urine.  Here’s the conclusion — Urine contains about 4,000 pats per million nitrogen.  In terms of what plants can handle, that’s a lot (which is why dogs produce “dog spots” when they pee on a small area of ground — too much nitrogen in a small area).  400 parts per million nitrogen, applied once a week in irrigation water, is what you might apply to encourage the growth of greenhouse plants.  Urine, by the way, is also relatively sterile (unless you’re dealing with a bladder infection) and so using urine is relatively safe as long as it’s used quickly.  It also conserves water because you don’t need to flush.  So, the way I figure it, you could mix 1 part urine with 9 parts water and have a really good once a week (or two weeks) fertilizer application for your flowers (I don’t know if I could bring myself to fertilize cabbage, broccoli, or tomatoes with it…).  You’d be saving yourself the cost of fertilizer, saving the environmental cost of shipping the fertilizer you might otherwise purchase, saving water, and you’d have something unique to tell your gardening friends about.  Win – win situation as far as I’m concerned.

Restoration ecologists – you need us!

Restoration ecology – the science of restoring degraded ecosystems – is another branch of applied plant sciences.  Oddly enough, very little plant science makes it into the scientific literature of this field.  This has driven me nuts for a number of years after reading an endless stream of papers where no mention is made of how plants are selected, installed, and managed.  Or worse, some ancient horticultural practices are used – like amending the backfill with organic material rather than using just the native soil.  Here’s what that will lead to:


Native soil discarded in favor of “lite-n-fluffy” amendment

The whole story

Restoration failures like this are often attributed to more esoteric causes, like lack of local plant gene pools in the plants used.  Believe me, even local populations aren’t going to survive poor installation techniques.

Thus, one of my recent graduate students conducted a meta-analysis of the applied restoration ecology literature to analyze it for horticultural content.  The results were not encouraging.  In Kathleen’s thesis abstract, she states:  “…careful selection and handling of planting stock, site and soil preparation, and rootball preparation, essential to increase survivorship of planted seedlings, are infrequently discussed in peer-reviewed restoration publications…Findings from this review support that restorationists either do not understand or are not providing important information to their peers, stakeholders, or the public on significant horticultural aspects of the restoration process.”

Now I know most of you are not restoration ecologists…but I’ll bet many of you are interested or actively involved in planting or maintaining native plant habitats, public greenspaces, degraded urban lots, etc.  The science behind gardening is just as applicable to these “wilder” areas as it is to home landscapes and gardens.


Failure of entire installation.  Note suckering from the roots – an attempt by the tree to establish a shorter crown.  (It’s easier to transport water to a short crown than a tall one, and suckers are often a symptom of root failure)

What’s New?!

Just back from OFA – my discipline’s humongous tradeshow and conference in Columbus, Ohio. All things Floriculture – new perennials, annuals, and seasonal plants, technology, structures, and equipment for greenhouses, and plants and products for floral designers. The bulk of the show and educational sessions is focused on growers, but garden center owners and florists are also targeted.  I was part of two team talks for growers on “Perennial Production Problems and Solutions”.

Aside from the thousands of attendees and hundreds of exhibitors, it’s like a big family reunion for floriculture faculty involved in teaching, research, and Extension. We introduce our latest graduate student to our own back-in-the-day classmates and our “old” major advisors. Beers are consumed. We’ve come to determine that we’re quite inbred; most floriculture researchers and educators received degrees and/or are employed by Michigan State, North Carolina State, Purdue, U. Florida, Cornell, or Minnesota. Many of our collegues have left academia to R&D positions in the horticultural corporate world, the conference also gives us a chance to catch up with them.

One of the highlights of OFA is the amazing array of new plant introductions from industry leaders such a Ball, Ecke, Syngenta, Dummen, Proven Winners, etc. Most of these names are not familiar to gardeners – they are wholesale (business-to-business) brands that provide growers with seeds, plugs, and liners, to be grown on and sold at retail. Proven Winners is one of the few vertically-integrated brands that market throughout the supply chain, from grower all the way to the consumer.


‘Gryphon’ – an exciting new begonia from PanAmerican Seed.

There are a slew of begonias out there – so what’s so special about this one (besides reaching almost 2′ in height and width)? Most fancy-leaf begonias are propagated by rooting vegetative cuttings that wholesale for $0.50 to $1.25 per liner.  This one’s grown from seed ($0.05 per), enabling the grower to produce a beautiful plant yet still make a decent profit margin.  The margin in our industry is ridiculously miniscule – wholesalers seem to constantly undervalue their product compared to all the costs involved in growing and shipping.

But I digress. I’ll post more from the “hot and new” front in ornamental plants on my next installment!

Tomato takedown

Well, Dr. Rohwer was right – he thought you’d get this more easily than I did!  Ray and Jon were spot on – this is classic juglone toxicity from those walnut trees (Juglans spp.) you see in the background.  Many of these leaves ended up on the roof, leaching into the rain barrels (good sleuthing Ray and KennyG!), the water in which was used in irrigating the vegetable garden.  In fact, Dr. Rohwer divulged that the rain barrel water was quite brown from the walnut leaves.  Thus, the tomatoes met an unhappy end, because tomatoes definitely do not love walnuts.

Juglone toxicity, an example of allelopathy, is an interesting phenomenon – it does not affect all plants equally.  In fact, this clue was given in the puzzle, when Dr. Rohwer mentioned the "garlic and carrots, amongst young beets, onions, kohlrabi, and bolting radishes and spinach" also in the garden.  Many of these vegetables are known to tolerate juglone, as are various landscape plants.  (There is an excellent publication from Purdue on juglone toxicity with lists of tolerant and sensitive species.)

Juglone is most prevalent in the nuts, roots and leaves of walnut trees.  This makes sense:  germinating walnut seeds and expanding root systems are both able to kill their competitors, retaining more resources for themselves.

Juglone tends to be less of a problem for established trees and shrubs, as their root systems are more extensive; seedlings would be the most sensitive stage.  And walnut wood used as part of a wood chip mulch has not, as far as I know, been shown to cause juglone toxicity in landscape plants. 

When criticism becomes libelous

Dr. Cregg is on vacation for a few weeks so I thought I’d post something today by trolling the web for discussion of my horticultural myth columns.  And when you go fishing, you know you might catch something you didn’t really want.  In this case, personal and professional attacks.

Like the rest of the GPs, I relish vigorous debates on different horticultural practices and products.  Ideally, these debates are based on science, so that we’re all friends afterwards and could go out for beer if we all lived in the same community.  But when criticisms become personal, malicious, and in some cases out-and-out untruths, what should one do?

I have a relatively thick skin and ignore most of the nasty comments, but when my integrity as a scientist is challenged, I really have a problem.  For instance, one blogger states “The fact that some – not all – of her articles have very little basis in reality and are widely disputed and even denounced in horticultural circles should be pointed out before anyone takes them immediately to heart.”  Another blogger remarks “What little I’ve read about this Chalker-Smith person leads me to believe she is an “opinion for hire” much like some “expert witnesses” one sees in courtrooms.”  How about this?  “She tried to prove compost tea is bad by PURPOSELY using E.Coli infested compost (without telling anyone about it) and proclaimed it as unsafe product to use.” And so on.

I can guarantee you that if I didn’t base my publications in reality, or if I were an “opinion for hire” I would be in serious trouble with the university.  The truth is I research the science behind topics and then have at least one colleague review them.  (Sometimes that colleague is my husband, also a PhD in horticulture and one of my most honest critics.)  The compost tea diatribe is so outlandish it took my breath away.

So onto my question:  what should one do when one’s professional reputation is libeled?  Do I continue to ignore it?  Do I wade into these debates, thus giving credibility to the libeller?  These people hide behind their anonymity – none have the courage to simply email me and voice their criticisms.

I’ll be curious to hear from my GP collaborators as well as non-academics.

(Hurry back, Bert.  This was a painful experience.)

A quiz – from our visiting professor

We’re glad to have Dr. Rohwer back for another visit!  Here’s his Friday quiz – see if you can figure out what happened to his tomatoes.

"Exhibit A is a tomato in our garden. We had 2 tomatoes last year a couple feet away from this one, they met the same fate. Wilting at about flowering time, and water did not resolve the wilting. Previous to last year, the area was turfgrass for who knows how long. There was no vascular discoloration or oozing."

Charlie also included more evidence: "Exhibit B – arrow points to former location of the wilted tomato behind the garlic and carrots, amongst young beets, onions, kohlrabi, and bolting radishes and spinach. Exhibit C – arrow shows the former location of the tomato.  In the far background you can see our roof. We have 2 rain barrels collecting most roof runoff." This water is used in their vegetable garden.

 
And here’s a bit of diagnostic information: "Plants sensitive to this condition exhibit symptoms such as chlorosis (foliar yellowing), wilting, and eventual death."

Can you figure out what happened? Answer on Monday!

Propagating in the air

Most gardeners that I know have tried to produce roots on stem cuttings from plants that they like.  Sometimes this turns out well for them, particularly if they are working with what we call an easy-to-root species, and sometimes it turns out poorly.  OK, in all honesty, it often turns out poorly.  The problem is that plants like very particular conditions when they’re growing roots and the typical gardener is going to have a tough time providing these conditions.  So here’s an option.  There is a method of propagation called air-layering which works on many plants that stem cuttings won’t work on and which doesn’t need all of the specialized equipment either.  It’s not a sure-fire technique, but it’s more likely that the average gardener will get this technique to work than any other (with the exception of seeds).

Here’s how it works.  Select a small branch from the plant you want to propagate.  Find a point on the branch about 6 to 12 inches from its apex and then cut out a ring of bark around the circumference of the tree.  This will allow water and nutrients to flow into the branch (assuming you didn’t cut too deep), but it won’t allow the carbohydrates produced in the branch to flow down the stem — instead they’ll be stuck where you made your cut and be used by the plant to produce new roots.

Around the cut you may apply a rooting hormone.  This will help the root production to some degree.  To keep the wound moist apply a heaping helping of moist peat and keep it in place with plastic wrap — or a cut up sandwich bag.  Wire ties, elastic bands or string will hold these in place.  Now you just sit back and wait.

It usually takes anywhere from 4-8 weeks for roots to emerge (you’ll see them when they do because they’ll push up against the plastic wrap).  Once the roots are there plant your new tree/shrub/perennial in it’s own container just like you would any new plant, care for it as you would any other plant, and then plant it out if you so choose (I like to keep young plants like this in a container for at least a few months — the landscape is usually a harsher environment than a container, and so the time in the container gives it a chance to get stronger and store needed nutrient reserves.)

Five little lavenders – an update

Long-time readers of our blog might remember my August 12 column (linked here for your convenience).  You saw my giant lavender plant devolve into 5 small plants with tiny spiraled root systems that put Marge Simpson’s beehive to shame.  In any case, I promised to keep you up-to-date with their progress.

Transplanting in August is a risky proposition, especially when you prune out root defects.  Nevertheless, all but one of the five survived the summer and here they are earlier this spring:

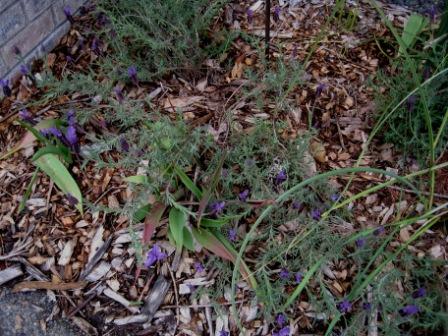
The one that didn’t make it was in the upper left corner of this south-facing landscape, where there is a lot of reflected heat from the nearby bricks and concrete.  (You can see the empty spot where it was in this photo.)

If you haven’t tried corrective root pruning before, I’d encourage you to try it with an inexpensive shrub.  Your best bet will be older containerized plants in the “sale” section of your nursery.

John Bartram Lives!

Yep, there he is. Showed up at our state Master Gardener College, just last week. I even went to dinner with him. The snake-on-a-stick startled the bartender just a bit.


The elder Bartram (his son William was also a great botanist and explorer) was the Royal Botanist to King George III and a member of the Royal Academy of Sciences, Stockholm. As with many of the Great Plant Explorers, his life combined botany with politics,
adventure, and lust [for plants,anyway]. Someone should make a movie…

Probably best know as the discoverer of the soon-to-be-doomed little tree, Franklinia
alatamaha
, he also was responsible for the introduction of lots of
other North American native garden staples such as rhododendrons,
Kalmia
, and deciduous magnolias.
Bartram died in 1777, but has recently been resurrected by Kirk Brown, master thespian and all-around talented guy.

Kirk works with Joanne Kostecky Garden Design in Allentown, PA, and is a director for Garden Writers of America.  But his passion for the life and times of fellow Pennsylvanian John Bartram takes the audience far beyond the usual gardening lecture. His presentation "John Bartram: The King’s Gardener" unveils the travels, collections, and psyche of the father of the nursery industry in the original thirteen colonies. I love the review by Stephanie Cohen (The
Perennial Diva!) "Kirk Brown did not imitate John Bartram, he actually
became him…anyone who has an interest in history or horticulture will
be spellbound by this presentation."  She’s absolutely correct. For more on John/Kirk,
check out www.johnbartramlives.com.