Advancing the science of gardening and other stuff since 2009
Author: Linda Chalker-Scott
Dr. Linda Chalker-Scott has a Ph.D. in Horticulture from Oregon State University and is an ISA certified arborist and an ASCA consulting arborist. She is WSU’s Extension Urban Horticulturist and a Professor in the Department of Horticulture, and holds two affiliate associate professor positions at University of Washington. She conducts research in applied plant and soil sciences, publishing the results in scientific articles and university Extension fact sheets.
Linda also is the award-winning author of five books: the horticultural myth-busting The Informed Gardener (2008) and The Informed Gardener Blooms Again (2010) from the University of Washington Press and Sustainable Landscapes and Gardens: Good Science – Practical Application (2009) from GFG Publishing, Inc., and How Plants Work: The Science Behind the Amazing Things Plants Do from Timber Press (2015). Her latest effort is an update of Art Kruckeberg’s Gardening with Native Plants of the Pacific Northwest from UW Press (2019).
In 2018 Linda was featured in a video series – The Science of Gardening – produced by The Great Courses. She also is one of the Garden Professors – a group of academic colleagues who educate and entertain through their blog and Facebook pages. Linda’s contribution to gardeners was recognized in 2017 by the Association for Garden Communicators as the first recipient of their Cynthia Westcott Scientific Writing Award.
"The Garden Professors" Facebook page - www.facebook.com/TheGardenProfessors
"The Garden Professors" Facebook group - www.facebook.com/groups/GardenProfessors
Books: http://www.sustainablelandscapesandgardens.com
I’ve promoted root washing of containerized and B&B trees and shrubs for a few decades now. The experimental science is slowly coming along – it can take several years to determine if the practice is more successful in terms of plant survival than leaving the rootball intact. But we know how soils function in terms of water, air and root movement, and we understand woody plant physiology. So it’s pretty easy to predict what will happen when trees, whose roots are held captive in layers of stuff, are then planted, intact, into the landscape.
Maple newly purchased from nursery.
Early in spring 2021 I purchased a couple of Japanese maples to frame our garage. As always, I root washed these specimens. Here’s a play by play of what we did, and what we found.
Container removed, exposing fine roots. Some of the media has fallen away and is at the bottom of the wheelbarrow.Since we can’t see the root flare, we mark the point at which the trunk and soil meet.As we remove the container media, we find burlap and twine. And under that, a clay root ball. There is a root crown somewhere…Some beating on the clay rootball helps create some cracks where water can then help with the process.Into a nice soaky bath to loosen up that clay. The longer it sits, the more clay will slough off.We speed the process along with a directional spray of water.Jim gets his fingers into the wet clay to pry it away from the roots. Still no root crown, but you can see the Sharpie line on the trunk a couple inches above the clay.Eureka! A root flare several inches below the original media level.
After more cleaning and untangling, we have a root system ready for planting. Well, almost.
We have roots, but we still have some problems.It’s got some pretty crappy roots (from not being potted up properly at the nursery), and the remanent of a stake next to the trunk (about 4 o’clock). But there is a nice structural root to the left, with healthy fibrous branches.“Knee roots” have to go (I call them “knee roots” because they are at 90 degree angles). They have poor structure and will only continue that downward growth pattern, rather than growing outwards. The easiest thing to do is sever them when they turn downward at 90 degrees – don’t worry about removing them if they are too tightly entwined. New root growth at the cut will be directed outwards.We neglected to get “beauty shots” of our maples through the summer, but you can see one of them to the left of the New Zealand flax plant in the pot. Both maples established their root systems quickly and grew vigorously throughout the summer.Now in late October, the maples are turning color. Note the distance between the trees and the garage – this ensures that we will have little branch/building conflict as the trees grow in height and spread.Here’s one of our beauties getting ready to shut down for the winter. They thrived throughout the summer, even when we reached record high temperatures. We look forward to their continued success in years to come.
If you are still wondering why this is a cautionary tale, consider what would have happened if the rootball was planted intact:
The root flare would have been buried below grade.
There would be multiple layers of stuff between the roots and the native soil (i.e., clay, burlap, and media).
The twine circled around the trunk would girdle it eventually.
The poor structural roots would not create a stable support system.
Now, one can argue all they like that there isn’t a robust body of scientific literature to recommend this practice – and there isn’t, yet. But leaving rootballs intact creates textural discontinuities between the roots and the native soil, and poorly structured woody roots are not going to correct themselves. So why not embrace a practice that removes both the soil and root problems?
I like catchy memes as much as the next person. They’re easily memorized and passed on. But “Save the planet, plant a tree” has always bugged me for two reasons. First, and probably most importantly, this simplistic mantra absolves people of doing MORE to improve our environment. It’s a “one and done” approach: “Hey, I planted a tree today, so I’ve done my part.” That’s hardly a responsible way to live in a world where climate change is a reality, not a theory. Planting trees (and other woody plants) needs to become part of a personal ethic dedicated to improving our shared environment, and that includes reducing our carbon footprint in MANY ways.
No and no.
Second, and more germane to this blog, is that most people don’t know how to plant trees (and that includes an awful lot of professionals who should know better). Planting trees properly requires an understanding of woody plant physiology and applied soil sciences. Otherwise, newly planted trees are likely to die due to one or more problems:
Poor plant species selection
Mature size too large for site.
Species not adapted to urbanized conditions. This includes insistence on using native species whether or not they tolerate environmental conditions far different from their natural habitat.
Gaultheria shallon does well in the forest subcanopy – not so well in urban settings
Poor/improper soil preparation
Working amendments into the soil before, during, or after planting. Your goal is to keep a texturally uniform soil environment.
Digging a hole before seeing what the roots look like. It’s like buying a pair of shoes without regard to their size.
The reality of tree roots: you can’t dig a hole until you can see what goes in it.
Poor quality roots
Most roots found in containerized or B&B trees are flawed through poor production practices. If you are using bare root stock, you don’t have to worry about this problem.
Can’t see the roots? Well, that leads to the next problem.
You can’t see root problems unless you take it all off.
Improper root preparation
No removal of burlap, clay, soilless media, or whatever else will isolate the roots from its future soil environment. Take it all off.
No correction of root flaws. Woody roots don’t miraculously grow the right direction when they are circling inward. They are woody; it’s like trying to straighten a bentwood chair.
Just try to straighten those circling, woody roots.
Improper planting
Planting at the wrong time of year. It’s best to plant trees in the fall, when mild temperatures and adequate rainfall will support root establishment and not stress the crown.
Not digging the hole to mirror the root system, especially digging too deep.
Failing to place the root crown at grade (which means the top of the root crown should be visible at soil level). Look at forest trees if you are not familiar with what a root crown looks like.
Stomping or pressing the soil around the roots. That just eliminates the air space in soil pores.
Adding “stuff” like transplant fertilizers, biostimulants, etc. They are not needed and you risk creating nutrient imbalances when you add “stuff.”
The tape marks where the burlap ended – a good 10″ above the root crown.
Poor aftercare and long-term management
Failing to add arborist wood chips as a mulch on top of the planting area. Regardless of where you live, natural woody material as a mulch is critical for root, soil, and mycorrhizal health.
Failing to irrigate throughout the establishment period and seasonally as needed. Trees will continue to grow above and below ground, and without a similar increase in irrigation the trees will suffer chronic drought stress during hot and dry summers.
Adding fertilizers of any sort without a soil test to guide additions. Trees recycle most of their nutrients; don’t add anything unless you have a documented reason for doing so.
There is nothing better for roots, soil, and beneficial microbes than fresh arborist chips.
That’s a lot to think about when you are planting a tree – but when you understand the science behind WHY these actions should be avoided, then you can devise a better plan for planting. And if it all seems to be too much, I have created a twelve-step planting plan that might be useful. Please feel free to share it widely!
This home landscape is managed using science-based methods; the only routine additions are water and arborist chip mulches.
Upon reading this post’s title, you may be inclined to stop right there. (That’s why I have an eye-catching photo to lure you in.) While logic may seem irrelevant to your enjoyment of gardening, I can guarantee that reading this blog post will challenge many seemingly logical assumptions you’ve heard or read about. Recognizing unsubstantiated assumptions and avoiding their pitfalls means you can make wise choices about how you care for your gardens and landscapes.
You can find this and thousands of other silly correlations at www.tylervigen.com
A few definitions are needed before we get started:
Correlation refers to variables whose changes mirror one another. For instance, the addition of nitrogen fertilizer to container plants is correlated to plant growth: as nitrogen levels increase so does plant growth. You can also have inverse correlation, where the variables move in opposite directions. An example is water availability in soil and planting density: the more plants you have in a specified area, the less water is in the soil.
Plant growth is correlated with increased nitrogen and other nutrients (from Xu et al. 2020)
Causation takes correlation one step further: it establishes that one of those variables is causing the change in the other. Using the same examples, we know through published evidence that the increase in nitrogen is causing the increase in plant growth, and the increase in planting density is causing the decrease in soil water because of competing roots. These relationships are obvious to us, but what’s important is that these causative effects have been established through scientific experiments.
Inverse relationship between planting density and soil water content (from Shao et al. 2018)
Sometimes scientific evidence doesn’t exist to demonstrate causation. That may be because it’s impractical or impossible to run an experiment that tests for a causative effect, or it may be because the experiments just haven’t been conducted yet. The latter is the unfortunate reality for those of us interested in managing gardens and landscapes: there is no major funding agency that supports field research for us. There is research being done, but it’s on a small scale with a shoestring budget…so the body of literature develops very slowly. In such situations, we must rely on established applied plant physiology and soil science to ask whether a suggested correlation might be elevated to causation.
Something caused these arborvitae to fail…but what? Research is slow to catch up to our observations of landscape failures.
Which brings me to my current source of online irritation: the constant blaming of tree failure on mulch volcanoes. Yes, tree failure is definitely correlated with mulch volcanoes – because lots and lots of newly planted trees fail. But is the mulch to blame? No one seems to care much that there is NO published work to show that mounds of appropriate mulch materials will somehow kill otherwise healthy trees. Instead, observers jump to the conclusion that thick layers of wood chip mulch kill trees. They are elevating correlation to causation in the absence of either experimental research OR known plant physiology. In fact, there is published research to show that thick layers of arborist wood chip mulch enhance tree establishment and survival. And there are many poor planting practices that increase the likelihood of tree failure. But it’s easiest to blame the wood chip mulch, though it’s merely masking a multitude of planting sins.
Street volcano 1
Street volcano 2
Volcano as garden fashion statement
Volcano mulching is ugly – but does it cause tree failure? Or is it hiding something?
Not interested in mulch volcanoes? Well, there are lots of other examples of garden and landscape management practices or phenomena that fall into the logical fallacy camp. I’ve linked to appropriate references, when available, that go into more detail:
and just about any gardening product you can think of where there is NO published evidence – or appropriate, established plant or soil science – that supports any causative, beneficial effect on plants or soils. Cornmeal, Epsom salt, gypsum, and kelp products are just some of these.
All of these products, practices or phenomena are correlated with some anecdotal observation (increased yield, healthier soil, plant failure, etc.) that elevates them to causative relationships. But no science.
I’d encourage you to think objectively about your closely held beliefs about your gardens or landscapes. Are you sure that what you’re doing is actually beneficial? How do you know there’s a cause-and-effect relationship? I’m not going to talk you out of your cherished beliefs – but if you are a science-based gardener, you might talk yourself out of them instead.
Willow screams in pain What is its source of anguish? More research needed!
Four years ago we moved to the family farm (where I grew up) and we’ve enjoyed restoring the 1 acre landscape around the farmhouse. Given that the residential part of this farm is surrounded by pastureland, there is a continual influx of weed seeds into our managed beds. While our thick applications of arborist wood chips have kept out many weeds, they still pop up where mulch hasn’t been applied yet or is too thin.
Hold a stem of Hypericum perforatum up to the sky to see tiny perforations in the leavesPhotosensitized livestock will suffer severe sunburning after consuming Hypericum perforatum
One of these weeds is Hypericum perforatum (also known as Klamath weed or St. John’s wort), a species native to Eurasia. The latter common name can confuse gardeners, as there are several ornamental species of Hypericum also called St. John’s wort, but H. perforatum is easily identified by the perforations in the leaf. This invasive species is a problem for our cattle, as Klamath weed causes photosensitivity when it’s consumed and can be toxic in large amounts.
The weeds to the right of my raised beds include St. John’s wort, or Hypericum perforatum.
In the last few years H. perforatum colonized our stockpile of native soil waiting to be used in our raised beds. It was a small enough infestation that we could pull it all up, but a closer look revealed that some shiny metallic beetles were already busy feasting on the leaves. Putting on my IPM hat, I first needed to identify these interesting beetles. It didn’t take long to find out they were a Chrysolina species.
Chrysolina spp. beetles on St. John’s wort
Chrysolina hyperici and C. quadrigemina (or St. John’s wort beetles) are also native to Eurasia and are specialist feeders – they only feed on Hypericum species. They were imported as biological control agents several decades ago and have been effective in controlling dense populations of St. John’s wort. C. quadrigemina in particular has been reported to feed on both ornamental and native species of Hypericum but not to the extent of causing significant damage.
Hypericum perforatum flower
Ornamental Hypericum flower
Ornamental Hypericum shrub
Ornamental St. John’s wort is Hypericum on steriods
Both species of the St. John’s wort beetle feed on the leaves, where they also lay thousands of eggs. The larvae that emerge from the eggs are voracious feeders and can defoliate dense stands of St. John’s wort. Like other animals that eat Hypericumperforatum, the larvae become photosensitive and generally feed before sunrise to avoid damage.
Hypericum perforatum infestation
Since biological control agents depend on the presence of their host, it’s important to retain a small population of the host. And because this particular beetle is a leaf feeder, one can remove the flowers of the plants to reduce reproduction, but maintain the plants to support the beetle.
Cinnabar moth (Tyria jacobaeae) was introduced to the US to help control tansy ragwort (Jacobaea vulgaris), another invasive, noxious weed
Many other introduced, invasive weeds can be controlled using carefully researched microbes and insects. Some of these biocontrol agents may already be found in your area – so it’s important to avoid using insecticides and fungicides, in particular, to conserve these garden assets.
The movie “Field of Dreams” is a family favorite – we love how baseball and the supernatural are interwoven to create a great story. If you haven’t seen the movie, you should – and for those of you that have, you know why it was important for Ray to build the baseball field. Like the magic that unfolded once that physical space was provided, botanical magic emerges from garden soils that support mycorrhizal life. Garden product peddlers have taken advantage of the scientifically-established relationship between plants and mycorrhizal fungi by selling inoculants. And gardeners tend to focus on which of the many brands of inoculants to buy, rather on questioning their efficacy.
Choices, choices, choices
I’ve attached a link to my peer-reviewed fact sheet on mycorrhizae for a more in-depth discussion about this symbiotic relationship, but the bottom line is this: inoculants don’t work. To understand why, we need to consider a modified version of the disease triangle. Many gardeners are familiar with this concept, which depicts the three criteria needed for plant disease to manifest: the presence of the pathogen, the presence of a host plant, and environmental conditions conducive to pathogen growth. Pathogen spores are EVERYWHERE in landscape and garden soils – they just aren’t activated unless their host is present and environmental conditions allow their germination. Likewise, mycorrhizal spores are EVERYWHERE in landscape and garden soils. We can make a mycorrhizal triangle to visualize the three criteria for needed for mycorrhizae to develop.
Comparison between a disease triangle and a mycorrhizae triangle
While our understanding of mycorrhizal relationships continues
to expand, we do know some of the environmental factors needed for successful
inoculation:
Soil oxygen. Mycorrhizal fungi are aerobes,
meaning they are active when sufficient oxygen is present.
Woody debris on the soil surface. Mycorrhizal
species are also decomposers of woody material. There is increasing evidence
that a natural woody mulch (not sawdust, not bark) is required for mycorrhizal
establishment. Fungal hyphae colonize the debris, extract nutrients, and
transport them to their host’s roots. Arborist wood chips are an ideal mulch in
this regard as they absorb water and provide an ideal substrate for hyphal
development.
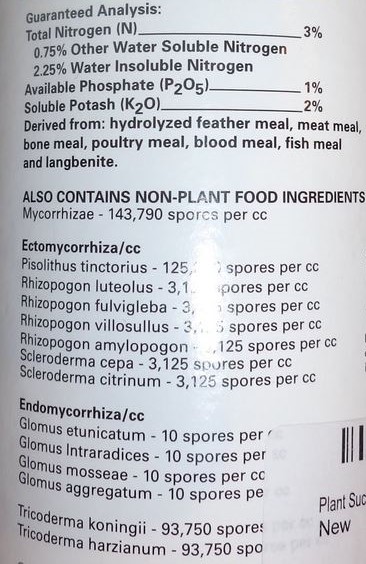
There is a robust body of peer-reviewed research conclusively demonstrating that commercial inoculants applied to plants in landscaped soils have no substantial effect on the development of mycorrhizae. This lack of efficacy has induced some inoculant manufacturers to add fertilizer, especially nitrogen, to increase plant growth and fool consumers into thinking the inoculant was responsible.
The image on the left is the label from a mycorrhizal inoculant. Close inspection (middle image) reveals addition of a fertilizer, which is identical in NPK content to a fish fertilizer (right image).
And here is the lesson “Field of Dreams” provides: if you build it, they will come. Build a healthy soil by mulching with a thick layer of arborist wood chips. Not only do they provide nutrients and absorb water, but their presence reduces soil compaction and increases aeration. You can be assured your plants will be successfully inoculated with your soil’s native mycorrhizal species.
This Quercus garryana seedling is already inoculated with native mycorrhizal fungi
A seedling with green cotyledons and emerging radical
Most of us have witnessed dicot seed germination at some point in our lives – watching the coytledons transform from seed halves to green, photosynthetic structures, while the radicle developed into the seedling root system. This seedling root – or taproot – is important to seedling survival as it buries itself in the soil to provide structural support and to give rise to fine roots for water and nutrient absorption. But that’s where much of our visual experience ends – because we don’t see what’s happening underground. Without additional visual information we imagine the taproot to continue growing deep into the soil. And while this perception is borne out when we pull up carrots, dandelions, and other plants without woody root systems, the fact is that woody plants do not have persistent taproots – they are strictly juvenile structures. Understanding the reality of woody root systems is critical in learning how to protect and encourage their growth and establishment.
Mature carrots have taproots. Mature trees do not. Photo courtesy of Pixnio.
Trees, shrubs, and other woody perennials all have juvenile taproots just like their herbaceous counterparts. But these long-lived plants develop different morphologies over time, which are primarily determined by their soil environment. Water, nutrients, and oxygen are all requirements for sustained root growth. Gardeners always remember the first two of these needs, but often forget the third. And it’s oxygen availability that often has the biggest effect on how deeply root systems can grow.
Roots grow where they can. Sometimes that zone can be very shallow, as this coastal forest photo shows.
Whole-plant physiologists have known for a long time that “roots grow where they can” (Plant Physiology, Salisbury and Ross, 1992). But this knowledge has become less shared over time, as whole-plant physiologists at universities have been largely replaced by those who focus on cellular, molecular, and genetic influences (and can bring in large grants to support their institution). Sadly, many of these researchers seem to have little understanding about how whole plants function. Simply looking at the current standard plant physiology textbook (Plant Physiology and Development, Taiz et al., 2014) reveals as much. (To be fair, there is now a stripped-down version of this text called Fundamentals of Plant Physiology, [Taiz et al., 2018] but even this text has little to do with whole plants in their natural environment.) If academics don’t understand how plants function in their environment, their students won’t learn either.
The Table of Contents for Plant Physiology and Development. You won’t find a discussion of woody root ecophysiology in here.
Well. Time to move on from my soapbox moment on the state of higher education.
Roots grow where oxygen is plentiful. It becomes a limiting factor as soil depth increases. Photo courtesy of Wikimedia.
Let’s look at what happens with a young tree as it develops. The taproot grows as deeply as it can, but eventually runs out of oxygen so vertical growth stops. At the same time, lateral root growth increases, because the levels of oxygen closer to the soil surface are higher. These lateral roots, and their associated fine roots, develop into the adult root system, continuing to grow outwards like spokes on a wheel. When pockets of oxygen are found, roots dive down to exploit resources. These are called sinker roots and they can help stabilize trees as well as contribute to water and nutrient uptake.
Gardeners and others who work with trees and other woody species would do well to remember that woody root systems, by and large, resemble pancakes rather than carrots. These pancakes can extend far beyond the diameter of the crown – so this means protecting the soils outside as well as inside the dripline.
Typical root structure of a mature tree in its natural environment. No taproot here!
Masses of spring bulbs transform this lawn. Photo by Charlotte Scott.
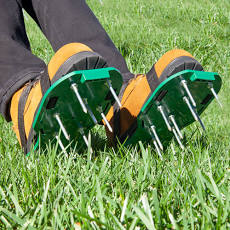
Nothing seems to take homeowners more time, or generate more frustration, than maintaining their lawns. In addition to mowing, fertilizing, and applying pesticides for weeds, insects, and diseases, gardeners fret about removing thatch and aerating the soil. Commercial interests have taken note and pedal various “aerifying” products like soap (cunningly described in non-soap terminology), spiked sandals, and thatching rakes. Previous posts (here and here) have addressed ways to decrease fertilizer and pesticide use. This post will look at the science behind aeration of home lawns.
Iron maiden torture devices in sandal form
More lawn torture via thatching rakes
That first ingredient in this aerifying product? It’s soap.
The home lawn care industry is lucrative and full of questionable things.
First, let’s acknowledge that most research has focused on maintaining turf on golf courses and playing fields. Neither of these are good models for home lawn management because home lawns have different functions. The turf that one might find on a putting green, for instance, is devoid of most life except for closely mown monocultural (or oligocultural) grasses. The management of these grasses is chemically and physically intensive to preserve a completely unnatural system. Yet these management techniques, including core aeration and vertical mowing (aka verticutting), have seeped into the lucrative home lawn maintenance market, especially to address the dreaded thatch layer common in many home lawns.
Live and artifical putting green turfs look alike. Neither is a good substitute for a home lawn.
What is thatch?
Briefly, thatch is caused by organic material accumulating at the base of grass plants. (It is NOT caused by lawn clippings, which are small and nitrogen rich – they are broken down quickly.) Accumulation of thatch is said to lessen lawn resilience and increase disease, but this appears to be a classic CCC (correlation conflated to causation) error. I’ve seen nothing in the literature to suggest that thatch causes these problems. Instead, I see evidence that thatch is yet one more negative result of poor lawn management. Removing thatch, without addressing the CAUSE of thatch, is an exercise in futility.
Lawn with thatch layer
Natural grassland
Look at these two images of grass-covered soil: one is a typical lawn, and the other is a natural grassland. There are no roots extending below the “thatch” layer in the lawn, while grassland soils support deep and extensive root systems. The problem with the lawn is that the system is not well aerated, meaning that the grass roots are shallow and contribute to the buildup of thatch. Lack of aeration also inhibits a robust community of microbes, which are necessary to decompose the organic material that makes up thatch.
If you have standing water on your lawn, there is no oxygen in the soil beneath.
So, lack of poor oxygen and water movement between the grass layer and the underlying soil creates a dead zone in that soil, with life restricted to those few inches of soil where oxygen and water can penetrate. Thatch accumulates and underlying roots from nearby trees and shrubs are forced upwards into the lawn to obtain water and oxygen. This is where lawn maintenance companies promise to fix the problem through core aeration or verticutting.
It’s not goose poop. It’s core aeration.
Vertical mowers look impressive but do they work?
Popularly recommended gadgets and gizmos
Does core aeration and verticutting improve home lawns?
While there is scant research on home lawns, the results are fairly uniform: core aeration does not reduce thatch accumulation and does not improve grass coverage. Verticutting can decrease thatch slightly but decreases grass coverage and reduces turf quality. Several quotes from published research stand out:
“All cultivation practices [which included core aeration and verticutting] resulted in some quality loss at various times during the spring transition period compared to the control.”
“Thus, under homelawn conditions, core aeration and vertical mowing should only be used if a specific problem exists and not as routine practices to prevent thatch accumulation.”
“After two years, no treatments consistently reduced thatch accumulation compared to the non-cultivated control.”
There is no published research, anywhere, that supports these techniques in maintaining healthy home lawns. So, it’s time to stop using these heavily promoted products and practices and instead focus on why lawns accumulate thatch in the first place.
It’s all about the oxygen!
There’s no question that lawns can be heavily compacted, but it’s not because grasses can’t tolerate foot traffic. Think about those hundreds of thousands of bison that use to roam the Great Plains grasslands. Even modern cattle ranching, done sustainably, does not damage pastureland by compacting the soil. There’s something else going on in home lawns that creates compacted conditions and the cascade of negative effects that follow; it’s improper soil preparation and management.
Pastureland dosen’t become compacted despite the significant pressure cattle exert on the soil.
When sod is laid for home lawns, several inches of compost are tilled into the soil bed. The tilled soil is then flattened with a roller, and then a layer of sand is applied. Then the sod (which consists of grass and growing media and a mat of some sort) is arranged. And voilà! You have a turfed landscape that more closely resembles a five-layer dessert than a functional grassland. Those layered materials restrict the movement of water and oxygen, and this restricts root growth into the underlying native soil. Not only do these barriers create a shallowly-rooted turf, they compound the problem by stimulating ethylene gas production in grass, further inhibiting root growth. To top it off, the anaerobic conditions in the lower layers restrict microbial decomposition. As decomposition and root growth slow, thatch accumulates. And homeowners despair.
All of these practices are bad for soil structure and function, and over time will result in an unhealthy lawn.
So, thatch serves as a warning sign that soil conditions are poor – and any attempts to permanently remove thatch without addressing poor soil preparation and management are going to fail. Possible corrective actions to improve soil structure and function are beyond the scope of this column; over the years we’ve had blog posts touching on this topic and I encourage readers to explore our blog archives.
There’s wood chip mulch peeking out of all of our landscape beds
One of the popular arguments against mulching landscape and garden soils is that mulch delays soil warming and thus retards plant growth. Given that a well-chosen mulch will moderate temperature extremes – both hot and cold – is this an argument supported with evidence? In today’s post, I’m reporting the data I collected in visiting various parts of my home landscape and gardens and measuring soil temperatures.
My trusty soil thermometer
For measurements, I used a soil thermometer placed at the
same depth in every soil tested. This required movement of mulch if mulch was
present, so that thermometers were inserted completely into the soil. These
thermometers read the entire length of the probe, so readings represent the
average temperature in the top 5” of soil. I took close-up photos of each of
the areas tested. I took 5 measurements for each location.
Bare mound in the sun
Bare soil in the sun
Bare soil in the shade
Turf in the sun
Turf in the shade
Newest mulch in bed
Older mulch in bed
Unmulched soil in bed
Examples of the readings collected in different locations of our landscape
Our evening temperatures have been near or below freezing, but the past several days have been sunny and the air temperatures are well into the 50F range. On March 17, it was 68F at 2 pm in the sun, though it was 27F that morning. The morning after (March 18), it was 35F.
There are several interesting trends to see on the
box-and-whisker graph:
The variation of soil temperatures is most extreme in unprotected soils
Mulched raised beds have the most consistent
temperatures, with no differences seen at any time or in any location measured.
Unmulched soil mounds have extreme changes,
mirroring air temperatures.
Bare soil in beds under sunny conditions have extreme
changes mirroring air temperatures, but not as great as that in raised beds.
They are warmest during the day and coldest during the night.
Bare soil in beds under shaded conditions are
the coldest soils during the day and even colder at night.
Soil under living mulch (turf) and beds with varying
depths of wood chip are cooler during the day than bare soil in sunny conditions,
but warmer at night.
Bare soil in beds that were newly mulched are much
warmer than bare soils not near mulched areas.
The soil temperature under turf or in beds at
least partially mulched did not change at night (data not shown on graph).
Raised beds – mulch only right now
Mounded soil. Weeds were removed several months ago.
Mulched beds
Turfed area, exposed to sun and shade
Examples of our sample sites
Extreme temperature swings can result in the death of germinating
seeds, seedlings, expanding buds, and other tissues that aren’t cold hardy. This
is especially true of tissues near the soil surface, where temperature are
colder than they are at increased depths. Unprotected soil mounds show huge daily
vacillations; comparative raised structures under mulch are cooler during the
day but warmer at night. And bare soil in the shade is colder than any mulched
soils. Consistency is important for young tissues, as they have few protections
against environmental extremes.
What my little experiment demonstrates is what mulch research
has consistently shown: appropriate mulch materials will moderate soil
temperature extremes due to air temperature fluctuations. Just because a bare soil
is 55F in the daytime doesn’t mean it won’t be 35F at night.
One of the newer “miracle products” targeted to gardeners is
rock dust. Rock dust (also called rock flour or rock mineral powder) is exactly what it sounds like. It is a
byproduct of quarry work and is generally a finely pulverized material that resembles
silt. It’s heavily promoted as a way to provide macro- and micronutrients to
your soils and plants. Is it worth adding to your gardens?
Rock crushing at a quarry
First, it’s worth acknowledging that repurposing an industry
byproduct is always preferable to throwing it away. Fortunately, the last few
years have yielded some peer-reviewed research that we can use to make informed
recommendations.
What’s in rock dust?
Obviously, the mineral content of rock dust is dependent on
the rocks used to make it. This means the mineral content varies considerably,
but in general rock dusts contain:
Large amounts of silicon, aluminum, and sometimes
iron
Lesser amounts of calcium, copper, magnesium,
manganese, potassium, sulfur, and zinc.
Potentially toxic levels of aluminum, arsenic, cadmium,
chromium, copper, lead, nickel, and sodium.
I’ve added some tables from a few research articles that analyzed their rock dust mineral content below. Note the high silcon, aluminum, and iron content. (LOI = loss on ignition, meaning some materials were burned off during analysis.)
How is rock dust used as a mineral source?
Rock dusts must be solubilized to release minerals. There
are some criteria that can speed mineral release:
Decreasing the particle size of rock dust.
Blending the rock dust with nutrient-rich organic
matter like manure. This provides an acidified environment for mineral solubilization.
When is it beneficial to use rock dust?
There are documented benefits to using rock dusts – but only
in agricultural production systems:
Rock dusts can contribute minerals to nutrient
depleted soils, such as agricultural soils that have been overworked for
decades.
Organic farmers can use specific rock dusts to
supply micronutrients, rather than commercial fertilizers which are not
certified for organic crop production.
Cereal crops – members of the grass family – require
silica as a micronutrient (though silica is rarely if ever deficient in field conditions).
Azomite is a heavily marketed garden product. New to me is that plants require 67 essential nutrients. Sounds like we need to update our plant nutrition textbooks.
What’s the bottom line for gardeners?
As one article states, “…there is a potential for using [rock
flour]…where there is a lack of these nutrients and where conventional chemical
fertilizers are either not available or not desired.”
And how do you know if you have a lack of a certain
nutrient? Why, by having your soil tested, of course! There is no point in
adding anything to your soil unless something is missing. It is MUCH harder to treat
a nutrient toxicity than to add a deficient nutrient. Iif a soil test reveals a lack of a particular
nutrient, a carefully chosen product
could supply this mineral. But you would have to know what else was being
supplied and possibly creating a mineral toxicity.
At this point, there is no evidence to suggest that rock
dusts are of any value to a home garden or landscape. And adding these products can easily
contribute to aluminum and heavy metal toxicities. I would never add it to this
soil, for instance, as it already has excessively high aluminum levels.
Aluminum is already at potentially toxic levels in this soil. No need to add more.
This blog is full of great ideas on how to manage your soil
naturally, sustainably, and safely. Rock dusts are just the latest garden
product with lots of marketing but little benefit.
(A friendly caveat – this post does not lend itself well to images. So the pictures here are simply eye candy from my 2019 trip to London to reward you for considering this visually drab but important topic.)
The actual “whomping willow” in Kew Gardens
I’ve been involved in Extension education for 17 years and
one of the most important things I’ve learned is that Extension audiences want
information that’s easily understood and has obvious practical use. Most
peer-reviewed research articles are written for academic audiences, so only the
most persistent nonscientists will slog their way through pages of dense, technical
writing. It’s up to Extension educators
to accurately translate and summarize technical scientific information for use
by the public.
Epiphyte “tree” in Kew Gardens glasshouse
Extension is part of the American land-grant university system
and extends traditional academic teaching to citizens statewide (hence the term
“extension”). In addition to providing seminars and workshops to interest
groups, Extension publishes educational materials in-house and provides them at
low or no cost to their clientele.
The Bonsai Walk at RHS Wisley Gardens
But here’s the problem: the standards for Extension publications are set by each university. Unlike the peer-review system adopted by reputable journal publishers, Extension publications can vary widely in quality. Some universities have adopted a system that parallels that of scientific journals in that they require double-blind peer review. But many universities have not – and this means that looking for Extension publications on a particular topic results in a collection of materials with contradictory messages. This is incredibly frustrating to confused nonscientists and to Extension faculty who have to sift through the mess to find publications that are relevant and science-based. As a result, Extension publications are often regarded with suspicion by both nonscientists and academic faculty (who often do not have the disciplinary expertise to sort through the mess). Since I was a traditional academic before entering Extension, I have a foot in both camps.
Sunken gardens at Kensington
Nonscientists are probably not going to have the disciplinary
expertise to tease out the good stuff from the dreck. But they can look for some
indicators that will help them identify the most reliable publications. Here’s
a checklist to start the process: the more “yes” answers you have, the better
the chances are that the information is reliable.
Is the author identified? Anonymous publications
are not reliable.
Is the author an expert? Expertise is determined
by advanced degrees (at least a Master’s degree) in the subject matter.
Is the publication peer reviewed? There should
be a logo or a statement on the publication that says so.
Is the publication relevant? High-quality Extension
publications targeted towards commercial agricultural production are usually inappropriate
for use in home gardens and landscapes.
Is the publication current? Information relative
to urban horticulture and arboriculture is rapidly changing. Publications over
10 years old likely do not contain the newest information.
Are there scientific references included, either
as citations or as additional readings?
As necessary as this process is for identifying reliable
information, there can also be negative outcomes. Universities that do not have
a rigorous process for publishing Extension materials put their Extension faculty
into the uncomfortable position of having to defend their work when it’s questioned.
It would benefit all parties for every land-grant university to institute a rigorous,
peer-reviewed process for their Extension publications.