While we can’t ever control or even predict the weather, in most places it is important to have a plan on how to deliver water to our home gardens during the hot, dry months of the summer. Aside from reducing water need through some good management practices, delivering water in an efficient and sustainable way is important when planning and planting our home gardens.
When there is scarcity, it is necessary to conserve. Several years I got to see scarcity in person on a sustainable agriculture tour of New Mexico. Farmers in New Mexico have only limited access to water from irrigation canals, to flood irrigate their fields, or even wells for drip irrigation.
This severe lack of water got me thinking about how much we take water for granted in our own gardens. We often apply as much as we want or need in an inefficient manner (using sprinklers, sprayers, etc.) because we think it will always be there when we turn on the tap.
Where I’m located in Nebraska we are also blessed to have water falling from the sky. Sometimes there’s too much, and at others there’s not enough. But that’s much better than in some places – I visited some parts of New Mexico on a farm tour where they get seven inches of rainfall in a normal year. Seven. Total.
Thinking about conserving what water we have means that we are good stewards and are ready for when issues do arise. And let’s face it, there are some times in the summer that are dry where water conservation will help reduce using water, which can also save money.
When we talk about conserving water, there are two ways to go about it. First, look for ways to reduce the need for water. Then, look at ways to reduce water waste and usage whenever you need to use water on your lawn, landscape or garden.
Reducing the need for water
During dry times, it can be necessary to provide water to the garden to keep it growing healthfully along. However, there are many ways to reduce water loss or increase the amount that stays in the soil around the plants.
Mulching not only reduces weeds, but also helps hold moisture in the soil. Having one to two inches of mulch on landscape beds can reduce evaporation from the soil and decrease the amount of water you need. Newly planted trees should be mulched for the first few years to help hold moisture in the root zone as well.
Mulching is also important in the vegetable garden. Using straw or shredded newspaper are simple ways to conserve moisture, beat weeds and even reduce diseases. Note that this is shredded newspaper used on top of the soil for a mulch, not whole sheets applied below another mulch or on top of the ground. That process is called “sheet mulching” and we typically don’t recommend it here at the GPs because it limits air movement into the soil and can disrupt the soil microbiome. Stick only to shredded newspaper as a top dressing. (See the bottom of the article for journal articles discussing paper and straw mulches).

You can use woodchip mulch in the vegetable garden, but it can be difficult to manage when you are frequently planting, replanting, or harvesting crops. If you accidentally incorporate it into the soil, it can tie up nitrogen available to plants and cause deficiencies. As long as you are good at keeping it on the surface, it isn’t as much of an issue.
Large scale gardens or farms make use of black plastic as mulches to do much the same thing. Plastic mulches are typically beyond the scale needed for home vegetable gardens and have their own set of drawbacks such as limiting water and air movement, but for those struggling with difficult weeds or with issues limiting manual removal (disability, limited movement, etc) it may be explored for smaller scale production. There are now even biodegradable plastic and paper mulches available. Use of these does require drip irrigation beneath the mulch, as rain cannot penetrate to the root zone. With the issues associated with them, plastic mulches would be considered a last resort for all but the largest home vegetable gardens, and many of my GP colleagues recommend against them for all home garden situations – but they can have their very limited place in the home garden toolbox. And we definitely recommend against the use of plastics and landscape fabrics in ornamental beds and landscapes.
Choose plants that require less water. There are many plants available that have lower water requirements. Ornamental grasses, Liatris (blazing star), Kniphofia (red hot poker) and sunflowers come to mind. Most native plants are commonly thought to have lower water requirements, but this isn’t always the case and natives may not thrive in altered ecosystems (urban settings or even managed landscapes). Most bulbs also are water efficient and do not require extra watering, as are most culinary herbs.
Mowing less often in the hot and dry summer also can conserve water if you are one who waters the lawn. I’m not a big fan of watering lawns, since it is such a large water usage, but I know there are those who prefer to have their lawns lush and green at all times. Instead, when the summer gets hot and dry, leaving the grass on the taller side can help it stay green even without water. Many of the grasses we grow here are cool-season and go semi-dormant in the heat. Stopping mowing when the heat starts slows down growth and the need for water.
Irrigating Efficiently with Drip
When it comes to getting water to the garden, there are definitely more efficient ways to make it happen.
Unfortunately, the most common method — using sprinklers — is also the least efficient. It is hard to direct the water to the right place, and during periods of high heat evaporation takes up much more water than you think. But there are ways to get water to your thirsty plants without running up the water bill.
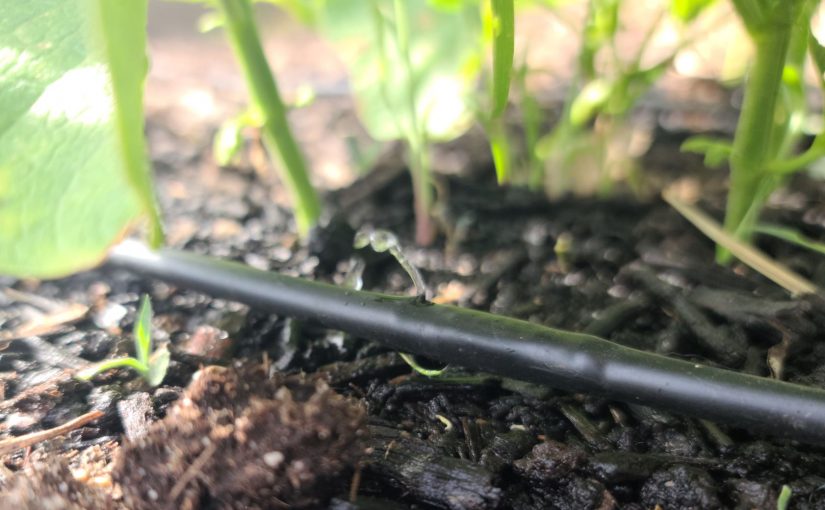
Drip irrigation is probably amongst the most efficient and sustainable ways to water your landscape or vegetable garden. This method allows you to apply water directly to plants in a controlled manner, rather than spraying an entire area with water. Also, since the water is applied directly to the ground rather than sprayed through the hot summer air, the water is much less likely to evaporate.

There are a few different types of drip irrigation systems available. Probably the easiest to install is a drip tape system. This is a deflated tape that already has water-emitting slits cut into it. While each slit applies a precise amount of water over a given time period, the pre-determined regular placement of the slits makes this system better for plants grown in rows, like vegetables, rather than landscapes where plants are of differing sizes and spacing. And while it can be used for vegetable gardens, probably the easiest system for a landscape would be one where there are tubes you can cut to various lengths and insert controlled drip emitters at customized locations. Another use for this type of drip irrigation could be for containers on a porch or deck – you can easily run the tubing out of sight along a bannister or railing and direct individual emitters to individual containers.
It all sounds complicated, and larger systems can be, but there are small and simple kits you can easily find at many garden centers or online retailers available for home gardeners to install their own within a matter of hours. You will need to have some skill at reading directions to install them, but the process is pretty simple.
For information on setting up drip irrigation for your home garden, check out these great resources from Extension institutions across the country:
Drip Irrigation for Home Gardens
Building and Operating a Home Garden Irrigation System
DRIP: Watering the Home Garden
Soaker hoses are a similar concept to drip irrigation, but instead of small drips these hoses just emit water all along the hose. Still better than sprinklers, these hoses are quite a bit less efficient than drip, since you can’t direct the water exactly where you want it. They are also easy to apply too-much water to an area since they can emit large volumes. Installation is pretty simple, though, since you just lay the hose down where you want it.
One great benefit of both drip irrigation and soaker hoses is the application of automation. Using a timer can make it easy to keep the garden watered through the season. Timers can be as simple as a dial to manually run the irrigation for a specified time or fully automatic to run the irrigation for various lengths of time on different days of the week. Some more advanced timers also have rain sensors or soil probes to reduce or avoid running when rain makes watering unnecessary (if you don’t have a sensor, remember to stop automatic running until the soil has dried). And in today’s emerging technology, there are also timers or flow controls that can be automated or controlled from a phone app. The timer that I’m now using at home connects to my Wi-fi, and in addition to allowing me to control and observe the watering status from anywhere in the world, connects to local weather data to automatically set a “smart watering” schedule taking into account rainfall, temperature, wind speed, and other factors.

Another effective way of providing water to your garden is through water catchment. Water catchment is just a fancy way of saying that you use a rain barrel. Here you are collecting rain runoff to use in place of water from the tap. There are some ultra-low-flow drip irrigation systems that you can use with rain barrels (if they are raised high enough to get water pressure), but this use is usually for watering by hand. For larger gardens, the large IBC totes that hold 200 or more gallons can make good water catchment barrels. Just make sure that if you are using them (or any other barrel) for fruit or vegetable production that they are made of food-safe plastic and their previous contents were also food safe. (Check out our guide on Building a Rain Barrel)
Selected references:
Comparisons of shredded newspaper and wheat straw as crop mulches
Newspaper Mulches for Suppressing Weeds for Organic High-tunnel Cucumber Production
Thanks for this article! If you accidentally incorporate shredded paper into the soil, will that tie up nitrogen? Also, I have heard many different views about toxins in various inks. Do you have any thoughts on the matter?
JR-
In short, yes – if you incorporate paper into the soil it will also tie up nitrogen. It is a carbon source just like woodchips. I recommend using it because it is usually much harder to accidentally incorporate into the soil than a woodchip mulch. If you’re trying to figure out what to do with it at the end of the season, you can pull it off and put it in the compost pile or incoprorate it into the soil to break down over winter. As for toxins in ink – most modern newspapers use vegetable based inks that are considered non-toxic and pose minimal risk. Here are a few sources:
https://extension.oregonstate.edu/gardening/techniques/ink-bad-my-vegetables
https://www.charlotteobserver.com/news/local/community/university-city/article9097874.html#:~:text=The%20consensus%20is%20that%20modern,to%20use%2C%20according%20to%20Botts.
Thank you for the article. I have a question about something you don’t mention in the article, but which I have searched in vain to get answers to. how to fertilize properly when using drip irrigation. Is fertigation the only option? I have an established orange tree, which I am irrigating using inline emitters. I’m in California, where irrigation is essentially the only source of water for this tree from April to November. I have 3″ of mulch on the ground to retain water. I’m also trying to use only organic practices (e.g. fertilizer)
Given that water from the emitters saturates the soil in discrete cone shapes, I don’t see how dry fertilizer applied evenly over the surface of the soil is going to get utilized. The vast majority of it will never even get wet. Even if I’m willing to go to the trouble of removing all the mulch and then applying the fertilizer, it doesn’t seem like a good idea to till it into the soil, since i would damage all the surface roots of the tree.
This problems really has me stumped. I’d really appreciate any advice or references you could provide.
I’ll let John Porter answer this too, but I want to point out that you really should have a soil test done first before routine fertilization. While you may often need nitrogen, you may not need other nutrients and adding them in excess will cause nutrient imbalances in your soil and in your plants. If you are using a decent woody mulch (i.e., arborist wood chips), they will not only provide a slow, steady source of nutrients to the roots but will also hold and releases water slowly and uniformly across the soil surface. You can add another few inches without harm and for increased weed control.
Thanks, Linda! I should have mentioned that—thanks to your advice—I had soil test done by A & L Western Agricultural Labs, and they have shown some deficiencies in the soil: Low nitrogen, sulfur, and manganese (medium iron, high phosphorus, medium high potassium). The pH is also not ideal, at 6.9. The tree was badly neglected for 20 years (never watered) and was never fertilized (which makes the high phosphorus finding a bit surprising). It’s been getting watered for 3 years now, and is looking much better. But the tree has a significant amounts of chlorosis (yellow w/ green veins). My understanding is that citrus trees are heavy feeders, so the tree is going to need some kind of fertilizer applied on a periodic basis, and I’m struggling to come up with a reasonable long-term fertilizing strategy.
Linda, I’d also like to take this opportunity to express my deep gratitude for all your efforts to bring the scientific method into the world of gardening. Sorely needed! (I have your Great Courses videos.)
The chlorosis is most likely from the high P. High P inhibits iron and manganese uptake. You will need to work that level down slowly by not adding ANYTHING with significant amounts of P. That includes mosts composts and organic amendments. Don’t add anything else except N, as that will be a limiting factor.
If you have not topdressed with arborist wood chips – do it now. All trees require woody debris as a mulch, both for their own health as well as their mycorrhizae. You will see an improvement if you do this. But if you add anything other than N, especially with P, you will not.
PS thanks for the kind words! I’m thrilled you enjoyed the great courses series.
Thanks again, Linda! I have a number of additional questions, but I’ve just discovered the Gardenerprofessors facebook page, which seems like the better forum for things like this so I’m going to move my questions over there.