Insects and pathogens cause damage and disease in garden plants, but damage can also occur in absence of pests. We refer to these diseases as abiotic disorders. Plant pathologists consider abiotic disorders diseases because plants develop symptoms that reflect the changes in their physiology over time. Unlike outbreaks caused by insects or pathogens, abiotic disorders do not cause epidemics or as plant pathologists say “epiphytotics” because abiotic disorders do not spread the way insects and pathogens can. Like all diseases, abiotic disorders are a perturbation of plant physiology that show up as different or “not normal” appearance. Symptoms typically define most abiotic disorders since signs (of the actual thing causing the disorder) are not usually visible.
Since abiotic disorders do not require an organism to begin or complete a life history, they can occur at any time and are often of sudden onset. The reverse can also be true, depending on the agent causing disease symptoms which may not show for years in some disorders. Abiotic disorders are often associated with the degree to which a plant is adapted to its environment. Adaptation and establishment in an environment are different. New plantings (those not yet established) do not tolerate abiotic extremes as well as established plants. Plants poorly adapted to the climate, soils or water of a region may be prone to abiotic conditions while plants adapted to their planting site thrive among the same abiotic factors.
Nutrient Disorders

Plants require mineral nutrients (which arrive in the sap flow after intake by roots) from soil solutions. While carbon, hydrogen and oxygen come from air and water, virtually all the other elements plants need for their growth and physiology come through the root system. Minerals are dissolved in water as ions and are available at various pH levels depending on their solubility characteristics. In general, under alkaline conditions many minerals are held in soil as insoluble precipitates and are unavailable; under acid soil conditions some elements again become insoluble and many leach away from the root zone causing soils to become depleted, especially of metals. Since roots take up minerals as ions (charged molecules) roots must be alive to regulate osmotic potential and the charge balance of ions entering and leaving roots. Anything that compromises root function can lead to inability to take up nutrients and eventually symptoms of nutrient deficiency. Compaction, flooding, root injury, poor soil food web conditions, and pathogens can all impair root function. Plants can show nutrient deficiencies for the following reasons:
• The minerals are missing from the soil
• The pH is not favorable for absorption of the nutrient which is insoluble
• The roots are not able to function and absorb nutrients
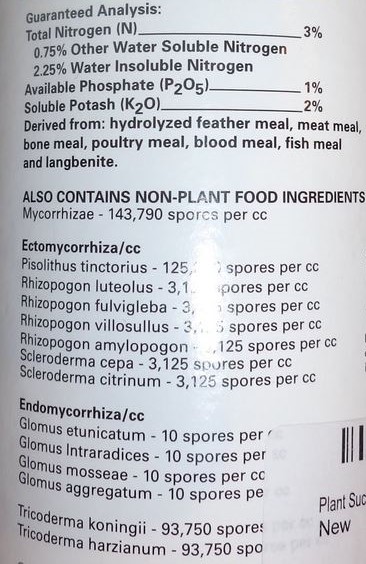
• Lack of mycorrhizae in soil or poor conditions for microbial growth
A soils diagnostic lab can help identify soil conditions and nutrient content of your samples, and suggest methods to provide optimum plant nutrition. Several soil samples should be taken all through the areas where affected plants grow, combined and sent to the lab soon after collection. Soil pH is like blood pressure – you can’t tell when it is too high or too low – so you need to have it tested. Knowing the soil reaction (pH) is the first step in investigating nutrient issues. Mulched plantings (with coarse tree trimmings chips) usually have few deficiencies in a wide range of soil conditions because nutrients are slowly but constantly provided and beneficial microbes can assist roots in nutrient uptake.
Temperature Extremes


Temperature extremes cause injury and may cause abiotic disease to landscape trees. As the climate continues to warm, extreme hot weather is increasingly likely. In California, we had record all time high temperatures in the last three consecutive years and this year in the Pacific Northwest. In some cases these temperatures were damaging to native tree species, suggesting that they are no longer adapted to the new normal temperature extremes. Years of record breaking freezing temperatures have declined, although cold temperatures can harm sensitive species if freezing occurs suddenly or for prolonged periods. Sunburn comes when temperatures exceed the ability of bark and leaves to adequately cool the tissue. Burned leaves fall from the tree and bark often splits, cracks and dies. This damage can become an important entry point for fungal pathogens such as Botryosphaeria spp. that cause canker diseases in most landscape trees. Planning for a warmer climate means selecting trees that can tolerate higher peak temperatures in summer while surviving the low temperatures of winter.
Air pollutants

Another air pollutant is sulfur dioxide, which reacts in the atmosphere to form sulfuric acid, and may reduce the pH of surface waters. Acid deposition due to SO2 (the precursor) is an eastern US problem and often tied to coal use for electrical generation. Air pollution damage to plants depends on the specific air pollutant, its concentration, and the sensitivity of the plant species, with ozone the air pollutant in California having the greatest effect on plants.
Air pollutants originate from a variety of both natural and anthropogenic sources. Some, called primary pollutants, are released directly into the atmosphere. Others, called secondary pollutants, are formed via atmospheric reactions of precursors. Some air pollutants are both primary and secondary. Ozone is a principal air pollutant in California which also affects plants. It is formed in the lower atmosphere when volatile organic compounds (VOC), i.e., short-chain carbon-containing compounds, which are released from a variety of anthropogenic as well as natural sources, react in the presence of sunlight with oxides of nitrogen (NOx) which come from internal combustion engines.
Ozone is toxic to plant cells because it is very reactive and quickly binds to plant tissues causing damage. Note that ozone in the stratosphere is necessary and protective of life. It is the same molecule but has a different chemistry of formation. In urban areas, such as the Los Angeles Basin, pollutants may be held in the lower atmosphere by topography and meteorology, and ozone levels may exceed federal standards for air quality, although much progress has been made since the 1960s . Conifers are particularly sensitive to ozone. Needle retention is reduced and the trees thin and appear yellowed.
While all plant tissues are susceptible to abiotic disorders, stems are most resistant, while leaves, shoots and young roots are perhaps most at risk of environmental factors that cause these disorders. Like biotic diseases, plants with abiotic disorders may require time to develop symptoms. There is a progression from slight to severe symptoms depending on the intensity and duration of the environmental factor causing the disorder. Below are some of the most common causes of abiotic disorders.
References
Costello, L., Perry, EJ, Matheny, NP, Henry, MJ, and PM Geisel. 2003. Abiotic Disorders of landscape plants a diagnostic guide. ANR publication 3420 University of California, Communication Services, Oakland CA.
Manion, P. 1981. Tree Disease Concepts. Prentice-Hall Inc., 399pp.
Schumann, G.L. and C.J. D’Arcy. 2010. Essential Plant pathology. 2nd ed. APS Press The American Phytopathological Society. St. Paul, MN. 369pp