Say the word “hydroponics” or the even more mysterious sounding “controlled environment agriculture” and the image that most people conjure in their minds is of large greenhouses or artificially lit rooms filled with complex hoses and tubes using all manner of technological gizmos to pump water and nutrients to plants. True, modern ag technology does allow for some pretty amazing and technical production of food but hydroponics can be super simple and so easy that just about any home gardener can do it.
Why grow hydroponically at home?
Growing vegetables can be pretty easy and straightforward for outdoor production – seeds, soil, water, and wait (sure, there’s a few other steps in there), so why complicate things by growing hydroponically? Aside from the challenge and the novelty that delights many gardeners, intensive growing with hydroponics can allow gardeners with the smallest of spaces to grow impressive amounts of produce in a short amount of time. Most of these systems also do well for winter production indoors with the use of grow lights or some good-sized south facing windows.
Hydroponic or similar-type production systems are the “craze” right now for folks wanting to grow some of their own produce at home, usually in smaller indoor spaces, but these systems can run into the hundreds or thousands of dollars making production less than economical. Plus, most of these systems require the use of pre-made plant/seed plugs that add to the expense.
Why is hydroponic production important?
On a larger scale, hydroponic and controlled environment agriculture has a few benefits that will help in feeding a growing population on a warming planet. Hydroponic production can be pretty intensive, meaning that it can grow a large amount of food in a relatively small amount of space. This makes it ideal for production in urban areas, which is important as most countries become more urbanized. It also cuts down on transportation needs to get food to consumers. This not only reduces fuel consumption but also, as we can see, makes it easier to get food to large populations when distribution becomes an issue. And as the term “controlled environment agriculture” implies crops can be grown using hydroponics in greenhouses or indoor farms no matter what the season or climate making it ideal for year-round production in areas where it is too cold or too hot part of the year to do so. This also means that hydroponics and controlled environment agriculture can be important mitigation strategies for climate change. When the temperatures or precipitation are no longer favorable for growing outdoor crops in certain areas, controlled environment ag can provide a stable source of produce with indoor production.
And as ironic as it sounds, growing hydroponically drastically reduces the amount of water used for production. Closed systems, which either recirculate water or grow in enclosed containers, use much less water than field production systems relying on irrigation.
A simple system example
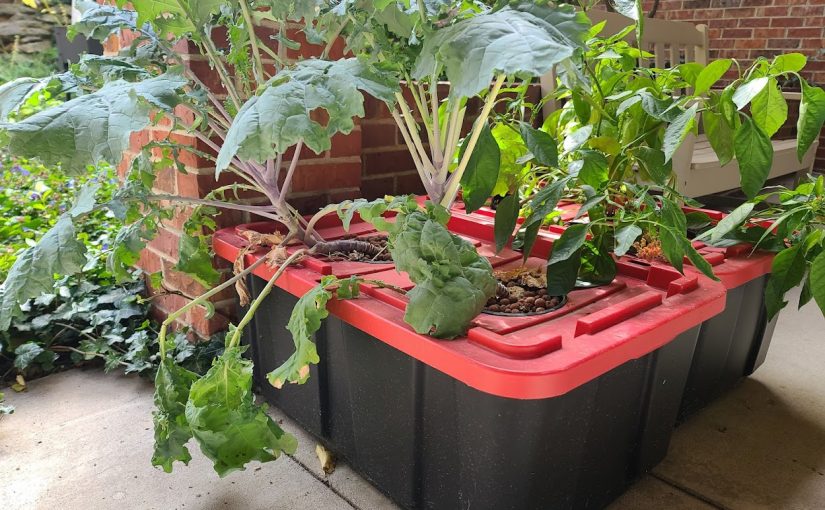
Earlier this year I build some super simple enclosed hydroponic systems for demonstration at our Extension office and at the county fair. My goal was to show how easy hydroponic production can be – no need for pumps, tubes, or expensive equipment. The system was so simple that I built it with my non-horticultural interns as an onboarding/team building exercise.
The system we built utilizes the Kratky method of hydroponic production – a simple system where the plant is suspended on top of a container full of nutrient solution. In a typical recirculating hydroponic system where water is moved around air is introduced into the water that then provides oxygen to the roots to avoid hypoxic conditions that damage roots. Some static systems rely on introducing air (like using aquarium air stones) to introduce oxygen but the Kratky method is even simpler than that. Instead of introducing air into the solution, the level of the solution is reduced (usually through use and evaporation) as the roots grow keeping a section of roots exposed to open air. The setup is super simple and low maintenance – no moving parts, no electricity (unless I need to use lights for indoors). Just plants, a medium to hold them, a container and a nutrient solution.

I’ve seen the systems made with all kinds of containers but we chose 25 gallon storage totes because they are inexpensive and pretty easy to come by. Having a lid that is relatively easy to cut/drill also makes these kinds of containers ideal to make multi-plant “beds” but I’ve also seen lidded buckets used as a single-plant system.
To hold the plants we used plastic net pots that you can find at garden centers that sell pond or aquarium plants (or order) that are also now common at hydroponic supply stores, if you’re lucky enough to have one in town. You can also use plastic orchid pots or standard nursery pots, perhaps adding extra holes for roots to grow out. We used 6 inch and 2 inch pots to plant a variety of sizes.

Next we cut holes in the lid slightly smaller than the diameter of the pots so that they sit on top and don’t fall through. You can do this by tracing and cutting with a sharp object, or use a drywall hole saw that you use with a drill to cut a perfectly round hole. We used one with adjustable sizes, rather than buying individual sizes.
And now, to plant!
The pots were then filled with an inert, soil-less medium to support the plants. We used a puffed clay stone called LECA, but you can use rockwool or hemp fiber blocks made for hydroponic starts, large particle perlite, or even something like a poly fiber filling (like used in sewing) – just something that won’t break down to hold the plants in place.
Some of the plants I had started in fiber cubes so those easily went into the LECA, but we did end up buying a few transplants. Since these were started in some sort of potting soil we had to wash as much of the soil off as we could. We placed larger plants like peppers and kale in the large pots and smaller plants like herbs in the small pots.
As for plant selection, leafy greens and herbs like basil and parsley are easiest and can use smaller containers and pots. Plants like tomatoes and peppers will need bigger containers and pots and will also require more light and heat if you are growing them indoors.
A solution for easy nutrient solutions
And last but not least – the nutrient solution. Since we are growing without soil we have to provide basically all macro and micro nutrients. We are used to supplying nutrients like nitrogen and phosphorous, but not so used to supplying things like manganese and molybdenum. This one is probably the scariest to those new to hydroponics, but there are some easy options out there for small scale production that are “off the shelf” solutions. Rather than worry about mixing up nutrients by hand, these pre-made mixes make it easy for home growers to try hydroponics. They come in two or three part sets of either liquid or solid fertilizers, because some of the chemicals used will react and precipitate out into a sludge if kept together in concentrated form. Just mix according to package directions and you’re good to go. If you are growing anything like tomatoes or peppers that require flowering and fruiting, you’ll want to make sure the formula is for flowering plants. Regular water-soluble fertilizers might do in a pinch, but for long term growth you’ll want to invest in something with all micronutrients.

If you’re planning on refining your technique, you might want to invest in a pH meter or TDS (total dissolved solids) meter to fine tune the solution based on the minerals dissolved in your water. And if you have really hard water you can usually get an additional nutrient product to account for the pH and calcium levels to balance things out.
So now we just filled the totes with the solution all the way up until the bottom few inches of the pots were covered. We kept watch on the solution and added water as needed, keeping in mind that as the roots grow out of the pot the nutrient solution level needed to be low enough to expose around 2/3 of the roots to air.

As the plants grow, you’ll just want to keep an eye for signs of nutrient deficiency and add nutrients to the water as needed. The solution should be completely dumped and replaced every 6-8 weeks, as the plants rapidly deplete some nutrients, allowing some to build up to toxic levels. You can typically just pour the solution out on the garden or lawn, as it only contains plant nutrients. However, you’ll want to make sure not to keep dumping in the same spot to avoid build up of salts in the area. Spraying the area with a bit of water from the hose can help wash it off of plants and start diluting it into the soil, rain and weather should do the rest of the job. But if you are in an area with little precipitation, you may also want to take care since there won’t be a lot of water to dilute the nutrient build up over time. And just remember, if you harvest and completely remove crops, pull apart and clean the system with some good soapy water and a sanitizer (bleach works well). You should do this every few months if you have a long-lived crop in the system.
In a nutshell…..
A simple system like this one can be a great way to explore a new growing technique, even for beginner gardeners. After these were set up, we basically left them in our courtyard all summer with little to no maintenance, except adding water earlier in the season and changing out the nutrient solution once. If you need a bit more info, or want to try something a little more complex, there are some great resources out there for small systems that I’ll share below.
Resources:
Growing Lettuce in Small Hydroponic Systems – Univ of FL Extension
How to grow with the Kratky Method – Upstart Farms
Small-scale hydroponics – Univ of Minn Extension
Home Hydroponics – Illinois Extension
Thanks! Very interesting and I want to try this. We were wondering, though, if the water is stagnant with fertilizer solution, particularly organic, what keeps it from getting skunky? Can coco-coir be used as the media?
Norm – the water will get “skunky” over time as bacteria build up. Changing out the solution will help with this. Limiting organic matter in the system will also help – making sure roots of transplants are cleaned well or started in a soil-less manner is a big help, as is selection of the media in the pot. Coir can be used as media in hydroponics, but I’ve seen it more in systems where the water is not captured and recirculated. Since it is a source of organic matter it could speed up the “skunking” of the water as it is a food source for bacteria and fungi. It is technically useable, but it can make the need for solution changes more frequent.
A Super Simple Salad? I think not. There will be people who find this challenging and/or fun but, when you consider the time, space, effort and cost of producing a few heads of lettuce hydroponically, it is totally impractical.
Any specifics on what lighting would be required (without getting lost in the PAR, Lux, Lumen etc)? I’m wondering if this would be a good use of my propagation setup during the off/early season.
Also, any info on yield/nutrient solution/electricity used? Most info seems geared towards industry and greenhouses, understandably.
If you are just growing lettuce, greens, or herbs you can probably get by with a simple grow-light situation and/or a super bright window. If you’re trying to grow anything that fruits, like a tomato or pepper, then you’ll need a higher powered grow light set up – either multiple grow lights or an LED lighting system. LED grow lights will be your best bet electric wise – and the price has gone down considerably on “home” versions you can buy online since the houseplant craze is booming. For quick turn around plants, the red/blue LED version would work well – they’re good at getting stuff to grow quickly. If you want to have stuff in the system a long time (fruiting crops, multiple harvest crops) you either want to use white LEDs or use the Red/Blue near a window. Using LEDs, you’d probably only spend a few buck on electricity in the off season.
As for solution, I just use the off the shelf nutrients for hydroponics. You can buy them at many garden centers now or order them easily. The ones I’m currently using are General Hydroponics FloraGrow in a liquid form. They’re pretty simple to just mix in water.
Yeield really depends on a lot of factors – light, keeping the nutrients “just right” (it is something you just have to observe and learn), and what you are growing. With a few systems like this and keeping plants rotating in and out (relay planting – planting a few plants every other week or so), you could have enough lettuce for a few salads a week. It really depends on what you’re growing and how you manage it.