Hitting rock bottom

Facebook
Self explanatory. Image courtesy of Pixabay.

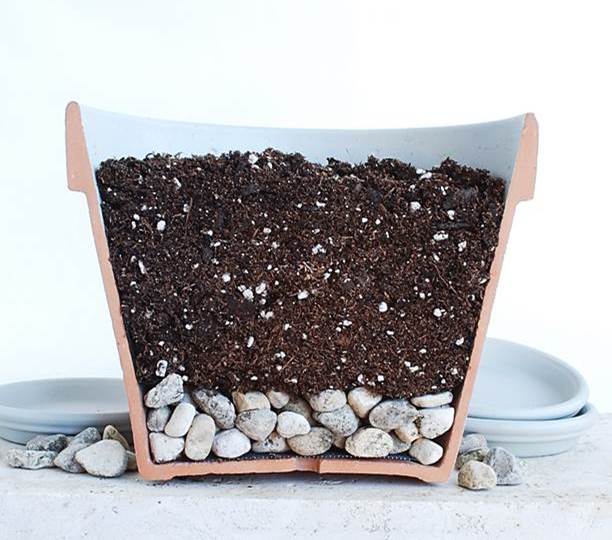
“Put rocks in the bottom of pots for drainage” is one of the most pervasive gardening myths, because it makes intuitive sense (as discussed in this earlier post). Understanding the science behind capillary barriers (what gardeners call perched water tables) is not only more mentally satisfying than the faulty belief but it can help you avoid other gardening practices and products that inhibit water movement within the soil (see earlier posts here, here, here, and here).

Classic image of capillary barriers forming between two different soil textures. From Hsieh and Gardner, 1959.

Science is not static however, and new research can change our understanding of soil-water relations. A new article was recently published in PLOS One that contradicts the well-established science about layered soils and other media impeding drainage. It’s important to give these contradictory viewpoints careful scrutiny before any deciding whether they represent a true paradigm shift or if they are fundamentally flawed. This article falls into the second category, primarily due to flawed experimental design.

The methods sections of scientific articles are, unfortunately, the least exciting. My approach to reading scientific articles is to read the abstract first and then the conclusion. (Kind of like having dessert before the salad course.) Then I read the introduction and discussion and finally the methods and results. Getting the big picture first prepares me for the nitty gritty details of how the work was done.

Red flags appeared as I read the introductory section: the author compared research on textural barriers between different soil types with their research, which was organic potting media overlaying drainage material. Differences in adjacent soil textures cause perched water tables, or as soil engineers like to call them, capillary barriers. Their presence is a well-established fact. But even given the faulty comparison there is substantial research showing that organic matter can also create capillary breaks with the underlying soil. This means there is a very large body of literature that supports the presence of capillary barriers between soils of different textures and between soils and other materials.

Root ball left in potting media and installed into native landscape soil experiences capillary break, which impairs root establishment into the surrounding soil. Image courtesy of Tammy Stout.

Eventually I got into the methods section. While reading about how to dissect methodology is not the most exciting thing in the world, learning how to do it is exciting – you never know what you will find. Ideally, methodological errors are found during peer review but sadly peer-review is not always of the highest quality. In any case, a careful reading of the methods section of this article generates more questions than it answers.

Without going into excruciating detail about experimental design (there are textbooks written on this), it’s important to understand what you will find in a rigorously designed experiment. There will be an underlying hypothesis (or research question) to explore, a well-designed experimental methodology with sufficient replicates and controls, and appropriate and objective statistical analyses. Paramount to all of this is that variability must be controlled, which means all replicates must be treated identically except for the variables being studied (in this case different drainage materials and their overlying potting media).

Below are many of the problems I identified, along with a brief explanation of why.

  • “For trials with sand, a piece of fibreglass mesh (16 x 18 mesh count, approximately 1 mm spacing) was placed over the drainage hole to prevent the sand escaping.” Mesh should have been placed in ALL treatments, regardless if they were needed or not. The presence or absence of mesh has now become an uncontrolled variable (an unforced error to use sports terminology).
  • “For each potting medium, trials were conducted with a layer of each drainage substrate to depths of 30 mm and 60 mm…” Weights of the materials (drainage as well as media) should have been made for each treatment replicate so that there are no differences in material weights among the replicates for each treatment. Each drainage substrate should then be shaken to eliminate any large gaps before adding the media on top. Differences in weights of the drainage material is another uncontrolled variable.
  • “For each of the three potting media, a baseline moisture level was defined according to the mass of a fixed volume of medium.” These baseline moisture levels need to be reported in the methods. Furthermore, it would have been better to use fully hydrated media, as the wetting time for the different media were likely different.
  • “Each filled container was irrigated from above using a watering can with a rose until the water level reached the top of the pot.” There should have been a fixed volume of water added to each container. Differences in how much water was added is another uncontrolled variable.
  • “The containers were monitored until water was no longer visibly draining, which took between one minute and three hours.” The differences in time is another uncontrolled variable, as they do not appear to have been used in any of the data analysis. Among the questions one could ask is if there were differences in drainage times within the same treatment?
  • “The saturating and draining process caused all the potting media to compact.”  Given that the media compacted to different levels, this introduces another uncontrolled variable. A fully hydrated media could have been compacted uniformly. Furthermore, adding water to a dry medium results in an unknown amount of water running down the inside of the plastic containers (which do not bind water), which is a loss unrelated to the experimental goal. Media hydration time varies among media. Unintended water loss is another uncontrolled variable.
  • “The compacted depth was measured from one representative sample for each medium with each depth of drainage substrate…” This is a fatal methodological flaw. The depth should have been measured for each container and the average should have been calculated statistically. Furthermore, how was the “representative sample” chosen?

I did read the supplemental files (linked at the end of the article) which I hoped would contain much of the missing information I noted above. They did not – and again I had more questions arise than were answered.

Lack of drainage is probably due to multiple capillary barriers created during sod installation.

The article was supposedly about drainage – and I expected there to be data generated that looked at drainage times and water loss. If a fixed volume of water was added to each container of fully hydrated substrate, it would have been easy to measure water loss over time. (You can do this at home using university extension information, such as this website from Iowa State University).  Instead, the article focuses on water holding capacity -which really doesn’t look at whether or not a perched water table exists -and on developing models.

If you’ve made it this far through my post, congratulations! Here are the takeaways:

  • There were numerous design flaws and methodological errors, which introduced uncontrolled variables and created high levels of uncertainty. The data cannot be analyzed statistically and any discussion of the results is pointless.
  • This is a good example of insufficient peer review. Had this been submitted to discipline-specific journal (like a journal in the soil or compost sciences), many of the problems I found would have been flagged. But the journal is a general interest journal, meaning that peer reviewers may have had little to no expertise with the science.

The cautionary tale here is don’t be a victim of SSS – single study syndrome. One contradictory article does not dismiss decades of peer-reviewed research and publications unless it meets a very high bar, which this one does not.

Tried but not true. Rocks don’t help pot drainage. Original photo source unknown.
Facebook

Compost, raised beds, and unexpected finds

Facebook

My 3-section covered compost bin system, inside a chain linked fence, excludes scavengers.

Like many home gardeners, we maintain a compost bin (a lovely 3-bin system built by my husband). I don’t need very much compost as the only organic matter I add to our landscapes is an arborist wood chip mulch. We do have a couple of raised beds for veggies and I do need organic matter for potted plants, so our compost goes there.

One of my raised beds ready for spring planting

A few weeks ago I was preparing our raised beds for spring planting. (Actually, I should have done this in the fall but better late than never.) In any case, my raised bed preparation consists of a few very easy steps:

  1. Clear out any weeds or veggie residue.
  2. Pull all wood chips to one side, leaving soaker hoses exposed.
  3. Lay down a thin layer of compost
  4. Replace wood chips and add more as needed to raise mulch level to at least 4”.

This is a great way to preserve and enhance the soil environment, while inhibiting weed growth. In the spring, I only have to pull the chips back and plant seeds or starts.

Bits of eggshells and big wads of tea bags in various stages of composting.

But back to the compost. We only add kitchen scraps and yard debris to our bins. Nearly everything is unrecognizable after it’s been composting, save a few eggshell pieces. So imagine my surprise and unhappiness when I found partially decomposed and even intact tea bags in my finished compost.

Not only do the nylon bags not degrade, but neither do the strings or tags.

Now, I drink a lot of tea. I go through 4-8 teabags a day. Most of those teabags are of the simple paper variety, but I do get fancy pyramidal tea bags on occasion. Many of the sellers of these teabags claim their products are biodegradable, and some are made of silk or some other degradable fiber. But most are made of nylon. And they are full of microplastics.

This problem was reported years ago by The Guardian, which I managed to miss until recently. This article is well worth reading for those of you who drink tea and compost the teabags. Here are a few salient quotes:
“A single silky plastic tea bag at brewing temperature (95C) releases… microplastics,…nanoplastics… and polyethylene terephthalate (PET) into a single cup of tea.”
“To put it unscientifically, the amount of plastic found in these tea bags is more than we ingest from just about anything else.”

Microplastics (UF/IFAS Photo by Tyler Jones)

I’ve written before about the dangers of unwanted chemicals in corrugated cardboard and advised against its use on soil or in compost. Now we need to add nylon teabags to the list. The research reported in The Guardian is alarming enough that I will no longer use pyramidal teabags in brewing my tea. I won’t even compost the tea leaves in these bags, as they are contaminated by the brewing process.

Have you found uncomposted items in your finished compost that surprised you? Make a comment below!

Facebook

2024 – A Tree Oddity

Facebook

We at the Garden Professors stress the importance of accurate diagnoses of plant “problems.” Often, problems aren’t due to pests or disease, and sometimes they aren’t problems at all. That got me thinking about a tree oddity I saw earlier this year when I was visiting my daughter in Walla Walla. Near her office at Whitman College stands a mature box elder (Acer negundo), whose lower crown has large swaths of pale yellow leaves (Figure 1). From a distance, one might think of several reasons these chlorotic leaves have developed: lower crown leaves and branches are routinely less productive than upper canopy leaves and as a result receive fewer resources from the tree. Lack of water in particular can cause early fall color change.

Figure 1. Acer negundo, also known as box elder. Its common name is an oddity in itself, as it doesn’t include “maple.”

But that’s not what’s going on here. A closer examination of the leaves (Figure 2) also reveals a lumpy trunk (Figure 3) – and venturing around the trunk we find multiple trunks that have fused together (Figure 4). What become obvious through careful observation is that those pale yellow leaves are associated with the smaller diameter stems wrapped around the main trunk.

Unfortunately, Whitman College does not have an online tree database for me to access, so I don’t know when this tree was planted or what variety it is. But I am fairly confident that it is Acer negundo f. auratum Schwer. (That “f.” stands for forma, which is synonymous with subspecies.) Anyway, this natural variation was recorded in 1893 in Gartenflora 42:202. More current references to this variant erroneously call it a cultivar (‘Auratum’). It’s identified as having golden-yellow leaves with smooth undersides.

Box elder is widely regarded as a fast-growing, weedy tree with challenged aesthetics. The auratum form, with its chlorotic leaves, is less vigorous and would be better suited for a college campus landscape. It’s reported to only reach 25’ at maturity, with its yellow leaves becoming nearly white in the summer.

Box elder can make appearances everywhere. Photo from Neil Sperry/Ft. Worth Star- Telegram.

And that life history characteristic is what spelled the near-demise of the originally planted tree. Varieties, subspecies, and cultivars are often grafted to species rootstock, which is a faster method of propagation than by seed. Careful management of this young tree would have included removal of suckers as they appeared at the base. Left unchecked, a vigorous sucker rapidly outgrew the scion, which then became embedded in the new, dominant trunk.

The take-home message here reflects the importance of onsite field diagnostics. In this case, a photo of a chlorotic leaf does not tell the whole story and would likely result in a misdiagnosis.

Happy holidays to you and your trees!

Thanks to Sylvia Hacker for her never-ending supply of photos for any occasion.
Facebook

Seeing red – in autumn leaves and in misdiagnoses

Facebook

Existential dread – the botanical version. (Thanks to Tommy Siegel’s creative talents)

While the onset of autumnal leaf color change reminds us that winter is coming, there are many other reasons why leaves turn red. Knowing why and how leaves turn red is key in accurate diagnosis.

Once near-freezing temperatures occur, leaves seem to turn red overnight.

These are examples of leaf reddening misdiagnosed as phosphorus deficiency:

These leaves are not phosphorus deficient, either.

Leaf reddening here is due to solar damage (leaf scorch)

Congratulations to accurate diagnosticians at UCANR! This is indeed phophate deficiency. Damage is not localized as in the previous images.

Lack of sufficient phosphate causes overall leaf reddening among other symptoms.

Here are some other underlying causes behind leaf reddening.

This Cornus kousa (dogwood) is sitting in a perched water table. Poor soil drainage is causing anthocyanins to accumulate at the margins of the leaves.
Leaf reddening on a Cornus spp. (dogwood) suffering from anthracnose

If you’re interested in learning more about how and why leaves turn read, be sure to download my most recent factsheet, appropriately titled “Why do leaves turn red?” ] It’s peer-reviewed and relevant to any part of the world.

Enjoy this Halloween treat!

Facebook

An antidote for anecdotes

Facebook
Cats and orchids – what’s not to like?

I often feel slightly nauseous after a day of debunking misinformation online, in emails, and in person. Others who selflessly give their time and energy to the same efforts probably feel the same. An antidote counteracts poison; in a very real sense, those of us who guide gardeners through the six circles of horticultural hell are routinely exposed to the mind-numbing dregs of lazy thinking.

Not exactly Dante’s Inferno, but this ‘Inferno’ coleus is certainly ablaze. Courtesy of The Blade.

What are the six circles of horticultural hell, you may ask? After playing with word lists and acronyms I have come up with the ABSURD approach, as in “don’t be ABSURD with your gardening information.”

This is a first draft of ABSURDity and I imagine it might get tweaked and shaped a bit. But it’s a good mnemonic device for educators to consider using, right along with the CRAP test.

A = anecdotal. Anecdotal evidence is simply one person’s observations that are not supported with scientific evidence. Reporting that your roses grew better when you used compost tea is an anecdote. Anecdotes are often collected by advertisers and called “testimonials” which sounds vaguely legal and therefore more reliable.

B = bogus. Bogus information is verifiably false; factual evidence exists to disprove it. Claiming that water droplets will scorch leaves on hot days is bogus.

There are lots of photos of water drops on leaves, but none that show scorching. Courtesy of pixabay.com.

S = scam. Scammy sources of information exist to sell stuff. Websites selling seeds for nonexistent flowers whose pictures are generated by AI are scammy.

A scam is born…

U = useless. Useless information promotes something that has no effect. Adding eggshells to gardens for any purpose is useless.

At least this photo is from a website with good information!
Courtesy of MSU Extension.

R = ridiculous. Ridiculous recommendations defy even common sense. Placing plastic forks into the soil to discourage animals from digging is ridiculous.

Salad fork takes on a whole new meaning.

D = dangerous. Dangerous products and practices can injure people, pets, and the environment. Putting mothballs in your landscape to discourage nuisance wildlife is dangerous.

Mothballs are highly toxic and do not belong in your garden! Courtesy of Public Health of Madison and Dane County.

You can find many more examples of ABSURDities in our 15 years of blog archives. Simply type in the word you are looking for and have fun diving down the (mothball-free) rabbit holes!

Type in a word, or part of a word, to find archived blog posts to explore.
Facebook

Weeding out the Pseudoscience in Companion Planting

Facebook
A polycultural landscape mixing vineyards and annual crops with woody hedgerows and trees in Charente, France. Photo courtesy of JLPC through Wikimedia.

As gardeners, we often assign human characteristics to our plants as a way of feeling more connected to them. We talk about their preferences and dislikes for certain environmental conditions and even for each other. The idea that plants have feelings has caused many to believe that plants are sentient and capable of making deliberate choices. (We’ve discussed plant sentience in previous posts that you can see here, here, here, and here.)

I could spend my time debunking all the books, websites, and social media accounts that promote the pseudoscientific side of companion planting. But this popularized version is a horticultural zombie: it never dies. Instead, I’d rather discuss the ways that plants can change their environment physically, chemically, and biologically – which can influence the survival of other plants. The table below summarizes these methods.

Table borrowed from “Gardening with Companion Plants.”

I encourage you to download and read my recently published Extension manual – it’s free and peer-reviewed. In addition to providing solid scientific advice, it will help you understand why the classic example of companion planting – The Three Sisters – may be of historic and cultural interest but is unlikely to benefit plant productivity or soil quality.

Three Sisters Garden next to the Harry and Jeannette Ayer House, Onamia, Minnesota. Photo courtesy of Wikimedia.

Below are some evidence-based companion planting strategies for your gardens and landscapes. More are also available in the Extension manual linked above.

  • Perennial companion plants will take a year or two to establish. Annual companion plants should be used if immediate benefits are desired.
  • If you are growing perennial crops, avoid using annual companion plants that require yearly soil disruption. Crop growth and yield can be negatively affected.
  • Use living mulches on pathways, between rows in vegetable gardens and orchards, and other locations that are not densely planted to reduce competition. Living mulches play a crucial role in protecting soil from erosion as well as biological and chemical degradation, and this improvement may outweigh any drawbacks from competition.
  • To reduce competition among desirable plants, choose species whose roots are less likely to interfere with one another. Intersperse large taproot vegetables like carrots and radishes with those whose root systems are shallow and widespread, like corn, onions, and lettuces.
  • Avoid invasive species and aggressive native plants. They will be overly competitive for resources like sunlight, resulting in reduced growth and vigor of other species.
  • A well-chosen organic mulch will improve plant growth and productivity. A woody organic mulch, such as arborist wood chips, will enhance mycorrhizal populations, improve overall soil health, and control weeds. Arborist wood chip mulches also house predatory spiders and insects, such as ground beetles.
  • In vegetable gardens, try to intercrop different species so that individuals of the same species are as far apart as possible from each other. This will reduce the ability of pest insects to infest an entire crop.
Intercropping coconut and Tagetes erecta (marigold) in Kerala, India. Photo courtesy of Ezhuttukari through Wikimedia.
Facebook

The nitty gritty on movement of chemicals in plants, part 2

Facebook

My social media administrator (aka cat herder extraordinaire) reminded me recently that I’d written a post on xylem function and promised to follow up the next month with a post on how phloem works. Well, that was about 18 months ago. Guess I better keep my promise.

Do read the linked post if you don’t remember why “xylem sucks.” In contrast to xylem, functional phloem is an interconnected series of living cells with cell membranes. The presence of a membrane means the plant can regulate what goes in and out of the phloem, and the direction of phloem flow is determined by the relative concentrations of dissolved substances in the water – most importantly sugars derived from photosynthesis. Areas of high sugar concentration are sources; areas of low sugar concentration are called sinks. As these words suggest, phloem contents are moved from the source to the sink. This process is called translocation.

A general schematic depicting both xylem and phloem movement. Courtesy of Wikipedia.

The most obvious sources in plants are leaves and other green tissues: this is where photosynthesis takes place and sugars are created. Other less obvious sources are woody roots, trunks, and branches: carbohydrate reserves are built up in the fall, as winter-hardy species enter dormancy and deciduous plants shed their leaves. Carbohydrates are re-mobilized in the spring when trees, shrubs, and perennials emerge from dormancy.

The carbohydrates stored in the branches, trunk, and roots of trees will provide energy to leaves as they emerge in the spring.

Like source tissues, sink tissues vary with the season but can also change daily – especially during the growing season. Expanding leaf and flower buds demand energy for building new cells; ripening fruits require large quantities of sugars. As new branches grow and produce leaves, their demand for carbohydrates decreases until they become source tissues. Translocation is a complex, dynamic process, where phloem in different parts of the plant translocate sugars in different directions.

Newly developing leaves without chlorophyll are sinks for translocated carbohydrates.

This information can be used to guide your gardening practices:

Application of translocated herbicides. While we always want to reserve chemical weed control as a last resort, sometimes it’s necessary when other methods aren’t successful. Glyphosate (the active ingredient in Roundup) is applied to leaves and is carried through the phloem to sink tissues. When you read the label on a glyphosate-containing herbicide, it will mention that late summer/fall application is needed to kill the roots of perennial weeds. Consider hedge bindweed (Calystegia sepium), a pernicious and difficult weed to remove by mechanical or cultural means once it’s established in a garden or landscape. Glyphosate will successfully kill this weed but only if it’s applied after flowering. At that point the plant is no longer putting resources into either flower production or vegetative growth; instead, translocation moves carbohydrates (and the glyphosate) to the roots for storage over the winter. Killing the underground storage tissues means this herbaceous perennial will not reappear the next spring.

Bindweed can be almost impossible to remove.

Pruning the crown during the growing season. When plants are actively producing new leaves and flowers, translocation is generally directed towards these tissues. Pruning leaf-bearing branches and stems has two consequences: removal of source tissues (the leaves) and increased demand for resources from the rest of the plant. Carbohydrates are moved from other sources, like remaining leaves and woody storage tissues, to the expanding stem and leaf buds that have been stimulated by pruning. This is why chronic and/or severe pruning can have a dwarfing effect on woody plants: woody storage tissues are depleted of their resources which are translocated to the developing buds. Until the new growth leafs out, it will remain a sink tissue.

Newly emerging larch needles will become source tissues once they finish expansion.

Pruning the crown after transplanting. Take the information from the previous section and now consider the additional sink that has been created during transplanting. Successful establishment of a newly installed plant requires rapid development of new root tissues. Pruning the crown of new transplants siphons much of the stored resources away from the roots, reducing the rate of root growth and establishment. Reduced root establishment also means reduced uptake of water, which will damage the newly expanding buds and leaves. Bottom line: do NOT crown prune after transplanting, except to remove diseased, damaged, or dead branches. Wait until the following year to undertake any structural pruning.

Fine roots must establish quickly to provide water for the entire plant.
Facebook

The truth is out there – you just need to know where to look. Part 1 – navigating the informational swamp

Facebook
Good and good for you!

It’s been 20 years since I began my Extension position at Washington State University. During that time, I’ve tackled gardening myths and produced peer-reviewed fact sheets and manuals through our Extension Publications department. But because of the way that Google searches work, these resources are often buried far beneath the glitzy but fact-free websites promoting bad science. This month I’ll be shining a spotlight on some publications that are must-reads for those who wish to use science-based information in their garden and landscape activities.

If the sheer vastness of the online swamp of information horrifies you, there’s no better place to start than with our Scientific Literacy manual. This publication, coauthored with Dr. Catherine Daniels, introduces you to the CRAP (Credibility, Relevance, Accuracy, Purpose) analysis of information from any source. As the abstract states, this publication helps you “to distinguish science from pseudoscience and can help avoid wasting time, money, and resources on poor ideas or, worse, scams.”

With the CRAP analysis techniques under your belt, you will appreciate our fact sheets debunking some of the “plausible nonsense” force-fed to gardeners (and by extension their plants and soils). The use of Epsom salt in the garden is one of the biggest fact-free nostrums out there. Our Epsom Salt fact sheet, coauthored by Rich Guggenheim, outlines what misapplication of Epsom salt will do to your garden soils and the news is not good.

Right up there with Epsom salt is gypsum, another popular soil amendment with many purported benefits. While gypsum can alleviate problems in heavily used agricultural soils, it has little to no benefit when applied to gardens and landscapes. Our Gypsum fact sheet, also coauthored by Rich Guggenheim, will tell all!

Proper soil nutrient management depends on your gardening goal.

Since we’re discussing chemicals that are added to soils, I’ll refer you to another article written by Dr. Jim Downer and myself. Soil myth-busting for Extension educators – reviewing the literature on soil nutrition is a peer-reviewed publication in the Journal of NACAA. In this article we discuss address “six common misperceptions about managing soil nutrition in nonagricultural situations.” And yes, two of these misperceptions are the routine use of gypsum and Epsom salt.

Scooby Doo and the gang tackled the Swamp Monster – you can too!

I invite you to use the methods in our scientific literacy manual to debunk claims you read or hear about soil amendments. Knowledge is power and you can become a gardening superhero by helping fight the gardening swill that fills the informational swamp.

Next month I’ll continue the “truth series” with a look at some of our publications on garden practices we believe to be true…but aren’t based on science. In the meantime, here a couple of related blog posts that you might enjoy:

I do my version of the shame list with the “Dirty Dozen Garden Products.” Not only is this a good reviews of things that don’t belong on your garden soils, but there’s a fun quiz to see how your stack up with science.

This post on “Garden Logic” links up nicely with our discussion of CRAP analysis. Find out why we tend to jump to conclusions about what we see in the garden, regardless on whether it’s evidence-based or not.

Stay tuned for next month!

Facebook

News for gardeners in deer country: one solution to deer problems may simply be smaller gardens

Facebook

Wherever whitetail deer occur they present a challenge for gardeners. The internet offers abundant advice on this, but too often it is simplistic gardening myth such as scattering human hair or planting garlic.

Distance shot of micro-exclosure with the protective ability clearly evident

Historically in deer control literature there have been occasional observations that deer hesitate to enter an area which looks too small or constrained for rapid escape. Finally, it came time to acknowledge and test this theory.

Green Island Preserve and the University of Minnesota Extension set about investigating this possibility through their Regional Sustainable Development Partnership (RSDP) program which provides support to community-benefit projects in partnership with private citizens and organizations. The test site was a 60 acre rewilded forest inside a small northern city. Deer pressure was heavy with resident herd numbers varying from 16-30 animals during the trial.

This graphic represents approximate scale, small, but useful for special plants and for efforts at forest understory diversification.

The first issue was defining a “small space” for testing the theory. In all the literature only one other trial of this concept could be found. It was conducted in Wisconsin with traditionally fenced spaces ranging from 15 ft by 15 ft to 21 ft by 21 ft feet during part of one summer. The Minnesota Green Island Preserve and RSDP trial chose 16 feet by 16 feet based upon the dimensions of manufactured, ridged cattle panels. These panels are 50 inches in height and 16 ft long and tend to be readily available at Fleet or Home stores even in suburban areas. If successful, their advantage would be very easy set-up and portability at a reasonable cost.

Micro-exclosure close-up at the advent of the growing season.

What was the result? Over 2 years of trial, this test demonstrated 95% success. Six micro-exclosures were established and planted within forested and forest edge locations in a zone of heavy deer pressure. During an observation period of 730 days, only one instance of deer browse occurred inside a micro-exclosure.

Notice the ease and portability of an exclosure from “Cattle Panels”

This success rate is more impressive because these fences are not a physical barrier to deer entry. They are strictly a psychological deterrent. This places them in much the same class as flashing lights, sound cannon, water spray, etc., but according to this study’s data, they’re actually more effective. All psychological deterrents have a failure rate dependent on application, monitoring, seasonality, rainfall, and more. But micro-exclosures show a low failure rate, without maintenance. If a deer breach does occur, the solution is simply to make the exclosure appear even smaller. This can be done by stretching rope across the center holding noticeable flagging. It can be lifted off when tending plants.

A concise photo review of the micro-exclosure concept

This is a highly promising discovery which merits further controlled testing by universities and professionals. The Minnesota Green Island Preserve and RSDP trial was specifically targeted to white tail deer predation while other ungulates present browse problems in other geographies. Rabbits were not addressed. However, until further and definitive research is conducted, citizen-scientist gardeners can contribute by testing versions of this method for themselves and adding their data to the general deer-control knowledge base. In using and testing micro-exclosures, gardeners will fare infinitely better than by spreading human hair, interplanting garlic, or buying “ultrasonic” gizmos.

This post was provided by Kent Scheer. Kent is a career sculptor with a side mission for reforestation and environmental compassion. He is the editor of three handbooks on sustainable agriculture resources and owner/ manager of a rewilded pine forest in northern Minnesota created for environmental education and awareness. You can contact Kent at kentscheer@outlook.com.

Facebook

Cardboard does not belong on your soil. Period.

Facebook

In the quarter century that I’ve been researching, publishing, and educating on the topic of landscape mulches, one thing has become clear: cardboard should never be used as a mulch. This viewpoint has been of great interest to gardeners; in fact, my earlier post has been the most frequently viewed post since it was published in 2015. I occasionally appended new information to the original post as needed, but the topic deserves an update.

Landscape mulching with cardboard is wildly popular but has no published research to support it. Photo courtesy of Chris Martin on Flickr.

Rather than rehashing what’s been written earlier (which can be found here, here, here, here, and here in addition to the link above), I’m providing information in a Q&A format that might be helpful:

Q: Is there research on using cardboard mulch in home landscapes?

A: Not much. To date, the only peer-reviewed research relevant to landscape soil conditions is our own work published in 2019. The abstract explains the importance of the results to landscape soil health as stated in the abstract (below):

“The orders of magnitude differences in diffusion coefficients among the mulch materials, however, could negatively impact a diverse soil environment such as those found in biologically rich landscapes with higher oxygen demands. Among the mulches tested, wood chips are a preferred method of mulching in terms of providing best gas permeability, particularly in landscape conditions.”

This chart (derived from our 2019 study results) demonstrates the increased impairment of gas movement by different mulch types.

Q: Cardboard has been used as a mulch in agricultural production. Why doesn’t that research support using it in landscapes?

Sheet mulches, including black plastic, is frequently used in agricultural production where weed control and maximzing plant yield are the most important concerns. Photo courtesy of Wyoming BLM.

A: The goal in agricultural production is to maximize yield of an annual crop. In contrast, the goal in caring for a permanent landscape is to maintain a healthy soil ecosystem that will support plant life long term. The table below explains these differences in more detail.

Comparative criteria for intensive agricultural production, home vegetable gardens, and managed landscapes

Q: Okay, I understand that science doesn’t support using cardboard as a landscape mulch, but what about my vegetable garden? Isn’t the research on agricultural crops relevant there?

A: The research on agricultural production mulches is more relevant if maximizing yield is your most important goal. But your goals may include maintaining a healthy soil ecosystem, reducing the use of pesticides and fertilizers, and other criteria. Are you concerned about the established negative impacts that cardboard and other sheet mulches have on soil life? If so, then sheet mulches are not a good choice compared to chunky, three-dimensional mulches.

Q: I like reusing cardboard packaging as part of organic weed control. Isn’t that a good enough reason to use cardboard?

A: In addition to interfering with water and gas movement into the soil environment, corrugated cardboard has chemical contaminants that you really don’t want in your soil or even your compost pile. Corrugated cardboard contains environmental contaminants including dioxin and PFAs or “forever chemicals.” No gardener should want to introduce more of these widespread contaminants into their landscape or garden soils.

Recent peer-reviewed publication looking at hazardous chemicals contained in cardboard and other recycled materials.
Table from Fernandes et al. (2023). Compare the levels of contaminants between shredded cardboard and untreated wood shavings.

As I’ve been recommending for nearly a quarter century now, the very best mulch to use for treed landscapes is arborist wood chips. There is robust, peer-reviewed science establishing the benefits of arborist chip mulches in controlling weeds, enhancing growth and establishment of landscape plants, and maintaining a functional soil ecosystem. In contrast, sheet mulches such as plastic, weed fabric, and cardboard have demonstrated negative impacts on the long-term health of landscape soils. Any resource that says otherwise is not paying attention to the research-based facts.

Arborist wood chips protect exposed soil and suppress weeds while supporting desired landscape plants
Facebook