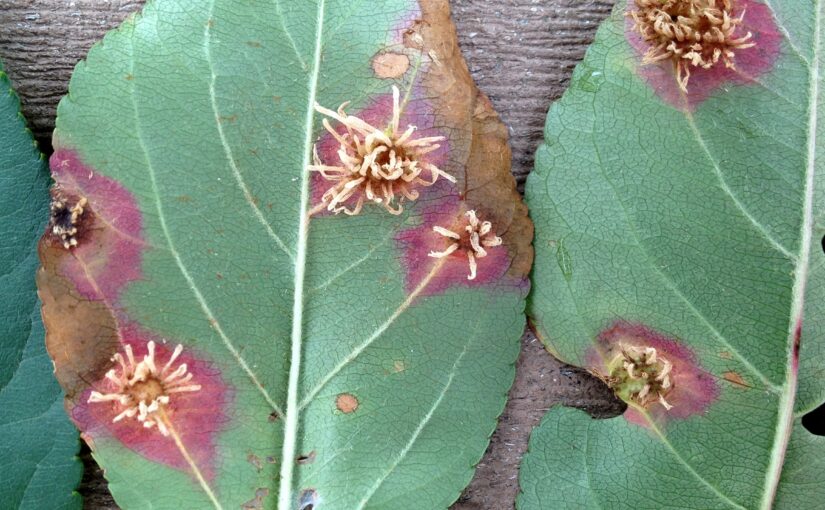
Home Greenhouses Pt. 2: Regulations & Restrictions

Last month I dipped into some of the considerations of owning or building a home greenhouse, having just “inherited” a greenhouse with my new house.  The questions and comments were numerous, so I decided to continue on discussing considerations for home greenhouse ownership and operation.  There will likely be a few more articles down the line….so strap in. 

This time around, I thought I’d talk about something that we hate to talk about, but is important to understand: rules and restrictions around what you can and can’t do, especially if you live in an urban area or municipality. 

I know, I know.  We all just wish we could do whatever we want, but when we live in close proximity to others there are usually some sort of rules we have to follow to keep the peace.  I have a little better understanding of how it works, now that I helped write an urban ag ordinance with our city planning department (fingers crossed is passes city council next month!) that will “decriminalize” urban farming, including controlled environment ag structures like greenhouses.  Of course, aside from what you can and can’t do there are tax implications that you should be aware of, no matter where you live (more on that in a bit).

Zoning, Ordinances, and Planning Commissions – oh my!

Most agricultural activity, which includes greenhouses, is likely regulated to some extent if you live within a municipality.  Even if you don’t live in a town or city, there could be certain building codes or ordinances on county or state levels that you’ll want to check into. 

You’ll want to look up your municipal code online, or call your municipal administration (like city hall, mayor’s office, planning office, etc.-whatever you have) to see if there are specific allowances or restriction for or against greenhouses.  There are a few scenarios that could play out here, so you’ll want to be prepared on how to proceed.  In general, you might find that greenhouses are:

  • Permitted, but only in certain zoning areas (more on that later)
  • Permitted, but requiring a permit of some sorts
  • Restricted altogether
  • Not mentioned at all

If you fall in that last category, then anything you do will exist in a gray area, where it isn’t strictly legal or illegal but the fate of your greenhouse (or any fines you might incur) would be up to interpretation by whoever is in charge of compliance (and what side of the bed they woke up on that day).  And your greenhouse could be made legal or illegal at any time in the future if some sort of ordinance or decision is made. In the case of our new ordinance here in Omaha, greenhouses and structures like high tunnels will be allowed, but only in certain zoning areas.  People who already have structures (and have for years) will now find that those structures are either allowed or banned (or will require a permit).  Of course, enforcement of issues like this are often complaint-based, meaning that the municipality probably isn’t driving around looking for your greenhouse but if you and your neighbor aren’t on good terms they can call and turn you in. 

As for zoning, there are several different categories and sub categories.  The ones you’re most likely to encounter are residential, commercial, industrial, and agricultural (there are others as well).  And then there are usually numeric (or named) sub-zones within those zones denoting the density or intensity of use on those zones. 

For example R-1 (Residential 1), might be for a single-family dwelling whereas R-3 would be for a small apartment building.  C-1 (Commercial-1) might be for a single-use building like a stand-alone fast-food restaurant and C-8 might be for a skyscraper office headquarters.  Municipalities use these codes to denote what is and what is not allowed in certain places.  For example, the code we worked on for Omaha allows certain types of farming on all residential zones with a conditional use permit and on commercial zones without a permit.  (Home gardens and even community gardens are not considered farms and are allowed on all residential zones without a permit.)  Many municipalities may also have agricultural zoning on properties around the periphery but still within the city/town limits.  On lots like this, most agricultural practices are allowed. 

Three things you can do with NYC's new zoning and land use map - Curbed NY
Your municipality may or may not have a map available showing lot zoning, like this small area of NYC.

Since a greenhouse is a structure, there may or may not be a requirement for a permit for the structure, even if it is allowed.  This could be dependent on a number of factors, including whether it is considered a permanent or temporary structure, whether there are utilities going to it (which is usually the case for a greenhouse), or even how the structure is constructed.  In some areas, it comes down to how pretty or ugly the city and your neighbors think the structure might be.  In discussions for our ordinance, there was talk of not requiring a permit for a greenhouse but requiring permits for structures like high tunnels/hoophouses because there’s an (incorrect) assumption that greenhouses are prettier than high tunnels.  But many people make greenhouses out of those structures (the greenhouse I inherited is just a high tunnel with a space heater). There was also an assumption that a greenhouse wouldn’t have loud, flapping plastic but a greenhouse would (I kid you not). 

The tax man cometh….for your permanent agricultural structure.

One other thing you’ll want to consider about a greenhouse has to do with the tax bill.  Since greenhouses are considered permanent structures, many places consider them a permanent improvement to your property and will add them to the tax bill like they might do an out building or garage.  The municipality will definitely know about it if you have to apply for a permit or if you get a visit from the assessor.  But this could also be dependent on how your structure is built.  If you build a solid sided greenhouse (one of the nice looking ones) with a concrete slab floor, permanent utilities, etc then it will definitely considered permanent.  But if your structure is more like a high tunnel/hoophouse like mine (a high tunnel in a trench coat pretending to be a greenhouse) then it could be considered a temporary structure and not taxable. 

My high tunnel parading around like a greenhouse

High tunnels are considered temporary since you could really take them down at a moment’s notice (and some planning department officials think this means that you take them down and put them up each season, despite how much an extension educator tries to convince them otherwise….but I digress). So your mileage may vary depending on your local rules and how your structure is constructed. 

So what home greenhouse topic should we cover next?  I’m sure there’s plenty of questions out there – be sure to leave them in the comments.  Also – would you like to have your greenhouse featured in a future article (this means I don’t have enough home greenhouse pictures)- feel free to send them to me at john dot porter at unl.edu.

So you think you want a home greenhouse, do you?

Given the growth in home gardening, the fervor around houseplants, and the interest in hydroponics and other growing methods, it makes sense that the interest in home greenhouses is also building.  Sure, home greenhouses have been a “thing” for a long, long while – from well-to-do folks with conservatories on their estates to the more common and basic home greenhouse in the last few decades.  But shifting interests, and more/cheaper options have made home greenhouses more accessible to the masses.  The number of calls that I (and other extension folks) get about greenhouses and other controlled climate production methods is increasing.  And even retailers like Walmart and Wayfair have greenhouse options on their websites (I know, because my social media and email is filled with ads about them).  So let’s explore some of the benefits and pitfalls as well as some of the things to keep in mind if you are considering (or already have) a home greenhouse.

Honestly, it is planted like a jungle. You can’t even walk through my greenhouse.

Now, the timing of my thoughts on this couldn’t come at a better time (or really, I just write these blogs on topics that are current in my life).  I just bought a new house and one of the benefits of this new house, aside from less peeling paint, fewer creaky floors, and (hopefully) fewer plumbing problems is that it came with a greenhouse!  A real, honest-to-goodness greenhouse.  Not a fancy one – its just a heated high tunnel, but it’s a real greenhouse.  Apparently, the previous homeowner was enough of a plant geek to not only have a greenhouse, but plant it like a conservatory as well.  So it is full of palm trees, citrus trees, and tropical plants all planted in the ground.  Aside from everything being planted so close you have to bushwhack like you’re in the jungle it is quite lovely. So my big winter project will be controlling those plants and making room for stuff I want to grow.  But I digress…

A few considerations for home greenhouses

There are a lot of things we could discuss about managing a greenhouse, so I won’t go in depth on a lot of things (maybe more articles to come?).  But there are definitely several things you should consider before buying or installing a home greenhouse.  Here’s just a few of them:

Purposes and uses

First up is to think about how you’re going to use the greenhouse.  Will it be for tropical plants (houseplants), for starting seeds, growing produce, or something else?  Having the purpose of your greenhouse in mind can help you choose things like size, materials, and more.  For example, if you’re just planning on starting seeds in the spring for your home garden you might get away with a small greenhouse that’s just a few feet by a few feet.  If you are going to grow fruits and vegetables, keep large tropical plants, or grow on a larger scale you’ll need something bigger.  Keep in mind that the bigger the greenhouse, the more it will cost both in terms of materials or installation and in terms of climate control.

Climate Control & Associated Costs

Whether you live in a cold climate or hot climate, you’ll need to have some sort of climate control in your greenhouse.  In cold climates, heat is the major factor.  In warm climates and during hot spells, cooling and air flow can be major issues.  While we think most plants like heat, there’s definitely a temperature sweet spot for plant growth and it can definitely be too hot.  You’ll want to be able to control your temps to keep your plants growing best.  Many of the kits available from box stores/etc. don’t include a heat source or fans, so you’ll have to either find alternatives or install your own.  Amazingly, the greenhouse I inherited is heated with a space heater.  This is a cheap, no-frills option but can also be risky.  Shorts and fire hazards are risks, of course.  But so is failure of the unit and also power outages. I’m not putting my fancy/expensive plants in the greenhouse because I could imagine a power failure during a Nebraska snowstorm with below zero temps killing everything in the greenhouse.  I keep an eye on the temperatures in the greenhouse with a smart sensor (left by the previous owner) that sends temperature information and alerts to my phone, but that can only do so much when you don’t have a method to keep the temperatures up. 

That space heater is the sole means of heating the greenhouse

Of course, the other hazard will come when I see the electric bill for keeping the greenhouse warm.  Even on cold days the temperatures usually warm up on their own with even a little bit of sun, but keeping the plants warm at night is the problem.  I have the heater set to keep the greenhouse just warm enough so that the plants aren’t damaged killed (between 45 and 50), so I’m not paying to keep it super warm all winter long. 

Of course, using fans to cool or control air flow will be another expense for most greenhouses, as will water.  Greenhouses are typically pretty high humidity, but if you have a lot of air flow you’ll need to water more often.  Amazingly, my greenhouse doesn’t have vents or fans, but it is small enough that it doesn’t really need them.  If it were a big greenhouse, it would require some airflow to keep it much cooler in the summer.  Right now, an open door (covered with netting) suffices.

One way that some folks are reducing energy costs in cold areas is by building geothermal greenhouses.  These are becoming oddly common in Nebraska.  These are a much bigger undertaking than just popping up a kit from a box store in the back yard.  You have to dig down deep enough for the ground to aid in temperature control, have to install an underground system to intake and deliver air (to help with temperature control), and usually build a solid block or concrete wall to absorb solar heat amongst other considerations.

Location, location, location

A place to put your greenhouse is also an important consideration.  Whether you are an apartment dweller popping a small greenhouse structure on a balcony (it is possible) or someone installing a walk-in greenhouse on a larger property location is important.  Some greenhouse structures are lean-to or attach to the house, meaning that you get the added benefit of the heat holding properties of your house siding.  I’ve even seen some greenhouses used as sun rooms – which basically is a modern day solarium. If you attach the greenhouse to your house, you’ll also want to have a safer heat source than just a space heater.

This kit greenhouse is much cuter than mine…but it probably costs a whole lot more.

Orientation of a greenhouse can be important for those that are either elongated (like mine) or those that are on the side of a house in terms of sun exposure and temperature control. Square or roughly square freestanding greenhouses don’t have to be as planned out.  For greenhouses on the side of the house, you’ll want to place it on the side of the house, or closest to the side of the house, that faces the sun.  For the northern hemisphere this would be the south facing wall.  For the southern hemisphere this would be on the north wall. However, in warmer climates where over heating may be an issue you might want to place it elsewhere, like on an east facing wall to get morning sun but protect it from the hot afternoon sun.  This is, of course, dependent on light levels available to plants, as you’ll want to maximize light exposure in winter. 

For elongated greenhouses, a common orientation is to have the greenhouse oriented north to south so that the sun passes over and both sides receive the same amount of light.  An east-west orientation will mean that one side will receive more light. In windy areas like Nebraska, orientation is also important to preserve the structure.  My greenhouse has a curved or hooped top (sometimes called Quonset style), which allows wind to blow over the structure.  If the flat end of my greenhouse was facing into the wind (west), a strong gust of wind could damage the structure.  So location and structure play a part in the ability of a greenhouse to weather the storm. 

In conclusion?

We’ve covered purpose, climate control, and location in setting up a home greenhouse.  There’s plenty more to talk about when building and managing a home greenhouse, so if interest is high enough perhaps I’ll talk more about the topic in future installments.  What say you?  Is there enough interest to keep talking about home greenhouses and following the adventures of my home greenhouse jungle? 

Po-TAY-to, po-TAH-to: Let’s call the whole yam thing off!

As most folks in the US prepare for a Thanksgiving meal, or at least eat more Thanksgiving-inspired fall meals, potatoes and sweet potatoes often play a major supporting role in these most delicious victuals.  Whether mashed, smashed, baked, candied, or turned into casseroles or pies, these starchy vegetables are stockpiled in grocery stores and markets in the fall for shoppers to turn into those tasty treats. 

But sometimes there is confusion lurking in those grocery aisles and even in the minds of unwary shoppers….enter the “yam”.  Wander down the canned vegetable aisle and you’ll see canned yams.  Are they the same thing as sweet potatoes?  And are they related to the standard potato that you usually mash, bake, or fry?  I yam going to set the set the record straight. 

First things first, sweet potatoes and yams are two totally different species so they are not the same thing.  They’re even in different plant families so they aren’t even closely related.  And neither of them are related to the regular old potato.  So those “canned yams” at the grocery store are mis-named.  They are sweet potatoes.  Yams are rarely consumed or sold in the US, except usually though markets that sell specifically African/Caribbean foods. 

A sweet potato in bloom….look familiar?

Sweet potatoes are soft when cooked, thin/soft skinned, usually pretty sweet, and usually orange.  Though there are some white-fleshed, less sweet varieties available.  Native to tropical regions of the Americas sweet potatoes, or Ipomoea batatas, are members of the Convolvulaceae, or bindweed, family and are closely related to morning glories many of which are in the same genus Ipomoea.  These sweet veggies are part of the root structure, so they are modified storage roots that store starches and sugars produced by the plant. 

Yams, on the other hand, are white with a hard skin like tree bark, and are usually pretty dry when cooked.  There are three main species of yams in the Dioscorea genus, which has its own family Discoreacea.  Also tropical in nature, three different species were domesticated independently in Africa (D. rotundata), Asia (D. alata), and the Americas (D. trifida).   Yams are monocots, meaning they are more closely related to lilies and onions than they are to sweet potatoes.  Also, unlike sweet potatoes, the edible portion of a yam is a tuber, which is structure arising from modified stem tissue. 

Piles of yams…that look nothing like sweet potatoes

And just to round out the tater trifecta – the humble potato.  Sometimes called a white potato or an Irish potato (which are both bad descriptors for them because they come in many different colors, and while they are a staple in Ireland they originate from the Americas), these versatile spuds, Solaunum tuberosum, are members of the Solanaceae family and are closely related to tomatoes, Solanum lycopersicum.  Their morphology has similarities to those of the yam, though, as they are tubers arising from the stem vs being a root like sweet potatoes. 

So where does all the confusion come from? 

There are various theories on how yams and sweet potatoes got caught up in this mash-up, and I don’t pretend to be an expert here.  But the most common theory that I’ve seen is that enslaved African people held in the US south called the local sweet potatoes by the names they used for yams, as the sweet potatoes reminded them of the yam that was part of the staple diet in many African countries.  The word yam is derived from nyam, nyami, or nyambi, meaning “to taste” or “to eat” in certain African language dialects.  Adding to the story, apparently Louisiana sweet potato growers in the 1930s used “yams” as a marketing name for a new orange-fleshed sweet potato cultivar and the name stuck. 

One thing I find interesting is that yam was used to describe orange sweet potatoes when the white fleshed ones (which are less common now) would probably more resemble an actual yam, both in appearance and flavor.  In fact, in my travels in Rwanda I ate many white fleshed sweet potatoes, as they are now a major staple crop in many African countries.  It is also interesting to note that the refugee farmers in our urban farm programs prefer to grow the starchier, less sweet varieties of sweet potatoes, which often complicates things as they can be hard (and expensive) to find. 

Whether you cook sweet potatoes or “white” potatoes for your Thanksgiving feast, now you’ll know a little bit about how each of those crops are different…and you’ll at least know that sweet potatoes aren’t yams. 

What the words on the seed packet or food label mean…

This article was originally published (surprisingly?) by the Mother Earth News Blog.

What do the words on your food (or garden supplies) labels mean? Do you know the difference between organic, natural, and sustainable? Are there rules about who can use which labels? When you are shopping at the farmers market or grocery store, or when you’re buying seeds or plants at the garden center, it is important to know what the words used to describe the product mean. It is also important to understand that some words have different meanings to different people and sometimes are used more for marketing (and sometimes misleading customers) than conveying actual meaning. Let’s take a look at some of the words that have an “official” definition, some where the meaning can be interpreted differently, and some that can be misleading or misinterpreted.

“Official” words for foods and plants

There are a handful of words that you’ll find at the grocery store, farmers market, or garden center that have an official definition because they are either part of a law or code or are part of an official certification process.

USDA Organic | USDA

For example, in the US for a product to bear the term “certified organic” or “organic“, it must be produced in accordance with the National Organic Program organic certification process outlined in federal policy/law and administered by the USDA. While there are many minute details for organic production, the “big picture” definition is that only organic/naturally occurring soil amendments and pesticides can be used – typically from a biological or elemental source. It is important to note that organic does not mean pesticide free. Repeat: ORGANIC DOES NOT MEAN PESTICIDE FREE

The organic certification process can be costly and time consuming, and some producers feel that restrictions do not go far enough, so alternative certifications have been developed such as Certified Naturally Grown and Regenerative Organic Certified. These certifications are not administered by the USDA, but rather by individual organizations that have developed them.

Another term that has emerged is “biodynamic,” which marries some organic principles with the requirement that the farm be a “closed system”, meaning that outside inputs like fertility are not used. Biodynamic production also requires the use of “preparations” that would be described as mystical or homeopathic and must be practices in accordance with “energies” such as the phase of the moon. In order to be labeled “biodynamic” a product must be certified by Demeter USA. Our very own LCS has addresses the “pseudoscience” of biodynamic growing in a previous paper. As a science-based group, we consider biodynamic to mainly be WOO.

A number of other certifications exist, such as Certified Animal Welfare Approved and Salmon Safe that guarantee things like best practices in livestock welfare and proper wild fishing practices.

“Unofficial” words for growing and marketing

While “official” words have certifications that standardize their meaning across industries, other words we use for production and marketing don’t have official meanings and are often up for interpretation. In instances where a relationship exists between a consumer and producer, say a customer buying directly from a farmer at the farmers market, a conversation can take place to share the meaning of what the words mean. In situations like a product at the grocery store, words are often left to the interpretation of the customer.

For example, while the term “organic” or “certified organic” requires official certification, using the term “organically grown” does not. Many small farmers will use this term to reflect their use of organic practices, but their understanding of practices may deviate from the “official” definition. The term natural or naturally grown may also be used to describe produce or products at the grocery store but no officially sanctioned definition exists. When customers and growers/producers can discuss what the terms mean, an understanding can be developed. However, when such a relationship doesn’t exist, it is hard to know what the terms mean. For example, an ad might say that a product is “natural, so you know that it’s good” to which I might joke that poison ivy and rattlesnake venom are both natural, but that doesn’t mean it is good for you.

The term “local” also doesn’t have a specific definition and can vary widely depending on the context. At farmers markets, it is up to the organization operating the farmers market to create vendor rules and decide what makes sense for each individual market, according to the national Farmers Market Coalition. For example, the closest meat producer may be farther outside of the city than the closest produce farmer. Markets in urban areas may need to recruit vendors from a bit farther away than those in the suburbs. If you have questions about the rules of your local market or where a vendor is farming – just ask! At a grocery store, local can mean whatever the chain wants to decide. Sometimes this can mean in the same state or other times it is regional. Often food at the grocery store will have a label saying the town or region it came from for you to learn more about each specific item.

Walmart's locally grown produce | In Oct. 2010, Walmart comm… | Flickr
Is it “local”? Depends on who you ask.

The terms sustainable and regenerative might be used to describe production practices or a farmer’s philosophy on production. While there aren’t official definitions, the USDA Sustainable Agriculture Research and Education program defines sustainable agriculture as holistic farming practices that balances environmental stewardship, profitability, and personal/social benefit. Though most use of the term sustainable for marketing focuses on the environmental aspect. Regenerative agriculture is a relatively new philosophy of production practices that focus on environmental stewardship to reverse climate change and/or environmental degradation and social fairness and often involves improving soil health. While the terms sustainable and regenerative might seem interchangeable, there are differences (mainly around economic sustainability and around maintaining current environmental conditions vs. improving them). We’ll see how the “regenerative” term plays out – as many consider it to be a “buzzword” in some ag circles.

Words that can confuse or mislead

While there are words that may seem abundantly clear to the person using them, the information or intent may seem totally different to the audience. These words are often used as buzzwords for marketing or may be used to create a sense of fear that is misunderstood. For these words, alternative words or further explanation might reduce confusion.

One such word that is often used is chemical-free. This is often used to describe produce or food that is produced without pesticides. However, use of chemical-free can be misinterpreted and misunderstood. It may be a facetious response, but as a scientist I often cringe when I hear this word used at the farmers market because that I know that everything is made of chemicals – all rocks, plants, animals, humans, and even air and water – are chemicals. Some say that the use of this term is based in fear of pesticides (even organic ones) or is based in anti-science “chemophobia” rhetoric. Using a more precise term, such as pesticide-free conveys the same message without anti-science connotations and reduces the chance of misinterpretation.

Non-GMO is also another term that was created as a fear-based marketing term that has become pervasive at the grocery store, the seed rack, and the farmers market. While there are concerns AND benefits to genetic engineering technology, use of the term non-GMO is often redundant and confusing to consumers because, as it turns out, there are very few opportunities for gardeners, farmers, or consumers to interact with bioengineered crops. Most bioengineered crops are those that are produced as commodities – field corn, soybeans, sugar beets, cotton, canola, etc. Only a handful of crops are those that you’d find at the farmers market or produce section – sweet corn, summer squash, papaya, and one apple cultivar. But these crops are grown in very small amounts, are not available to small-scale farmers or home gardeners, are sold only in larger quantities, and require a contract for purchase. Most produce items grown in the US do not currently have a genetically engineered counterpart – there are no GMO lettuces, radishes, etc. So labeling a tomato as non-GMO is redundant and has unfortunately caused so much confusion and fear amongst consumers that many specifically demand or seek non-GMO tomatoes, even though all tomatoes are non-GMO. There is a third-party certification process through the Non-GMO Project (they’re the ones you see with the butterfly logo on almost every product, even bottled water and salt), however given the confusion and misinformation around the term, the US government recently created a standard “Bioengineered” labeling requirement for all produce and products that consist of or contain genetically engineered crops or ingredients.

A few more words on words…

While words can inform and confuse, being an educated consumer (or producer) can help reduce confusion and help us understand the food that we eat. While we haven’t covered every word you might encounter on a label here, researching words you see can help build your label vocabulary. Building interest in learning about where your food comes from should be a fun way to connect with what is on your plate and who is in your community. Go out there and enjoy the learning process! You can check out some more words related to agriculture and food here.

This article by John Porter was written as part of a partnership in collaboration with staff at the Farmers Market Coalition (FMC) as part of FMC’s partnership with Mother Earth News Fair.


More about seed packet lingo here.

Fair Judgement: garden lessons from a fair (and crop trial) judge

I love a fair! Which is a good thing since I find myself at a lot of them as an extension professional.  It seems like fairs attract extension folks like honey attracts flies.  We’re always involved in the 4-H activities – the livestock, project displays, and contests.  Sometimes we pop up other places as well.  The one thing that I get asked to do multiple times each summer is act as a judge for horticultural entries.  Usually for 4-H youth entries, but sometimes for the open class where anyone can enter their best (or sometimes not so best) produce, flowers, and more.  I thought I’d take a few moments to talk about what I look for as a judge, so if you ever want to enter your best tomatoes or dahlias at the fair you’ll know what to do to get the best ribbon possible.  And even if you aren’t going to enter something into the fair, the rules and guidelines we use can help you select quality seeds and plants for your own garden or help you pick out the best produce at the grocery store or farmers market. 

Produce items and flowers with their ribbons after judging. Each item is judged on its own merits and is not compared to the other entries (except for selection of a “grand champion” or for submission to the state fair).

The fact is, many of the same qualities I look for and skills I use when judging produce and flowers at the county fair are also ones I use as a trial judge for the All-America Selections (AAS) program.  I recently attended the AAS/National Garden Bureau/Home Garden Seed Association summer summit and was discussing fair judging with some folks from seed companies.  They were excited by the process, and especially by the fact that one of the things that I judge (and have gotten fairly strict about) is that the fair entry information contain the cultivar or variety name.  They found this exciting because companies, especially smaller companies, put a lot of work into developing new cultivars, and when the general public identifies specific cultivars as being high quality (as in, I grow XXXX cucumbers because I think they are the best) or at least being able to identify the qualities of specific cultivars then it is sort of like a recognition of the plant breeders and distribution company’s work (and also puts money in their pockets).  As home gardeners, it is important to know which cultivars or varieties work best for you and to be able to identify the qualities you prefer.  It can also be handy to see cultivars out in “the wild” and be able to recall the name of plants you like, which is why the All-America Selections program has display gardens where you can see the edible and ornamental winning plants up close and personal. I’ve written about the trial process for this blog before.

Our display garden on the UNL Campus, which is our home garden for our TV show Backyard Farmer. We feature the garden each week on the show, which is one of the longest running locally produced shows in the US celebrating its 70th anniversary this year. Watch episodes.

Now back to the fairs – this year I used my judgmental eye at five county fairs in the course of three weeks – with three of those fairs in one week.  I’m not sure why I’m so popular, maybe because I’m good at it or maybe because nobody else will do it.  In either case, I do my best to not only judge fairly and by the rules, but also provide valuable feedback as a learning opportunity for youth.  The whole point of fair entries and projects, from our point of view at extension, is not that a kid gets a blue ribbon (in Nebraska the top standard ribbon is purple, though, which I had to adjust to) but that we help raise blue ribbon kids.  In some counties I actually talk to kids, interviewing them on how they grew stuff and giving them feedback on their entries.  When I don’t interview, I fill out a score sheet and provide comments on positives and negatives of each entry. 

Here are a few of the things that I look for when judging, and how they might help home gardeners:

  1. Overall quality, appearance, and health – this is the one that most can identify with.  Does the produce item or flower look appealing and high quality.  Is it free of blemishes, diseases, bug holes, etc.  You’d be amazed at the quality of some things we get at the fair.  Of course, since I usually judge items for kids I do try to provide feedback on how to improve quality overall.  Basically, my reference point is “would I buy this at full price a the market or grocery store”. 
  2. Correct preparation – this is one where lots of folks get tripped up.  For produce items we are often looking for whether or not the item has been harvested correctly, whether or not the stem has been removed or trimmed properly.  It varies by produce item.  These rules seem superfluous and overkill, but they actually are based on guidelines for how to best prepare produce and flowers to extend their shelf life and storability. For example, in Nebraska our guide says to leave a ¼” piece of stem on cucumbers, to remove the blossom cap/stem (sepals) from tomatoes to reduce damage to fruit, to trim beet stems to 2”, to pull (not cut) rhubarb and leave 2” of the leaf blade attached, and so on and so forth.  These guidelines all help reduce damage to produce items or keep them fresher longer – so these guidelines can be handy for home gardeners, too. Herb stems are to be cut a certain length and kept in water (like a bouquet) with the leaves below the water line removed.  For flowers, rules will often state how large of a specimen to provide, and to remove the leaves below the water line.  Rules vary by state and by fair, but many of them are fairly consistent here.  You can find our Nebraska preparation guides for produce and flowers to see how best to harvest and prepare crops and flowers for storage or usage. 
  3. Uniformity of size, shape, color, etc. – this one also trips a lot of people up.  First, most fair rule books will state a specific number of one item that needs to be provided, so that a judge may judge consistency and uniformity across multiple specimens.  For example, our fairs require two specimens of larger produce items (slicing cucumber, zucchini, eggplant, etc), five specimens of medium size items (slicing tomatoes, carrots, potatoes, pickling cucumbers, beets, etc.), and twelve specimens of small items (cherry tomatoes, string beans, etc.).  Flowers usually require five stems, but larger specimens like sunflowers may only require three.  All the specimens provided in the exhibit should be as uniform as possible.  All of the produce items and flower stems should be exactly the same size.  Being the same level of maturity is also important and also leads to uniformity of color, especially in produce items.  Color uniformity is especially important in flowers.  I use this uniformity rule when judging our AAS trials as well – do the plants perform consistently across the whole plant in terms of harvest or flower appearance.  This is a useful skill for home gardeners as well, as you can judge how well a specific cultivar or variety performs for you. You want to grow plants that perform well and provide consistent produce or flowers and not plants that only produce a few good items here and there with questionable produce or flowers mixed in. 
  4. Correct identification and cultivar names – as I stated earlier, the correct identification of the plant (like don’t enter a jalapeno pepper as a bell pepper) and the cultivar or variety are important.  Knowing what the actual end product is supposed to look like is helpful for gardeners to know what they are growing, understand the traits that they want in the plants, and how to select the seeds or plants with the traits they desire.  That’s why the seed company reps got excited about this part – because having gardeners identify specific (newer) cultivars as the ones with the traits they want is important.  It takes garden selection from “I want a slicing tomato” to “I want this specific cultivar of tomato because I know it does X, Y, and Z, so I’ll buy it from this specific seed company that sells it.  That in part is what we do with the All-America Selections trials.  We try out new things (before they hit the market) to test them out for taste, color, disease resistance, and a whole bunch of other things to give a “stamp of approval.”  So any time you see that AAS symbol you know there have been several judgmental eyes (including mine) have assessed those plants and found them worthy. 

So next time you visit a fair take a look at the exhibits to see if you see what a judge looks for.  And think about entering your produce or flowers in a fair near you just to see how your garden skills stack up with your neighbor’s.  Even if you don’t win best of show you can have fun and learn a bit along the way.  And even if you don’t enter at the fair, you can use your judgement to pick the best plants for your garden for years to come. 

Sometimes you get to judge the “fun” stuff, too….like best dressed vegetable.

Barf! An ode to the fascinating life of slime mold

It may seem odd to sing the praises of a weird, sometimes gross, looking phenomenon that sometimes freaks gardeners out, but every summer I love educating gardeners about the fascinating lives of slime molds. Here in Nebraska we often get calls about “this weird thing that’s all over my mulch” after a rainy period in the summer and whether or not it will 1) hurt their plants, 2) poison them, or 3) some other horrible outcome they’ve dreamed up. But the fact is, not only are slime molds harmless they’re also quite fascinating. In fact, I’ve often thought if I ever had the right terrarium setup, I’d love to have a pet slime mold. No joke.

What is a slime mold?

Basically speaking, slime molds are a group of eukaryotic organisms similar to amoebae that feed on microorganisms and do some pretty amazing things for simple-celled organisms. They can often be found in soils, forests, especially wetter ones, where they live on the microorganisms that are breaking down fallen logs and detritus on the forest floor. In gardens, you’ll find them in areas with heavy, woody mulches or high organic matter. (They also live in rain gutters if they’re full of leaves and also air conditioner units with poor drainage, FYI.) Most of the calls that we receive at the extension office are from suddenly finding slime mold in woodchip mulch. Usually after a large or extended rain event during the summer, and usually in thickly layered (several inches) mulch.

When food (microorganisms) is abundant, the majority of a slime molds, at least the ones in the “cellular slime mold” category live most of their lifecycle is as a single cell, imperceptible to humans. But when food becomes scarce is when the fun begins. In mulch, this can happen when the weather conditions (wet and hot) favor a slime mold population boom thanks to sexual reproduction and they eat themselves out of house and home. When that happens, the individual cells join together as a single body (one big cell blob with multiple nuclei), forming a visible and for many disconcerting presence in the landscape. Many of them look like actual slime and several look like webbed networks or neural structures.

Slime mold on mulch | Jody Green, UNL Extension @JodyBugsMeUNL

The most fun thing about slime mold, though, and the thing that I love about them is that THEY MOVE! Yep, you heard that right. These single-celled organisms, that stream together to form a single body, can chemically sense the presence of food in the nearby environment and will change shape (together) to move toward the food. And they’ll follow the food wherever it is – on the ground, up on a plant, into the canopy of a tree, etc. Scientists have demonstrated this by having slime molds solve mazes or even create designs, like the Tokyo subway system, in vitro. The trail of slime that it leaves in its path even relays a chemical signal that it uses to “remember” where it has been so it doesn’t backtrack or go the wrong direction.

Several of our concerned callers call because a slime mold has moved up onto one of their plants and they want to know if 1) it will kill their plant and 2) if it is toxic. Neither of which is the case. But most of our calls happen when our most common slime mold in the area moves onto its next phase of life – spore production.

You see, when environmental conditions change or the slime mold finds a good supply of food it is time to settle down for some good old-fashioned asexual reproduction. The shape and texture of the slime mold changes, usually becoming more pronounced and dryer looking as it produces sporangia that produces spores.

Slime mold life cycle | Wikimedia Commons

Callers often describe what looks like dog vomit in their landscape, and that’s where our common slime mold gets its name – the Dog Vomit Slime Mold (Fuligo septica).

Dog vomit slime mold | Peter Stevens, Flickr

Shortly after this phase, the collective body of the slime mold will dissipate. Spores will turn into new single-celled organisms that will repeat the process over again.

Can it be stopped or controlled?

First of all, why would you want to stop this fascinating phenomenon in your garden? (I’m kidding). Really, there’s nothing you can do as a control and there really isn’t a need to do so. As I stated earlier, slime molds do no harm to plants and aren’t dangerous for people or pets. If you just don’t like the look of it, you can reduce the likelihood of it popping up in your landscape by reducing the thickness of woodchip mulch (don’t let my GP colleague Linda hear me say that) or reduce irrigation if it is occurring outside of larger rain events.

Otherwise, just enjoy your pet! It won’t hang around for long. The visible, fascinating life of a slime mold is fleeting but exciting. Next time you see a slime mold, check it out! And keep an eye on it to see if it moves or if it progresses through its life cycle – maybe you’ll just develop an appreciation for them, too. And I’m not joking about pet slime molds, someone even wrote a guide to dog vomit slime mold pet care!

Haul out the Holly…and a cactus…and a parasite: A review of holiday plants and their traditions

Auntie Mame was on to something when she told her orphaned nephew Patrick to “Haul out the Holly, Put up the Tree Before My Spirit Falls Again” (I just sang this in a concert with my community chorus.  I’ve been hauling out the holly since August, so I’m done.) 

Plants play a big part in our holiday traditions this time of year.  When it comes to decorating for the holidays, needless to say I prefer a simpler, natural approach. The best inspiration — and materials — come from nature and sometimes from your very own landscape. It is no secret that the celebration of Christmas was timed by early church leaders to coincide with other ancient winter festivals that predate Christianity.  It made it easy to get everyone to join in the celebrations. 

Saturnalia was a Roman festival that celebrated Saturn, the deity of agriculture, and the harvest. Yule was a 12-day midwinter festival celebrated by Germanic pagans into which Pope Julius I inserted Christmas in AD 336 (there was no celebration of Christmas until then), giving rise to the 12-day Christmastide festival (or Yuletide, depending on where you are). The celebration of the winter solstice is also of pagan origin, a celebration of the darkest, or shortest, day of the year (in the Northern Hemisphere) and the rebirth of the sun.

Many of these festivals included the bringing of evergreens and natural elements indoors to celebrate the connection between humans and nature. They were a sign that life would return after the cold, harsh winter. And also a way to bring a little cheer indoors to brighten up the home during the cold, dreary winter. 

If you look at many of the more traditional elements of Christmas, you’ll notice their connection with nature, and specifically plants — evergreens, holly, amaryllis, poinsettias and more. Of course, the star of the show is the Christmas tree. Christmas trees as we know them didn’t debut until the 16th century in Germany.

A prickly holiday tradition

I’ve written about several holiday plant traditions over the years, each a different way to look at a plant that or plants that bring tradition and cheer into the home.  Perhaps the most popular of these articles is about one of the most recent additions to the holiday plant family – cacti.  The interest in this holiday plant is surging thanks to the interest in houseplants at the moment.  This is making an issue I pointed out several years ago in the article A Cactus by Any Other Name: A Case of Mistaken Holiday Cactus Identity about the mis-naming of cacti even more important.  There’s a Christmas cactus, but there’s also a Thanksgiving cactus (and an Easter one, too). 

Thanks to years of marketing and selling Thanksgiving cacti as Christmas cacti (since they bloom early enough for the Christmas shopping season and actual Christmas cactus bloom closer to Christmas), many people confuse the two.  This isn’t a big issue for the casual holiday plant shopper, but for those that “collect” the plants it can be an issue trying to sort out which is which.  For example, someone recently posted in a local plant group that they were looking for a Christmas cactus.  Half the responses were telling them where they could buy a Thanksgiving (more commonly called Zygo cactus after the zygomorphous shape of the flower) cactus and the other half were asking if they meant that they wanted a true Christmas cactus or a Thanksgiving cactus. 

As romantic as poop on a stick

As holiday plant traditions go, the hanging of mistletoe has to be both the most interesting and weirdest.  As tradition goes, if two people meet beneath the mistletoe they’re supposed to kiss.  How did kissing become associated with a toxic plant that parasitizes trees and whose name translated from the Anglo-Saxon means “poop on a stick” from the fact that the seeds are spread by bird droppings? 

Mistletoe: the romantic parasite (Source: Wikimedia commons)

As I shared in The Myth, the Legend, the Parasite: Romance, Lore, and Science beneath the Mistletoe, Norse legend has it that the goddess Frigga (Frig, or Fricka) made everything on earth promise to not hurt her beloved son Baldr, but she forgot to ask mistletoe since it was so small and innocent looking.  Baldur’s brother, the trickster Loki (you know, the one in all the movies these days) made a spear of mistletoe and that ended up killing Baldr. The white berries of mistletoe represent Frigga’s tears, and she decreed that the plant should represent love and that no harm should befall anyone standing below it.  And there you have it.

The flower that’s really just a bunch of overachieving leaves

Most recently, I shared a bit of history and lore around poinsettias, that common but prissy holiday plant that most people can’t keep alive more than a few weeks.  I mean, the original Aztec name for the plant, cuetlaxochitl (ket-la-sho-she), can be translated as meaning “flower that withers” or “mortal flower that perishes like all that is pure”, so the reputation fits. The actual flowers of the plant are the ugly little greenish-yellow bits in the center, which are highlighted by leaves, called bracts, that change colors to bright red (and more colors now) as the flowers develop.

The flower and the bright red represented a gift from the gods for the sacrifices that the Aztecs would make to them. You can read a bit about the history, and how to save them and get them to rebloom from year to year (if you dare) in my festive little ditty Poinsettias: from ditch weed to holiday super star (history, lore, and how to get those d@!% things to rebloom next year).  Of course, there’s been recent discussion on how the story of the poinsettia is similar to the pagan traditions associated with Christmas – a plant tradition of the Aztecs was changed as a way to fit with the Christmas story and work as a conversion tool. It is good to know a bit about the original tradition of the plant to understand its importance throughout history. 

Haul out the holly….and the magnolia….and the rhododendron…..

Holiday plant traditions don’t stop at those finicky plants we grow in greenhouses- the original traditions of Solstice and Yule consisted of bringing in all different types of plants for the season. Sometimes you have to look no farther than your yard to find natural elements fit for a holiday celebration. If you have evergreen trees or shrubs in your landscape, they can easily be incorporated into holiday arrangements indoors or out.

While you can readily purchase live Christmas greenery at many retailers and markets (except for this year, with all the supply issues going on), what you can harvest from your own yard or nearby woods (where permissible) will be much fresher and last much longer. Remember that harvesting branches from your own trees and shrubs is actually pruning them, so you can kill two birds with one stone.

Both white and Virginia pine make excellent decorating choices as they are long-lived and retain their needles well. Junipers, cedars and firs all have interesting foliage and wonderful evergreen scents. Junipers can sometimes be found with berries and cedars sometimes have tiny cones. Spruce is a great choice for wreaths, as it is bristly and holds its shape.

Decorating doesn’t have to be left to the needled evergreens, though. Holly is a classic choice, but mountain laurel, rhododendron, boxwood and magnolia and many others can provide beauty and elegance in holiday displays.

You don’t even need to stick with green things in your decorating, either. Attractive bare branches, plumes from ornamental grasses and other “brown” things can add contrast. Other natural items, such as fruits, nuts and pinecones can also be incorporated for color and interest.  Just take a look around your yard or neighborhood to find those natural elements to bring indoors.

To keep your greenery fresh, there are some basic tips that you can follow:

  • Use sharp pruners to make cuts, and keep the ends of branches in water until ready for use.
  • Soak evergreens in water overnight to absorb moisture and extend shelf life.
  • Keep arrangements in a cool location until use.
  • Keep evergreens out of sunlight to reduce moisture loss.
  • Use an anti-transpirant spray to keep in moisture.
  • Don’t decorate too early — live plants have a limited lifespan.
  • If purchasing plant materials, select healthy, green plants and flexible needles/leaves.

Poinsettias: from ditch weed to holiday super star (history, lore, and how to get those d@!% things to rebloom next year)

The holiday season creeps earlier and earlier each year, at least here in the US. Decorations, trinkets, and more start filling store shelves before summer is even over. But some holiday traditions can’t be rushed, like live holiday plants. Many of these picky plants have to be bought and cared for closer to the holidays, else they likely won’t look so festive once the holiday finally arrives. Since the origins of many of the holiday traditions are pagan and druid in nature, it stands to reason that plants are a major theme for the holidays. I’ve written before about the origins of using the plant parasite mistletoe as a holiday decoration and invitation for lip locking. And also about how what most people call a Christmas cactus is actually a Thanksgiving cactus and they are actually two different things (and there’s also a Spring/Easter cactus as well. We have amaryllis, paperwhites, cyclamen, Norfolk Island pines, pine-shaped rosemary plants, and more that make up our usual holiday decor. But none are so vibrant and indicative of the holiday as the poinsettia. So let’s talk a little about the history and lore of this plant and also about how day length affects its colorful holiday display. Just in case you want to try saving one from year to year.

Poinsettias take center stage as a 25 ft tall tree at Lauritzen Gardens in Omaha, NE each holiday season.

What is a poinsettia, anyway? It doesn’t really look like other plants.

This plant is a standout in the mostly weed-filled and much-maligned spurge family Euphorbiaceae. This family includes lots of different plants that take on a variety of forms. It does include many weeds, but also many houseplants that have much more of a cactus form than poinsettia.  Relatives you might find as houseplants include a cactus-like plant with leaves on its margins (mainly just called Euphorbia), a plant called crown of thorns and a sticklike plant called pencil cactus. It is a weird family. Most of them do have a sap that can cause dermatitis in the skin or a stomach ache if ingested. But poinsettia has earned an incorrect reputation as being poisonous and a plant to steer clear of if you have kids or pets. Sure, ingestion might cause a tummy ache and associated symptoms, but the amount of poinsettia one would have to eat to actually have life-threatening symptoms is astronomical.

These ugly bits in the center are the actual flowers of the poinsettia.

While we enjoy poinsettias for their bright colors, it would be incorrect to say that poinsettias have large, colorful blooms. The colors that we see are called bracts — brightly colored leaves.  These bracts change color much the same way leaves change color in the fall: They lose their green chlorophyll to expose the color beneath. This happens when the flowers, those ugly little yellowish lumps in the middle of the bract, mature.  

While the classic red poinsettia (pronounced poin-SEH-tee-uh, not poin-SEH-tuh, by the way) lends itself to the classic colors of Christmas, it might be hard to figure out how this weed from Mexico found its way to the top of the list of traditional holiday plants. After all, it is a much more recent addition to the holiday decoration arsenal than the evergreens borrowed from ancient pagan rituals. And while we most often think of red poinsettias, there are hundreds and thousands of different cultivars and colors – and we’ve even taken to spraying them with dye and glitter (shudder).

Poinsettias these days come in all shapes and sizes and colors.

Poinsettias are famous for having a difficult blooming process. The plants are considered short day plants, thought the more accurate description would be a long night plant. This means that in order to set blooms, the plant needs a few weeks where it receives at least 12, and preferably 16, hours of uninterrupted darkness each night. This creates physiological and chemical cues that allow for development of floral structures, which in turn result in development of the colorful bracts. Even a few seconds of light in the middle of the night can stop, interrupt, or delay the process. This often makes saving poinsettias from year to year difficult, and can even make it difficult for commercial growers to provide darkness in our ever (artificially) brighter night sky.

How did a weed get associated with Christmas?

The poinsettia (Euphorbia pulcherrima) is a native plant (and can grow as a fairly large shrub or tree) in Mexico. The original name used for the plant, prior to Americanization, was cuetlaxochitl.  I’ve seen them in several places around the world, including one as big as a tree in Kigali, Rwanda (other Euphorbia, like the pencil cactus also grow there). A local Mexican legend from the 14th century explains that a young girl on her way to Christmas Eve mass was upset that she had no gift for the baby Jesus and picked a handful of weeds on her way to church.  As she placed the humble bundle of weeds on the altar, they erupted into brilliant red, and all those around exclaimed that it was a Christmas miracle.

Aside from the miracle legend associated with the flower, there are other connections between the plant and the holidays. The traditional red of the poinsettia is cited by many as a representation of a blood sacrifice and the shape of the flower as the Star of Bethlehem.  Before poinsettias became a worldwide symbol of the holidays, Franciscan friars included the vivid plants in Christmas celebrations in the 17th century.  In Mexico, the plant is also known as Flor de Nochebuena, or Holy Night (Christmas Eve) Flower.

From ditchweed to international holiday superstar

The poinsettia really didn’t come into its current fame until it was introduced to the United States in 1825, at the hands of a politician.  It just so happened that the first U.S. minister to Mexico (this was before we had ambassadors) was an amateur botanist. He brought the plant back to his private hothouses in South Carolina, and then shared it with friends (including renowned botanist John Bartram) who introduced the plant to the nursery trade.  It filled an empty spot in the nursery calendar, so nurseries were quick to embrace the plant.

This is the guy who brought you the poinsettia, and so much more.

The plant quickly was renamed Poinsettia (it was originally sold under its botanical name) in honor of the man who brought it to the country — Joel Roberts Poinsett.  His contribution to the plant’s history and the nursery business in the U.S. was honored by Congress, which has declared Dec. 12 National Poinsettia Day. A date which, oddly, commemorates the date of Minister Poinsett’s death.

Aside from his botanical triumph and service as minister to Mexico, Poinsett was also an “agent” to Chile and Argentina, a state representative, a member of the U.S. House of Representatives and secretary of war.  Most people would be surprised to learn that the man who brought you the poinsettia also oversaw the removal of Cherokees from North Carolina to Indian Territory in 1838 and the military during the second Seminole War. But he was also involved in the Columbian Institute for the Promotion of Arts and Sciences and a co-founder of the National Institute for the Promotion of the Sciences and Useful Arts.

This national institute, composed of politicians, promoted the use of the Smithson bequest to form a national museum. While they were defeated in their efforts, the institute went on to become part of the result of the Smithson bequest — the Smithsonian Institution.

The poinsettia didn’t become common holiday fair for the general masses until Paul Ecke Sr., a German immigrant living in California started growing them on a large scale. Ecke and family were also responsible for breeding poinsettias, turning them in to a weedy plant in to the more robust, bushy form we see today. While the Ecke family has moved a lot of production overseas, they are still responsible for 70% of the poinsettias sold in the US and nearly half of all poinsettias sold worldwide.

Paul Ecke Sr, the Poinsettia King
(1895-1991)

So, how can I save my poinsettia and get it to rebloom next year?

In theory, this is pretty simple, but as GP alum Holly Scoggins points out it can be difficult to keep these plants happy and healthy, let alone get them to rebloom so that the bracts will color up.

But if you do want to save your poinsettia from year to year, here’s how to do it:

  1. Keep your poinsettia in a bright but cool spot to keep it colorful longer. When the leaves start to yellow, or you are done with it for the season, slowly reduce watering until it loses all leaves (and colorful bracts, which will be last to go) and goes dormant.
  2. Store the plant in a cool (50-60 F), dry, and dark area. Keep the soil on the dry side, but water just enough to keep the stems from drying out.
  3. After the danger of frost has passed, or in April or May (if you don’t have frost), remove the plant from storage and repot. Use a good quality and light soil mix – poinsettias do not do well with heavy soils. And it turns out that since poinsettias are typically sold as disposable plants, the soil they come in is crap (even high end houseplants these days come in cheap, crappy soil). Practice root washing to remove all the old soil and pot up to a larger size if the plant seems root bound.
  4. Place the plant outside if possible after the danger of frost has passed, or grow in a bright, sunny window. Keep humid, well watered, and fertilized throughout the growing season.
  5. As the danger of frost approaches, move the plant indoors in a bright, sunny window (if it isn’t kept indoors). Ideal temperatures are 75F during the day and 60-65F during the night.
  6. In late September or early October, move the plant to an area that receives no light at night, even from outdoor street lights. The easiest way to provide exact light and dark needs would be in a dark room with lights on a timer. Provide no fewer than 12, and preferably 14-16 hours of uninterrupted darkness and 8-12 hours of light per day. Alternately, you can move the plant to a dark room or closet for its dark period.
  7. After flowers begin to form and bracts start to change color, move to a preferred place in the home for the holidays. Continue to keep the plant well watered, and regularly fertilized through the holiday season.
  8. Rinse and repeat, if desired.

Sources:

NMSU Extension – Poinsettias: Year after Year

Ambius – The long, strange tale of the poinsettia

UMN Extension – Growing and caring for poinsettias

Investors.com: Paul Ecke Sr: ‘Poinsettia King’ Cultivated a Holiday Tradition

A Super Simple Salad in Stor(age): A DIY Home Hydroponics Example

Say the word “hydroponics” or the even more mysterious sounding “controlled environment agriculture” and the image that most people conjure in their minds is of large greenhouses or artificially lit rooms filled with complex hoses and tubes using all manner of technological gizmos to pump water and nutrients to plants.  True, modern ag technology does allow for some pretty amazing and technical production of food but hydroponics can be super simple and so easy that just about any home gardener can do it. 

Why grow hydroponically at home?

Growing vegetables can be pretty easy and straightforward for outdoor production – seeds, soil, water, and wait (sure, there’s a few other steps in there), so why complicate things by growing hydroponically?  Aside from the challenge and the novelty that delights many gardeners, intensive growing with hydroponics can allow gardeners with the smallest of spaces to grow impressive amounts of produce in a short amount of time.  Most of these systems also do well for winter production indoors with the use of grow lights or some good-sized south facing windows.

Hydroponic or similar-type production systems are the “craze” right now for folks wanting to grow some of their own produce at home, usually in smaller indoor spaces, but these systems can run into the hundreds or thousands of dollars making production less than economical.  Plus, most of these systems require the use of pre-made plant/seed plugs that add to the expense.

Why is hydroponic production important?

On a larger scale, hydroponic and controlled environment agriculture has a few benefits that will help in feeding a growing population on a warming planet.  Hydroponic production can be pretty intensive, meaning that it can grow a large amount of food in a relatively small amount of space.  This makes it ideal for production in urban areas, which is important as most countries become more urbanized.  It also cuts down on transportation needs to get food to consumers. This not only reduces fuel consumption but also, as we can see, makes it easier to get food to large populations when distribution becomes an issue.  And as the term “controlled environment agriculture” implies crops can be grown using hydroponics in greenhouses or indoor farms no matter what the season or climate making it ideal for year-round production in areas where it is too cold or too hot part of the year to do so.  This also means that hydroponics and controlled environment agriculture can be important mitigation strategies for climate change. When the temperatures or precipitation are no longer favorable for growing outdoor crops in certain areas, controlled environment ag can provide a stable source of produce with indoor production. 

And as ironic as it sounds, growing hydroponically drastically reduces the amount of water used for production.  Closed systems, which either recirculate water or grow in enclosed containers, use much less water than field production systems relying on irrigation.

A simple system example

Earlier this year I build some super simple enclosed hydroponic systems for demonstration at our Extension office and at the county fair.  My goal was to show how easy hydroponic production can be – no need for pumps, tubes, or expensive equipment.  The system was so simple that I built it with my non-horticultural interns as an onboarding/team building exercise. 

The system we built utilizes the Kratky method of hydroponic production – a simple system where the plant is suspended on top of a container full of nutrient solution.  In a typical recirculating hydroponic system where water is moved around air is introduced into the water that then provides oxygen to the roots to avoid hypoxic conditions that damage roots.  Some static systems rely on introducing air (like using aquarium air stones) to introduce oxygen but the Kratky method is even simpler than that.  Instead of introducing air into the solution, the level of the solution is reduced (usually through use and evaporation) as the roots grow keeping a section of roots exposed to open air.  The setup is super simple and low maintenance – no moving parts, no electricity (unless I need to use lights for indoors). Just plants, a medium to hold them, a container and a nutrient solution.

How To Start Growing With The Kratky Method - Upstart University
The Kratky Method, Source

I’ve seen the systems made with all kinds of containers but we chose 25 gallon storage totes because they are inexpensive and pretty easy to come by.  Having a lid that is relatively easy to cut/drill also makes these kinds of containers ideal to make multi-plant “beds” but I’ve also seen lidded buckets used as a single-plant system. 

To hold the plants we used plastic net pots that you can find at garden centers that sell pond or aquarium plants (or order) that are also now common at hydroponic supply stores, if you’re lucky enough to have one in town.  You can also use plastic orchid pots or standard nursery pots, perhaps adding extra holes for roots to grow out.  We used 6 inch and 2 inch pots to plant a variety of sizes.

Net pots in the system, with holes made slightly smaller for them to fit and not fall in.

Next we cut holes in the lid slightly smaller than the diameter of the pots so that they sit on top and don’t fall through.  You can do this by tracing and cutting with a sharp object, or use a drywall hole saw that you use with a drill to cut a perfectly round hole. We used one with adjustable sizes, rather than buying individual sizes. 

And now, to plant!

The pots were then filled with an inert, soil-less medium to support the plants.  We used a puffed clay stone called LECA, but you can use rockwool or hemp fiber blocks made for hydroponic starts, large particle perlite, or even something like a poly fiber filling (like used in sewing) – just something that won’t break down to hold the plants in place. 

Some of the plants I had started in fiber cubes so those easily went into the LECA, but we did end up buying a few transplants.  Since these were started in some sort of potting soil we had to wash as much of the soil off as we could.  We placed larger plants like peppers and kale in the large pots and smaller plants like herbs in the small pots. 

As for plant selection, leafy greens and herbs like basil and parsley are easiest and can use smaller containers and pots. Plants like tomatoes and peppers will need bigger containers and pots and will also require more light and heat if you are growing them indoors.

A solution for easy nutrient solutions

And last but not least – the nutrient solution.  Since we are growing without soil we have to provide basically all macro and micro nutrients. We are used to supplying nutrients like nitrogen and phosphorous, but not so used to supplying things like manganese and molybdenum. This one is probably the scariest to those new to hydroponics, but there are some easy options out there for small scale production that are “off the shelf” solutions.  Rather than worry about mixing up nutrients by hand, these pre-made mixes make it easy for home growers to try hydroponics.  They come in two or three part sets of either liquid or solid fertilizers, because some of the chemicals used will react and precipitate out into a sludge if kept together in concentrated form.  Just mix according to package directions and you’re good to go.  If you are growing anything like tomatoes or peppers that require flowering and fruiting, you’ll want to make sure the formula is for flowering plants. Regular water-soluble fertilizers might do in a pinch, but for long term growth you’ll want to invest in something with all micronutrients. 

Storage tote hydroponic system, sitting in the office courtyard.

If you’re planning on refining your technique, you might want to invest in a pH meter or TDS (total dissolved solids) meter to fine tune the solution based on the minerals dissolved in your water.  And if you have really hard water you can usually get an additional nutrient product to account for the pH and calcium levels to balance things out. 

So now we just filled the totes with the solution all the way up until the bottom few inches of the pots were covered.  We kept watch on the solution and added water as needed, keeping in mind that as the roots grow out of the pot the nutrient solution level needed to be low enough to expose around 2/3 of the roots to air. 

The nutrient solution is only a few inches deep in the bottom of the tote at this time, allowing roots to be exposed to air for oxygen uptake.

As the plants grow, you’ll just want to keep an eye for signs of nutrient deficiency and add nutrients to the water as needed.  The solution should be completely dumped and replaced every 6-8 weeks, as the plants rapidly deplete some nutrients, allowing some to build up to toxic levels.  You can typically just pour the solution out on the garden or lawn, as it only contains plant nutrients. However, you’ll want to make sure not to keep dumping in the same spot to avoid build up of salts in the area. Spraying the area with a bit of water from the hose can help wash it off of plants and start diluting it into the soil, rain and weather should do the rest of the job. But if you are in an area with little precipitation, you may also want to take care since there won’t be a lot of water to dilute the nutrient build up over time. And just remember, if you harvest and completely remove crops, pull apart and clean the system with some good soapy water and a sanitizer (bleach works well).  You should do this every few months if you have a long-lived crop in the system. 

In a nutshell…..

A simple system like this one can be a great way to explore a new growing technique, even for beginner gardeners.  After these were set up, we basically left them in our courtyard all summer with little to no maintenance, except adding water earlier in the season and changing out the nutrient solution once.  If you need a bit more info, or want to try something a little more complex, there are some great resources out there for small systems that I’ll share below.   

Resources:

Growing Lettuce in Small Hydroponic Systems – Univ of FL Extension

How to grow with the Kratky Method – Upstart Farms

Small-scale hydroponics – Univ of Minn Extension

Home Hydroponics – Illinois Extension

Everything is chemicals: the myth and fear of “chemical-free” gardening

“Chemical-free” – a term I’ve seen several times attributed to many products, especially food and produce at farmers markets and even in gardening circles these days.  This term is often misused to describe plants grown without the use of any pesticide, either conventional or organic. I have my thoughts that I’ll share later on that subject but first let’s talk about this “chemical-free” that gardeners, farmers, and others use and why its not only a myth, but a dangerous one at that.

Ain’t such a thing as “chemical-free” anything

At face value, the term “chemical-free” would literally mean that whatever the label is applied to contains no chemicals.  That the entire item, whether it be animal, vegetable, or mineral is devoid of any and all chemicals.  Factually this can never, ever be true.  Everything that exists is made of chemicals.  Oxygen, water, carbon dioxide, and any simple molecule, by definition, is a chemical.  Plants and animals are organized structures filled with complex chemicals.  Even you and I, as humans, are walking, talking bags of chemicals.  The air we breathe, the food we eat, and the water we drink are all composed of a great mixture of chemicals.  The use of the term “chemical-free” to describe anything is uninformed at best, and intellectually dishonest at worst. But a bigger problem, as we’ll discuss later, is that using the term can cause confusion and even fear of things as simple as food and as complex as science and medicine. 

Expert reveals how even natural foods contain chemicals | Daily Mail Online
The “ingredient list” of a peach.
Source

What most people intend to say when they use the term “chemical-free” in relation to plants or produce is that they are produced without use of pesticides or conventional “chemical” fertilizers.  Therefore, a better term to use would be “pesticide-free” instead of “chemical-free” as it more accurately represents the situation.  Many may ask why the term “organic” or “organically grown” couldn’t also be used to describe “pesticide-free” plants.  And while those terms would be accurate, organic production can involve the use of organic pesticides that are derived from natural sources such as plants, bacteria, or natural minerals.  Natural sources of fertility for plants, such as composts and even soil itself, are all composed of a myriad of chemical substances.  Plants don’t differentiate between the chemicals they uptake from compost or soil and those from fertilizers.  To plants, nitrogen is nitrogen and phosphorous is phosphorous no matter where it comes from.

For some clarification on what different growing and production terms like these mean, check out this lecture I gave for the Oregon Farmers Market Association earlier this year.

While many have a strong opinion on the use of pesticides and fertilizers, I’ll state here that the use of any pesticide, organic or conventional, must follow the label on the container by law. And the use of any pesticide according to the label instructions means that the use of that pesticide should present a minimal risk to the health of the applicator, consumer, off-target species, and the environment.  And don’t use any home remedy recipes or products that aren’t labeled (or at least scientifically researched) for use as a pesticide.  In most cases these remedies aren’t effective, in some cases they can be more dangerous to human health or the environment than the pesticide they are trying to replace.  And applying them as a pesticide could also be illegal. 

Reading Pesticide Labels - Pests in the Urban Landscape - ANR Blogs
Pesticide label signal words that denote relative toxicity of a given pesticide.

Any gardener or producer, whether they use pesticides or not, should also be practicing Integrated Pest Management (IPM) to decrease or mitigate the effects of insect and disease pests on their plants.  For those using pesticides, use of the least toxic pesticide that offers control of the problem should be the last step in a series of steps to avoid damage from pests after a threshold of damage has been reached.  For those who don’t use pesticides, IPM should be a central practice in their gardening or farming practice.  Unfortunately, the tradeoff for not using pesticides is often time and labor, so successful “pesticide-free” growing often involves more work (and for produce at the market or grocery store, a higher price).  I have seen some gardeners and farmers who don’t use pesticides and don’t make an effort to practice IPM, taking whatever plants or produce mother nature and her children deal them.  I’ve sometimes referred to this type of growing as “organic by neglect” as I see insect and disease riddled produce harvested and even sold at local farmers markets.

Why does it matter?

“So what if I use the term ‘chemical-free’?  It doesn’t hurt anyone,” you may say.  While this may seem the case, the use of the term “chemical-free” has risen as a result of what many call chemophobia, effects that reach far beyond the garden or the farmers market.  This kind of thinking leads to the incorrect notion that all “natural” remedies are safe and all “synthetic” remedies are dangerous.  True, many chemicals do pose a risk to human, plant, animal, and environmental health but many do not.  Just like not all natural substances are safe.  Poison ivy, anthrax, botulinum, and cyanide are all natural and cause everything from a skin rash to instant death (sometimes I get poison ivy so bad I wish for instant death).

This chemophobia can lead to, or is a symptom of, a broader mistrust of science, the scientific process, and modern medicine that has developed in society in the last few decades.  Many attribute this to an anti-intellectual or anti-science stance in society resulting from mistrust or political saber-rattling against universities, education in general, science/scientists, “big Pharma”, “big Agriculture”, and others.  As a result, the news is filled with people who eschew well-researched scientific advances that have been proven safe and instead turn to home remedies that have no such guarantee of either effectiveness or safety.  The results can be worse than the effects of the proven advance the person was trying to avoid. 

While the outcomes of “chemical free” gardening might not have such dire consequences as immediate death, the misuse of such terms can feed into a cycle of anti-science cause and effect, serving as both a cause and a symptom of mistrust of science and the scientific process.  While everyone has a right to choose whether or not they use pesticides (or any other scientific advancement), making such decisions from a place of knowledge instead of fear is paramount for success and continued advancement. 

Sources and further reading:

https://www.columbiasciencereview.com/blog/debunking-the-myth-of-100-chemical-free-slogans

https://www.sciencedirect.com/science/article/pii/S0278691520302787

https://www.canr.msu.edu/news/chemophobia-fearing-chemicals

https://www.businessinsider.com/what-chemicals-are-in-an-all-natural-banana-2017-6