Extremes

Extremes

On September 06, 2020, it was 122F in my yard in Ojai, California. A new all time high never before recorded in Ojai, Ca.

Here in California we had an extreme heat event on September 6, 2020. In my yard temperatures peaked at 120 degrees F. This also happened back in 2018 earlier in the summer where we reached a similar peak temperature. It is not supposed to get to be 120 degrees F. in Ojai. This year new high temperature records were set all over southern California for the month of September. Following these heat extremes, wildfires have spread from border to border (Canada to Mexico) in western states. As we suffer through heat and flames here in Western US states, we are also now told that this is a la Nina year so Southern California will continue with drought conditions into 2021. Extremes in climate bring hot dry weather to the Western United States and hurricanes and drenching rains to the eastern United States. Plants in landscapes may or may not be adapted to these extremes.

Damage from September 6, 2020 heat day showing damage to foliage on the tree on the right; a native Coast Live Oak (Quercus agrifolia), but not on the non-native Peruvian Pepper (Schinus mole).

My poster child heat monitor is the coast live oak, Quercus agrifolia. When temperatures exceed triple digits >110F, foliage on this native oak turn brown and burn on the south exposed canopies. They are not adapted to these record temperatures. This can be evidenced by looking at the damage throughout many California communities. Coincidentally other non-native plants are better adapted to high temperatures. The California pepper or Peruvian Pepper (Schinus mole) does fine in 120F weather with no irrigation. Eucalyptus of several species also have tolerated these increased temperatures. Trees that are drought stressed from lack of irrigation after a long dry summer will sunburn more severely than the same plants under consistent irrigation. If you see this kind of damage, its best to leave it alone until the plant responds by growing new shoots.

Damage to the tender new growth and leaves of Cherimoya. Sunburn symptoms usually show in the middle of leaves.

While study of “climate ready” trees is giving us tree selection options for hotter climates, the research is still new and we have many other species to consider beyond what has been recently reported. Of the species I have in Ventura County few of our study trees showed any damage from the extreme heat, and only the very youngest leaves were damaged on western hackberry and Catalina Cherry. Pistache, Island Oak, Palo Blanco, Tecate cypress, Arizona madrone, and Ghost Gum were not affected by triple digit weather this September. Other ornamental species that were damaged all over Southern California include the following: Avocado, Camphor, Privet, Magnolia, Coast Live Oak, Sycamore (especially the native Platanus racemosa), loquat and ornamental plum.

It our recent heat damage surveys I have observed that Coast Live Oak and Western Sycamore, two native trees that enjoy widespread tree ordinance protections were consistently damaged by our hot day early this month. If we continue to have extreme hot days, poorly adapted native trees will be injured more frequently, and possibly become more susceptible to damaging insects or native pathogens. This tends to restrict the range of natives to areas they are still adapted to growing in or grow into a new region where they are more successful. A time may come when a native tree is not the best choice for your area.

McPherson E.G., Berry, A.M., van Doorn, N.S., Downer, J, Hartin, J., Haver, D., and E. Teach. 2020. Climate-Ready Tree Study: Update for Southern California Communities. Western Arborist 45:12-18.

A time to deadhead!

Summer is here in the west in a big way. We are just coming off of one of the largest heat waves ever recorded, and while temperatures are down they are not done. Its hot. Depending on where you live your gardens may have suffered. In the East Hurricanes are starting and extreme rains are occurring. I have images of bent over palm trees in Florida. No matter the season, plants respond with their own growth stages providing they are not blow away or burnt up by raging wildfires. Here in Arizona we have had moderately hot weather in my location but the garden is surviving with irrigation. My Iris plants remind me that it is long past time to deadhead and remove spent flower stalks. Deadheading is second nature to most gardeners and other than making the garden look better, you may not realize why you have or have not adopted this common garden practice.

Deadheading involves removing the spent flowers or inflorescences have withered.  Sometimes pruning back to a lower leaf or adventitious bud in the case of roses, or completely removing flower stalks in the case of German Iris is required.   The immediate result is a neater looking garden and an emphasis on remaining blooms. When the dead flowers are gone the remaining flowers look better the garden is refreshed. Depending on the plant there can be other benefits if deadheading is done consistently and is well timed.

This portion of the flower garden needed deaheading weeks ago. Even though I won’t advantage the plants by deadheading it will look better if I do.

We grow many kinds of plants in our gardens and deadheading has varied physiological impact depending on the subject being pruned. Properly timed, deadheading can extend the bloom of some plants for example Calendula.  However, Calendula produces lots of flowers and removing spent flowers can become an enduring task if you have a lot of Calendulas.  Deadheading some garden plants seems pointless such as impatiens which just regenerates flowers on its own. Deadheading soon after a flower passes prevents the plant from investing energy in seed development. If the plant has a long enough bloom cycle, so that energy can be put into other flowers then trimming back the flowering stem stems that are destined to fruit production often releases other buds to grow more flowers. Since photosynthate (sugars) flows in plants on a source-sink model, taking away the “sink” or developing fruit allows  energy to be used for growth elsewhere in the plant. The trick is to remove spent flowers soon because seed begins to form immediately after flowering and the plant will rapidly allocate its energy to reproduction once the flowers are pollinated.

with dead heads removed this corner of the garden looks a bit better

Not all garden plants respond to deadheading–the number of flowers some plants present is genetically regulated and dead flower removal does not promote more flowering (many bulbs produce only one set of flowers). Other garden plants will re-bloom if given a chance, and with deadheading (no matter what the flowering habit) the garden will look better without the dead flowers. Some bulbs can be deadheaded to prevent seed formation so that the energy is put back into the bulb or bulblets for next year’s display. Many roses will re-bloom after deadheading. This is not a wild-type characteristic of roses but a quality that has been selected for after years of plant breeding.

Deadheading can also be an excellent method of excluding diseases. Botrytis on rose blossoms and petal blight on Camellia are both controlled to some degree by removing infected blooms as soon as they are observed and disposing of them away from the garden.

This bag contains Penstemon with ripe seed heads ready for harvest and seeds for planting somewhere else in the garden.

Sometimes deadheading results in seed collection. Left too long, some plants go to seed but have not yet released their seed. If you want to save seed for propagation, strategic deadheading will allow you to collect seed while redirecting the plants growth patterns for more vegetation or more flower shoots. It is also helpful with our more ruderal garden friends to remove flower stalks to prevent their reproduction and taking over of smaller garden spaces that endure frequent cultivation or soil disturbance. Some plants are desirable but their progeny are a bother….

Terrariums

Glass bowls make excellent closed terrariums. This one has been planted for about three years. Episcia cupreata. and Begonia luzonensis dominate this planting.

Terrariums are are contained environments that allow culture of plants. They take many sizes, shapes and dimensions and can be sealed or open. At the least terrariums are just plants in a bottle, in their highest form they are cultivated landscapes in miniature. Closed terraria create a unique environment and opportunity for plant growth. The transparent walls of the container allow for both heat and light to enter the terrarium while maintaining high relative humidity and preventing system water loss. Sealed containers combine retained moisture and heat which allows for the creation of a small scale water cycle. This happens because moisture from both the soil and plants evaporates in the elevated temperatures inside the terrarium. Water vapor then condenses on the container walls and eventually drips back onto plants and soil below. A sealed terrarium is ideal for growing some kinds of plants due to the constant supply of water, thereby preventing them from becoming dry. Lowland jungle plants from warm climates will do well. Some cloud forest plants, orchids and bromeliads will not fare well in sealed environments because they require more air movement and/or cooler temperatures. Terrarium culture can allow growth of plants difficult to cultivate even in greenhouses. Terrariums can be displayed to great effect and are an easy method of indoor gardening. Success with a terrarium garden requires an understanding of the container, light, media, and the plants themselves.

My favorite terrarium fern Lemmaphyllum microphyllum (center). On the very bottom is the vining Peperomia prostrata and at the top is a runner of Ficus minima ‘Quercifolia’.

A Word about the Plants
A contained environment is not for all plants. When in a sealed environment, certain plants such as cacti or succulents will grow poorly or in a manner not suited to their habit (lanky or etiolated growth). Problems arise when plants not suited to a small contained environment are used. Plants such as Syngonium, Diffenbachia, and the larger Peperomia spp. look good when planted initially, but will soon outgrow their space–they are not suitable for closed terrariums. The classical “florist” terrarium planted with very young houseplants looks good at first but is completely unsustainable for months or years. A well designed terrarium should grow for multiple years before a complete tear down and replant is necessary. Thus it is necessary to select truly miniature and high-humidity-loving plants for closed terrarium culture. Ferns, sellaginellas, gesneriads, begonias and some peperomias are suited for these conditions. Obtaining truly miniature and humidity loving plants is difficult. Online vendors are the most accessible sources, but also other hobbyists or plant societies can be sources at their annual sales. Nurseries carry some of these plants but the vast array and diversity of rare plants are found on Ebay and Etsy. Many nurseries list plants under the ‘terrarium plants’ search words that are not really suitable, so take care to look for truly small or miniature plants. Perhaps start with the list I have provided at the end of this article for some of the tried and true plants that will work well. Terrarium gardens are not sustainable if you make bad plant choices, you will eventually end up removing plants that outgrow their containers.

The Container
Once you have your plants, you are ready to start. Or you can start before getting your plants and set up your terrarium now to plant later, or in stages, as you acquire new specimens to add into your contained garden. The first consideration is a suitable container. The larger the container the easier it will be to plant, grow and maintain your garden. Larger containers will also allow for a greater diversity of plant types. Fish aquariums may not be the most attractive, but are the most practical in many ways. Because they are rectangular they allow for placement of a light on the lid and they are easy to cover and place on square surfaces such as tables or window sills. Glass containers are preferred over plastic because they maintain transparency better over time. While bottles are attractive, if you can not get your hand inside they can be very difficult to plant and maintain.

Small containers are not optimal but if the plants are small, they can work well. This sundew has been in this container almost for a year

The Media
Lowland, humid jungle plants grow in decomposing organic matter. For our purposes peatmoss is the best medium. It can be amended with fine horticultural perlite (20-30%) or sand. Sand will make a heavier mix, and, if you are doing a large terrarium, mix weight is important. If not, sand is ideal. Also, since terrariums are contained, they may become disease gardens if you are not careful. Therefore I recommend sanitizing your media in a microwave until the media temperature exceeds 160F. Keep the bag closed until the media cools. A turkey roasting or other microwave safe bag works well. Media can be sanitized in a conventional oven–it just takes longer. Media should be moist but not wet when microwaved. Distilled water can be added later to moisten the media after planting. Commercial mixes can be used for terrarium media but care should be taken. Search the blog for my article on potting soils.

Since terraria are sealed environments, you need a reservoir for the water and a filter. Create the reservoir with coarse horticultural perlite (#3) up to an inch thick (the bottom most layer) depending on size of the container –the bigger container, the thicker the layer. Cover the perlite with activated charcoal. Fish aquarium charcoal or horticultural charcoal from the nursery is fine, but NOT charcoal briquettes. The charcoal layer just covers the perlite. Now add soil. Slope the soil from thin in the front to thicker in the back. You can also add wood, sticks, and rocks to make interesting landscapes. They should all be sanitized in the dishwasher or boiled or microwaved until sterile. After placement of soil, rocks and sticks are ready to plant. Place larger growing plants in the center and rear and small vines up front.
Your container should be sealed either with “cling tight” plastic wrap or glass. I prefer glass for most applications.

Light
While terraria can grow in window light, especially north light, it is not optimal for most plants and they will grow slowly. You can’t place terraria in direct sunlight or the plants will “cook” because closed terraria can’t dissipate heat that rapidly. The old standard for light sources is fluorescent tube fixtures, but they have been supplanted by Light Emitting Diode (LED) technology. Grow-light LED fixtures are expensive, but provide some performance differences. Terrariums are not crops and we don’t want them to grow too fast so find an affordable light source that works for you. LED sources are nice because they are not bulky and do not add large amounts of heat. A bit less light or less optimal wavelengths of light are ok because we want to sustain plant growth for a long time, not grow the plants to the edge of the container real fast and have to prune or start over. The Costco brand shoplight LED fixture is perfect, but it is four feet long. Smaller LED fixtures would be appropriate for smaller containers. The Costco fixture is perfect for a 60 gallon fish tank. White light works well and looks best. Red and blue LED fixtures change the way we see the plants and are not best for viewing. Light should come from above so plants will appear to be growing normally. If the terrarium is placed near a window it will need to be rotated to keep plant growth even.

Moisture
Moisture is critical in terraria. The growing medium should hold a shape when squeezed but not be saturated when you plant. After the terrarium is planted, you can “water it in” with a dilute -1/4-strength fertilizer solution mixed into distilled water. Watering amounts will vary by container size. Water should penetrate soil to the depth of roots and some should enter the reservoir. No more watering is necessary again until some time later when plants have grown considerably—usually months later. I usually water the glass to clean it from the initial planting with a turkey baster. At some point in the future, months not weeks, the soil may dry as growing plants use up water. When this occurs, water again with another dilute fertilizer solution. Do not over water your terrarium or bad things will happen. Also resist misting or spritzing as this will cause leaves to rot and is not necessary in a sealed environment.

Pruning, Replanting and Maintenance
Some of your chosen plants may outgrow their space. Some like Ficus minima ‘quercifolia’ will just overgrow everything, the same can happen with common Sellaginella sold in nurseries such as S. brownii. You should plan on pruning back the plants and making cuttings or planting other terrariums with the prunings. Cut begonias below a node or along the rhizome. Rhizomatous ferns can be clipped or dug and planted elsewhere. If you have to remove a really big plant it will leave a hole. New sterilized mix should be added to fill the hole along with the new plant occupant. Removal of flowers, mushrooms (should they form) and dying leaves is important. They will cause rots on plants they fall on. Sticks are usually always a problem since it is very difficult to kill mushroom fungi living in them. Mushrooms are mostly non-toxic to plants, but they drop spores and these lead to rot on sensitive begonias and ferns. Clip back Begonia, Episcia Sellaginella, Peperomia or Ficus to prevent them from overgrowing other plants.

Recommended Plant List
If you can find them, here are some recommended plants for terrariums.
Begonias
B. prismatocarpa
B. prismataocarpa variegata
B. versacolor
B. ‘Raja’
B. ficicola
B. exotica
Ferns
Edanoya spp.
Humata parvula
Lemmaphyllum microphyllum
Microgramma spp.
Pecluma pectinata
Tectaria spp.
Quercifelix zelanica
Others
Peperomia prostrata
Sininngia pusila and all its variants
Episcia spp. (there are many, I like the pink ones)
Saintpaulia (african violets-only miniatures)
Sellaginella erythropus
Sellaginella spp. (there are many kinds, S. brownii is most common)
Ficus minima ‘quercifolia’

Summertime pruning

Summer is a time of bounty in the home garden. During June, July and August the majority of small fruits ripen on home orchard trees. Plant health care is important to consider in advance of summer bounty. Careful dormant season pruning, dormant sprays, mulching and care helped to produce a nice harvest. As the fruit comes off the tree, some summertime options are available. This is a time when some limited summer pruning can be done to manage the physiology and growth of many fruit trees. Even some citrus will benefit from careful summer pruning.

Summertime brings a harvest bounty for many home gardeners, and with it an opportunity to modify tree growth with pruning

One obvious reason to prune in summer is to repair broken and remove dead branches that may have occurred from excess fruit weight or other injuries. Breakage is common in peach, plum and apples if fruit loads are not thinned earlier in the season. Cut the broken branch from the stem it attaches to with an angled cut that leaves the branch collar intact. Do not cut branches flush with the stem they were attached to. Many years ago the myth of flush cuts for shade trees was found to permanently damage trees, but flush cuts are often still practiced on fruit bearing trees. Flush cuts allow decay organisms to enter trees leading to heart rot and other kinds of wood decay.

Sporophores or fungal fruiting bodies indicate the presence of wood decay in trees. Usually be the time sporophores are showing wood decay is extensive in the tree.

Another myth that persists in home fruit orchards is painting wounds with a ‘sealant’ or ‘protestant’. There is no reason to paint cuts. They do not limit the progress of decay or prevent decay from forming behind the paint. Pruning paints do not promote “healing” or callus formation to close the wound. There is some thinking that pruning paints may even accelerate the process of decay formation. So throw away the black tar, it has no practical purpose in support of pruning.

Pruning paints are a relic of past horticulture traditions. They have no place in modern arboriculture or pomology

While pruning paints are no longer used, paint has other functions that can be helpful. If a large branch was removed from a tree, sometimes the remaining branches may require protection from sunlight. Apples and other thin-barked trees (citrus, cherries, etc.) are very susceptible to sunburn. If branches that were previously shaded are suddenly exposed to high light levels, the bark can be destroyed leading to sunburn cankers and entry of disease-causing fungi such as Botryosphaeria spp. If repair pruning exposes a large gap in the canopy, it is appropriate to apply white wash or diluted white latex paint to exposed branches in order to protect them from bright sunlight. The most severe damage occurs on southern and west facing branches. Sunburn is one of the leading causes of abiotic damage and a predisposing factor for disease such as stem and branch cankers in apples.

Fireblight is another common disease on pears and apples and develops after bloom. Pruning out fireblight affected twigs helps to arrest disease progress. Finally, bacterial canker can be devastating to Prunus (plum, cherry, peach, nectarine and almond) in parts of the country with warm summer rains. Immediate removal of bacterial canker affected branches is necessary to prevent permanent damage to the tree. Tools used to remove cankered branches should be sanitized by flame (torch) or with disinfectants. Canker diseases are active in the warm summer growing season. Cankers can be caused by bacteria or fungi and should be dealt with as soon as symptoms are noticed. The earliest symptom of an active canker is slowed growth relative to other branches on the tree. Slowed growth results in smaller leaves and fruit and fewer leaves. Affected branches seem more open and just look “weaker” than their healthy counterparts. Slowed growth is often followed by wilt, leaf drop and eventually necrosis or death of the branch. It is best to remove diseased branches early before the organism spreads to the main stem. Since symptoms occur when leaves are on, summer pruning is the best approach to remove cankered branches. Regardless of where or when damage occurs, using correct pruning practices should be adhered to.

Cankers kill branches in fruit trees, they can be caused by either bacteria or fungi. Here Botryosphaeria dothidea has killed a branch in this apple.

Healthy growth on the tree above but thin, weak, small leaves on the tree below indicate a developing branch canker.

Pruning is used most widely on fruit trees to dwarf them so that fruit is produced at a height convenient for harvesting. Pruning creates two universal responses that apply to all woody plants:

I. Pruning is growth retarding. The part of a tree pruned will grow less than the unpruned part. Or, a pruned tree will grow less than an unpruned tree.

II. Pruning is a bud invigorating process. A pruned tree or branch will have more of its buds released to grow compared to the unpruned branch or tree where many buds remain in a dormant state.

The more a tree is pruned, the less its roots and stems will grow. Even though the more a tree is pruned the more latent or axillary buds will be released to grow, it will not be able to make up for the lost leaf potential of the unpruned tree. The pruned tree has reduced photosynthetic capacity, makes less energy and will grow less overall. The thing that is not very clear is how the timing of pruning affects the basic processes. In his review, Chandler makes clear that pruning in the dormant season will retard the growth of apples less than if they are pruned in the summer. Summer pruning also significantly reduces the growth of roots compared to dormant season pruning. Removing leaves in mid-summer or after all shoot growth has stopped (summer rest period), removes photosynthetic capacity and reduces stored energy in the tree, thus retarding growth overall. While buds may be invigorated and new summer growth may occur, this rarely makes up for the tissue lost and still results in growth reduction.

Summer pruning does not result in more fruitfulness the following year, and in apples does not increase the number of spurs formed for fruit formation. Summer pruning can open the canopy and allow branches to form lower down that are useful for easy harvest. The effect of summer pruning on next year’s fruit quality is uncertain. Summer pruning can accelerate the ultimate scaffolding or canopy shape for the mature tree.

Pruning citrus after harvest, during the warm season can affect fruit size in the following year. This may be due to fruit thinning as some citrus have green fruit formed by summer that ripen in winter or spring. Summer pruning removes fruit and remaining fruit can grow larger.

Summer pruning of fruit trees before fruit harvest increases light penetration into the tree and can increase color development of the fruit. Pruning must be done cautiously to avoid excess light penetration and sunburn to scaffold branches and resultant canker diseases. Summer reduction pruning is most often accomplished by pruning the ends of branches back to other branches or twigs. Removing about one half the current season’s wood (on a given branch) will achieve objectives usually without causing excessive light penetration into the canopy. Not every branch need be pruned but an even approach, removing branches consistently around the tree, will maintain form. No more than 15-20% of the canopy should be removed by summer pruning. On some vigorous growing trees such as Persian mulberry, pomegranate, or some peaches, heavier pruning doses can be used. Pears, apples, plums and cherries require less pruning and cuts should be made to preserve spurs and other fruit bearing wood. Some varieties of cherries can become ‘over spurred’ and thinning cuts to remove excess spur wood can sometimes be helpful to limit production and increase fruit quality in the next season.

References:

Chandler, W. H. 1923. Results of some experiments in pruning fruit trees. Cornell University Agriculture Experiment Station bulletin 415.

Ingels, C. and P. Geisel. 2014. Fruit and Nut Tree Pruning Guidelines for Arborists. University of California Agriculture and Natural Resources publication 8502. http://anrcatalog.ucanr.edu

Saure, M.C. 1987. Summer pruning effect in apple—a review. Scientia Horticulture 30: 253-282

The weed apocalypse

I have been hiding from COVID-19 in Arizona, but I had to return to Ojai, Ca because I was “noticed” by the local fire department to abate my weeds. I returned to find the Weed Apocalypse (WA 2020). Late spring rains were spaced nicely in California supporting rampant weed growth. So, why did this happen? What can I do about it now? How could I have better prepared for WA 2021 next year?

The Ojai “Weed apocalypse”. This is what happens when you leave and do nothing in your garden for two months.

In May, the days are getting noticeably longer and moving closer to the longest day of the year (June 20–the summer Solstice). Longer days add more photosynthetically active radiation and put plants on a rapid growing phase at this time of the year. If water and soil nutrients are not limiting, this is the fastest growth period for most plants. Weeds have the unique quality that they will grow faster than many garden plants even with less resources. When resources are plentiful, they grow  faster still.

One way to prevent the weed apocalypse is to deteriorate the weed seed bank . The “weed seed bank” (WSB) is the amount of seeds stored in soil that are viable. The seed bank is restored each year when weeds set seed and drop them on or into the ground. In some cases the seed bank also includes plant parts such as Bermudagrass (Cynodon dactylon) stems and rhizomes (underground stems) that can lie quiet but, once sufficient moisture is available, they spring into life! So once the weeds set seed, just “whacking” or mowing and leaving the mulch behind does not usually solve the problem as viable seed is added to the WSB. Annual weeds can be reduced substantially if they are controlled prior to seed set.

Weeds are sneaky buggers. They imbue their progeny with germination inhibitors or dormancy factors that delay germination. Some seeds complete their maturation even when they have been cut away from the main plant. This is why weeds always seem to be there for you. When dormancy factors wear off, or are washed away seeds will germinate. So after a strong rain event or irrigation weeds emerge that were previously dormant. Some of the seeds remain dormant in the WSB as a back up opportunity to grow. In the case of Slender wild Oat, Avena barbata, it has two maturation ‘stages’ that take advantage of both early spring and late fall rains, with seed ripening at both of those seasonal times. Light is also necessary for many weeds to germinate. When weeds are removed by tilling or digging, new seeds are brought to the surface and may now germinate. Additionally, many weeds have the capacity to regenerate if the entire root is not removed. One tenacious weed, Field bindweed (Convolvulus arvensis), is known to regenerate from each node and root as deep as four feet. Cutting the plants into pieces makes more of them!

Weeds can be annual biennial or perennial . Some weeds such as Poa annua or annual bluegrass complete their life cycle (seed to seed) in only a few to several weeks, others grow for years. Annuals survive drought or cold winters as seeds while perennials as roots, tubers or dormant stolons or stems. Biennial weeds usually grow their vegetative body in the first year and reproductive structures in the second year, they are often rosette forming plants that grow close to the ground in the first season and develop tall stocks in the second. Knowing how to identify weeds helps to understand their biology and ultimately control strategies.

Many gardeners are herbicide averse. However, herbicides will often give the most economic and effective control of weeds. Some weeds like field bindweed are only well controlled with herbicides. Herbicides are broken down into two categories: pre-emergent herbicides and post emergent herbicides. Pre-emergent herbicides inhibit seed germination or kill emerging seedlings before they can develop. Post emergent herbicides kill weeds after they emerge from their seeds. Almost all weeds are better and more easily controlled at juvenile life stages. This is true for mechanical or chemical control. Regardless of how you choose to deal with the WA in your garden starting when weeds are small will give you a tremendous advantage.

Like all pesticides, herbicide labeling must be followed carefully to apply the right amount of product at the right time to the target weed (which also must be listed on the label). There are some amazing herbicidal tools that can save hours of labor. Some drawbacks of herbicides are that they may be expensive, may require multiple applications, require equipment to apply as well as personal protective equipment. Herbicides can be selective or broad spectrum. For instance, Fluazifob-P-butyl (active ingredient of Fusilade II) will control warm season grasses in many ornamental broadleaved plants. This is immensely useful since you can apply Fluazifop-P-butyl “over the top” of a flower garden and free it of bermudagrass (Cynodon dactylon) without harm to your ornamental garden plants or other non-grass landscape plants. Other herbicides containing plant growth regulators such as 2,4-D are broad-spectrum and will kill or harm many kinds of broad-leaved plants in turfgrass without harming the turfgrass. There are also some broad spectrum contact herbicides made of soaps or acids that will kill both broad leaved and grass weeds on contact. While these products do not have systemic action they can be very effective on both cool and warm season young weed seedlings. Herbicides when used carefully and following labeled instructions can save hours of hand weeding labor.

In my own yard I have chosen not to use herbicides because I have so many plants that are sensitive to the kinds of products I would need to use. I am pretty much down for other types of control. This month my city council decided to ban the use of gasoline powered lawn mowers–my chief weapon for the WA! We took a chance and used it anyway because our weed issues are so bad. As mentioned earlier the best time to use mechanical control of weeds is when they are in the cotyledon or two leaf stage of growth. A quick attack with a scuffle hoe will wipe them out. When they grow to adult weed size, larger and larger machinery become required.

Once perennial weeds such as bindweed grow a bit they become impossible to control with hoeing because they will grow back from roots. String line trimmers are used for weeding in many apocalypses but have their limitations. Bits of plastic trimmer line break off and pollute your landscape. Biodegradable plastics are usually used, but the idea of littering your yard with plastic bits is bothersome. Limiting the use of oil consuming machines is a great idea, but using battery powered machines has limits. Buying extra batteries so you can destroy while you charge is helpful.

Hand pulling is a great way to release pend up stress (of the human not the weed), get exercise, and rid the garden of apocalyptic pests. However, for some weeds like yellow nutsedge (Cyperus esculentus) you will only increase the problem as nutlets are released from dormancy when you pull the “mother” plant. By the time you see the emerging nutlets they have formed more nutlets so you can never get ahead of the problem. If you decide hand pulling will work, irrigate the day before you want to weed and they will come out much easier.

Mulching with fresh coarse arborist chips is a great way to prevent annual weeds from getting the light they need to germinate. Mulches also break down to improve soil. We have been mulching for a couple decades on my driveway but have not added any mulch for a few years. The broken down mulch and improved soil are now the most apocalyptic weed garden. If you use mulches for weed control fresh chips need to be applied at least annually in a thick layer to be effective. Also constant application of mulches can make soil! This soil builds up without you realizing that the root collar of perennials or trees may be getting buried. If you mulch consistently around trees be sure to keep the root collar exposed.

Not all weeds germinate in the early winter. There are winter and spring or summer germinating weeds. The differing timing of their emergence can happen unexpectedly. Just when you thought you had weeds in control, another set seems to appear requiring your attention. Look for summer emergent weeds when night temperature lows are above 60F.

Using an old glass shower door to solarize the soil and kill weeds. Note some yellow nutsedge is surviving near the edge of the doors.

Solarization is another way to kill weeds. This is the old greenhouse effect used as a weed weapon. Clear plastic laid on the soil surface and sealed at the edges will if exposed to full sun heat the contents to the point of their death. The solarization effect does not penetrate deeply into soil, so if perennial weeds are solarized, they may survive and regrow from root pieces. If you want to try solarizing your weeds purchase thick UV resistant plastic otherwise you will have bits of plastic everywhere as the sun breaks it down into pieces… Warning, this does not work with Field bindweed! In my own yard I have used old glass shower doors to solarize the soil.

Finally if all else fails and the WA is bearing down, you can just eat them. Many weeds are edible and can make good food. Nettle, Sonchus (sow thistle), purslane, dandelion and many of the Mustard family are edible at various stages of their development. Some folks have even collected mustard seeds and made their own condiments. Of course, you should always exercise caution when consuming wild foods. Some contain toxins or other chemicals that individuals may be sensitive to. The Sow thistle and wild lettuce (Lactuca spp.) contain latex which many are sensitive to. The stinging nettle has hairs on its surface that contain an irritant (oxalic acid) that causes skin burning and welts. Others, such as black elderberry may contain cyanide alkaloids in the green tissues-stems, fruit and other parts. Research the risks of consuming or contacting some plants before attempting to eat or handle them.  There is hope, because even the nutlets of one of the worst weeds (yellow nutsedge) are edible…

Sustainable gardens?

Natural ecosystems like this woodland in the Chiricahua national monument in Arizona maintain species density over time because the inputs are consistent with the plants that live there and the outputs are recycled.

The concept of sustainable agriculture is not new and the idea of sustainable gardens is likely just as dated. Sustainability as a concept can be applied to soil, farms, gardens or life in the biosphere. The second law of thermodynamics says that all systems tend toward thermodynamic equilibrium where there is maximum entropy (randomness). In functional ecosystems equilibrium is achieved to a degree, and plant, animal and other species are at stable levels. Ecosystems evolved over millions of years to develop connections between individuals creating support networks, predator-prey cycles and nutrient cycles. Inputs are adequate to “sustain” the system and outputs are all recycled. When we create our gardens we are setting up a system that we maintain through inputs and we appreciate the outputs, and it keeps us interested and involved in pushing back the entropy.  In almost all cases gardens are not natural systems and if left untended will become more random, weeds will grow, poorly adapted plants will be overrun and the balance will change to something matches the inputs and outputs of a sustainable system as dictated by the location/climate/soil, etc. 

Sustainable gardens rely on low inputs with maximum outputs. The plants grow over time with little maintenance, pest pressure, fertilizer or water…

The key to a sustainable garden is understanding inputs and outputs and the flow of energy in your system. The reason I like pristine ecosystems is that I don’t have to add inputs to them to take part in their beauty. As long as I don’t interrupt what is going on by breaking connections between organisms unwittingly, the system is self sustaining. Imagine the garden of Eden that always bears fruit and flowers with no inputs from you the gardener. You just walk into the garden and bask in it sbeauty occasionally eating some delicious item you find there. Well we all know that our own circumstances are far from this reality. Getting a garden to provide the aesthetics (beauty) or food (both outputs) often requires us to provide heavy amounts of inputs. Inputs are mostly energy in the form of kinetic or work energy of the gardener, hydrocarbon energy in the form of electricity to run gadgets or fuel to power mowing or clipping equipment, or fertilizers which may be derived from fossil fuels or from the sun as by products of plants. Energy is also the main input into plant systems that may be in your garden. Light contains the energy for their growth. Finally cash money is easily converted to all forms of energy. You can purchase labor, fertilizer, any number of garden amenities bypassing the personal output of your own kinetic energy. Or you can garden smarter and avoid large energy inputs by creating the sustainable garden…

So how do we get a sustainable “Garden of Eden”. First, recognize that not all gardens are the same; they have different functions and purposes. Some are for aesthetics only. Some are for food production. There is a wide body of research that shows gardens and green environments sustain our health; both physical and mental (this would be an output). So a garden is not sustainable if it does not appeal to you or produce enough food or sustenance to justify the inputs. Gardens are like checking accounts in a way; we put in deposits (inputs) and we withdraw benefits (outputs). If the amount of inputs generate the required outputs the garden is sustainable. So since money converts to energy and labor the more money you have the more complicated and detailed your landscape or garden can be, but entropy will have its way with this kind of garden with out extensive inputs. Water thirsty plants, greenhouse cultivation, weed and other pest control, poorly adapted plants and wide swaths of turf all require greater inputs.

Hardscape such as walls, patios, pathways, fences etc. do not use many inputs over time, require no water or fertilizer, pruning and can be very low kinetic energy (maintenance). If done well they add aesthetic value to the outputs

-Increase Hardscape
Hardscape includes landscape elements such as walkways, walls, boulders, patios, sculptures, small out buildings etc. Since hardscape is not green or growing it uses no water, requires no pruning or other tasks to maintain. Installing strategic hardscape can improve the appeal and functionality of a landscape while cutting down on the sustainable square footage that you are maintaining. It is often wise to consult a landscape designer or architect to optimize the uses and functions of your garden.

-Mulch Mulch Mulch
Fresh mulch from chipped tree trimmings is essential for a sustainable landscape/garden. Fresh wood chips are the best source of energy for microbes when used as a surface mulch. Wood chips layered four inches thick over bare soil will improve many aspects of soil, essentially making the soil more “sustainable” for your garden by conserving moisture and adding nutrients over time (for more on mulch see the paper by LCS referenced in the GP site). Fresh wood chips are best around perennials but can also be used as walkway material in vegetable gardens, as mulch around berries and fruit trees and around perennials like rhubarb and asparagus. A well mulched garden uses less water and, in time, requires little or no fertilization.

Mulch is essential to the sustainable landscape. this aloe garden was heavily mulched initially. Its rocky soil was improved and weeds reduced thereby reducing labor energy inputs

-Maintain Light
Sunlight is the main energy input into your garden and is necessary to sustain the plants growing there. Plants that are adapted to full sun when shaded out by growing trees, shrubs or other tall plants become disease prone, produce less fruit, and are less attractive. To keep vigor up, ensure that plants get enough sunlight by pruning back intruding branches from nearby trees or other shade providing plants. Remove trees that have outgrown their space in your garden and replant with size appropriate specimens.

-Use Enduring Plants
Grow what grows well for you. Time spend on poorly adapted and fussy plants will decrease the sustainability of your garden and increase the necessary inputs of time, labor and energy. For oranamental gardens use enduring plants. Flashy annual plants look good for a few months but require replacement regularly. Long lived perennials used as specimens in a garden add value over time with little care, pest control or fertilization. I term these ‘enduring plants’. Enduring plants grow slowly but live long lives. For those who grow food vegetable gardens are a necessity and plants are mostly annual, however perennials are also an option. Rhubarb is an enduring perennial, berry vines, fruit trees, asparagus and grapes provide food year after year with low maintenance relative to annual crops. Keep fussy, pet plants to a minimum, and in containers so they can be moved when necessary to accommodate their needs.

Enduring plants live long lives, add value and are low maintenance additions to landscapes

-Recycle Reuse
Gardeners spend a lot of energy clipping, removing and throwing away unwanted yardwastes. Consider composting trimmings and weeds and recycling these materials back into the garden. This reduces energy spent processing these materials and decreases the cost of purchasing organic materials for your garden. Lawn clipping, leaves, and tree trimmings (when shredded) can make a high quality compost if carefully produced. Many extension offices have publications on home compost production.

Study of natural ecosystems provides an interesting window into sustainable landscapes. Plants grow with each other in a balance or harmony that results in a sustainable landscape. In these natural settings, litter accumulates under tree canopies (think mulch in your garden) providing a continued source of biological and mineral motivation for soil to be productive. Annual plants grow each year where sun is abundant and shade loving perennials inhabit the understory of trees. The right plants in the right place create a beautiful environment.

A root’s life

Roots are the unsung heroes of plants! But unfortunately your every day hard working root gets little respect from gardeners. “We are so taken for granted” whined Radix– “Its just so hard, we are all down here in the dark, nobody see’s us, we get no admiration, yet we work so hard!”. Radix is your every day “working root” mostly ignored by gardeners. Even though the seasons change, and leaves come and go, Radix is growing most all the time! Gardeners love the color of flowers, the texture and shape of foliage, the architecture of tree tree branches and admire all the things plants do above ground. They beautify the world, provide us food, and provide oxygen for us to breathe. We heap our admiration on above ground functions of plants, but without Radix, and all the other roots, the above ground parts would perish.

Healthy roots growing under wood chip mulches.

Growing plants is about growing the whole organism. We may pick the fruit, admire the flowers, or rest under the shade, but none of it would be possible without proper care of root systems. Roots have varied functions—they provide anchorage so the plant can stand upright; they absorb minerals and water; and they store energy in form of starch. Plant shoots grow in the realm of light and much of their adaptations revolve around catching sunlight. Their atmosphere is mostly nitrogen and oxygen. Roots grow in the realm of soil and darkness, their atmosphere is oxygen restricted and dominated by carbon dioxide and even toxic gases like sulfur dioxide, and methane if soil conditions become saturated. Just like all parts of plants, oxygen is required by roots to respire or utilize chemical energy for their growth. Poor Radix can choke if the oxygen supply is limited.

Shoots live in a herbivorous world. Plants get eaten by animals. Because they have buds of all kinds they can grow back, leaves may contain alkaloids and other molecules that reduce herbivory, and plants can arm themselves with spines, thorns and prickles, but roots live in a microbial world. While microbes can grow on most plant surfaces, the root system is bathed in microbes (the soil food web). Not only do roots have to defend themselves underground but they have specific alliances that let them do that! As you know from some of my other blogs, root pathogens can kill all ages of plants from seedling to mature oak trees. The happens when pathogens (which are opportunists) are not well regulated by soil microbes, or when plant root systems are stressed in some way. Large populations of soil bacteria, fungi, nematodes and arthropods limit the development of opportunistic pathogens. These organisms are supported by soil carbon or organic matter which is essential to their abundant reproduction in soil. This carbon is best supplied to root by mulching with freshly chopped Arborist chips.

To examine root health, expose the cortex with a knife. It should be white, an unhealthy root will be discolored. Many roots are black on the outside and this is normal as they have melanin in their epidermis as a protectant against microbes.

Roots store carbohydrates made in leaves as starch. This stored energy can be used for their growth or redistributed through the plant later. In order for stored starch to be used, it must be converted back to glucose (by enzymes) and then broken down through chemical respiration. These processes take oxygen which is limited in soil as a function of depth. The deeper you go the less oxygen. This is why trees and most plants have roots in the upper foot or so of soil. This upper foot of soil is sensitive and fragile. It can be compacted by foot traffic or equipment and lose oxygen content. Weed barriers, fabrics, and sheet mulching deprive soil of gas exchange, and the amount of carbon dioxide increases at the expense of oxygen under these barriers. Too much water can fill soil pore spaces causing saturation that usually contain oxygen and decrease the amount of available oxygen since it does not dissolve well in water. All of this also applies to the soil microbial communities which also require oxygen to grow and thrive.

A healthy soil contains plant roots (top) and an abundance of micro organisms. These soils will be porous, contain higher levels of organic matter and mycorrhizal fungi (white portion at the bottom of image)

So how do we respect Radix and all the other hard working roots? Promote soil health by avoiding tillage and cultivation. Use Mulches made from fresh tree trimming chips, avoid compacting soils with machinery, and do not shock soils with excessive application of manure, fertilizer, or water which can perturb the microbiology of a soil. I also suggest you learn to admire roots for all that they do for plants in your garden. Check in with Radix every now and then by digging down and looking at root systems. See if they are growing. Try to learn the seasonality of peak root growth so that you avoid practices that may harm roots during their critical growth periods. Be alert to the symptoms of root rot on garden plants especially at the tops of plants such as leaf drop, shoot dieback and wilting.

Potting Soil Poison

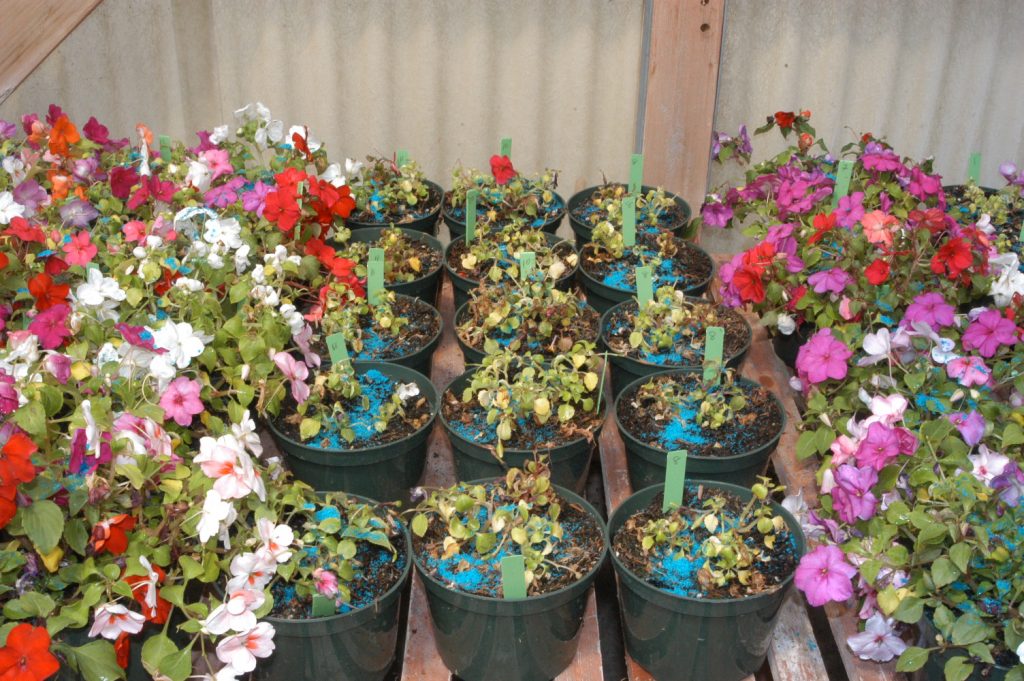
Gardeners often struggle to grow plants in containers. You may feel that you have a really black thumb at times when newly planted seedlings fall over dead or fail to thrive. The problem may not be disease or poor gardening acumen but rather your container media otherwise sold as “Potting Soil”. A trip to one of the big box stores or a larger retail nursery will offer gardeners many choices of bagged potting soils. They are marketed to give you the impression they will grow anything and everything. But do they?
Over the last couple of decades I have done comparative potting media trials where I plant small plugs (usually impatiens) three per six inch container. I go out and find every retail brand of potting mix I can find and plant them all up and then follow them for about two months. I’ve been thinking of revisiting the studies and seeing if anything has changed. I also want to test the assumption that you can’t predict the grow ability of a potting soil by reading the ingredient label as some research suggests. While there can always be a surprise with any given product, I think that from my many trials I can make some suggestions to improve the outcome of your gardening adventures in containers.

Soil on the left has no nutrients same soil on the right with 2 grams of ammonium sulfate added on the surface of the medium one time.

Growing media is not the same as soil. Since media are placed in containers, often plastic ones, they need to be very porous. Porosity of up to 50% is not uncommon in container media. The bulk of the media needs to hold water and minerals for plant growth. Usually an organic material that has a high cation exchange capacity is used. The darling of potting mixes has been Peat Moss. Since peat moss harvesting is damaging to the environment (see previous blog by Linda CS), many gardeners may want to avoid media with peat moss. Bulking agents that do not hold much water or nutrients are also added to “lighten” or aerate the medium. Horticultural perlite (expanded volcanic glass) is the most common. Sand is also sometimes used but it adds weight to the bag and is not preferred by manufacturers. Some media use bark or other wood products to provide greater porosity.
There are usually about 18 to 20 different media on the market at any given time and the results of growing plants in them is predictable. About 10 of the media will not grow anything very well, 5 give ok results and about 5 of the products will grow a nice plant. A lot of the reason for success or lack thereof is about nitrogen chemistry. If no fertilizer is added, the medium will likely not grow well. You can add your own fertilizer and make about  ½ of these poor growing media work. One quarter to one half a teaspoon (approximately 2gm) of ammonium sulfate usually peps up most media that are ok but lack nutrients.  This is an amount used in a standard height 6inch (15cm) diameter plastic container.  Larger containers and plants will require incrementally more fertilizer to achieve growth goals. 
Some media will not grow even when fertilized. This is because they may contain manures, or composts and manures that have added too much salt to the medium. Adding fertilizers to these products only makes them less growable. Sometimes these potting soils will improve with leaching but then fertilizer will need to be added back later to make up for what was leached away. Generally a salty potting mix is worth avoiding.
So how can you tell if you are getting a good or bad mix. You can start by reading the ingredient list. And you will need to decode that list to help you make some decisions. What manufacturers call things can be very misleading. Look for a medium that has fertilizer added and lists what kind of fertilizer was used. These media usually grow without help. Avoid media that use manures, they are not suitable container media ingredients.

Some potting soils claim they can grow plants bigger than others, some claim to be all organic and some claim to be friendly to the earth. This is all marketing. Look for a simple ingredient list that is fortified with a nutrient charge (fertilizer). Begin there. You may want to sieve the medium to remove large particles if you are growing seeds, add more bulking agent (bark, sand, perlite, pumice) for plants that need increased porosity such as orchids, bromeliads and cactus. Don’t be afraid to modify potting mixes to suit the needs you might have. If plants don’t grow, consider adding more nutrients. After growing for some time (months to years), many media will breakdown, and the plant will need to be repotted in a new medium.

Fruit Tree Pruning Basics

Last week I helped to train Master Gardeners about pruning fruit trees. January and February are the months that we recommend fruit tree pruning in Southern California.  In colder climates, pruning may not occur until later when freezing temperatures are minimized and there is less chance of damage to new growth. While trees don’t “need” pruning to bear fruit, pruning practices can enhance fruit production, promote earlier fruiting bearing buds, and increase fruit quality if done in an informed way. In many respects, modern fruit trees have been bred for big fruit, and pruning might need to be done to prevent limb breakage, reduce the number of fruit and position it in the tree fore ease of harvest. Misinformed pruning can lead to disease or loss of bearing wood. “Fruit tree” is a broad category, but for this blog, I am referring to deciduous trees (not subtropicals such as citrus, avocado, mango etc.). Two main categories are common: Pome fruits such as apples and pears and Stone fruits such as cherries, plums, apricots, peaches, almonds and pluots.

The first thing to figure out when pruning any tree grown for fruit production is where the fruit will be formed. This requires examining and understanding buds, twigs and the age of growth that is produced. Second we need to understand the tree’s responses to pruning and how that will affect future fruit production. Finally an understanding of negative consequences of pruning is essential.

Peaches produce fruit on last year’s growth

Apples and pears produce fruit on spurs

Why prune you ask if trees will produce without pruning? Pruning shapes a tree, and helps to create fruiting buds that are conveniently placed for harvest-this keeps fruit pickable with less time on ladders. Pruning gives an opportunity to remove fruiting buds thereby invigorating remaining buds and increasing size and quality of the fruit that will form with less fruit thinning later. Pruning also gives an opportunity to remove diseased, damaged, tangled or infested branches.  While various training styles can be used for structural pruning of young fruit trees the open vase or modefied central leader systems are preferred and descriptions of them can be found in extension leaflets.  For my own trees I usually do not prune them the first year after planting in order to encourage a stronger root system.  In the second and third years I pick scaffold branches or train branches on the central leader.

Fruit is produced on various aged twigs or branches depending on tree species. Peaches produce fruit on growth from the previous year or one year old wood. Since peaches grow vigorously fruiting wood ends up on the outside of a tree. Heading back (or heading) cuts (reducing last year’s branches by at least half their length) will remove ½ the fruit and stimulate buds lower in the tree that will make more fruiting wood. For this reason peaches are usually pruned “hard” to stimulate maximum amounts of fresh fruiting wood. Apples, Pears, Plums, Cherries and Apricots produce most of their fruit on small side branches called spurs. Apples and Pears may also produce fruit from the terminal bud.

Young trees often make many long whips and these are usually headed back (heading cuts remove the terminal bud) to stimulate spurs in the following years. Once the overall shape and size of the trees are set, less pruning is required as spurs may produce fruit over decades of time. As trees mature spurs build up so removing densely clustered spurs on mature trees with thinning cuts (removing an entire branch, spur or twig) will increase the size and quality of fruit formed on the remaining spurs.

Pruning is often used on newly planted trees to form the structure of the tree. When forming the branch structure do no indiscriminately head back every branch as this will stop the growth of the branch that is headed. New growth will only resume from buds that are released to grow. Think carefully about what you want to grow and what you want to slow-down in growth. Pruning is always a growth retarding practice. Branches are best spaced up and down and around a central leader. In other training systems for stone fruits one heading cut when the tree is just a whip will create an open vase shape where all the branches arise from a single point on the trunk. While this is considered a branch defect in shade trees, it is a convenient training system for fruit trees if you don’t let the tree get too large and manage the fruit loads that are produced. Trees trained to a modified open center where branches are spaced on a central leader have stronger branch attachments and can bear greater fruit.

This apple is extensively sunburned from over pruning

As trees age and grow they require regular training with heading cuts to shorten vigorous branches of peaches or thinning cuts to remove whips, water sprouts or other unwanted branches.  Be careful not to over-prune especially in summer or sunburn can result.  When fruit sets in the spring or early summer it can be thinned by hand.  This form of pruning will increase size of the remaining fruit and quality.   Summer pruning is sometimes practiced on very vigorous trees to slow their growth and invigorate buds for the following spring.  Prune with care in the summer espeically on green barked trees like apple and pears to avoid sunburn.

Flammability of Landscape Plants–Why the lists are BAD!

California had the worst fires in the last two years of its existence as a state. Hundreds of thousands of acres of brush and forest burned. More importantly thousands lost their homes as fires moved across urban/rural interfaces to destroy communities. The entire town of Paradise, California was burned to the ground. Here in Ventura County, the Thomas Fire was the state’s largest fire by the time it was done, and hundreds lost homes. No other time in history have we been so focused on what will burn, why it will burn, and what we can do to have a “firewise” landscape.

In 2017 The Thomas Fire in Ojai, California was the largest brush fire in the history of California fire fighting. It was surpassed the following year by the Camp fire in Northern California.

Fire authorities around the world have advocated creating defensible spaces around homes that are clear of ignitable vegetation. Some authorities have mandated by law that mulch, pine needles and other debris be removed as a fire prevention measure near structures. There is a general recognition that any plant can burn. Even well irrigated plants will rapidly desiccate and become flammable in the face of strong wind and a heavy fuel load that is inflamed nearby.

Flammability of landscape around homes is dependent on several factors. Vegetation placement can obstruct or allow for fire fighters ability to reduce damage to a home. While it is natural to assume that avoiding flammable plants is a part of this process, there is no standard method for testing plant flammability. Many lists of firewise plants have unknown origin or are just guesses. Flammability can be assigned four dimensions: ignitability, sustainability, combustibility and consumability. These factors refer to time till ignition; time a material will burn; rapidity or intensity of burn and quantity of material that will burn. The components of combustion are influenced by moisture content, percentage of carbon, percentage of volatile compounds; surface area to volume ratio and other factors. The varied factors are usually not all studied at the same time and are not all equally important to plant flammability. Thus assessing flammability even within the context of a controlled study will only partially assess a material’s likelihood of burning under various conditions. Hence most of the lists are not that helpful.

While fresh wood chip mulches are consideder by some fire authorities to be a fire hazard, there is little published evidence of this and a single element like mulch can not be tied to flammbability of the landscape.

Behm et. al. showed that variations in flammability between plant species exists, and also that species within the same genus can vary widely in their flammable nature. Thus lists should not assume species in the same genus all have the same flammability. There is some thinking that flammability is an evolutionary trait that some plants exploit to their benefit, i.e. they are made to burn, such as the California Chaparral plant communities. Simply burning fuels in a laboratory setting does not take into account many of the factors associated with fuel burning intensities. Species differences notwithstanding, the amount of dead plant matter (dead twigs and leaves) vs. live matter, the arrangement of leaves, mulch and adjacent species all play a role in the flammability of the landscape itself which cannot be studied in a lab setting. Landscapes are “fuel bed complexes” with multiple elements that are not replicated in studies. For instance, small leaves from some shrubs ignite easily, but when burned as litter, develop low heat release rates because of poor ventilation.

Testing live plant materials alone is misleading because the flammability of an intact shrub is caused by the interaction of live matter with “necromatter”. Dead tissues are thermal catalysts which ignite live material. The ratio of necromatter to live matter influences flammability and is generally not well studied. Fire modelling also has a role in understanding what will burn. Both wind and slope increase the spread rate and the fireline intensity of burnable plants. Fire behavior characteristics on a given plant also are affected by both its physical and chemical characteristic — tissue mineral and water content have impacts on flammability. This bodes poorly for firesafe plant lists because lists do not consider plant physical or chemical attributes and if moisture levels are low it will burn regardless of its structure and geometry or its status on a list. Sometimes though a dense wall of well hydrated vegetation can save homes such as the avocado orchards that held back fire in the Thomas Fire in Montecito, Ca.

While lists don’t satisfy scientific rigor they are great for policy makers and homeowners who want to know what to plant. Unfortunately many lists are just compilations of other lists, none of which were based on research. Sometimes lists confuse one desirable characteristic with another, such as native plant lists that tout drought tolerance. Many drought tolerant plants are not fire resistant especially after a long dry period, indeed they often evolved to burn under such conditions.

For those that live in fire prone areas, fire resistant plant lists will always be an attractive or even required element of landscapes. Lists will not save a structure in the face of high winds and adequate fuel or embers. A defined defensible space around buildings, and maintenance of plantings that removes dead matter, maintains irrigation, and maintains proper distance from combustible surfaces will be more effective than choosing landscape plants from flammability lists.

References:
Fernandes, P.M. and M. G. Cruz. 2012. Plant flammability experiments offer limited insight into vegetation—fire dynamic interactions. New Phytologist 194: 606-609

Behm, A.L., M. L. Duryea, A.J. Long, and W.C. Zipperer. 2004. Flammability of native understory species in pine flatwood and hardwood hammock ecosystems and implications for the wildland –urban interface. International J. of Wildland fire 13: 355-365.

White, R.H. and W.C. Zipperer. 2010. Testing and classification of individual plants for fire behavior: plant selection for the wildland-urban interface. International J. of Wildland Fire 19:213-227.