Advancing the science of gardening and other stuff since 2009
Author: Jim Downer
Dr. Downer has 34 years of experience as a horticulture and plant pathology Advisor with the University of California Cooperative Extension in Ventura County. Dr. Downer’s academic training is from California Polytechnic Univ., Pomona, (BSc. horticulture & botany, 1981; MSc. Biology, 1983;. In 1998 he earned a Ph.D. in plant pathology, from University of California, Riverside. Dr. Downer’s research is focused on mulch, soil microbiology and disease suppression in mulched soils, diseases of shade trees and cultural practices to maintain landscape plants. Dr. Downer is a member of the American Society of Horticultural Science, the American Phytopathological Society, The International Soc. of Arboriculture, and the Western Chapter of the ISA, and the International Society for Horticultural Science. Dr. Downer is an Adjunct professor at California Polytechnic University in Pomona. Dr. Downer serves on the Board of the John Britton Fund for tree Research as the chair of the research advisory committee, and currently chairs the regional conference committee for WCISA. Dr. Downer has a love of shade trees, Shinrin roku (forest bathing/walking) tree work, wood working, horses, gardening, horticulture and the study of plants and their biology.
It seems so simple to plant a tree. But to grow a tree is more difficult! In many parts of the United States there is enough water for trees and turfgrass, but it is often a bad idea to mix the two. You may have observed that sometimes young trees do not grow as well when planted in turfgrass. Certainly this is a generalized view and tree/turfgrass genetics are very different between their respective species. So it is natural to expect different outcomes when planting different species of trees in any landscape setting, turfgrass notwithstanding. Another factor to consider is time. The day we plant a tree is not the same time reference as ten years later. In ten years, the tree if it is successful, may have modified
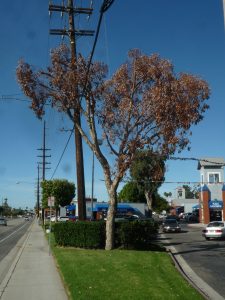
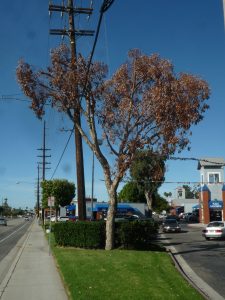
A basic incompatibility: Eucalyptus growing in warm season turfgrass (kikuyugrass) resulted in excess surface moisture and crown rot of the eucalyptus killing it.
its environment significantly, making turfgrass cultivation more difficult. Most tree/turfgrass difficulties begin when the tree is young–as a newly planted tree. If it succeeds in growing a large canopy, difficulties will ensue for the turfgrass. Sometimes turfgrass cultural requirements (frequent irrigation) can predispose trees to root or root-collar diseases such as Phytophthora.
Trees and turfgrass have some similar and very different requirements from their respective landscape settings. Both trees and turfgrass require sunlight to photosynthesize and grow. Both would usually prefer full sunlight without shade. As trees grow they shade the turfgrass sward beneath their canopies. Turfgrass can lose density, and become a thinner sward that is more susceptible to diseases such as powdery mildew. Trees grow roots near the soil surface and as they become larger, some trees may even proliferate roots near the mowing height of turgrass and suffer repeated injury from mowers, also increasing the risk of pest invasion into the tree. Both trees and turfgrass need water and soil minerals to grow. While soil minerals are usually abundant enough for both, water is often limiting for one or the other in this landscape combination.
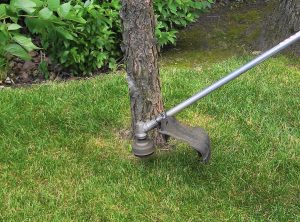
String Line Trimmer’s or weed whips will injure both young and older trees in the landscape. Image: Chicago Tribune.
The maintenance practices required for turfgrass often injure trees, especially young trees. Mowing near trees can injure the bark on the lower stem especially if the mower comes to close and actually scrapes the young stem. Since grass will grow longer where the mower can’t reach right near a tree stem there is a temptation to use a string line trimmer or weed whip to maintain the grass that has shot up around the tree stem. The repeated use of string line trimmers around trees removed young bark and can “girdle” the tree stem. While trees can survive these practices their growth rates are slowed considerably.
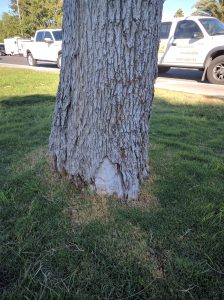
Constant injury from mowing equipment has injured this elm killing the tissue on a major root flare. This is now an entry point for decay and other fungi.
One approach to having trees growing with turfgrass is to remove a ring of turf away from the tree and replace it with mulch. This eliminates the need to maintain the turfgrass near the trees stem and root flare. Richard Harris and others (1977) found many years ago that a one foot circle removed around the stem of newly planted trees would increase their establishment rates compared to trees with turfgrass growing right near the stem. Whitcomb (1979) also recognized that turgrasses are competitors with newly planted shade trees. Whitcomb’s earlier research (1973) showed reduction in root density when trees were planted in a sward of Kentucky bluegrass.
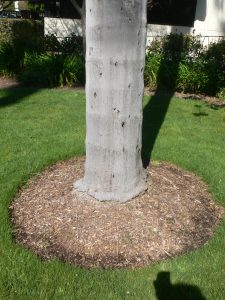
A ring of mulch replacing turfgrass around this tree keeps turf maintenance equipment from injuring it.
As trees grow it is important to widen the ring around them giving more room for mulch and reducing the competing turfgrass underneath their expanding canopies. This is a general concept; some trees can live in turfgrass without problems as long as resources are not limiting. Riparian trees such as sycamore can grow well in swards of turfgrass, but other species such as Peruvian pepper (Schinus mole) tend to languish.
Trees are adapted to drop leaves, this is termed litterfall and it becomes part of their natural mulch. Litterfall tends to prevent annual plants such as grasses from developing. Fallen leaves, fruit and twigs are recycled by fungi providing nutrients back to the tree. Turfgrass cultivation interrupts this process and while trees obtain some of the nutrients supplied to turfgrass, as Whitcomb observed, turfgrasses are fierce competitors for nutrients so young trees are especially susceptible to nutrient deprivation in turfgrass swards. For the best results in your
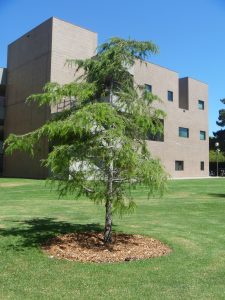
This young tree has an expanding mulch area to help sustain it and reduce competition from turfgrass.
garden, it is best to maintain some distance between young trees and turfgrass. It is optimal if the mulched (no turf) area under a tree can expand to its dripline as it grows.
Gardeners are assaulted with marketing campaigns nowhere better than in the fertilizer aisle of a garden center. There are so many choices and the labels suggest that fertilizing garden plants is a complicated process that requires specialized products.
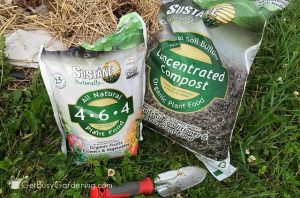
Fertilizers can be marketed for many reasons; here one brand offers many products
Laws require that fertilizers list the proportion of the most important macronutrients on the front of the bag. Nitrogen, Phosphorus and Potassium abbreviated N, P, K, respectively, will always be shown with the ratio of their concentrations such as 5-10-15. This indicates the bag contains 5% nitrogen, 10% phosphorus and 15% potassium. The bag will also specify the weight of fertilizer contained in it, usually in pounds here in the United States. Of course, labeling requirements vary in other countries. Since fertilizers are not drugs or pesticides the labeling requirements are relatively lax and thus are open to extensive marketing. With fertilizers, as long as the contents are labeled and the proportion of N P and K are somewhere on the bag, any other claim can seemingly be made.
Laws require that fertilizer manufacturers list the N-P-K ratio in % by weight on the bag in a prominent place
For years fertilizers have been designed specifically for certain plants. You can commonly purchase citrus food, camellia and azalea food, vegetable fertilizer, and of course turfgrass fertilizers which have been widely marketed for decades. Some fertilizer blends are based on research. Turfgrasses have a high requirement for both Nitrogen and Potassium and you often see elevated percentages of these in turfgrass fertilizers. Palms also require more potassium than Phosphorus and products have been developed that are “palm special” fertilizers. Despite all the research, manufacturers still throw in some phosphorus even though phosphorus is abundant in the United states in most soils. It is not clear to me what makes citrus food different from any other fertilizer, although claims that it is best for citrus can usually be found on the product. We grow more citrus in Ventura County, particularly lemons than anywhere in California, but none of the growers apply “citrus food”.
There is no such thing as “Citrus Food”
Some fertilizers are marketed for acid loving plants. Acid forming fertilizers have the ability to temporarily reduce pH in media or soil to which they are applied. This is because they have a high amount of ammonium or urea as the nitrogen source. Microbes in soil oxidize the nitrogen to nitrate and release hydrogen ions that make the soil more acid. Continual use of acid forming fertilizers can drop soil pH to dangerously low levels and make nutrients unavailable to many plants. This is especially the case in high rainfall climates where mineral nutrients are easily leached from soil. Another product often used to lower pH is aluminum sulfate. Often marketed as “hydrangea food” it helps to promote blue flowers in this plant. Special care should be given here as aluminum can easily be applied to toxic levels.
Technically aluminum sulfate is not a fertilizer: note the 0-0-0. It can be toxic if applied too much and can make soil too acid.
For as long as fertilizers have been sold they have been marketed as products that make plants grow better. When the importance of mycorrhizae were discovered, manufacturers found a new marketing angle that could be used to sell fertilizers. Now countless manufacturers include mycorrhizal inoculants as part of their fertilizer blend. Not only are we able to feed the plant but we can also feed the soil with beneficial micro-organisms. This all sounds great but often the inoculant, if present in the bag, is not viable. In many cases garden soils already have plenty of mycorrhizal fungi in them so they really are not needed in fertilizer products. Other fertilizers include growth stimulants such as humic acid, fulvic acid or humates. Research does not support their efficacy in horticulture.
Most gardens do not require mycorrhizal inoculants.
Fertilizer manufacturers feel that it is important that we gardeners use things that are “all natural”. I don’t know what is natural to you but for me it is natural to challenge claims that have no scientific basis. The very practice of fertilizing plants is NOT NATURAL! But the products are often purported to be. Sometimes natural is synonymous with organic. There are an amazing number of organic fertilizers, so much so that it becomes bewildering as to which one to choose. Organic fertilizers may or may not be ‘certified’ by an agency such as OMRI as meeting some standard. Generally speaking organic fertilizers are made from some carbon based source. They can be sourced as manures or as plant or animal based meals or products. The N-P-K ratios vary widely.
There are many organic fertilizers. They usually have low N-P-K values; some are good slow release sources of nitrogen.
I am always careful to avoid manure-based organic fertilizer products as they can be unnecessarily salty. While many organic fertilizers may be rather “slow release” as they need to mineralize from organic to soluble forms, this is often not the case with manure based products which can easily burn plants if over-applied. Some organic fertilizers are made from rock like substances such as leonardite which are very slow releasers of nitrogen. These products are mined and are similar to coal but have fertilizer value. In trials I have conducted on containerized plants some of these products were top performers.
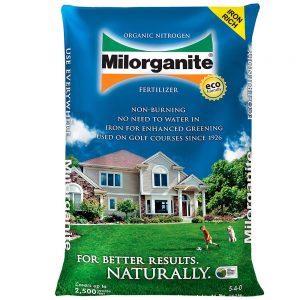
Biosolids are made from treated human waste. They are an excellent source of nitrogen, but may contain unwanted metals.
Another common type of organic fertilizer are the biosolids products such as Milorganite. These are processed sewage sludge products that are de-watered and made into fertilizer. They are very effective nitrogen sources. Some biosolids fertilizers have also been sources of metals, such as zinc, lead and cadmium. Metal contents are closely monitored by manufacturers but since these products come through municipal systems, zinc, copper and other metals such as lead are often elevated. Slow release and organic fertilizers are useful if they are applied with understanding of the mineral needs of the plants they are applied to.
Most plants grow fine without fertilization and the main fertilizer element that plants respond to is nitrogen. So despite all the marketing claims seen on fertilizer bags, a fertilizer with an adequate source of nitrogen will likely benefit plants in need of that element. Specialized fertilizers that promote flowers or roots are not substantiated by research. Elements other than nitrogen are usually not required and ratios of N P and K are not tuned for more blooms or more roots. Adding phosphorus to your fertilizer does not promote flowering unless your soil is deficient in phosphorus (a rare condition). Gardens in high rainfall areas will likely need more potassium and nitrogen, but Phosphorus is hardly ever limiting to plant growth. Most plants do not need or require special fertilizers but will respond to fertilizers that contain an element they and soils they are growing in are lacking.
Phosphorus does not promote flowering. “Bloom maker” fertilizers are a marketing gimmick.
For gardens that have a loam soil texture, little fertilizer will be needed. Soil types often determine fertilizer needs for plants. Sandy soils likely need the most fertilizer because they do not hold nutrients well. They are also the most likely soils to lead to pollution because fertilizer elements will leach easily. Plants growing in sandy soils are also at greatest risk from injury of overfertilization. Plants growing in clay soils are least likely to require fertilization because clays hold and retain cations so well. An informed way to fertilize your garden is to obtain a soils test and base your fertilizer program on the results you obtain. For more on technical details of fertilizing see John Porter’s column in this blog archive.
When you think you need to fertilize garden plants follow these suggestions:
-Base your fertilizer program on a soils test
-Fertilize sandy soils more frequently than clay soils but with smaller amounts
-Most gardens require some nitrogen but not Phosphorus or Potassium so look for NPK ratios with X-0-0 as these products will only supply nitrogen.
-Some plants such as palms and turfgrass benefit from potassium so use a product with X-0-X
-Do not fertilize at planting time, wait until plants establish
-Always apply water after applying soluble fertilizers so they are dissolved
-If using Organic fertilizers chose one with a higher N content
-Never over-fertilize. Landscape fertilization can impair natural waterways resulting in algal blooms that kill fish and other aquatic life.
I was taught in horticulture school that the ideal soil is composed of 50% solids and 50% voids or spaces which are themselves composed of a variable amount of water from small amounts to as much as 25% water when the soil is at field capacity or the amount of water left in soil after gravity has pulled all the free water down in the profile. So the “ideal” soil always has 25% pore spaces or more depending on how much water is present. These conditions are vital for root growth since roots go through the chemical process of respiration which involves absorbing oxygen and giving off carbon dioxide. For gas exchange to happen in this ideal soil, spaces or voids are important, and necessary. A well-structured soil has micro aggregates (pea sized or smaller clumps of soil) in high concentrations which creates many of these spaces and is said to have high porosity.
Porosity in soil is created by the action of roots, fungi and soil fauna developing channels, micro-aggregates and incorporation of organic matter so that soil becomes highly “structured”.
Porosity – the amount and types of voids – is determined by two major factors: 1) The size and distribution of the soil particles; and 2), how those particles are arranged. Sand, silt, and clay particles can be arranged and formed into pathways that help move air and water. These paths are formed by past root channels and the movement of organisms like worms and insects. These channels are glued together by exudates from roots, bacteria and fungi. This organic, both living and dead, soil fraction also add and stabilizes porosity. All together, soil particles, plant residues and microorganisms create a fragile structure that adds more porosity than just the pores and voids created by spaces between the soil mineral particles.
Soil structure is physically crushed and destroyed by cars driving over this tree planting area. As the surface compacts, runoff increases, the soil holds less water and oxygen as a result tree roots die.
Structure and porosity can be physically destroyed or crushed. The soil can be squished by heavy equipment or constant foot traffic of animals, such as humans or horses, or others that constantly tread over the same soil. Compacted soil can be near the surface (the worst for trees since their roots are mostly near the surface), or lower down in the profile. A “plow pan” is actually a compacted zone at the depth of plow or ripping agricultural implements where soil structure is constantly destroyed at the same depth over and over. As soon as roots and worms create a new pathway and reinforce it with micro-aggregates and glues, it is destroyed again, creating a zone of loosened soil where the implement has traveled, but a zone immediately below what which has been compacted by the pressure of the implement.
Most horticulturists and many gardeners know that compacted soils are bad for plants growing in them. Shade trees frequently have restricted growth in these kinds of soils. This can happen at a young age when trees are just planted or on large specimen trees, such as in parks that have the soil compacted around them by visitors. Footpaths, picnic tables, playground equipment or any publicly attractive park feature will often have compacted soils in the area.
Deprivation of litterfall and mulch layers, either through wearing out (grinding of organic matter by foot traffic) of the mulch or by mulch/litter removal through raking will promote compaction by removing the cushioning effect of that mulch layer. Sadly, the tree itself can be the feature that attracts people to it, resulting in compacted soils all around its base that limits its health.
Tree growth is limited when soil is compacted around the trunk. Turf loss, and a dry soil are symptoms of a compacted zone around this tree
What is not so well known is why growth is slowed in compacted soils. The effects of compaction are multi-fold. Compacted soils are less porous because the compaction literally reduces the air pockets in the soil, making it more dense with lower oxygen diffusion rates. Soil with destroyed structure becomes less permeable to water infiltration and holds less water. Under these conditions tree roots may not be adequately hydrated, and cannot physically penetrate the highly compacted soil. Thus, they are not able to develop and expand and explore enough to supply the needs of the tree. Reduced soil oxygen, along with other site, soil, and tree variables such as water and nutrient uptake, are all reasons for restricted tree growth.
There is compelling evidence that different species of trees can exert greater pressure at their root tips to break through compacted soils. Different tree species also have different root architectures – finer, deeper, shallower, etc. Thus, there is a genetic factor in a tree’s ability to deal with this soil problem.
Soils are more or less compactable depending on their texture, structure and moisture status. Generally a dry soil is harder to compact that a moist one. Dry soils resist compaction (but still can be compacted) because the soil aggregates stiffen as they dry. Wet soils are easily compacted but people and machinery also easily sink in very wet soils. Waterlogged soils may or may not have structure, but the water in the pores, prevents further collapse of the soil structure. Soils that are moist (at field capacity) are just right for growing plants, and are also perfect for compacting and thus must be protected from compaction.
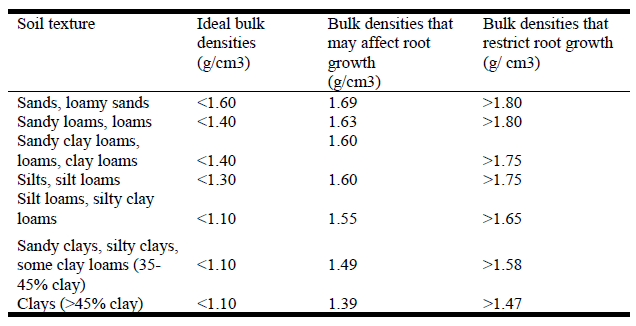
Soil compaction is measured by calculating what’s called bulk density (Bd). Bulk density is the weight of soil in a given volume, and is measured in grams/cubic centimeter. In order to measure bulk density a special soil sampling device called an “intact soil core sampler” is used. This device extracts a core of soil while preserving its structure. The volume of the sample is a constant. The soil sample is removed and dried to drive off all the water and then the weight of dry soil is divided by the known sample volume giving the bulk density.
Bulk densities vary depending on the soil texture (%Sand:Silt:Clay) and to a smaller extent on the organic matter content. Sands generally have very large particles, more pore spaces and lower bulk densities than silts, loams and clays which will
A Comparison of Root Limiting Bulk Density for Different Soil Types (NRCS 1998 in Dallas and Lewandowski, 2003)have the highest bulk densities. Thus compaction is determined by measuring both bulk density and soil texture. Generally, pure rock has a bulk density over 2.65 g/cc. Uncompacted sands may have bulk densities of 1.2-1.4, while loams and clays may have Bd from 1.5-1.8 g/cc. A sand may be compact at 1.4 but a clay may have a higher Bd of 1.5 and not be considered compacted. Organic soils can have Bd that are much lower – 0.02-.9 g/cc. Generally, soils (average of all textures) with bulk densities over 1.5 can be suspected to be compacted and will limit tree growth.
Bulk density for a given soil is not a fixed property, it can change depending on the history of what has happened to the soil. For instance, in an annual color bed or vegetable garden bed, the soil may be turned or tilled by the gardener, amended, and replanted. During this process structure is destroyed, but the organic matter, growth of the crop, and time foster a new soil structure, perhaps even more porous than the soil was previously. This can happen in one growing season. In the case of compacted soils around trees, it can take years for a mulch laid over a compacted soil to correct the compaction.
Another way of looking at this is: if you can get the sampler into the soil, its likely not compacted, but if you have to use a hammer to get it into the soil it might be compacted (or dry). Pressure required is going to depend on the soil moisture, as well as the state of compaction. Compaction can also be measured by a device called a penetrometer which quantifies resistance to penetration. We as gardeners can use a screwdriver, if you can push it into soil; it is less compacted than if you can’t. The screwdriver test is also used to test for moisture content–when soils dry out, they resist penetration. The depth of water penetration in an irrigated soil is the depth to where the screwdriver stops when pushed in. So, it is easy to confuse a compacted soil with a dry soil. Also, if a soil is compacted, water will not easily enter, so many compacted soils are also perennially dry soils since irrigation does not easily penetrate them. This can be seen as increased runoff when you try to irrigate or ponding if the compacted zone does not drain away.
How do we fix compacted soils with high bulk densities? I was always taught that chemical fixers like gypsum, soil penetrants, or other chemical means will not affect a structurally damaged and compacted soil. The only way to fix them is to physically un-compact them. So, further destroying structure by ripping, drilling, trenching, air spading, or in some other way breaking up the compacted layers is the thing to do. Basuk (1994) cites cases where soil modified to treat compaction actually re-compacts (bulk density increases) over time (2-3 years after a compaction relieving treatment is applied). Numerous studies indicate that breakdown of arborist chip mulches will lead to reduced bulk density, but little is known about actual bulk density reductions with mulch applications over time. I am confident mulches will reduce bulk density, but given the diversity of soils, textures and compaction levels, I can only imagine this is a variable response. Removing the cause of the compaction, (foot traffic, machine usage etc) is the first step. Mulching following some kind of “soil fluffing” procedure should begin the process of increasing soil porosity and reducing bulk density. It may take years to relieve compaction passively through the action of mulching. If soil can be mechanically broken up, the compaction issue is solved and soil structure will slowly be reformed in time depending on what is grown thereafter.
References:
Bassuk, N. 1994. A review of the effects of soil compaction and amelioration treatments on landscape trees. Journal of Arboriculture 20:9-17.
If you follow national news, you may have noticed that Sudden Oak Death disease caused by Phytophthora ramorum has been found again in a new state and has escaped into retail commerce and thus into gardens. This is news because the disease is a killer of rhododendron, oak, camellia and many other ornamental plants. Yesterday I was measuring trees in a research plot here in California and I found that one of my subjects had turned brown and lost all its leaves. On checking, I discovered a Phytophthora collar rot was the cause of the symptoms. Phytophthora diseases kill woody plants, often our cherished specimen plantings. This blog post is to introduce you to Phytophthora collar rots, their diagnosis and treatment.
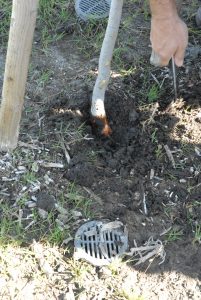
A Phyotophthora crown rot canker on ghost gumThis Eucalyptus suddenly collapsed from a Phytophthora basal canker. All the leaves remain on the tree and turned brownPlanting too deep is predisposing to Phytophthora infection. Note the aeration tubes could not save this tree–they serve no function in landscapes. Avoiding over-wet conditions, proper planting and irrigation timing would have prevented this Phytophthora death.
Phytophthora means plant destroyer in Latin. It is the “deathstar” of plant destroyers and once it has infected, death is the usual outcome. All Phytophthoras are Oomycetes. These are organisms that form an Oospore. Oospores are usually produced when two strains of Phytophthora join and the sexual organs form resulting in this spore. It is thick walled and can live for years in soil without a host. Phytophthora used to be considered a fungus but this was changed some years back to put all Oomycetes in groups that are more closely allied with brown algae. Phytophthoras are not in the kingdom fungi but rather the SAR supergroup of organisms. One main difference between these microbes and fungi is that Phytophthora has cellulose in its cell walls just as plants do. There are hundreds of species of Phytophthora, most affect flowering plants especially woody plants. Very few affect grasses and monocots. There are some that affect palms and others, vegetables and herbacious plants. The late blight fungus Phytophthora infestans caused the Irish Potato famine that resulted in millions of deaths (of people and potatoes) and migration (of people not potatoes) to the United States to avoid starving further. caused the famous Jarrah (a Eucalyptus spp.) die off in Australia, one of the largest known forest epiphytotics. Phytophthora species occur worldwide and affect plants in almost every garden.
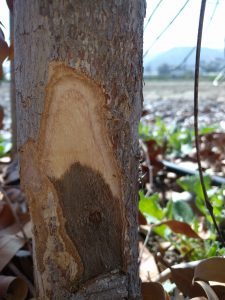
Why are Phytophthoras so successful and how do they get into gardens? I think the answer is that they are cryptic. You can not see any of the spore stages, even with a microscope. There is no “mold-like” growth of the pathogen that you can see either in soils or on the plant. This is because the organism lives inside plant tissues and is very reduced in soils where is survives as spores. Unlike many fungi, you can’t see the mycelium of most Phytophthora species. In plants, Phytophthora usually grows in the vascular cambium of roots or stems and kills those tissues. Plants react to Phytophthora by producing phenols and other phytochemicals turning tissues brown. Brown roots or spreading brown cankers on the main stem are common. When Phytophthora kills the tissues on the main stem this often causes a basal stem canker near the soil line. Usually the plant collapses rapidly with all the leaves turning brown or falling from the plant suddenly. Sometimes basal cankers are associated with deeply planted trees and shrubs or where soil has been added over the root collar. Since basal cankers are under the bark they may not be visible while active and need to be revealed with a knife to expose the brown tissue.
Phytophthora diseases are increased by excess water in soil or on plants. Overly wet situations are predisposing to these diseases if the pathogen is present. Other conditions like reduced oxygen in the rootzone (from compaction), increased salts in soil, very dry conditions followed by very wet circumstances all promote Phytophthora. There are also some groups of plants that seem to be very susceptible—these include: rhododendron, camelia, oaks, cyclamen, most plants in the Ericaceae (madrone, manzanita, blueberry etc.), cedars, pines, and the list goes on. It is hard to avoid susceptible plants because there are so many of them.
Phytophthora species are not native everywhere but have been distributed far and wide by people. Nurseries are prime disseminators of Phytophthora infested plants. Fungicides “subdue” the pathogen but do not eradicate it. So a plant can look healthy while still being infested with Phytophthora. When the fungicide wears off, the plant may become sick if conditions are right for the Phytophthora to grow. Another reason why this type of pathogen is so successful is that a plant can have 50-75% of its roots killed before symptoms begin to show on above ground plant parts. Wilt and collapse only occur very late in the progress of the disease. Because of this, it is important to inspect plants before bringing them home. Never purchase a plant with brown feeder roots, or this could be the starting point for Phytophthora in your garden.
If you are an avid gardener who likes to try new plants all the time, then your future encounter with Phytophthora is likely inevitable. You can do things to limit its development.
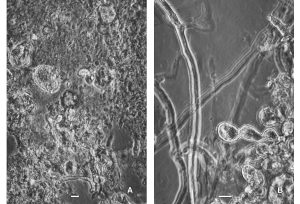
Mycelium of Phytophthora exposed to cellulase (left) and healthy mycelium (right)
-Plant on berms or mounds while avoiding planting in low or poorly drained places
-Use wood chip mulches from freshly chopped tree parts
-Add gypsum to soils as part of your mulching protocol
-If you irrigate your garden allow drying out periods between irrigations
-Plant “high” so that the root crown is clearly exposed
-Do not volcano mulch or cover the root crown with anything at all
-Avoid planting woody perennials in turfgrasses or lawns
Fresh wood chips are often broken down by fungi that release cellulase, this enzyme is toxic to all Phytophthora’s, and the reason why FRESH mulches are so important to create soils with cellulytic enzymes that destroy this pathogen. As gypsum dissolves it provides a slow release source of calcium ions which are also toxic to the swimming spores of Phytophthora. While fungicides can also help limit Phytophthora development, the cultural practices listed above will be just as important in preventing and limiting root and crown rot disease in your garden.
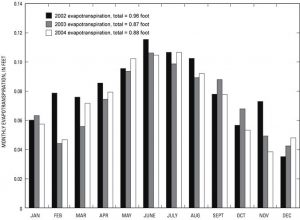
The dog days of summer are here and as we approach the longest day of the year (summer solstice is June 21st), we are also feeling the advance of high summer temperatures. Long days mean more evapotranspiration and water withdrawal from the soil. During these long days, plants photosynthesize more, grow more, and use the most water during the month of June. In fact evapotranspiration looks generally looks like a bell shaped curve when plotted by month (figure 1). Soils dry quickly and irrigation or rainfall may not keep
Figure 1. Evapotranspiration data by month. Image from US geological Survey
up with plant demands for water. This can bring some very real stress to garden plants and turfgrasses. If you live in a place that does not receive summer rainfall you will certainly need to increase irrigation to reflect day length at this time of year.
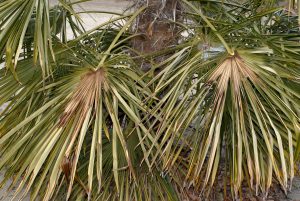
Transpiration is water loss through leaves and is not part of photosynthesis, but it is critical to cool the plant. As soils dry out, the level of abscisic acid produced in roots increases and translocates to leaves resulting in the closing of the pores called stomates. Closed stomata reduces transpiration, but only at a steep cost to the plant. That cost is heat build up. Since this is also the time of the hottest weather it is not long before leaf temperatures rise to lethal levels and sunburn results. Sunburn is always seen as damage in the middle of the leaf because that is the hardest spot to dissipate the heat. The edges that lose heat rapidly are usu
Figure 2. Sunburn occurs in the middle of leaves as in this Windmill palm (Trachycarpus fortunei)
ally not burnt (Figure 2).
Short of applying water properly, what else can be done? Mulches are a great way to avert drought stress since they reduce water loss from the soil surface. The effect is greatest where sun hits the soil. So in new gardens or gardens without a lot of shade, mulches are essential during hot weather to reduce plant stress. Wood chip mulches are particularly helpful in that wood does not reflect, hold or emit heat as much as soil, so it protects adjacent plant surfaces from heat.
How about water absorbing polymers or hydrogels? While much of the allure of these “water crystals” has worn off, it is still good to remind that polymers don’t change evapotranspiration rates of plants so even if they did all the things they claim to, they won’t get plants through a hot summer any better than if they were not present in the soil.
With the longest days come warming soil temperatures. Hot soil can affect plants especially perennials. Ground that is not mulched will radiate infrared onto plant surfaces, this can increase stress. This is yet another reason to employ wood chip mulches around perennials.
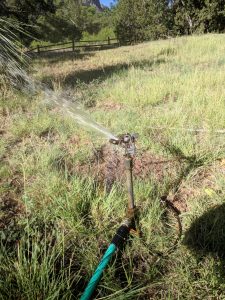
Figure 3. Impact sprinklers raise humidity on very hot days relieving plant stress
So when it is particularly hot and dry how can we get plants through this stressful time? Running sprinklers (where practical) will increase humidity and if soils are dry reduce stress (Figure 3). For annual plants, some shade is often helpful. Applying shade cloth to sensitive or newly planted/emerged plants can cut stress dramatically. As plants establish, the shade can be gradually removed. Keep irrigation even so moisture is always there to maintain transpiration — this is essential during warm weather and long days. For perennial plants there is not much to be done. While pruning will reduce the amount of surfaces that lose water, pruning (thinning) will also lead to temperature increases in the plant canopy since the evaporative surface area of the plant is decreased. So while soil water is saved, canopy temperatures may rise, this may be a poor trade off in the hottest months of the year. Over-pruning opens plants up for sunburn on stems which can lead to fungal canker infections by pathogens like Botryosphaeria. This is very common in Apples.
Another treatment you may have heard claims for are anti-transpirants. These are products that are sprayed on plants to create a film that will cut water loss from leaves. Taken from a recent Amazon search I found the following product description recently… “Product is a water-based, semi-permeable polymer coating that can minimize the damages from climate related stresses, such as frost and freeze, heat stress and sunburn, drying winds, and transplant shock. Applied as a foliar spray, Product provides a unique non-toxic, biodegradable, elastic membrane over the plant surface to reduce moisture loss and insulate the plant.” While there may be an application (such as freeze protection) that makes sense for this kind of product somewhere, I don’t see it in your garden during hot weather. Cutting transpiration (“reducing moisture loss”) will increase the heat on leaves, so one of the common side effects of using these products is hot weather is damage or phytotoxicity. Like polymers the fad is faded.
Sometimes the dog days of summer bring insurmountable challenges. In early summer of 2018 in California, temperatures reached record levels of 115-120. Even in irrigated situations plants were damaged, short of providing immediate shade, there was nothing to be done and many plants were injured, even native plants are not adapted to such high temperatures. If these conditions occur in your garden, you may not be able to limit damage, but there are considerations for after care when this kind of blitz occurs. Don’t prune anything immediately, let the leaves fall and buds form because stems may be intact. Prune away injured plant parts after regrowth begins. If injury is severe, cut back on irrigation. Injured plants don’t require as much water because there is less functional leaf area. This is why root root rot often follows this sort of severe injury. The summer solstice is here—I can already feel the shortening days of fall some distance away.
Reference
Costello, L.R., E.J. Perry, N. P. Matheny, M.J. Henry, and P.M. Geisel. 2014. Abiotic disorders of Landscape Plants. University of California Division of Agriculture and Natural Resources Publication #3420.
I think the blog and garden professors web page is pretty full of research and benefit descriptions of mulching, particularly with arborist chips. A little less clear is the role of amendments in garden soils. I always like to ask the “why” questions for gardening practices. Like “why” prune trees? Why fertilize, etc? Ideally gardening practices should be founded on a basis of science and inquiry as to their necessity. Poor structure early structural training or a damaged canopy may prompt tree pruning, mineral nutrient deficiency symptoms may suggest
When amending, organic materials are often tilled in 50% by volume (3 inch layer tilled six inches deep)
fertilization. So why amend your garden soil? For me as a gardener you do this because your soil is not providing something you think your garden or plants growing in that soil need. This could be nutrients, or water. Amending as a soil or garden practice is best done in garden beds that host annual plants: vegetable gardens, color beds with annual plants etc. Obviously we are not going to lift all the perennials just to add some amendment under their root systems. We can also make arguments that amending soils that you are going to plant perennials in is unlikely to be helpful. So why amend?
Research on providing amendments in the holes of perennial plants has most often shown no significant differences compared to plants installed with just native backfill. There are lots of reasons for this and I can imagine some soils where amendments would give a slight boost, but these were not the soils most studies used (extreme sands). Mostly, perennial roots do not reside in the planting hole for long, so the time that amendments would be effective is very short. Since amending can also harm some plants if done incorrectly, University of California does not recommend the practice, neither did Harris for trees, shrubs and vines. Nor did we find any effect in palms (Hodel and others). For this blog we will assume that amending is restricted to annual plant beds. So why amend? The usual reason I hear is: “My soil is crap!” I think it would be interesting to survey people about their soil and see what they think about it as compared to how it actually grows. Most people seem to disparage their poor soil….So many gardeners believe that if they add something to their crap soil it will get better. Maybe, or no. Amending has potential benefits and detriments depending on what and how much you amend with.
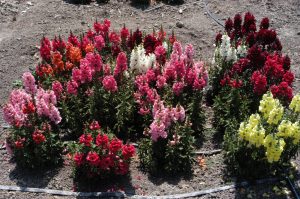
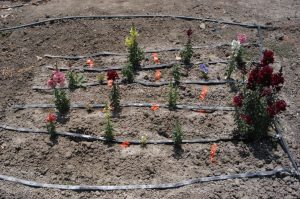
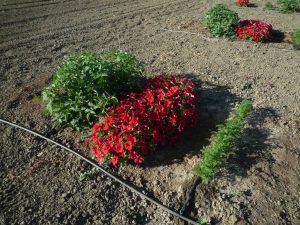
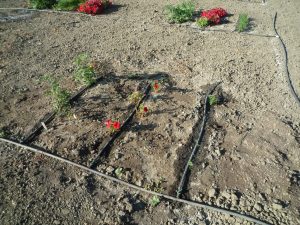
snaps growing in soil amended with high quality yardwaste compostSnaps growing in soil with uncomposted yardwaste used as an amendment. Nitrogen is immobilized
So the potential benefits of amending are:
• rapid (immediate) modification of the planting bed
• potential increase of moisture holding capacity in the soil
• potential increase of nutrients and nutrient holding capacity (cation exchange capacity of the soil
• change in the soil texture, porosity
• rapid increase in soil organic matter
• suppression of soil borne pathogens
Potential detriments include:
• nutrient draw from the soil (nitrogen immobilization: see images above)
• toxicity from residual phytochemicals
• adding pests (weeds or root pathogens)
• soil structure is destroyed
• soil food web is challenged and harmed
• may increase soil salinity
• contaminants can be transferred to gardens
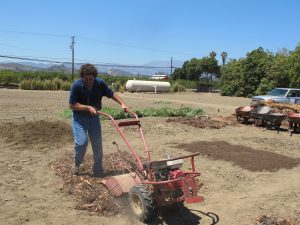
One of the incontrovertible facts about amending is that you have to disturb the soil to do it. Amending involves digging in, roto-tilling, soil turning with a spade, or some kind of incorporation process. Usually the more the better. This destroys soil structure and a good part of the soil food web. Beneficial nematodes are highly sensitive to tillage and many are killed by tillage, often perturbing the entire soil food web in a disturbed soil (See research by Howard Ferris). The beauty of mulching is that the soil structure is not initially influenced only assisted in its further development. The downside is that mulches take months or years to have their effect. While amending can give immediate physical, chemical and biological assistance to soil, it also may bring pathogens, salts, toxic phytochemicals or weeds to your garden depending on what you choose to use as an amendment. Soil tends to be very resilient, so structure destroyed by amending is usually back in place at the end of the cropping cycle in many cases. The need for further amending should be considered carefully after each rotation.
So you still want to amend? What do you amend with? In the case of mulching we (Garden Professors) make a strong argument for freshly prepared (not composted) arborist chips. Nothing could be worse for amending (at least in the short term). Un-decomposed substrates such as wood chips are high in carbon and low in nitrogen. They will cause the microbial community of soil to attack the carbon and utilize all the free nitrogen in the soil, screened or fine materials after composting have greater surface area and will enhance the water absorbing and nutrient holding properties they give to soil. Furthermore, well composted substrates or feedstocks will be free of pathogens and other pests so they should be “safe” for your garden. Composts that are made from plant feedstocks tend have concentrations of plant required minerals. Since composts lose about 2/3 of their carbon and moisture during the decomposition process they have a much higher mineral content than their feedstock. Manures have already been partially composted by the animals that made them. Additional composting increases their salt levels sometimes to plant damaging levels. Manures should be used with care, or in lower quantities as they can damage sensitive plants. Some manures and composts can be contaminated, since some long term soil-residual herbicides such as clopyralid are not broken down in the composting or animal eating process.
soil amended with peat mossSoil amended with composted coffee grounds
Gardeners are inventive in their use of compost and amendments, so there are many ways to amend soil. Peat moss has been the gold standard amendment for many gardens. However due to environmental damage, sustainability of peat moss use is questionable. Coco fiber or coir is a good amendment, but it can bring high salts with it depending on how it was processed. Biosolids are phenomenal amendments and often produce growth responses, but there can be issues with metals and other biological contaminants in biosolids. Home-made compost is a good amendment because you know what is in your compost, as long as it is properly prepared and cured, it can function very well. Greenwaste or yardwaste compost is a possibility, but from my experience, most of these if commercially produced are not well prepared, and are not mature (they still heat up if piled). Many gardeners like coffee grounds, and with the advent of large coffee companies, grounds may be available in bulk quantities. Be careful though as some sources of coffee are toxic to many plants and their use should be limited in any amending situation.
What about rate? In my research I have always tried to amend soils 50% by volume. So a three inch layer of amendment tilled six inches deep has been my goal. Most annual plants have their roots in the upper six inches and this strategy works well. Also, most rototillers are only good for about a six inch depth. If you intend to dig deep with a spade and incorporate to depths beyond six inches, increase the amounts accordingly.
What kind of soil needs amending? Another way to view this is, “have you tried growing without amending? Many soils grow very well with just added nutrients. Typically sands will most benefit from added amendment due to increased water and nutrient holding capacity. I also like to amend clays because they become easier to plant in over time, however the initial go round may be difficult. Clays are very nutritive so amendments may make you feel better gardening in them, but often plants grow very well without amending clay soils. Plant responses to amendments are best in sands.
How often should I amend? This is up to you, but organic matter is “burned up” by the soil microbial community rapidly because 1) you are tilling and this accelerates microbial activity; and 2) you are likely amending during the growing season when warm soil temperatures favor organic matter breakdown. Most gardeners amend prior to replanting the bed.
References
Ferris, H., and M.M. Matute. 2003. Structural and functional succession in the nematode fauna of a soil food web. Applied Soil Ecology 23:93-110
Harris, R.W. Arboriculture: Integrated management of landscape trees, shrubs and vines. 1992. Ed. 2 Prentice-Hall International, New Jersey. 674pp.
Hodel, D.R., Downer, A.J., Pittenger, D.R. and P.J. Beaudoin. 2006. The effect of amended backfill soils when planting five species of palms. HortTechnology 16:457-460.
Ok. I admit this blog is going to turn into a rant pretty quick because there seems to be a lot of ways to screw up a fairly simple horticultural practice—tree planting. Since Arbor days are happening/happened everywhere around now, its a good time to talk about how to plant trees. First let me state some simple and useful guidelines for a successful tree planting.
-When at all possible, plant trees bare-root. Even washing the container media away. This allows for inspection and removal of root defects.
-Select trees carefully that are free of defect and disease and that are adapted to your climate and soils
-Plant the youngest tree you can
-Take care in choosing the planting site.
-Avoid Root Barriers
-Plant trees so that the root flare is above ground slightly
-Plant trees in a hole only deep enough to contain the root system, no double digging.
-Plant trees in a hole wide enough to contain the root system, no wide holes (unless there is a reason for using one)
-Fill the hole with soil removed to make it. Do not amend the backfill around newly planted trees—Do not put rocks in the bottom of a planting hole!
-Plant trees without staking unless there is a reason to stake them
-Plant trees away from turfgrass or other groundcovers.
-Plant trees under the cover of a fresh layer of arborist chips.
-Irrigate newly planted trees from the surface—Do not install U tubes or tree snorkels to irrigate deeply.
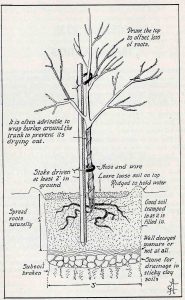
An old planting detail from “a book of trees” . Several myths here: rocks at the bottom of the hole, amended hole, nursery stake still there when it does not need to be, etc.
I guess this rant comes from the variety of tree planting specifications I have seen over the years used by municipalities, landscape architects, nurseries and others. There seems to be a need to use the latest product, method or modification to site soils in order to make a fancy planting detail. Simpler is better and research by Universities has not verified most of the “innovative” approaches seen in planting details.
The first step in planting a tree is to chose the tree you want to plant. While this seems simple there is a lot that goes into tree selection. Setting aside personal choices, it comes down to selecting a tree that is healthy and free of defect. The potential candidate tree should have no signs or symptoms of disease, a naturally developed canopy unfettered by nursery pruning (especially heading cuts), and has few or no root defects. Initial superficial examination of the root collar in the nursery can eliminate some trees with circling or girdling roots. However, when the tree is planted root washing will reveal the entire root system and as Dr. Linda Chalker Scott has shown in this forum, root washing allows for rapid establishment in site soil. When at all possible chose the youngest tree you can for the new site. Young trees have fewer root defects, and we have the advantage of training them (structural pruning) from an early age. Young trees establish rapidly and will often outgrow older, boxed trees. The larger the specimen that you plant, the more chance for establishment problems such as settling, drying out, root rot or just slow growth. Planting trees from seed is ideal but most gardeners don’t have the patience to wait and seedlings, and seedlings do not give the option of using cultivated varieties that impart horticultural value, such as predetermined flower color, disease resistance, and known form (canopy shape and size).
Once the tree is selected, purchased and root washed, it is time for setting it in the ground. The first step is choosing a good planting site. A good site for a tree is somewhere that provides adequate soil volume for its roots to expand and for its canopy to expand. Many trees in urban settings fail to achieve their potential because they have restricted spaces to grow in. Chose a location in full sun. Unless you are planting a species that grows well in shade or needs protection from the environment, most trees will grow best in a sunny location. While trees are forgiving of most soil conditions, they will not grow well in compacted soils. If this is all that is available, break up compacted soils before planting. Consider the ultimate size of the tree you are planting, and imagine it attaining that size in your planting site. Avoid sites that have close proximity to buildings or hardscape. One of the most frequent problems with trees is that as they attain mature size they conflict with the infrastructure at the site.
Dig the hole for your tree so that the roots are very slightly above the grade. Do not double dig! While double digging has its proponents, there is no research-based reason for destroying soil structure– it is a disaster for tree planting. When a hole is dug too deeply soil will always settle after planting and irrigation resulting in the tree being planted too low in the ground. The root collar is buried and this is a predisposing factor for disease. The hole should have undisturbed soil under the roots. The hole only needs to be as wide as the root system. While many planting details show wide holes these are not necessary in most garden sites. If the site is compacted, wide holes can give temporary advantage to a newly planted tree, but the width of the hole will be the size of the “pot” the tree will have to grow in. So it is better to modify the site first to take care of compaction and then you will not need a wide hole.
Root barriers do not function well in most landscapes and lead to the development of landscape trash. They can also create root defects
Root barriers were very popular and are still specified today. They actually do not usually achieve thier goal of preventing surface roots and protecting infrastructure. Trees outgrow root barriers and they result in increases of landscape trash/pollution. Root barriers can also create root defects such as circling and girdling roots. Do not install root barriers, if you are tempted to do so you are likely not choosing a good site to plant a tree.
Cover the roots with backfill from the hole. Do not modify the backfill. Research does not support adding amendments to planting holes for trees. The native soil is what the tree will be growing in ultimately, and there is no reason to modify it. If the soil at your site is so bad that it needs to be changed, this should be a site-wide soil modification that will cover all the area the tree roots will explore up to its maturity. Most gardeners are not able to do this. Roots rapidly expand beyond the planting hole within months, so the time and benefit derived from an amended planting pit is minimal. Adding amendment, especially organic amendments to backfill can also be disastrous for trees. The organic material may utilize nitrogen in the soil and lead to a deficiency in the newly planted tree, worse, it may break down and cause anaerobic conditions in the bottom of the planting pit. Avoid amending planting holes! Never place rocks in the bottom of the hole—this does not create drainage, but creates an interface that prevents it.
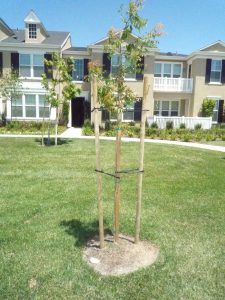
A “lollipop” Tree. Note the very skinny un-tapered stem, lack of temporary lateral branches and retention of the nursery stake–all bad…. Also note the tree snorkel lurking to the left. Kudos for keeping turf away but not far enough away.
If you have selected a good tree, it will stand without staking. There are three reasons for staking: support; anchorage; and protection. Support is sometimes necessary when a tree is cultivated with a long un-tapered trunk and a lollipop crown. Lollipop trees are often sold in nurseries as they resemble small trees. Trees trained in this manner, will not stand without staking. Loose staking allowing trunk movement will foster development of caliper so the tree can eventually stand without supportive staking. Anchor staking is used for trees that experience high winds and “staked out” with guy wires and a non-constrictive collar. Protective staking is analogous to placing bollards around a tree prevent impact from machinery or cars. Always remove the nursery stake at the time of planting and provide any additional support the tree may need. Many Cooperative Extension services have publications on how to stake a shade tree.
Providing a No Turf Zone around trees will aid in their establishment
Avoid planting trees in lawns. Turfgrass and trees conflict with each other. Trees shade turfgrass which results in a thinning sward and increased disease prevalence. Turfgrass slows the growth of trees in an attempt to limit their shading effects. Turfgrass is a very competitive water user and trees will be deprived of moisture and nutrients if turfgrass is present. If trees must be planted in lawns, maintain at least a 1 yard radius around them with no turfgrass.
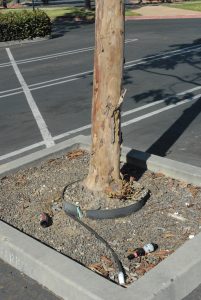
Aeration/Irrigation snorkel tubes do not help trees and result in landscape pollution. Note the original nursery stake still in place and the supportive stakes should have been removed long ago. Mulch needs to be replenished.
It has become a common practice to add irrigation or aeration devices to tree plantings. Sometimes called a tree snorkel these plastic 4 inch U tubes are buried below the root zone. Kits can be purchased from Box stores, and architectural details have been drawn specifying their use. Work by UC researchers showed that oxygen does not diffuse far from aeration tubes. So utilizing tree tubes to increase air flow is suspicious. Some planting details specify adding irrigation to the tubes to force a deep rooted condition in the tree. This places water below the root system, which can dry out and compromise establishment—not a good idea… Worse of all tree snorkels are sometimes installed with no purpose at all other than that was what the planting plan indicated. This is a needless practice and results in landscape pollution. Long term, tree snorkels are ugly, easily broken and provide no useful function to an establishing landscape tree. It is not in the nature of trees to proliferate absorbing roots deep in soil and snorkels will not change a tree’s genetics.
After the tree is set in its hole, and backfill settled in with water, apply a 4 inch layer of arborist chips as far out from the trunk as feasible—at least several feet. The chips will modify the soil improving, chemical, physical and biological properties while conserving moisture from evaporation, preventing runoff, and germination of annual weeds. Generally trees thrive under mulch as it simulates litterfall, or accumulation of organic matter under their canopies. Replenish the mulch as it deteriorates. Finally apply irrigation as needed through the mulch from the surface of the soil. This will help establishing roots, leach salts, and move mulch nutrients into the soil profile. Avoid companion plantings near the main stem of the tree and avoid piling mulch around the tree stem. Following these guidelines will lead to a healthy and useful shade tree that provides its many services for decades.
Understanding the mysteries of plant diseases: Prevention, Control and Cure (Part 3 of 3 in this blog series)
What next?
You’ve done your research and made a diagnosis—now what? Sometimes the plant has to be removed and never planted there again. Start over, do something else.
Some diseases are difficult or impossible to control (virus diseases) especially when they are new or unknown to science.
Controlling plant pathogens or abiotic disorders can be daunting, frustrating, even impossible. As I mentioned in the last blog early detection gives more options for control because the disease has not advanced to a degree where it can not be controlled. Controlling plant diseases is not just palliative (treating your plant’s pain) it involves understanding where pathogens come from, stopping their movement, arresting their development and preventing their spread. Understanding genetics of resistance can offer amazing control of diseases, and finally biological control limits the development and spread of many pathogens.
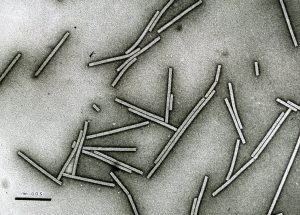
Virus particles can only be seen with an electron microscope, since signs are hard to visualize, early detection is very difficult. Shown are TMV virions
What Can What Can’t?
There are some battles that can’t be fought or fought easily with plant pathogens. When plants are infected with viruses, there is almost no control option but removal (roguing). All plants likely contain some kind of plant virus; but not all viruses in plants cause symptoms of disease. Dangerous viruses like tomato spotted wilt, impatiens necrotic spot virus, cucumber mosaic virus, or many others, are devastating to their hosts and once infected there is no controlling these. Removing infected plants at the first symptom of viral involvement is prudent but often infections have already spread. Viral pathogens almost always infect without significant symptoms, and become systemic in the plant before their more
Once trees with root rot show symptoms it is too late for control measures, the tree is dead and will not recover. Here Phytophthora spp. has killed a eucalyptus tree.
devastating effects become visible. By late season, in most vegetable gardens, viral titre (concentration) is very high in solanaceae plants (pepper, tomato etc) and in cucurbits, both groups are highly susceptible. When perennial plants get viral pathogens there is no cure, and symptoms will increase over time. In orchids, viruses can sometimes be avoided by tissue culturing the meristem (which is usually virus free) to clean up a rare plant worthy of salvation. Sometimes plants are already dead but don’t look it. In the case of root rotted trees and shrubs, leaves may still hang from the tree, may still be green but the tree is beyond salvation, control may not be possible. In general control measures are best conducted early. And by early I mean before you obtain your plant!
An old adage goes: “An ounce of prevention is worth a pound of cure” This is especially so when there is no cure!. Prevention as a control technique really involves several factors such as exclusion, quarantine, and maintaining plant health so that plants are not predisposed to disease. The first tenet of control is exclusion. Don’t bring pathogens to your garden. Gardeners are their own worst enemy where plant diseases are concerned. Since pathogens can be seed-borne, come with insects, be already infected in the nursery, or resident in soil, care must be exercised when new plants are selected for your garden. Practice safe plant swapping! Gardeners sharing plants with each other may also be sharing their respective plant diseases! Be careful where you buy plants, sloppy nurseries with their plants on the ground in standing water is a red flag. Also be on the look out for weeds in nurseries since they can harbor insects that vector virus diseases. Plant debris left on the ground and not cleaned up, can be a source of fungal spores. So consider the source when selecting plants for purchase. Inspect plants carefully before purchase, especially slipping the container off to look at the root
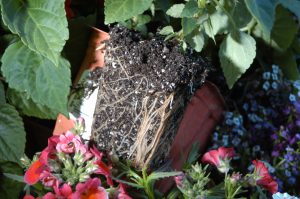
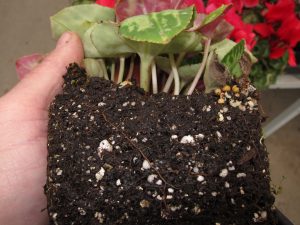
All plants should be inspected carefully, especially root systems. Always remove a sample from containers to inspect. Here cyclamen are shown with root rot.
system. I don’t purchase anything (even boxed trees) without doing this first. If you are satisfied that you have a healthy plant then you are ready for the next phase of disease control.
Plants are often quarantined before they are released for cultivation or planting. When you bring your plant home, leave it in the pot for some time. Even bedding plants if purchased young can grow for a bit in containers. Remember lack of growth is a symptom of incipient disease. Observe your new purchase of a few days or even weeks depending on the plant. If normal growth is occurring then move on to garden placement and planting. A little time set apart from other plants, and careful observation, will possibly prevent bringing something bad to your garden.
Once disease is established, and symptoms are apparent, gardeners often turn to pesticides to try to provide therapy. Sometimes fungicides applied to a plant post infection will slow down the spread of the pathogen within or on a plant. Therapeutic approaches can also turn on plant defense systems or enhance them so that the plant can limit the progress of disease. Therapy is usually not an option with most diseases because the pathogen has often gone beyond the point of stopping it by the time disease is recognized. Some fungicides applied early, can be very therapeutic in turfgrass diseases, blights and powdery mildew diseases. The key to therapy as a control option is to detect the disease early and use an efficacious material that is labeled to control the pathogen you think is causing the disease on a given plant. All this should be on the label.
Pruning out branches with cankers is a form of eradication.
An immediate response of many gardeners when disease is discovered is to kill the pathogen. This is eradication. Eradication takes several forms. There are eradicant pesticides, that kill the pathogen on contact. Usually these cause some degree of harm for the host since most pathogens have a host relationship that is destroyed when the pathogen is killed. Eradication can also be or removing plants from the garden that are a source of disease. Picking up and disposing of fallen plant debris is eradicating a source of potential inoculum from the garden. Pruning cankered branches from a tree is a form of eradication.
One of the best forms of disease control is resistance. Selecting plants that resist disease is built in control. Diseases such as rust and powdery mildew have wide ranges of interaction with their hosts. By selecting plants that are resistant, there is no need for other control measures such as sprays. Resistance to plant disease comes as two types. Horizontal or multigenic resistance is partial or incomplete resistance and is conferred by several genes or their interactions in the host with the pathogen. Vertical or complete resistance is resistance conferred by a single gene in the host. Plants with horizontal resistance will get some of the disease but it won’t be overwhelming, often in grains, lack of resistance will result in complete crop failure. Plants with vertical resistance show no symptoms and are completely immune to the pathogen. While this complete resistance is appealing, it is only conferred by a single gene, and the pathogen can easily break down this resistance and cause disastrous disease. Horizontal resistance while not complete, is called “durable” resistance because it takes more time to overcome resistance conferred by multiple genes. The nature of resistance in garden plants is rarely detailed by growers or seed sellers. Often we are lucky to see any labeling for resistance. Crops like rose, crape myrtle and snap dragon are often sold as resistant to powdery mildew or rust and in some cases plant breeding programs strive to incorporate disease resistance into their breeding lines but then fail to label the product as disease resistant!
Cultural control often involves doing the right horticulture. Keeping turfgrass away from the stem of trees, applying arborist chips, planting at the right depth, are all cultural controls for root disease.
Cultural control is using good horticultural practices to limit the development of disease. Since many plant pathogens require a host to be predisposed, we have the opportunity through good horticulture to avoid the disease development. Planting woody ornamentals at the right depth is a cultural control of Phytophthora collar rots. Appropriate application of water, reduces stress and prevents plants from being predisposed to both root rots and canker diseases. Correct pruning cuts limit the development of decay in trees. Appropriate horticulture as discussed in the Garden Professors page will go far toward cultural control of common garden maladies. Proper plant selection is also a form of cultural control. Choosing plants adapted to the growing area climate, and soils selects plants that are less likely to be predisposed to disease. Poorly adapted plants are more susceptible to pathogens and thus more likely to become diseased.
Biological control is the effect of one organism limiting the development of another thus preventing disease. Classical bio-control is when an exotic pest is introduced and there no natural enemies or parasites to regulate it. The pest/pathogen multiplies rapidly killing or affecting a large plant population. Research in the native range of the host looks for native organisms to control the pest. They are brought to the infestation, released and the pest/disease is brought into control. This works well with insects and the damage they cause. It has also been achieved with exotic plant pathogens. For our native pathogens, there may already be a community of organisms that limit its development. This is especially true for soil-borne pathogens. This is why the GP professors so often recommend fresh wood chips as mulch. Fresh wood chip mulches supply carbon for organisms in soil that interfere with soil-borne pathogens; a kind of mulch-mediated bio control for root diseases.
I find controlling diseases is a lot more difficult than understanding or identifying them. Usually by the time you have observed disease in the garden it is too late to stop its progress. You can take mental notes not to plant that variety again, or prune more diligently etc. but diseases are largely regulated or advantaged by the environment and our good or bad gardening practices. Of course the pathogen has to be present for biotic disease to happen, as we know that organisms don’t spontaneously generate. Disease control starts with identification then research and finally gardening actions that help prevent, limit or eradicate disease propagules.
Sometimes its subtle sometimes its not–like here with powdery mildew on coast live oak.
Do you ever have a feeling that there is something wrong with a plant? It’s just not healthy looking, or it has not grown for awhile? As we discussed in the last blog, disease is a process–it occurs over time. When in the disease time-line you notice the process, can be quite varied. Some astute gardeners may know something is wrong before there are symptoms, others may not take notice of the process until the plant is dead. Your disease detection acuity, or disease intellect, is largely dependent on your ability to recognize when the disease process is happening. Early recognition gives you a chance to interrupt or limit the progress of disease or “control” it. This blog is all about enhancing your disease detection acuity. In the last of the series, I will cover what we can do about plant diseases, their prevention and control.
Sycamore anthracnose disease has vein-following necrosis as one of its foliar symptoms.
Symptoms and signs
Plants respond to challenges from a disease agent by producing symptoms. Symptoms are physiological changes in plants which we can see. Yellowing leaves, necrotic (dead) areas of leaves, stems, flowers or roots are common for many diseases. Some symptoms are very subtle. Slowed growth may be the first symptom of a systemic disease that is spreading within a plant’s vascular system or destroying its roots. Some plants can have 75% of their roots killed by pathogens without any visible symptoms on foliage. Most of the time when symptoms are this subtle, the plant is not growing at the same rate it would if it were healthy. Absence of new foliage, short internodes (distance between leaves), lack of initiation of flowers can all be symptoms of disease. Another subtle symptom is an overall color change that takes away a Plant’s “brightness” or healthy glow. I think most gardeners recognize this, but may not associate color dullness with disease. When subtle symptoms are detected, it is always a good idea to check the roots to see if they are functional (not rotted).
Overt symptoms are easy to distinguish. Fire blight is a good example—the bacterium Erwinia amylovora is spread by bees to flowers where it invades the floral nectaries. Bacteria migrate into shoots and stems and turns them pure black.
Early infections of the fire blight bacterium kill the peduncles of flowers
The disease proceeds rapidly in springtime during bloom and the symptoms (necrosis) are striking. Blights, anthracnose diseases, and canker diseases all produce necrotic tissue symptoms that are easily distinguished from healthy tissues. Even root rot is overt if you take the time to look at the roots!
Fungal hyphae of Armillaria fuse into a mycelial mat under the bark of Peruvian pepper.
Signs are the causal agents of symptoms. Fungal hyphae (collectively mycelium) growing under bark or on plant surfaces are easily observable signs. Just like symptoms, signs can be overt or cryptic. Armillaria mushrooms form in large clusters around the bases of infected trees and are easily identified, but the fruiting bodies of canker diseases (pycnidia) are very small and look like small pepper granules on the surface of a dead twig or branch. Plants often form galls (a symptom) that form around insects or bacterial pathogens (signs). Observing plants carefully to look for signs can be quite diagnostic. For instance if you observe the symptom of distorted new growth on your grape or rose and then carefully examine the tissue with a hand lens you may find the sign of mycelium from powdery mildew. Symptoms often develop after signs and many signs only form in the dead tissue or after the disease has produced much damage.
Fruiting bodies appear as black dots in this necrotic coast redwood tissue. Also note signs of white mycelium
Since signs are often reproductive structures of a pathogen, they are very helpful in pathogen identification. Many microbes have signs and cause significant disease but their signs are microscopic and thus hard
Phytophthora mycelium and chlamydospores are impossible to see in garden soil. These signs are not visible in-situ.
to observe. The mycelium and spores of many Phytophthora spp. that cause root rot of trees, crops and flowers are invisible in-situ. They can only be visualized by isolation in the lab.
Internet searches and labs
So you have observed symptoms, you think you have signs but are not sure. What next? There are thousands of plant diseases, and we see new diseases at an ever increasing rate as we explore growing new plants in new places. Accurate disease diagnosis is beyond most gardeners. Certainly you can narrow things down by looking at google images of diseases listed for the plant in question. But you can also be misled by google searches. I would trust only University-based web pages, as there is a lot of mis-information from other sites that are inaccurate or outright incorrect in their diagnoses. In many states Cooperative Extension offices have personnel that will look at samples for you, or may refer you to a diagnostic lab that can examine or isolate the pathogen from your plant sample for a fee.
If you go to a lab for diagnosis, it can rapidly degrade into incorrect or inconclusive findings. Lab analysis, isolation and pathogen identification work well if you already have a suspicion of what your pathogen is. You are just seeking confirmation. Samples sent to a lab found without pathogens may not not indicate the plant was not diseased. Samples degrade as soon as they are taken, they may not be examined right away at the lab or they may not have been transported correctly (ice chest away from sunlight). Sometimes pathogens just don’t survive well in samples, and will be hard to detect in lab settings. And most frequently, the lab usually does not get a sample with the pathogen in it. A good example is branch die-back symptoms on a tree. So the gardener brings in dead twigs, but the twig dieback is actually caused by extensive root rot. The gardener never even thought to look at roots, because the twigs were the dead part. The lab of course finds no pathogens, only saprophytic organisms, which it lists and leaves the sample submitter confused and wondering if they are pathogens. Labs are best used to confirm something you already have strong suspicions about. You have the fruiting bodies (signs) the symptoms match on-line versions of the disease you are looking at, on the same host, and everything seems right, but you want to be sure. Then a lab is useful. Especially if they get a good sample with signs present.
There are some useful test kits that home gardeners can use to confirm their diagnoses. Lateral flow test strips are available that detect pathogen analytes. These are especially useful in testing for plant viruses and the diseases they cause. While the cost of each test is low, there is usually a requirement to purchase a number test strips, so the cost can be over $250 to purchase a number of lateral flow test strips. The test for Phytophthora (root rot organism) is quite effective, gives results in five minutes and requires no special chemistry or long incubation periods. Some of these diagnostics are species specific, some like the Phytophthora kits, only detect the genus, not the species of Phytophthora involved. Test strips are specific to the disease at hand, so you would already need to be pretty certain of what you have if you are using these. Like a lab, they can confirm what you suspect.
Another handy way to diagnose disease is to use a host index. This is basically a list of diseases occurring on a list of different plants. Cynthia Westcott published the most important host index for ornamental plants, but it is long out of print now, and no longer published. Her plant disease handbook can still be found occasionally at Library book sales. The host index by Farr and others, “Fungi on plants and plant products in the United States” produced back in 1994 by the American Phytopathological Society is still in use by most plant pathologists because in its twelve hundred pages, you can likely find what you are looking for.
So after looking at symptoms, perhaps some testing and examining a host index, you think you have your diagnosis. So what? What can you do with a diagnosis? Well this is a jumping off point for reading the literature on a particular disease and its causal agents. Understanding the disease, its processes and timelines for disease progression will assist you in building an effective control program for your plant or garden. At least you can decide if you dig it up and start over, or weather there is a chance of saving your plant and helping it to resist and recover from the pathogen at hand. Astonishingly, many plants are treated (even by professionals) without an accurate diagnosis. Know your pathogen and you will know the range of its effects on your garden plant and you can research ways to limit its damage and spread. Next time I will talk about actions to keep garden plants healthy.
Gardeners, especially those new to gardening may find they have a “black thumb.” Plants die for no reason! “Oh well chuck it in the greenwaste recycling can and start again.” Or… “Oh I can’t grow cyclamens!… They always die in my garden for some reason.” For many gardeners it is mysterious why some plants fail to thrive or die suddenly. Plant disease processes are complicated, and it requires some knowledge of botany (anatomy and physiology), genetics, and microbiology to really understand what is happening. Also, since microbes are microscopic and most pathogens are microbial we can’t always see them at work, especially before symptoms develop. Symptoms are plant responses to the action of a disease agent. In this post I will try to describe the different kinds of diseases, and where they come from.
There are two broad categories …
of plant disease possible in gardens: biotic diseases and abiotic diseases. Biotic diseases have a disease agent called a pathogen. The pathogen can be microbial, or a nematode or a virus, or a parasitic seed plant. Bacteria and fungi are the most common microbes. It is debatable whether viral particles are living, so also debatable whether or not they are considered microbes. Of the biotic pathogens, fungi cause most diseases in gardens. Many pathogens rely on environmental conditions to favor their lifestyle, this is particularly true of bacteria which like moist, warm environments.
The other category of disease is the abiotic category. Abiotic diseases have no pathogen. An environmental condition such as an excess or lack of an environmental condition causes physiological changes in plants that develop symptoms. Extremes of temperature, light, humidity, soil or water chemistry, soil physical conditions, air quality, and pesticide residue can all lead to abiotic diseases. Since there is no pathogen there is no epidemic, and abiotic diseases are not infectious. So spread, occurrence and movement of abiotic diseases are usually different than biotic disorders
So how does disease happen?
I have heard many gardeners make sweeping statements like “overwatering killed my plant” or “It just died of neglect” or “insects killed it”. Plant pathologists describe the disease process with a cartoon called the disease tetrahedron. It describes the interaction of four things: the pathogen, the environment, the host and time. Of course it is only a triangle for abiotic diseases since there is no pathogen.
For disease to occur there must be an active pathogen present that is virulent (has genes to cause disease). The pathogen must have enough inoculum present to begin the disease process. A single spore rarely leads to a successful disease (although it can in some systems). Most importantly the pathogen must have the right genetics to recognize its host.
Next the environment must be conducive to the pathogen and its development and/or harmful or stressful to the host. The environment can cause the host stress while favoring the pathogen. An example would be oxygen starvation in flooded roots. The environment must favor the pathogen’s build up and dispersal of its inoculum (infective propagules such as spores, cells or seeds). Often splashing rain during the warming spring period is important for their spores to reach a susceptible host.
Finally for disease to happen, the host must be susceptible to the pathogen and possibly predisposed in some way to its attack. Pathogens also have phenotypic synchronicity, that is the ability to produce inoculum at the same time as the host is producing susceptible plant tissues (leaves, buds or stems).
The final facet of the tetrahedron is time. Diseases do not occur instantaneously (even though we may only notice them instantly) – it takes time for them to develop. Disease life cycles or life histories describe how pathogens survive, reproduce and disseminate themselves through the environment over time. The tetrahedron can be used to understand the factors that lead to disease but also can be used as a way to stop or control diseases (more on that in another post).
So where do diseases come from and where are they going?
Abiotic diseases are caused by environmental extremes. Another way to look at them is that they occur when there is a violation of the adaptations of the host. In this regard when we grow plants not well adapted to our climate or environment they can be harmed. A good example is my papaya tree. Right now it has been harmed by low temperatures. Growing a papaya in Ojai, CA is a violation of its adaptations.
Jim’s papaya tree is intolerant of Ojai winter temperatures–a violation of its adpatatons
If abiotic factors don’t cause actual symptoms, sometimes they are able to weaken the host so that a pathogen can enter, and begin disease formation. So abiotic conditions are often predisposing factors for the development of biotic pathogens. Many of the root rot pathogens such as Phytophthora or Armillaria
Wet soils and fine texture (clay) predispose trees to root rot. Note the “root snorkels’ did not prevent the problem
require a predisposing abiotic factor such as drought, saturated soils, high salinity or compaction to facilitate disease development.
Many canker diseases such as those caused by Botryosphaeria are predisposed by drought conditions
So where do pathogens come from?
I like the hospital analogy. Where do you go to get sick? A hospital! They certainly have a difficult time controlling the spread of disease there because that is where sick people go. So where do sick plants come from? Often a nursery! Nurseries import plants from wholesale sources, propagate from their own stock, sometimes reuse their container media, and grow many hosts in a concentrated place over time. There is no better place for diseases to occur than in nurseries.
This is especially true of root diseases because roots are inside the container and often not observed at the time of purchase
Inspect nursery stock for healthy roots before purchase
(but you always should inspect roots of all purchased plants from six packs of garden flowers to boxed trees). Also, some nurseries suppress diseases with fungicides that do not eradicate the pathogen, so when fungicides wear off (after you purchase your plant), disease can develop from now unsuppressed pathogens. Nurserymen relax! I’m not saying that all nurseries sell diseased plants (at least knowingly), but consumers should take extra care when selecting plants and when bringing new plants to their property.
While landscape mulches don’t likely spread viable pathogens they can change soil moisture status enhancing collar rots if irrigation is not adjusted. This tree was also planted deeply, another predisposing factor for disease
Once pathogens establish in the landscape, they may continue to harm new plants. Some pathogenic spores blow in on wind or inoculum moves in water courses along streams or other water paths. Animals, people and equipment can move infested soil onto a property. Once diseases have run their course, pathogens often survive as saprophytes in the diseased tissues. They overwinter or over-summer in debris on the ground. So sanitation is critical in disease control (more on this in another post). Fruiting bodies can be moved in the greenwaste stream but there is very little research showing that disease is initiated by contaminated greenwaste, even though some pathogens may survive there. We do know that when greenwaste is chipped, it dramatically reduces pathogen and insect survival. Stockpiling wastes for as little as seven days will reduce chances pathogen survival by an order of magnitude. Certainly our favored arborist chips are very unlikely to have viable pathogens especially when sourced locally.
Understanding that diseases are not usually caused by gardening practices but by a pathogen or an environmental factor is the first step in diagnosis and control. In my next post I will talk about disease diagnosis and detection…