Slugs and Beer

Around my home I have gravel and hostas.  Just perfect, as you might imagine, for lots of slug damage.  This is where I do my work on slug remedies.  And there are lots of remedies for slugs!  One of the oldest of these remedies is beer.  Almost any beer will be adequate (including alcohol free), but generally the darker the beer the better.  When I first started testing different cures for slugs about five years ago one of the first ones that I looked at was beer.  And when I first tried it…..well, see for yourself.

This is the way that I set up my first beer trap (for this test).  There’s fine sand all the way around the trap and the trap is filled with Moose Drool (a nice beer — Suzanne, my wife — was actually a little irritated that I wasted a good Moose Drool when we had a Bud Light in the fridge — But I was only thirsty for half a beer when I set it out….and I don’t like Bud Light)

I set this trap up around 8 o’clock on a nice warm summer evening, the idea being that the next morning I could go out and see how many slugs approached the beer (by looking at the sand) and then see how many slugs the beer actually caught.

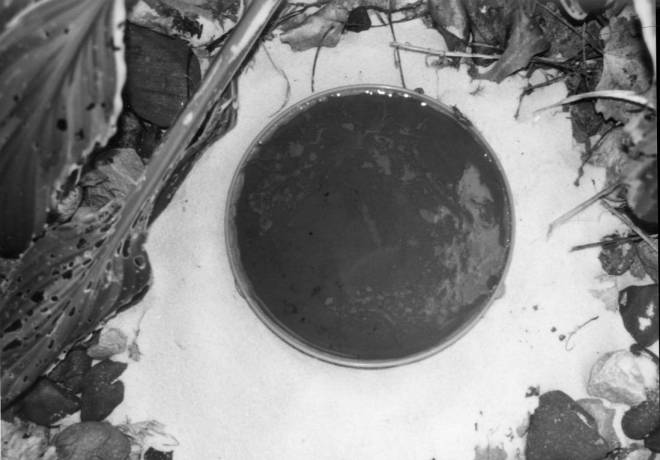
As you can see below we had quite a few slugs approach the beer (By my count about twenty).  And guess how many dead slugs were in that beer?

If you guessed 20…you’d be wrong!  There were no slugs in that beer.  Why?  Because this is a poorly designed slug trap!  slug traps are best when they are made with something like a mason jar and that jar is buried up to the lip of the jar in soil.  Then the jar should be filled up to within about an inch of the top with beer.  If you fill it higher the slug will be able to just reach his head in and drink.  In fact, after I set this trap out, I spent much of the evening watching slugs do just that — it was actually a little like watching old episodes of Cheers!  I had names for the slugs and everything (like Norm and Frazier and that mailman guy whose name I can’t remember now…).

So slug traps are good — but only if they’re set up right!

Health care reform (of trees)

Nothing is more frustrating to a gardener than watching a newly installed tree or shrub slowly die.  In performing “post mortem” analyses on failed landscape plantings, I’ve identified four common errors that can be easily avoided:

  • inadequate root preparation
  • improper soil preparation
  • planting below grade
  • inadequate aftercare

This blog entry will be dedicated to the first point – but before I do so, we need to understand how nursery plant production has changed over the last several decades.

A brief history of propagation
Many years ago the only way to obtain young trees and shrubs was as bare-root plants.  Plants were field grown, then dug up during dormancy for storage and shipping.  Bare-root trees and shrubs are usually only available during a narrow window of time, but in general these plants are healthy and structurally sound.  Most importantly for our discussion, growers can see the woody root system of bare-root plants and cull those that are not well formed.

The development of containerized production methods meant that plants could be grown and sold year around.  When plants are grown in a production greenhouse, they are generally started in small liner pots and gradually moved through a succession of increasingly larger pots.  Ideally this is done before roots become potbound, or the roots are corrected when “potted up” (moved to a larger container).  What we found, unfortunately, in a study of nursery plant quality, is that root systems are often ignored in an effort to produce large quantities of plants quickly and cheaply.  It is not considered to be cost effective to examine and correct root flaws during potting up, so the entire root mass is moved into the new container.  Structural root flaws are not self-correcting and will become more severe the longer they are ignored.

Based on our study, as well as evidence collected by numerous researchers and arborists, it is apparent that poor root quality is a significant problem in containerized and balled-and-burlapped trees and shrubs, at least in this part of the country.  Therefore, we need to correct root flaws before installing woody plants into the landscape.

A quick intro to correcting poor root systems
Balled-and-burlapped plants have a clay rootball; despite its appearance, it is fairly easy to remove the clay simply by removing the burlap and twine and soaking the entire rootball in water.  You can facilitate the process using your fingers to work out the clay, or use a gentle stream of water (Figure 1).

Figure%201.jpg
Figure 1.

Once the clay is removed the root system can be evaluated.  If you find woody roots that are circling, girdling, or in general not growing horizontally and away from the trunk (Figure 2), they should be pruned (Figure 3).  You want to develop an evenly distributed structural root system.

Figure%202.jpg     Figure%203.jpg 
Figures 2 and 3 – before and after

The pictures in this post are from my own Cercis tree, which I planted in April of 2004.  This is not a great time for planting, since Seattle has notoriously dry summers.  Nevertheless, that’s when I planted and as you can see from Figure 3, I had to remove close to 70% of the root system.  I mudded it in well (which eliminated the need for staking), mulched, and kept the root zone well rooted.  It sat for about 3 months and did nothing (Figure 4), except of course the flowers died quickly!.  In July it leafed out (Figure 5), and 3 years later had doubled in size (Figure 6).  It is now close to 15 feet tall and is in excellent health.  Given its initial root system, it’s doubtful it would have done this well without intervention.

Figure%204.jpg   Figure%205.jpg   Figure%206.jpg
Figure 4 – April 04              Figure 5 – July 04               Figure 6 – July 07

(I have performed radical surgery on hundreds of tree and shrub root systems and have only lost one small shrub, whose root system is in Figures 7-8.  Kind of tough to prune something as fatally flawed as this.)

Figure%207.jpg     Figure%208.jpg
Figures 7 and 8 say so much more than I can.

Another look at TreeGators

Following up on Linda’s earlier comments about potential problems with TreeGators, my summer interns and I did a random spot check of about 150 TreeGators currently in use on the MSU campus.  As background, MSU Landscape Services plants about 1,200 trees and shrubs each year.  All newly-planted trees which are not on an automatic irrigation system are fitted with one or two TreeGators, which are filled from a water wagon every week or every two weeks, depending on weather.  Conifers and multi-stemmed trees are fitted with Tree-Tubes, another style of irrigation bag that fits like an inner-tube around the base of a tree.  At MSU irrigation bags are usually left on trees during the first growing season.  Presnetly there are over 1,000 irrigation bags in use on the MSU campus.

During our spot-check, we found few items I would consider to be a major concern.  We found 25 trees with mold or saprophytic fungi growing in the mulch under the bags.  While unsightly, these are unlikely to cause major tree problems and will be gone once the bags are removed and the mulch is exposed to air.  All but a handful of the bags had drained properly and therefore the trunks on most of the trees were dry – eliminating the potential problems that Linda noted about the trunks remaining constantly wet.  TreeGators are designed to drain in 4-5 hours.  Therefore, on a once every two weeks or once a week filling-cycle, they should be full only 1.5% to 3% of the time.  TreeGators that are not draining between fill-ups should be checked for clogs and have a new hole punched, if needed.

It is worth noting that the dark protected space between the irrigation bag and the trunk can provide habitat for various organisms.  We found an assortment or earwigs, spiders, and millipedes; plus one tree frog and one dead bird. The major concern that we found, however, were gypsy moth egg masses (photo 1), which occurred on 14 trees.  Gypsy moths, which are serious defoliators of trees in the eastern US, like to lay their egg masses in protected locations on tree trunks so the inside of the Gator bags makes a handy hideout.  Once found, egg masses are fairly easy to remove, though killing the eggs takes some effort.

While there is a potential for pests to hide out under irrigation bags, I think the benefits of irrigating with TreeGators outweigh the potential negatives. This is especially true in our heavy Midwestern soils where it is impossible to deliver any meaningful amount of water to a newly planted tree in a reasonable time without run-off.   MSU Campus Arborist Paul Swartz reported less than 0.5% mortality out of over 1,000 newly planted trees on campus last year.  The high success rate is attributable to good overall tree management by Landscape Services, including supplemental irrigation using the irrigation bags.  The take home message from our survey is that tree care workers need to check bags at each filling to ensure that bags are draining properly and to lift up the bags and inspect for signs of pests or other issues.


TreeGators on MSU Campus


Tree frog inside TreeGator


TreeGators should drain in 4-5 hours when working properly.


Cause for concern.  Gypsy moth egg mass on trunk.

Bare Root Trees

For the past 11 years I’ve been running a nursery at the University of Minnesota called the TRE (for Teaching, Research, and Extension) nursery where we research all kinds of fun stuff like Dutch elm disease, the dangers of mulching, and what happens when you plant a tree too deeply.  One of the most interesting things we’ve done recently, though, is to install Missouri gravel beds into the nursery.  Missouri gravel beds are called Missouri gravel beds because they were invented by Chris Starbuck, a professor at Missouri State.  He mostly works with gravel beds above the surface of the soil, while here at Minnesota we work with gravel beds below the surface of the soil (the gravel bed below is 60 feet by 10 feet and filled with about 2 feet of pea gravel — we do have a system for recirculating the water — which we sometimes use and sometimes don’t because of clogs, algae buildup, etc.).

We take bare root trees and place them into these beds in spring (when bare root trees are available from nurseries) to encourage root growth and then plant them out into the field later in the season.  The amount of beautiful fine roots for transplanting is just incredible, and the resulting plant can be planted bare root any time of year, instead of just spring when bare root plants in our area are usually transplanted.

Now to be a little more specific: I’m a tremendous fan of planting bare root plants, but I’m not a fan of planting larger plants bare root (at least not without Missouri gravel bed treatment), particularly what are known as B&B trees — trees that are harvested and held in a burlap and wire cage, such as those being harvested below from our nursery.

The reason that I don’t like taking a B&B tree and planting it after bare rooting it (by removing all of the burlap as well as the wire cage and then washing off the soil that surrounds the roots) is that, no matter how gently you wash off the roots, fine roots tend to be destroyed.  When you harvest a root ball for a larger tree you are removing about 80-90 % of the roots.  The additional roots that you remove by washing the ball will often make the tree non-viable.  This is something that have I learned from experience with individual trees, as well as from replicated experiments using hedge maples and Turkish filberts.  We used trees with a stem diameter of about 2 inches with standard sized root balls for that size tree, washed off the root ball for half (five trees of each species) and planted the other half using our more standard system (we removed the top portion of the burlap and wire, but not the bottom portion so as not to disturb the ball).  All of the trees which we bare rooted from B&B died after planting and all that we didn’t bare root lived.  This is further supported by some research coming out of the University of Illinois earlier this year by Andrew Koeser (and coauthors) which shows that handling the balls of B&B trees just isn’t that good for them.

So why am I spending so much time with this?  Simple, this is an area where researchers disagree. In fact, based on what Linda has written in the past I’ll bet that she disagrees with me.  And that’s a good thing.  People always want the quick and simple answer, but often there isn’t a quick and simple answer.  I can’t deny that sometimes bare-rooting a B&B tree before planting might be a good thing.  But I think that, in the majority of cases, it’s a mistake.  In terms of containers — We’ve got a big research experiment going on that right now — we’ll have results next year.

Bad roots and deceptive marketing

I guess today’s blog should be entitled “The Cranky Garden Professor.”   Really, I’m not always cranky, and when I am I go outside to do something constructive in my garden.  Last weekend I finally tackled a 5-gallon container of lavender that I’d bought several weeks ago.  I had intended to wait until fall to transplant it, but I was watering it every day to keep it from wilting.  I figured I might have better luck getting it into the soil where a good mulching would help keep the soil moist without daily watering.

So I carefully slid the lavender out of its pot and into my root-washing tub (Figure 1).  (If you’re not familiar with root washing trees and shrubs, be sure to check out my web page.  I’ve got a fact sheet and some myth columns on why it’s important to bare-root containerized and B&B woody plants before installing them in the landscape.  Please visit www.theinformedgardener.com to access the entire site, or this link for a fact sheet.


Figure 1.  Five little lavenders.

As I worked the potting media out of the root mass, I suddenly discovered why I was using so much water to keep the lavender happy.  It wasn’t one plant.  It was 5 separate lavender plants all placed in the container to LOOK like one large plant.  Worse, all 5 plants had some of the crummiest root systems I’ve ever seen (Figures 2-6).  They were poked into the pot like little carrots.  Most of the pot was filled with untouched potting media.

    
Figures 2-6.  The beehive is back!

What you see in these figures are root systems that look like upside down beehives.  They were obviously left in their original small pots too long and developed circling root systems.  So rather than growing outwards into the soil, they stayed in these little spirals and eventually would fuse into woody knots.   They don’t miraculously straighten out when they’re put into larger containers (or the garden).  If they did, they would have rapidly spread throughout the big container to soak up all that water I was pouring on daily.

Sigh.  Now I was cranky again.  These lavender roots were just like those I’d seen on hundreds of landscape plant failures over the last 10 years.  Since these roots were so tightly woven together there was little hope of untangling them.  So I made one vertical cut through each of the root masses (Figure 7), spread them out horizontally (Figure 8), and planted them (Figure 9).

    
Figure 7.  The cut.           Figure 8.  The spread.   Figure 9.  In the ground.

This is the worst possible time of year to transplant trees and shrubs (it’s August, after all) and I most definitely put a world of hurt on these roots.   But I will say that since I moved them I have been able to reduce irrigation, since the soil holds moisture better than the potting media.  I’ll keep track of their progress through the next 12 months.  I’m hoping they make it through this summer – if so, they stand an excellent chance of growing a decent root system over the fall and winter.

Back to the cranky part.  I really resent nurseries that deliberately bunch small shrubs together in one pot to make them look like one big plant.  It certainly cost more to buy this one pot than to buy five smaller pots.  If this isn’t deceptive marketing I don’t know what is.

Evaluating ‘Scientific’ Claims

Whenever I give talks to landscapers or gardening groups some of the most common questions that come up deal with various products promoted to provide ‘miracle’ results in the garden.  These are usually various soil amendments; fertilizer additives, bio-stimulants, mycorrhizae, and the like.  My initial reaction to these inquiries is, “What does your current basic plant maintenance look like?”  Are you mulching? Irrigating when needed? Fertilizing if needed? Pruning properly?  Have you matched the tree to the site conditions?


As a culture we seem oblivious to the tried and true and gravitate to the quick fix.  Look at late-night infomercials for weight loss products.  Hoards of people are willing to shell out $39.95 (plus shipping and handling) for a bottle of pills guaranteed to miraculously ‘melt away pounds’.  Apparently “Eat less and exercise more” is a tougher sell.  For garden products claiming to produce bigger, better plants there is sometimes a grain of scientific rationale and for a few, such as mycorrhizae, there are specific situations where they can be a benefit.  Nevertheless the basic rule of caveat emptor is the best guide.  Remember, just about anyone can get on PowerPoint and develop some slick looking 3-D bar charts and put together a glossy brochure or cool-looking website. Here are some things to consider when evaluating ‘scientific’ claims.


English 101

Words such as more, greater, bigger, faster are comparatives.  They compare one thing to another.  They need to be followed by a ‘than something’.  Without an object they are meaningless.  Advertisers use this all the time: “New Shill gasoline gives your car more power!”  More power than what? Not putting any gas in your car at all?  So what does a claim that a stimulant produces ‘more and stronger blossoms’ really mean?


What’s compared to what?

Some manufacturers go further and compare their product to an untreated control.  This is a step in the right direction but can still be somewhat misleading.  A common example is various bio-stimulant products, which often contain various enzymes and nutrient elements.  Compared to an untreated control these may indeed improve plant growth.  But is this due to a unique and patented blend of dung beetle excrement and papaya extract or simply the fact that a product contains essential plant nutrients?  A better comparison would be to compare plants receiving the miracle product and plants receiving a conventional (and less expensive) fertilizer containing similar nutrient elements.


The bottom line, as always, is if something sounds too good to be true, it probably is.  Before reaching for an exotic concoction of eye of newt and wing of bat, consider the basics of site selection and landscape plant management.  Chances are there is a lot more to be gained from mundane matters such as putting the right tree in the right place than from trying to remedy the situation by sprinkling some magic dust over the roots.

Mulch Volcanoes

After Linda’s post yesterday I just had to add my own 2 cents about gator bags.  I use ’em and I like ’em.  But, that said, I never allow gator bags to sit against trees for an extended period of time  (Maybe 6 weeks when the tree first goes in).  That’s just asking for trouble!  But looking at those bags got me thinking about a project which we’re finishing up this year.  Volcano mulching. Believe me, it sounds a lot cooler than it is.  Volcano mulching is when you make a big pile of mulch along a tree’s trunk, as in the picture below.

The reason we’re looking at volcano mulching is that everyone says it’s bad, but no-one has really proven that it’s bad.  The reasons that volcano mulching are supposed to be bad are twofold:  First, the mulch could cause rot on the tree’s stem (as with those gator bags) and second, because it might be possible for a tree’s roots to grow up into the mulch, potentially surrounding the stem, which might lead to the roots choking the stem as the tree grows larger.  Not a good situation.  Anyway, early in 2007 we took a field of maples and cut squares in their trunks, as seen below, and then either did or didn’t mound up mulch around these tree’s stems.

What we expected to see was that, over time, the wounding and presence of a mulch volcano would lead to diseases in the stem.  Instead what we found is that, for many of the trees, deeper mulch actually led to the wounds closing more rapidly.  The image below is of a wound that was covered with mulch.

While this next image is of a wound that wasn’t covered with mulch.

Of course some of the wounds without mulch closed fine as well, as you can see in the next image.  (Why isn’t anything ever cut and dried?)

So what does all this mean?  Well, nothing yet.  Research is a funny thing: it rarely gives you quick and easy answers.  I won’t recommend mulch volcanoes because we still haven’t examined those roots that may enter the mulch and surround the stem.  And before I say that the volcanoes didn’t affect stem rot in this study I want to take a closer look at those wounds by cross sectioning the tree which we’ll probably do this fall. Plus we’ve got to run statistics on all the different trees….. and then it would be great if someone else would take a stab at this study to confirm what we see…. I tell you what, nothing’s easy.

What I Learned This Summer (Part 1)

Just flew in from St. Louis and boy are my arms tired! [Baadum – ch!]

I have very diverse responsibilities and interests, but all in one way or another relate to this thing called Gardening. I recently attended two very different conferences, both in St. Louis but thankfully scheduled back-to-back. The first was the Perennial Plant
Association (PPA): a colorful, enthusiastic, slightly eccentric group of growers, breeders, designers, and geeks of the highest order. Bus tours and talks centered on plants, glorious plants….of which we simply cannot get enough.

  Paul Westervelt is so excited...PPA visits Missouri Botanical Garden

Hot plants!!! Paul Westervelt expresses his enthusiasm during the PPA tour of the fabulous Missouri Botanic Garden.

The second was the American Society for Horticultural Science (ASHS) annual conference. Not so colorful. Lots of data…even presented some myself. But very necessary – especially in our realm (publish or perish). “Horticulture” is a ridiculously broad umbrella, under which falls food crops, ornamentals, biotechnology, econom cs, and some social sciences.  There were speakers and posters on a mind-boggling array of topics – from horticulture curricula to stress physiology; tropical fruits to public horticulture. Some of this research and information is ready for “technology transfer”, that is, with a bit of tweaking,
the results are directly applicable, whether to a nursery grower or a consumer.  Much of it is not; and will exist only in that “researcher to researcher” ether.

My point: there are many outlets for the information shared at PPA, i.e. hot new plants on the Terra Nova website, design articles by the various garden writers in attendance, the newest book from Timber Press, etc. For ASHS, not so much, unless you subscribe to HortScience and receive the 1000+ pages of abstracts from the meeting.

This is where we can help. Jeff Gillman has done a yeoman’s job at translating science to gardeners, and now all of us involved in this blog are going to chip in.  Call it “insider
information” or the less-glamorous “stuff that’s technical/boring to read but with
hidden nuggets of usefulness”.  The one thing we hope makes this useful to you is that we all consider ourselves gardeners, and though our day jobs certainly inform how we manage our own little piece of heaven, you’ll get a good dose of adventure, frustration, triumph, plant lust, and humor.

My next few blog contributions will be “things I learned in St. Louis”.  Not least of which is the hoppy goodness of locally-brewed Schlafly Pale Ale.