Bare Rooting – a guest post from a commercial landscaper

What are these trees and do they look like this? Read on to find out!

Today’s blog post is courtesy of Mary Blockberger of Sechelt, BC. As you’ll see, Mary and I go way back.  I thought it was important to our ongoing discussion to see how the industry can use the root-washing technique effectively and economically. Here’s Mary:

“Before I began managing the Sunshine Coast Botanical Garden in Sechelt, BC I had a small residential landscaping company.  By small, I mean that I was the employee of the month every month of the year!  One of our Garden’s mandates is to provide relevant and educational programs for our community.  Dr. Linda Chalker-Scott has been one of our most popular speakers several times.  One of her presentations dealt with the practise of bare-rooting perennials, shrubs, and trees prior to planting, and the tremendous advantages of following this method.

Root-washing and installing 36 Carpinus. November 2007.

“In November, 2007 I had a chance to try this technique out.  My client wanted a ribbon of Carpinus betulus ‘Fastigiata’ planted that would eventually be pleached into an interesting pattern.  [Pleaching is a formal tree training technique.] There was a total of 36 trees to be planted; most were container stock as I recall but there may have included a couple of B&Bs as well.  Working with another local landscaper, into a wheelbarrow of water went every single tree one at a time.  The dirt was clawed away from the root balls by hand with a final spray from the hose.  Honestly, it was a cold and miserable job, and I believe a few curses directed at Linda ensued.  However, once the roots were cleaned of all soil planting was a breeze.  It’s a lot easier moving trees without moving the soil too.

Carpinus are well established and pleaching is underway. April 2009

“Flash forward 12 years, and every single tree has flourished.  Bare rooting allowed us to identify and correct any problems before planting, and I’m sure this has a lot to do with the trees’ success.  It’s a time consuming and at times messy method, but the reward of a healthy row of trees is well worth the effort, IMHO.”

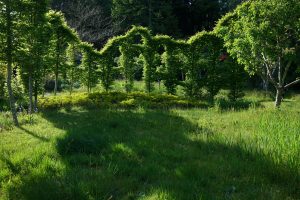
Pleached Carpinus hedge May 2019

And let me add to Mary’s account that a ZERO replacement rate is going to pencil out to long term economic success. I was able to see these trees earlier this year – that’s my photo at the top of this post.

Amending Soils—Why??

I think the blog and garden professors web page is pretty full of research and benefit descriptions of mulching, particularly with arborist chips. A little less clear is the role of amendments in garden soils. I always like to ask the “why” questions for gardening practices. Like “why” prune trees? Why fertilize, etc? Ideally gardening practices should be founded on a basis of science and inquiry as to their necessity. Poor structure early structural training or a damaged canopy may prompt tree pruning, mineral nutrient deficiency symptoms may suggest

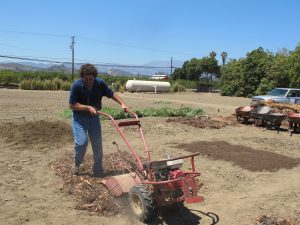
When amending, organic materials are often tilled in 50% by volume (3 inch layer tilled six inches deep)

fertilization. So why amend your garden soil? For me as a gardener you do this because your soil is not providing something you think your garden or plants growing in that soil need. This could be nutrients, or water. Amending as a soil or garden practice is best done in garden beds that host annual plants: vegetable gardens, color beds with annual plants etc. Obviously we are not going to lift all the perennials just to add some amendment under their root systems. We can also make arguments that amending soils that you are going to plant perennials in is unlikely to be helpful. So why amend?


Research on providing amendments in the holes of perennial plants has most often shown no significant differences compared to plants installed with just native backfill. There are lots of reasons for this and I can imagine some soils where amendments would give a slight boost, but these were not the soils most studies used (extreme sands). Mostly, perennial roots do not reside in the planting hole for long, so the time that amendments would be effective is very short. Since amending can also harm some plants if done incorrectly, University of California does not recommend the practice, neither did Harris for trees, shrubs and vines. Nor did we find any effect in palms (Hodel and others). For this blog we will assume that amending is restricted to annual plant beds. So why amend? The usual reason I hear is: “My soil is crap!” I think it would be interesting to survey people about their soil and see what they think about it as compared to how it actually grows. Most people seem to disparage their poor soil….So many gardeners believe that if they add something to their crap soil it will get better. Maybe, or no. Amending has potential benefits and detriments depending on what and how much you amend with.

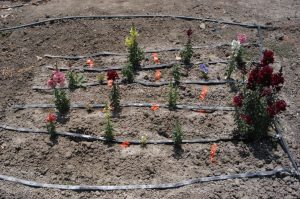
snaps growing in soil amended with high quality yardwaste compost
Snaps growing in soil with uncomposted yardwaste used as an amendment. Nitrogen is immobilized

So the potential benefits of amending are:
• rapid (immediate) modification of the planting bed
• potential increase of moisture holding capacity in the soil
• potential increase of nutrients and nutrient holding capacity (cation exchange capacity of the soil
• change in the soil texture, porosity
• rapid increase in soil organic matter
• suppression of soil borne pathogens

Potential detriments include:
• nutrient draw from the soil (nitrogen immobilization: see images above)
• toxicity from residual phytochemicals
• adding pests (weeds or root pathogens)
• soil structure is destroyed
• soil food web is challenged and harmed
• may increase soil salinity
• contaminants can be transferred to gardens

One of the incontrovertible facts about amending is that you have to disturb the soil to do it. Amending involves digging in, roto-tilling, soil turning with a spade, or some kind of incorporation process. Usually the more the better. This destroys soil structure and a good part of the soil food web. Beneficial nematodes are highly sensitive to tillage and many are killed by tillage, often perturbing the entire soil food web in a disturbed soil (See research by Howard Ferris). The beauty of mulching is that the soil structure is not initially influenced only assisted in its further development. The downside is that mulches take months or years to have their effect. While amending can give immediate physical, chemical and biological assistance to soil, it also may bring pathogens, salts, toxic phytochemicals or weeds to your garden depending on what you choose to use as an amendment. Soil tends to be very resilient, so structure destroyed by amending is usually back in place at the end of the cropping cycle in many cases. The need for further amending should be considered carefully after each rotation.

So you still want to amend? What do you amend with? In the case of mulching we (Garden Professors) make a strong argument for freshly prepared (not composted) arborist chips. Nothing could be worse for amending (at least in the short term). Un-decomposed substrates such as wood chips are high in carbon and low in nitrogen. They will cause the microbial community of soil to attack the carbon and utilize all the free nitrogen in the soil, screened or fine materials after composting have greater surface area and will enhance the water absorbing and nutrient holding properties they give to soil. Furthermore, well composted substrates or feedstocks will be free of pathogens and other pests so they should be “safe” for your garden. Composts that are made from plant feedstocks tend have concentrations of plant required minerals. Since composts lose about 2/3 of their carbon and moisture during the decomposition process they have a much higher mineral content than their feedstock. Manures have already been partially composted by the animals that made them. Additional composting increases their salt levels sometimes to plant damaging levels. Manures should be used with care, or in lower quantities as they can damage sensitive plants. Some manures and composts can be contaminated, since some long term soil-residual herbicides such as clopyralid are not broken down in the composting or animal eating process.

soil amended with peat moss
Soil amended with composted coffee grounds

Gardeners are inventive in their use of compost and amendments, so there are many ways to amend soil. Peat moss has been the gold standard amendment for many gardens. However due to environmental damage, sustainability of peat moss use is questionable. Coco fiber or coir is a good amendment, but it can bring high salts with it depending on how it was processed. Biosolids are phenomenal amendments and often produce growth responses, but there can be issues with metals and other biological contaminants in biosolids. Home-made compost is a good amendment because you know what is in your compost, as long as it is properly prepared and cured, it can function very well. Greenwaste or yardwaste compost is a possibility, but from my experience, most of these if commercially produced are not well prepared, and are not mature (they still heat up if piled). Many gardeners like coffee grounds, and with the advent of large coffee companies, grounds may be available in bulk quantities. Be careful though as some sources of coffee are toxic to many plants and their use should be limited in any amending situation.

What about rate? In my research I have always tried to amend soils 50% by volume. So a three inch layer of amendment tilled six inches deep has been my goal. Most annual plants have their roots in the upper six inches and this strategy works well. Also, most rototillers are only good for about a six inch depth. If you intend to dig deep with a spade and incorporate to depths beyond six inches, increase the amounts accordingly.

What kind of soil needs amending? Another way to view this is, “have you tried growing without amending? Many soils grow very well with just added nutrients. Typically sands will most benefit from added amendment due to increased water and nutrient holding capacity. I also like to amend clays because they become easier to plant in over time, however the initial go round may be difficult. Clays are very nutritive so amendments may make you feel better gardening in them, but often plants grow very well without amending clay soils. Plant responses to amendments are best in sands.

How often should I amend? This is up to you, but organic matter is “burned up” by the soil microbial community rapidly because 1) you are tilling and this accelerates microbial activity; and 2) you are likely amending during the growing season when warm soil temperatures favor organic matter breakdown. Most gardeners amend prior to replanting the bed.

References

Ferris, H., and M.M. Matute. 2003. Structural and functional succession in the nematode fauna of a soil food web. Applied Soil Ecology 23:93-110

Harris, R.W. Arboriculture: Integrated management of landscape trees, shrubs and vines. 1992. Ed. 2 Prentice-Hall International, New Jersey. 674pp.

Hodel, D.R., Downer, A.J., Pittenger, D.R. and P.J. Beaudoin. 2006. The effect of amended backfill soils when planting five species of palms. HortTechnology 16:457-460.

Plant Control to Major Tom(ato): The Art of Spacing Out Your Plants

“Why don’t you just plant it up against the house,” piped my mother-in-law.  She was talking about a run-of-the-mill “old fashioned lilac” that we had received in the mail for our donation to Arbor Day.  While I don’t necessarily think of the organized tn as a source of high-quality or novel plants, I felt beholden to  make a donation since it was founded and is still located in Nebraska (and we have visited the Arbor Lodge, home to founder J. Sterling Morton and his brood of tycoons (one of salt fame – that Morton, one of cornstarch fame – ergo we have Argo, and one of the railroad).  I had pawned the 10 blue spruce off to the freebie table at the office, but she wanted a lilac…and what momma-in-law wants, momma-in-law gets.

I explained to her that the labeled final size of the cultivar was 12 feet in diameter, so it needed to be at least 6 feet from the house (preferably more) and from other plants.  “Nonsense!” she decried, “I planted mine close to the house.  You just have to keep it pruned back.  Mine did just fine….. until it rotted.”  Since the right spacing would put the shrub in the middle of a narrow passage between the house and the fence, I opted to throw it into a pot since I was heading out of the country the next day for two weeks.  It was, after all, a little more than a spindly twig (with roots wrapped together in a ball) sheathed in plastic.

What’s the issue? 

Most gardener’s desire for instant gratification often means that correct spacing for the finished size of the plant gets thrown out the window so that the garden looks good to go from the beginning.  Or even worse, plants get shoved against houses, under power lines, or in other areas where they’ll either be cramped and crowded or incessantly pruned to the point of oblivion throughout their probably shorter-than-expected lifespan.  Think of it like your bubble of personal space.  Just like you don’t want to be crowded, neither do plants.

In addition to the pruning and space issues, crowding can increase the likelihood of disease or other plant issues.  Crowded plants reduce air flow, which aids the development of diseases by increasing (ever so slightly) the humidity in the plant’s microclimate, increasing drying times after rain or irrigation, and even allowing for disease spores to more easily settle on the plants.  For perennials, and especially trees and shrubs, overcrowding can be a chronic issue since the problem can last for many, many years.

That’s not to say that spacing it isn’t a problem with annuals, either, especially in the vegetable garden.  In addition to the increased possibility of disease, competition for space and for nutrients can reduce yields.  Crowded root crops like carrots, beets, and radishes don’t have enough space to fill out, resulting in stunted and irregular produce. The same goes for leafy crops like lettuce or kale.  Fruiting crops like tomatoes and peppers can also suffer from reduced production when plants can’t fully grow to their potential.

Getting Spacing Right: The Simple Art of Not Planting Too Damn Close

Perhaps the secret is complicated formula for figuring out the proper plant spacing?  Or perhaps it is some specific planetary alignment you need to wait for?  Since it seems to mystify may gardeners, spacing must be difficult, right?  Au contrare!

Most plants come with the proper space printed right on the label!  Think of such a novelty!  That lilac my MIL wanted to plant against the house said right on the packaging that it generally grew to 12’ wide.  If I were planting a bunch of them in a row (and not as a hedge), I could plant them 12’ apart.  If I wanted to grow them as a hedge, I’d reduce that spacing to make them grow into each other (but it will take time for them to grow into a hedge…so they won’t be touching right away).  Keep in mind that this is the genetic potential of the plant and isn’t a guarantee.  Many factors, including microclimate, soil conditions, precipitation, nutrient availability, disease, etc. etc. etc. could limit the plant’s growth to that potential (or even more rarely increase it).  What if I’m not planting a bunch in a row?  Here’s were a teensy bit of math comes into play.

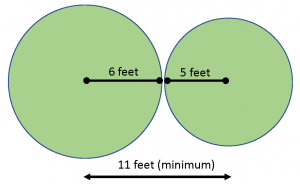
Think of plants in general terms as circles.  Just look at a basic landscape architect’s plans and you’ll sometimes see plants represented generally as circles.  If you think all the way back to that geometry class in high school, you’ll remember that there are several measures of a circle, including the diameter and the radius.  The diameter is the width of the circle from one side to the other. The radius is the distance from the center point of the circle to the edge.  So if our plant is a circle, then the listed width of the plant is the diameter and the distance from the trunk, stem, or center is the radius.  So I can expect my lilac (if it reaches full potential) to grow out 6 feet from the trunk.  That means I need to plant it at least 6 feet away from the wall.  If I wanted to plant it in the landscape with other plants around it, I would need to figure out the radius of the plants I wanted to plant close to it and add their radius to the lilac radius to figure the minimum distance I should plant them apart.  Let’s say I wanted to plant a small shrub beside the lilac with listed width of 10 feet.  That means the radius of that shrub is 5 feet.  Adding them together, I get a distance of 11 feet.  On the other side of the lilac I want to plant a large perennial with a diameter of 4 feet.  The radius would be 2 feet, so my minimum planting distance would be 8 feet.  You also have to keep in mind any variation due to microclimate and environmental factors.
What about the vegetable garden?

The same concept holds true for the vegetable garden as well – think of each of the plants as a circle.  Where planning the spacing is different is usually interpreting what the seed packet says in terms of in-row versus between-row spacing.  The in-row spacing is based on the size of the plant, a general idea of the size of the circle the plant makes or how much space it needs between plants (some plants, like beans, are OK when they overlap a bit and share space).  The between-row spacing is for human use in creating typical in-ground, large garden areas.  I’ve had the discussion before of large garden area vs. in-ground beds, vs. raised beds so we don’t need to go into that detail, but the general movement is toward some sort of bed system to reduce walkways (reducing bare soil that can lead to erosion or compaction when walked on) and intensify plant spacing/output per a given area.

Taking that into consideration, use the in-row spacing as the between plant spacing in all directions.  This is what the popular Square Foot Gardening method does – the spacings and number of plants per square are based on the between plant spacing and eliminates row spacing.  For example, radishes and carrots typically have an in-row or between plant spacing of 3 inches.  If you fit that spacing evenly within a foot row segment, you get four plants.  When you make that two dimensional you get 16 plants per square foot.  For four inch spacing you get 3 per foot and 9 per square foot, six inch spacing you get two and four, etc.  You can fill an entire bed with plants like this without spacing between rows of plants.

Of course, the tricky thing is that, just like our trees and shrubs that are planted too closely reduced airflow and increased microclimate humidity can increase the risk of diseases in the plants.  The Square Foot Gardening method by the book states that you shouldn’t plant any adjacent square with the same crop to decrease likelihood of disease sharing, but that seems sounder in theory than in practicality. I use some of the spacing (and you don’t need the book, just look at the between plant spacing and calculate. You just have to monitor, use good IPM, and treat or remove issues promptly to reduce disease issues. Using interplanting to intensively plant by mixing various space usages (tall plants with short plants, root crops with fruit crops) can also help make use of the space while mixing plants to reduce disease spread.

Planting with a “flare”

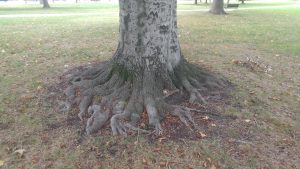
Anyone who plants or cares for woody plants eventually hears the term “root flare” (or root crown). It’s easy to describe a root flare (it’s the region where stem or trunk morphs into roots). What’s sometimes difficult or even impossible is finding it in improperly planted trees and shrubs.

Conifer root flare
Angiosperm root flare


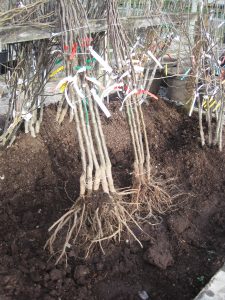
One of the primary causes of tree and shrub failure is improper planting depth. This is not a problem with bare-root plants, as you can easily see the region of transition. During planting you should make sure that the root flare is at grade, so that the roots are underground and the stem/trunk is above ground. The only mistake you can make with bare-root plants is to plant them upside down.

Grafted bare root trees clearly show root flare

The problem really started with the advent of containerized and balled-in-burlap (B&B) plants. This technology is less than 100 years old, and before it existed everything was either planted from seed or from bare-root stock. It’s possible to use containers and B&B properly for temporarily housing trees and shrubs, but increasingly automated production methods with unskilled workers and undereducated supervisors means increasing numbers of poorly planted woody plants entering the retail market.

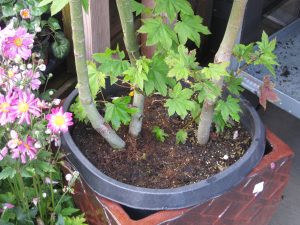
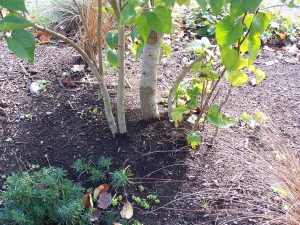
Vine maple planted too deeply in container
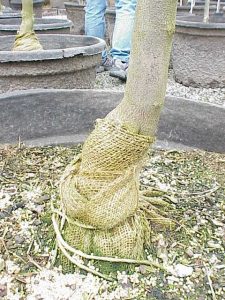
Tree buried too deeply in burlap


I’ve written earlier posts about how to select plants at the nursery. As you’ll note, finding the root flare can often be impossible without removing container media or B&B burlap. Because so many people are unaware of the problem or unwilling to disturb the root ball, these plants are then installed with the root flare still buried.

Lilac planted too deeply
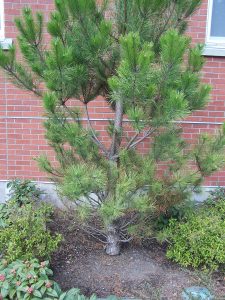
Pine tree planted too deeply


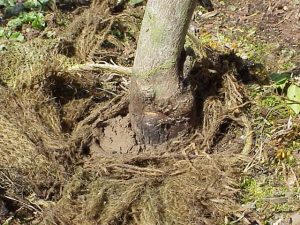
Why does it matter if part of the trunk is underground? For some species, it really doesn’t matter. Wetland species, for instance, can tolerate low soil oxygen levels and submerged trunks. But most of us are not planting wetland species, and many ornamentals are not tolerant of this treatment. Roots that are buried too deeply don’t receive enough oxygen to survive, and the plants respond by trying to create a new root system. These adventitious roots are unable to supply enough water to the growing crown, however, meaning shrubs and trees suffer chronic drought stress when the rate of evaporation exceeds the ability of these substandard root systems to supply water.

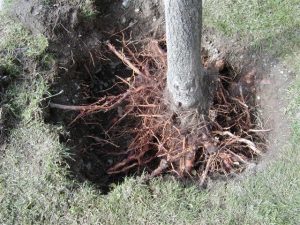
With only skimpy adventitious root system to take up water…
…this tree suffers chronic drought stress every summer


There are other problems, too. Stem and trunk tissues of non-wetland species are not adapted to being buried. The excessive moisture and lack of oxygen contribute to the attack of opportunistic pests and diseases, both of which can cause irreversible damage and eventual death. You can even see this happening to plants in the nursery.

Rotted trunk clearly visible in improperly bagged B&B

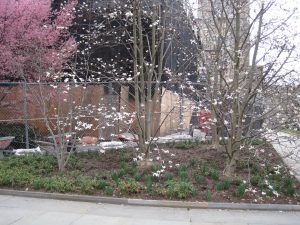
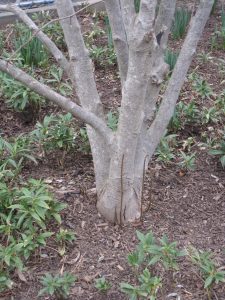
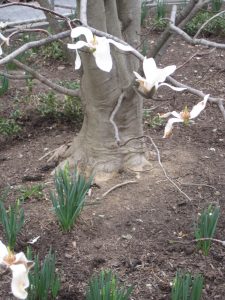
Finally, consider this landscape evidence of the impact of buried root flares. These magnolias are all planted on the campus at Princeton University. The one of the left is significantly smaller than the other three. A close up of the trunks explains why.

One of these trees is not like the others
Magnolia tree under stress from being buried too deeply
This magnolia tree thrives with its root flare clearly visible


If you have newly planted trees that look more like telephone poles than trees, the best thing you can do is dig them up and plant them correctly.