Tuning up for Pruning Up–Care, Maintenance and Utilization of Hand Pruning Tools

A. J. Downer

Fall is passing into winter and the bare sticks in my deciduous fruit orchard are calling to my annual fruit tree pruning chores.  I can prune my entire orchard with very few tools: a good pair of bypass clippers, a similar set of loppers
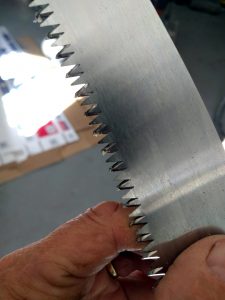
Illustration 1. Tri-edge saw blades are made from stainless steel and are not easily sharpened. When dull or bent they should be replaced.

(optional) and a high quality “razor” or “tri edge” saw.  Most hand tools require some maintenance especially the clippers and loppers.   Clippers are easily sharpened but modern saw blades can not be sharpened by gardeners. I usually just buy a new saw, replacing the old one when blade eventually dulls or bends from over zealous use (illustration 1).
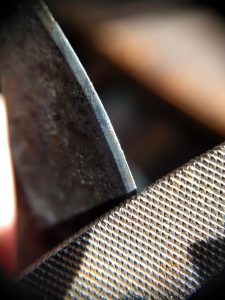
Illustration 2. To sharpen bypass clipper blades follow the angle of the bevel. Do not sharpen the flat side of the blade

Before using your pruning tools inspect them for signs of damage. Blades should be sharp and straight.  Loppers should have their rubber “bumpers” intact otherwise your knuckles will be smashed after exerting force on a difficult branch.  Sharp tools offer less resistance and actually decrease injury to users. One exception here is with the modern “tri-edge” or “razor” saws. These saws can cut so quickly that you may pass through the branch you are cutting and continue on to some part of your anatomy quickly ripping your flesh open. I have suffered more cuts (some serious) from these saws than from any other gardening activity (although I was recently impaled by a frog metal art sculpture!).  They should be used with careful precision, not with the wild abandon and pruning fervor of the craven academic desperate for real world pruning experiences.  A thick long sleeved shirt and gloves will also help prevent cuts from hand pruning equipment.

Bypass clippers are so termed because the blade passes by the hook. To sharpen these, find the bevel on the edge of the clippers and align a small file to the same angle of this bevel, and file the bevel until you can feel the sharpness with your finger (Illustration 2).  Never sharpen the back side of the bevel—this will create a gap, and every time you cut, a flap of tissue will remain. Back bevel sharpened clippers will require blade replacement or grinding until the back bevel is gone. The hook does not require sharpening, do not attempt to file it. Repeat this process with lopper blades.

When you are done pruning for the day, wipe the blades of your clippers and loppers with an oil soaked rag or apply a few drops of oil and rub it into the blade. Most modern saws blades are made from stainless steel and require no oil protection.

As a Cooperative Extension Advisor, one of the most common questions I receive is: “Should I sanitize my clippers between cuts or between uses on various plants?”.  Indeed, many publications, extension leaflets, gardening columns, and other sources make broad recommendations to sanitize clippers after every cut. Some articles even compare various products for their killing efficacy.  Blind recommendations are often made to sanitize clippers when the pathogen is not  known or specified.  It is not necessary to sanitize your clippers when pruning most garden plants and fruit trees.  There are a few pathogens that are spread by moving plant debris, but published evidence that they are spread by hand pruning equipment (especially clippers) is nil. One exception is palm wilt caused by Fusarium oxysporum f.sp. canariensis which is easily spread by saws. Some of the canker fungi caused by Botryosphaeria can also be spread by pruning equipment. With many of these pathogens, a wound is required for infection so it may not be that the clippers are spreading disease so much as providing an entry point (infection court) so that pathogens have a way to enter.

If diseases are present in or near the plant already, sterilizing pruning equipment will simply provide a clean entry port for the pathogen—infection can still follow after the cut is made with a sanitized tool.

In my garden, I never sanitize clippers between cuts.  However, conditions vary across the US, and in some places rain, humidity, and temperature are more favorable for disease development.  If you have concern about spreading pathogens, prune during the dormant season, when the likelihood of pathogen activity is lowest. Apply dormant sprays containing copper to limit the onset of new fungal diseases that may enter pruning wounds.  If you still feel you need to protect wounds from dirty clippers I like to use the flame from a plumber’s torch to sanitize.  A few seconds along the cutting edge front and back kills all pathogens (Illustration 3).  The process is similar for a saw but efficacy is increased if the saw gullets are wiped clean with a cloth and then the flame applied. The only time I take these measures is when I know I am working with plants that can be inoculated by pruning (which is rare).
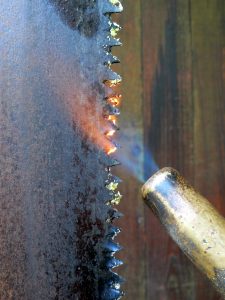

Illustration 3. A plumber’s torch will rapidly sanitize saws and blades when pathogens are present in plant tissues.

When pruning garden plants, there are a plethora of recommendations on how to make cuts. Rose experts have extolled the virtues of an angled cut so water runs away quickly, flush cuts used to be recommended by arborists as the highest quality cut. These examples are without research foundation. Cuts on woody plants should made to create the most circular exposure that leaves the smallest surface area possible. We abandoned flush cuts many years back because they cut into protective zones that limit decay in trees. Some gardeners feel compelled to cover their cuts with a pruning paint and there is a similar paucity of research to support this practice. Leave pruning wounds unpainted.
It came from the blog… The return of SOME-DED-TREES

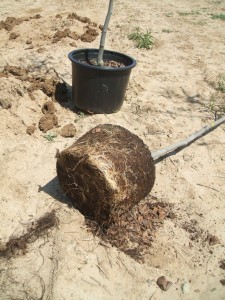
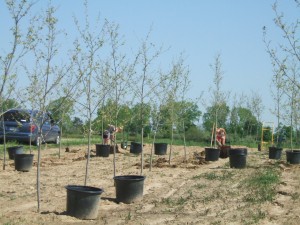
Things have been going fast and furious here since the start of the year. We still have a few days left in February and I’ve already logged 13 talks in five states. Nevertheless, I’ve manage to find a little time to crunch some data on SOME-DED-TREES. For the uninitiated, SOME-DED-TREES is the acronym for the Social Media Designed Tree Transplant Study. The project was an opportunity for Garden Professor blog readers to participate in the design of a landscape horticulture research project. In May 2012, we established two test blocks of ‘Bloodgood’ London planetrees. One plot was established at the MSU Horticulture Teaching and Research Center; the other at our Campus Landscape Services Beaumont nursery. All trees were planted from 25 gallon containers (avg. height 12’, avg. caliper 1.8”). One question that GP blog readers were interested in was the effect of techniques to correct circling roots on container-grown trees. So at each location we divided 48 trees into three groups. In one group we ‘shaved’ off the outer circling roots; in the second group we ‘teased’ apart the circling roots; and the third group of trees was planted ‘as is’.

DSCF2492

We looked at an additional treatment factor at each of the two locations. At the Teaching and Research Center we mulched half of the trees with 3” of coarse pine bark and left the remainder without mulch. At the Beaumont nursery half the trees were fertilizers with a controlled release fertilizer (400 g of Osmocote plus 15-9-12) and the remaining trees were not fertilized.

DSCF2489

Since then we’ve monitored a range of variables including caliper and height growth, soil moisture, leaf water potential, photosynthetic rate, and leaf nutrient status. Two growing seasons after transplanting here are some key findings.

Root ball manipulation
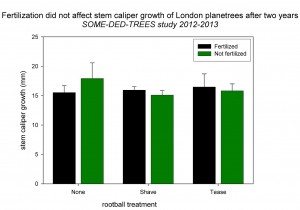
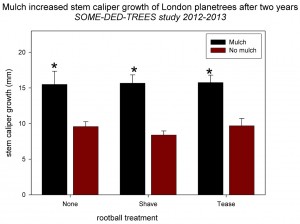
Neither of the techniques to correct circling roots (shaving or teasing) affected any of the tree parameters we measured. There was no difference among root treatments in caliper growth (Fig. 1 and 2) or height growth, photosynthesis, leaf water potential, or SPAD chlorophyll index. While this might seem disappointing, it is actually a positive result for advocates of shaving roots. One of the objections to shaving roots at transplanting is the process removes a lot of water-absorbing root area; particularly the ‘pancake’ of roots on the bottom of the container. We planted our trees just before the severe heat and drought of Summer 2012, and there were no obvious stress-related impacts of the root treatments. Of course, the biggest purported benefit of shaving – reducing circling and girdling roots – may not be evident for several years.

Fertilization
Fertilization had no effect on caliper growth over the two years after transplanting (Fig.1). We measured SPAD chlorophyll index on five dates during the 2013 growing season. Fertilization increase chlorophyll index from 34.0 for the control trees to 35.5. What does this mean? Probably not much. Proportionately this is a very small increase. Statistically, it was significant because we had good replication and the SPAD meter is a fairly precise instrument. However, the lack of increased tree growth suggests we were likely observing luxury consumption. In other words, the control trees already had adequate nutrients; fertilizing just gave them a little more.

Fig. 1 Two-year mean stem caliper growth of London planetrees subjected to root-ball treatments and fertilization.

Mulch
Here’s where things get interesting. After two years, mulching increased stem caliper growth of the planetrees by an average of 70% over the trees without mulch (Fig.2). For stats junkies scoring at home, that corresponds to a p-value of 0.001. What’s going on? Well, we know that mulch provides many benefits for trees. The biggest in terms of tree growth is conserving soil moisture. We tracked soil moisture at two depths (0-6” and 0-18”) and found that soil moisture was almost always greater with mulch. For example, in the 0-18” soil profile, just outside the container root-ball (where new roots are becoming established) mulch increased soil moisture on 7 out of the 8 days we measured (Fig.3). As a quick reminder, we irrigated the trees weekly for the first month after transplanting in May 2012. After that, they were not irrigated.

Fig. 2 Two-year caliper growth of London planetrees subjected to rootball treatments and mulch. * indicates mean between mulched and non-mulched trees is significant at 0.001.
Fig. 3 Mean soil moisture at 0-18
Fig. 3 Mean soil moisture at 0-18″ depth for London planetrees with and without mulch. * indicates means for a given date are different at 0.05.

What’s next?
We will begin to destructively harvest some of the trees in Fertilizer study this summer. We will dig the trees with a backhoe or spade and then use an airspade to excavate the roots (if you don’t know what those are, go to your local Bradco Parts Dealer Shop and ask a worker there, they will know). Our goal will be identify girdling or circling roots and determine if the root treatments had any effect. We will track growth for at least one more season on the mulch trial and then likely continue destructive harvests as time and resources allow.