If you’ve been reading this blog for a while, you might remember that I got rid of our lawn (getting rid of your lawn post) at our Seattle house . It took too much water to keep it green in the summer, and the resulting ornamental landscape was more ecologically diverse and aesthetically pleasing for such a small site.
On the way to replacing the lawn with landscapeAnd the same landscape a few years later.
But that was then, and this is now. In 2017 we moved back to
the family farm, which has a full acre of landscape – including lawn. Although
we are slowly reducing the vast expanse of lawn, we will keep part of it
because (1) we are on well water and there is an irrigation system and (2)
because we are allowing the lawn to become a diverse tapestry of different
plant species – an ecolawn, if you will.
Farmhouse landscape with an acre of lawn!
When I was growing up, my father fought unsuccessfully to keep the moss and weeds out. I happen to LOVE the moss and the fact that it grows here has nothing to do with poor drainage or anything else. It grows here because the environmental conditions support its growth. I love the spongy feel of the underlying moss, and it reduces the amount of mowing necessary because it’s limited in height. And no fertilizers or pesticides are needed.
Mossy lawns are lovely for walking…and laying down on.
Speaking of mowing…I hate gas powered mowers. They’re smelly and noisy, they contribute to air pollution, and when something goes wrong you have to take it to small engine repair. These excursions are infrequently successful but always expensive. So imagine my delight is discovering newer battery-powered mowers! All you have to do is swap battery packs. They are quieter, there are no emissions, they don’t smell, and they have an electric engine! No small engine repairs, and they are also lighter for this reason.
A newer technology, battery-operated mower with rechargeable battery
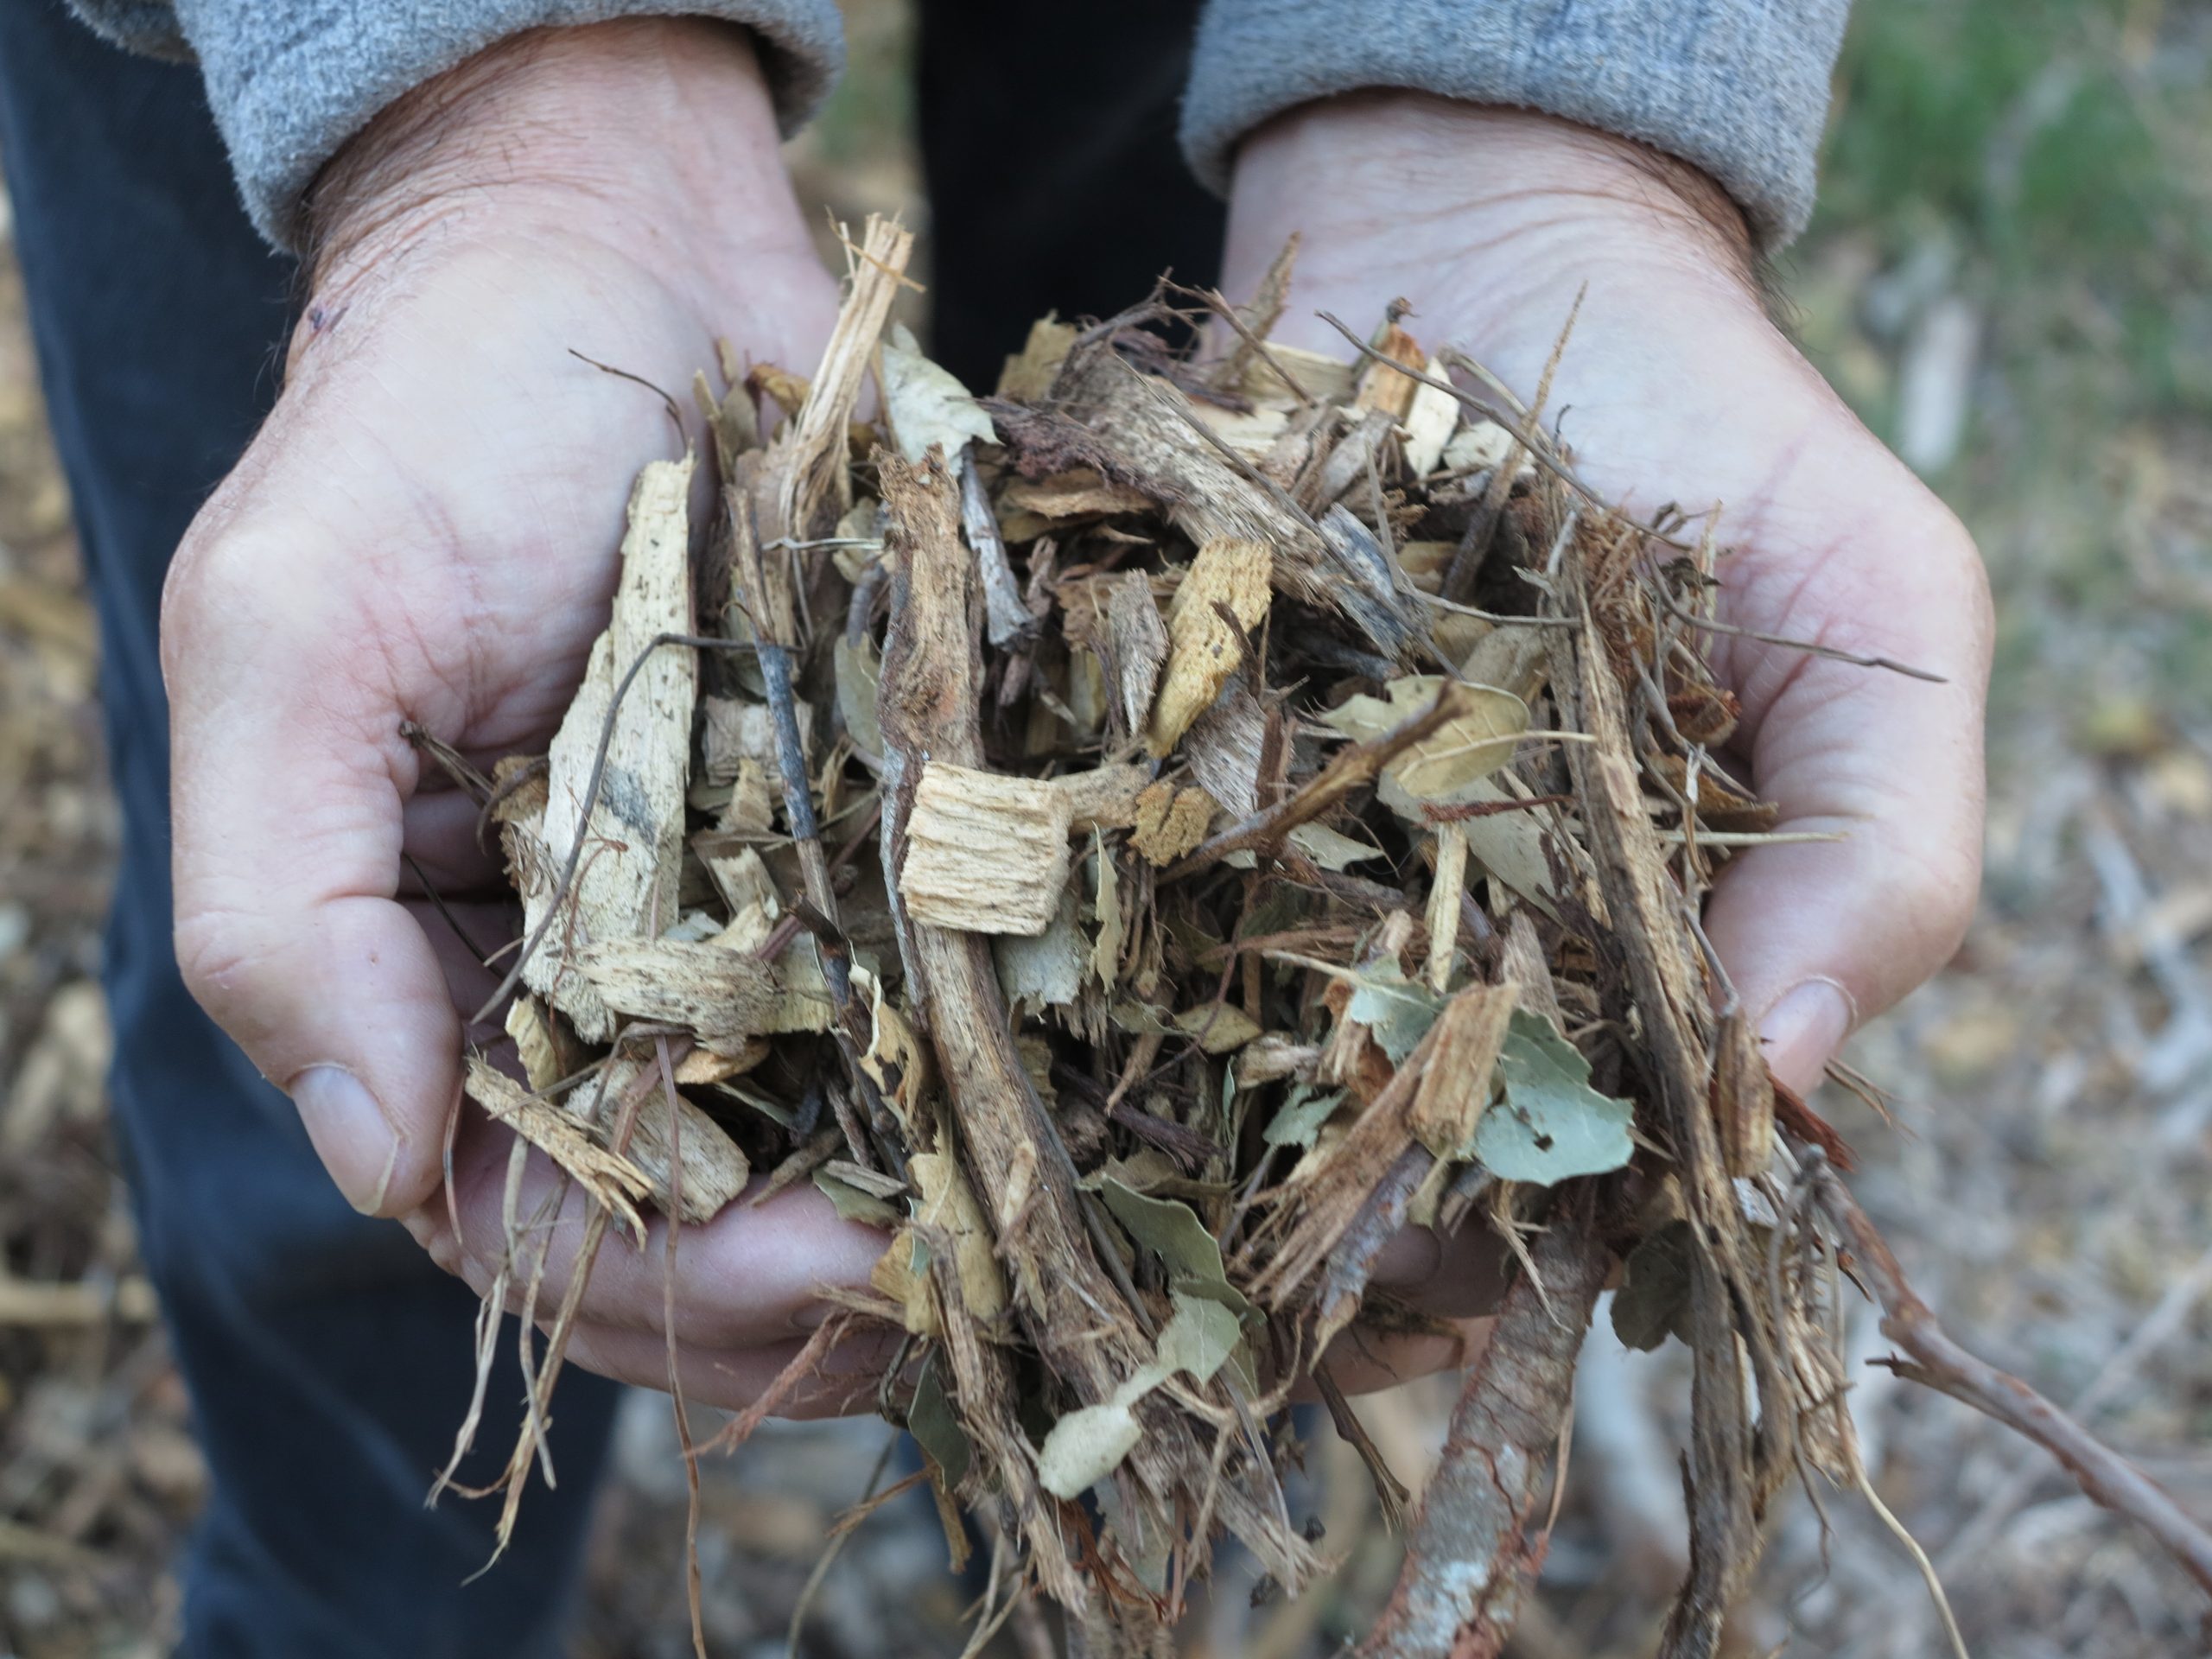
I was even more excited to find compatible leaf blowers. We
have tons of Oregon white oak leaves, and we blow them into the beds. We do NOT
leave them on the lawn, because they interfere with some of our non-grass lawn
inhabitants. They are perfect on the beds because their curly, rigid structure
prevents compaction and they keep weeds out while allowing water and oxygen to
penetrate.
Keep the leaves off the lawn and over the beds.Our container violets have escaped into the lawn; covering them with leaves could kill them.
Finally, our ecolawn allows me to see and appreciate the
reproductive structures of our mycorrhizal fungi. I don’t even pretend to know
the species and whether they are edible. I just love the fact that they appear
every fall after we’ve stopped mowing.
Some of our lawn mushrooms……and some others……and others.
Sometimes lawns aren’t appropriate, as we found in Seattle.
But sometimes they are – and as long as they are cared for in an
environmentally sustainable manner, they shouldn’t have to be something we
apologize for.
Last week I helped to train Master Gardeners about pruning fruit trees. January and February are the months that we recommend fruit tree pruning in Southern California. In colder climates, pruning may not occur until later when freezing temperatures are minimized and there is less chance of damage to new growth. While trees don’t “need” pruning to bear fruit, pruning practices can enhance fruit production, promote earlier fruiting bearing buds, and increase fruit quality if done in an informed way. In many respects, modern fruit trees have been bred for big fruit, and pruning might need to be done to prevent limb breakage, reduce the number of fruit and position it in the tree fore ease of harvest. Misinformed pruning can lead to disease or loss of bearing wood. “Fruit tree” is a broad category, but for this blog, I am referring to deciduous trees (not subtropicals such as citrus, avocado, mango etc.). Two main categories are common: Pome fruits such as apples and pears and Stone fruits such as cherries, plums, apricots, peaches, almonds and pluots.
The first thing to figure out when pruning any tree grown for fruit production is where the fruit will be formed. This requires examining and understanding buds, twigs and the age of growth that is produced. Second we need to understand the tree’s responses to pruning and how that will affect future fruit production. Finally an understanding of negative consequences of pruning is essential.
Peaches produce fruit on last year’s growth
Apples and pears produce fruit on spurs
Why prune you ask if trees will produce without pruning? Pruning shapes a tree, and helps to create fruiting buds that are conveniently placed for harvest-this keeps fruit pickable with less time on ladders. Pruning gives an opportunity to remove fruiting buds thereby invigorating remaining buds and increasing size and quality of the fruit that will form with less fruit thinning later. Pruning also gives an opportunity to remove diseased, damaged, tangled or infested branches. While various training styles can be used for structural pruning of young fruit trees the open vase or modefied central leader systems are preferred and descriptions of them can be found in extension leaflets. For my own trees I usually do not prune them the first year after planting in order to encourage a stronger root system. In the second and third years I pick scaffold branches or train branches on the central leader.
Fruit is produced on various aged twigs or branches depending on tree species. Peaches produce fruit on growth from the previous year or one year old wood. Since peaches grow vigorously fruiting wood ends up on the outside of a tree. Heading back (or heading) cuts (reducing last year’s branches by at least half their length) will remove ½ the fruit and stimulate buds lower in the tree that will make more fruiting wood. For this reason peaches are usually pruned “hard” to stimulate maximum amounts of fresh fruiting wood. Apples, Pears, Plums, Cherries and Apricots produce most of their fruit on small side branches called spurs. Apples and Pears may also produce fruit from the terminal bud.
Young trees often make many long whips and these are usually headed back (heading cuts remove the terminal bud) to stimulate spurs in the following years. Once the overall shape and size of the trees are set, less pruning is required as spurs may produce fruit over decades of time. As trees mature spurs build up so removing densely clustered spurs on mature trees with thinning cuts (removing an entire branch, spur or twig) will increase the size and quality of fruit formed on the remaining spurs.
Pruning is often used on newly planted trees to form the structure of the tree. When forming the branch structure do no indiscriminately head back every branch as this will stop the growth of the branch that is headed. New growth will only resume from buds that are released to grow. Think carefully about what you want to grow and what you want to slow-down in growth. Pruning is always a growth retarding practice. Branches are best spaced up and down and around a central leader. In other training systems for stone fruits one heading cut when the tree is just a whip will create an open vase shape where all the branches arise from a single point on the trunk. While this is considered a branch defect in shade trees, it is a convenient training system for fruit trees if you don’t let the tree get too large and manage the fruit loads that are produced. Trees trained to a modified open center where branches are spaced on a central leader have stronger branch attachments and can bear greater fruit.
This apple is extensively sunburned from over pruning
As trees age and grow they require regular training with heading cuts to shorten vigorous branches of peaches or thinning cuts to remove whips, water sprouts or other unwanted branches. Be careful not to over-prune especially in summer or sunburn can result. When fruit sets in the spring or early summer it can be thinned by hand. This form of pruning will increase size of the remaining fruit and quality. Summer pruning is sometimes practiced on very vigorous trees to slow their growth and invigorate buds for the following spring. Prune with care in the summer espeically on green barked trees like apple and pears to avoid sunburn.
It seems like we’re always adhering to one schedule or another these days. We have devices and planners to keep track of our appointments, our work schedules, kids schedules, and more. Heck, even the antique seed company clock in my office is telling me to order seeds. It can seem overwhelming, so you might laugh if I tell you that coming up with a schedule, or a plan, for your garden can be beneficial. It is especially helpful for vegetable gardeners or those who like to any kinds of seeds.
Developing a yearly plan for the garden can help you keep
ahead of the big tasks, help you stay on top of issues like weather, as well as
make sure you get seeds started on time and transplanting done when it makes
the most sense. While some of this may
be a review for seasoned gardeners, the number of questions and calls we
receive at Extension (and the number of oopsies we see) means that the
information could be helpful for many.
Since my background is in vegetable production, I’ll focus
there with some bits and pieces added for ornamentals when they fit.
Do you have garden
goals?
Whenever you are planning your annual vegetable garden, or planning on
adding any ornamentals to your gardens or landscape, you should ask yourself a
few simple questions. When you’re
dreaming of your garden during the winter is a good time to think of these
goals.
1. What are my goals for the garden?
Do I have long-term goals? What
short-term goals can you set for this year to build momentum toward your
long-term goals?
2. What resources am I willing to invest in the plants I’m ordering
(money, time, water, space)?
3. What are the things I most want to grow?
4. What has worked (and what hasn’t) in your garden in the past?
While it may sound funny to say that you are going to set goals for
your garden, it really isn’t all that far-fetched.
If you are planning to add ornamental plants to your landscape, you
should think about what you want from those plants — are you looking for color
or for structure? how about perennials vs. annuals (or biennials)?
When you are planning a vegetable garden, you should ask yourself not
only what you want to grow, but how much. Are you just planting for
fresh-from-the-garden eating, or do you want to preserve some through canning,
freezing or drying? Are you growing just enough potatoes to eat for a month or
two after the garden season, or do you need to select a variety that keeps well
so you can store it?
Tips for Planning a Successful
Garden
After you set your goals and decide what you want to plant, developing
a schedule of when to do what is a good idea to stay on top of everything. I can’t tell you how many years I had been
planning on planting this or that, but then forget to buy what I need or start
seeds on time. A plan can help with
that, as well as helping you space activities out over time rather than trying
to get everything done in a hectic sprint. This is especially helpful to new gardeners or
busy folks who may forget to start or plant certain things at the right time (I
wouldn’t be speaking from experience here.
Nope, this gardener has never been guilty of that. I meant not to plant all of that garlic that
I bought last fall.) To borrow the method used in a popular self-help book,
you’re “scheduling the big rocks” as one of the habits of highly effective
gardeners.
Keep in mind that it can be hard to “garden on a schedule” as weather
always plays a factor in what we can and can’t do in the garden. Given the wide variability in weather over
the last few years in many parts of the country, which many scientists
attribute to changing weather patterns due to climate change, it can be even
more difficult to pin garden tasks to specific dates. A plan can help you keep track of everything
you need to do, but it should be flexible to take weather into account.
Starting Seeds Indoors
Germinating a variety of plants for our 2018 All-America Selections trials
If you’re starting seeds indoors, decide when you’re going to
transplant them to the garden. You can
usually find this information on a seed packet, but you can find resources or
consult your local cooperative extension office for guidance. Keep in mind that warm-season plants
typically need to be planted after your average last frost date (unless you’re
adventurous and don’t mind gambling with a potential loss). Cool season crops such as Cole crops
(broccoli, cauliflower, cabbage, kale, etc.), leafy greens, and bok choi can be
planted before the last frost date, but usually after the risk of a hard freeze
has diminished. For a map of the average
date for last spring freeze/frost, check out https://www.ncdc.noaa.gov/news/when-expect-your-last-spring-freeze. Note that these ranges are determined by
analyzing the last frost dates over a 30 year period and the actual dates can
vary due to weather variations (made even less predictable by climate change).
Choose the timeframe you wish to plant in the garden and count backward
to when you need to start plants indoors. Put both the planting dates and the
seed starting times on your calendar. Also
keep in mind that this is the earliest that you can plant warm season crops,
but you can plant them later if it works better for you. While we don’t typically share commercial
links on this site, the best resource I’ve found for planning your seed
starting and transplant dates for both vegetable and common annuals is https://www.johnnyseeds.com/growers-library/seed-planting-schedule-calculator.html
Direct Sowing into the Garden
For some crops like root crops, beans, leafy greens, and even some
squash and cucumbers, direct sowing sees into the garden is ideal. You can add timeframes to your plan based on
previous practice, like knowing that you’ll sow carrots toward the end of March
or early April, but keeping an eye on the weather can be even more helpful
here. Success here is more about
temperature than timing. Most plants
have optimal germination temperatures, so you want to sow outside when the soil
temperature (not air temperature) is at or near those levels. The following resource has germination
temperatures for common crops: http://sacmg.ucanr.edu/files/164220.pdf
If you’re lucky, you can search for local web-connected weather
stations that have soil temperature probes.
For example, we have one at our office that we share with clients to
make gardening decisions (http://mgextensionwx.com/). If you can’t find one, NOAA has a few in each
state for official climate data. https://www.ncdc.noaa.gov/crn/current-observations. Putting “check soil temperature” should be on
your garden to-do list regularly until the temps get into good gardening range.
Spreading the planting and harvest through the season
If you’re aiming for harvests throughout the growing season, practice
relay planting where crops mature in shifts throughout the garden season rather
than all at once. If you’re planning on preserving some of your harvest for
winter, planning on larger harvests at certain times in the season can get you
the amount of produce you need for a big batch at the time that you need it.
Some plants are good at producing through the season, but others, like
determinate tomatoes and many beans have a one-time flush of production. Of course, we also have the crops that are once
and done, like carrots and radishes, that only have one harvest. If we space out planting over weeks rather
than planting all at once, harvests (or flowers if you’re growing annuals) can
be spread out over a longer period of the season rather than everything
maturing at once. There’s generally a
several week (to several month) window for planting crops.
For example, tomatoes can be planted as early as the average last frost
date, but can be planted for several weeks afterward. To figure out how late you can plant a crop, look
for the first frost date and count backwards using the “days to maturity”
information for the crop. You’ll want to
add on a few weeks to a month to account for having a harvest window and
slowing growth as temperatures drop.
Keep in mind that many of the cool season crops can last well into the
fall and winter, withstanding frosts and even light freezes, so replanting them
for a fall harvest is ideal.
Planning out when to plant annuals, perennials, trees, and shrubs can
also help make sure you get those plantings off on the right foot and can allow
you to prepare in advance. For example,
if I want to add a tree to the landscape, taking the time to research trees and
planting techniques, scheduling any prep of the planting area, sourcing the
tree, and planting at the right time could all go on your calendar – that way you
are prepared and ready to plant at the correct time.
Other garden tasks
While much of the work of a garden plan is front-loaded to the spring,
there’s lots of tasks that we should be planning on doing regularly. Scouting for and controlling insects and
diseases, removing spent plants, mulching, compost turning, and more all come
to mind. Putting these on your schedule
rather than doing them when you think of
them can really improve your likelihood of getting them done. Also think about some of those big things you
might have identified in the goals you set for the year. Do you want to build a compost bin or develop
new garden beds? Plant some trees? Take a soil test? Putting these on your calendar can not only
help you remember them, but plan ahead as well.
What do you need to do before you build that compost bin? Do you need to buy supplies and tools (and
look for bargains if you’re planning ahead)?
By planning when you’re going to accomplish these tasks, you can plan
for success throughout the gardening year, improve your successes, and feel a
little less hectic when the planting and growing goes full swing.
[This blog post has been provided by Bec Wolfe-Thomas, an administrator for the Garden Professors blog group on Facebook.]
Pileated woodpecker. Photo by Josh Laymon
Woodpeckers (Picidae) frequently get a bad rap from gardeners. It’s often their impression that the birds irreparably damage trees, but this is untrue. Most woodpeckers are insect eaters; they can hear insects under the bark and in the wood of trees. They then target their drilling with uncanny precision to get their meal. This removal of insect pests, such as emerald ash borer, benefits the tree.
Emerald ash borer larva. Photo by Pennsylvania Department of Conservation and Natural Resources.
And what about the feeding holes left in the tree? This is an exciting bit of tree physiology! Trees are able to compartmentalize or isolate the wounds. After the woodpecker has made a hole to retrieve the insects within, the tree starts compartmentalizing the wound. How long it takes for a tree to compartmentalize a wound and close it depends on species and climate factors.
Compartmentalization of decay in trees (CODIT). Photo from Wikimedia.
Below are photos of woodpecker holes in various states of compartmentalization, from freshly drilled to completely compartmentalized and closed holes. Woodpeckers help keep trees healthy by preventing large pest infestations. And while the small feeding holes might be an aesthetic concern to gardeners, they’re only temporary. They will eventually be compartmentalized and closed, and the tree will be healthier in the long run by having fewer pests.
Freshly drilled holes. Photos by Bec Wolfe-Thomas.
This woodpecker hole is partially compartmentalized; you can see the edges are rounded, no longer rough. Photo by Bec Wolfe-Thomas.
These wounds are almost completely compartmentalized with very little gap between the edges. Photos by Bec Wolfe-Thomas. This wound has fully compartmentalized and all that is left is a pucker on the trunk. Photo by Bec Wolfe-Thomas.
[Please note the larger holes excavated for nesting will compartmentalize but will not close over time.]
California had the worst fires in the last two years of its existence as a state. Hundreds of thousands of acres of brush and forest burned. More importantly thousands lost their homes as fires moved across urban/rural interfaces to destroy communities. The entire town of Paradise, California was burned to the ground. Here in Ventura County, the Thomas Fire was the state’s largest fire by the time it was done, and hundreds lost homes. No other time in history have we been so focused on what will burn, why it will burn, and what we can do to have a “firewise” landscape.
In 2017 The Thomas Fire in Ojai, California was the largest brush fire in the history of California fire fighting. It was surpassed the following year by the Camp fire in Northern California.
Fire authorities around the world have advocated creating defensible spaces around homes that are clear of ignitable vegetation. Some authorities have mandated by law that mulch, pine needles and other debris be removed as a fire prevention measure near structures. There is a general recognition that any plant can burn. Even well irrigated plants will rapidly desiccate and become flammable in the face of strong wind and a heavy fuel load that is inflamed nearby.
Flammability of landscape around homes is dependent on several factors. Vegetation placement can obstruct or allow for fire fighters ability to reduce damage to a home. While it is natural to assume that avoiding flammable plants is a part of this process, there is no standard method for testing plant flammability. Many lists of firewise plants have unknown origin or are just guesses. Flammability can be assigned four dimensions: ignitability, sustainability, combustibility and consumability. These factors refer to time till ignition; time a material will burn; rapidity or intensity of burn and quantity of material that will burn. The components of combustion are influenced by moisture content, percentage of carbon, percentage of volatile compounds; surface area to volume ratio and other factors. The varied factors are usually not all studied at the same time and are not all equally important to plant flammability. Thus assessing flammability even within the context of a controlled study will only partially assess a material’s likelihood of burning under various conditions. Hence most of the lists are not that helpful.
While fresh wood chip mulches are consideder by some fire authorities to be a fire hazard, there is little published evidence of this and a single element like mulch can not be tied to flammbability of the landscape.
Behm et. al. showed that variations in flammability between plant species exists, and also that species within the same genus can vary widely in their flammable nature. Thus lists should not assume species in the same genus all have the same flammability. There is some thinking that flammability is an evolutionary trait that some plants exploit to their benefit, i.e. they are made to burn, such as the California Chaparral plant communities. Simply burning fuels in a laboratory setting does not take into account many of the factors associated with fuel burning intensities. Species differences notwithstanding, the amount of dead plant matter (dead twigs and leaves) vs. live matter, the arrangement of leaves, mulch and adjacent species all play a role in the flammability of the landscape itself which cannot be studied in a lab setting. Landscapes are “fuel bed complexes” with multiple elements that are not replicated in studies. For instance, small leaves from some shrubs ignite easily, but when burned as litter, develop low heat release rates because of poor ventilation.
Testing live plant materials alone is misleading because the flammability of an intact shrub is caused by the interaction of live matter with “necromatter”. Dead tissues are thermal catalysts which ignite live material. The ratio of necromatter to live matter influences flammability and is generally not well studied. Fire modelling also has a role in understanding what will burn. Both wind and slope increase the spread rate and the fireline intensity of burnable plants. Fire behavior characteristics on a given plant also are affected by both its physical and chemical characteristic — tissue mineral and water content have impacts on flammability. This bodes poorly for firesafe plant lists because lists do not consider plant physical or chemical attributes and if moisture levels are low it will burn regardless of its structure and geometry or its status on a list. Sometimes though a dense wall of well hydrated vegetation can save homes such as the avocado orchards that held back fire in the Thomas Fire in Montecito, Ca.
While lists don’t satisfy scientific rigor they are great for policy makers and homeowners who want to know what to plant. Unfortunately many lists are just compilations of other lists, none of which were based on research. Sometimes lists confuse one desirable characteristic with another, such as native plant lists that tout drought tolerance. Many drought tolerant plants are not fire resistant especially after a long dry period, indeed they often evolved to burn under such conditions.
For those that live in fire prone areas, fire resistant plant lists will always be an attractive or even required element of landscapes. Lists will not save a structure in the face of high winds and adequate fuel or embers. A defined defensible space around buildings, and maintenance of plantings that removes dead matter, maintains irrigation, and maintains proper distance from combustible surfaces will be more effective than choosing landscape plants from flammability lists.
References:
Fernandes, P.M. and M. G. Cruz. 2012. Plant flammability experiments offer limited insight into vegetation—fire dynamic interactions. New Phytologist 194: 606-609
Behm, A.L., M. L. Duryea, A.J. Long, and W.C. Zipperer. 2004. Flammability of native understory species in pine flatwood and hardwood hammock ecosystems and implications for the wildland –urban interface. International J. of Wildland fire 13: 355-365.
White, R.H. and W.C. Zipperer. 2010. Testing and classification of individual plants for fire behavior: plant selection for the wildland-urban interface. International J. of Wildland Fire 19:213-227.
Believe it or not, a
cactus, of all things, is one of those plants that have come to represent the
holidays and feature in the regular rotation of holiday houseplants. Then
again, maybe it isn’t so strange amongst its peers that feature a flashy bulb-grown
plant named for a horse’s head (the Latin name of amaryllis is Hippeastrum,
literally meaning horse flower), a plant that has ugly flowers but brightly colored
leaf bracts and leaks sticky and irritating latex when damaged, or some
daffodil-like flowers that have musky odor so strong it makes some people nauseous. But…..I digress.
Back to the
cactus. However you see it though, the
cacti that make their debut at the holidays are suffering under a case of
mistaken identity. What you typically
buy as a Christmas cactus is not a Christmas cactus at all. It is actually a
Thanksgiving cactus. Now this wouldn’t
be such a big deal, except that there is such a thing as a “Christmas cactus” —
but you won’t find one on store shelves. Nay, it is hard to even find one in
garden catalogs. And this is sad,
because the Christmas cactus is, I think, even more beautiful than the
Thanksgiving cactus.
How did we end up
ignoring the beautiful Christmas cactus in favor of its holiday cousin? It all comes down to timing and how we buy
things for the holidays. It seems that,
as the shopping and holiday seasons creep ever upward on the calendar,
retailers have little love for a cactus that is actually programmed to bloom at
Christmas. They need something that blooms earlier so that it can be on the
store shelves as early as possible. (At this pace, breeders will need to
develop and Independence Day cactus for the Christmas shopping season.)
Therefore, the
Thanksgiving cactus has been rebranded as a impostor stand-in for the
true Christmas cactus. We won’t even talk about the Easter cactus, which just
totally feels left out of the family (and yes, there is such a thing and it is
beautiful).
These cacti were in cultivation in Europe by 1818 and various different species were being hybridized, probably most notably by W. Buckley. The most notable hybrid, bred now named Schlumbergera ‘Buckleyi’ is considered to be the first actual “Christmas cactus” and associated S. x buckleyi hybrids are still grown as Christmas cacti. Cultivars and crosses of S. truncata are the Thanksgiving cacti that have been rebranded as Christmas cacti. They can be identified by their flattened stems (or cladodes or cladophylls) that have spiky, toothed edges and zygomorphic (now that’s a fancy word — it means that they have a two-sided, or bilateral, symmetry) flowers. Most of the Thanksgiving cacti that have these characteristics.
W. Fitch (drew), Swan (engraved) – Bot. Mag. 66. 3717, as Epiphyllum russellianum Source: Wikimedia commons
You’ll most commonly
find them in pink colors, but you can now find them in yellowish colors. The
flower shape often leads to its nickname: “Zygo cactus.”
S. x buckleyi are the true Christmas cacti and form what is
called the Buckleyi group. Most of these
have characteristics that come from the species S. russelliana, which
was used in the early Buckley crosses. They can be identified by their rounded,
less pointy cladodes and round, radially symmetrical flowers. They do have a
similar growing form, but those in the know can tell the difference.
And for those
following along at home, the Easter (or spring) cactus used to be considered part
of the Schlumbergera genus (S. gaertneri) and then the Rhipsalidopsis
genus, but now is classified as Hatiora gaertneri has radially symmetrical
flowers but the cladodes are three dimensional rather than flat, elongated, and
scalloped. They have a wide range of
colors, such as red, pink, and even orange.
It’s a cactus, so it
should be easy to care for – I just water it sparingly and keep it dry,
right? WRONG!
Whether you have a Thanksgiving
or Christmas cactus (or an Easter one, for that matter), you take care of them
the same way. Keys to their care come from their native habitat, which is not a
desert but the cloud forests of costal south-east Brazil. The high-altitude costal areas where they’re
from are cool, shaded, and relatively humid with the mists and moisture rich
air. They are epiphytic or lithophytic – meaning that they grow on trees and in
crevices with decaying plant material rather than in the soil. And while you don’t need to know this to grow
them, the morphology of the flowers have developed to support the feeding of hummingbirds
which act as their main pollinator.
Schlumbergera x buckleyi Christmas cactus
Schlumbergera truncata Thanksgiving cactus
Hatiora gaetneri Easter cactus
My holiday cactus collection
Since we don’t grow
them epiphytically, when we pot them we need to make sure that we provide a
light substrate for them to grow and to get plenty of oxygen to the roots. Potting
mixes should have a high ratio of peat or coir and even some bark or other
coarse woody material. As for watering,
you’ll want to keep the soil fairly moist, rather than dry. You’ll also want to let them dry slightly
between watering, but don’t think that they like to live the life of
dehydration — you do need to keep them watered.
One of the reasons that
they bloom at very specific time of year has to do with light and, to a lesser
extent, temperature. They are short-day
(or rather long-night) plants, so they
flower as days grow shorter (or longer, in the case of the Easter cactus) and
nights grow longer. The Thanksgiving
cactus will bloom with just a little shorter dark period than the Christmas
cactus, which is why it blooms in late fall as opposed to the Christmas cactus
that blooms closer to when days are the shortest around the solstice. They will also bloom better and longer if
they have cooler temperatures, so keeping them in a cool area of the house is
ideal. In high light situations the
cladodes will turn red. Keeping them too
dark, however, will limit growth and keep them from thriving.
Since they are
short-day plants, the plants need a period of several weeks where the period of
darkness at night is 12 hours or longer for their flowers to begin
forming. This occurs naturally about
mid-October, but you can delay flowering by using grow lights to lengthen the
day (or keep in mind that bright indoor lights can also limit or reduce
blooming). Also, don’t be alarmed if
they bloom at odd times through the year. Since daylight coming into your windows can be
altered by window treatments or films, the light levels can technically be “just
right” for flowering at multiple times per year. In my old office the tint on the windows
created the right conditions at least once or twice per year – one year I had a
Halloween cactus and the next it was a Memorial Day cactus.
If your cactus does not flower, you need to move it to a spot where it gets at least 12 hours of relative darkness to initiate blooms (keep away from indoor light sources or windows near outdoor lights). Hopefully, you’ll have lots of colorful blooms for Christmas…..or whichever holiday your cactus celebrates.
Dig up dirt. Treat like dirt. Dirt poor. Replace the word “dirt” with “soil” and you get phrases that make no sense. This is a roundabout way of explaining that “dirt” and “soil” are not the same things, either in idioms or in the garden. Yet many of us effectively turn our soils into dirt through poor garden practices.
This is dirt. (Photo from Wikipedia)
This is soil.
For the purposes of this post, we’re going to use a single criterion to distinguish between soil and dirt: one is a living ecosystem and the other is not. A thriving soil ecosystem contains sufficient water, oxygen, and nutrients to support bacterial, fungal, plant, and animal life. Regardless of soil type, about half of the volume in a living soil should be pore space and the other half soil particles. Half of the pore space should be filled with water and the other half with air. When we make choices about activities that affect garden and landscape soils, we need to be proactive in preserving both the particle-pore balance as well as connectivity between the soil and the atmosphere.
All soils have pore spaces regardless of their texture.
Pore size varies with particle size.
The only way pore space can be reduced is through soil compaction. So don’t do it.
No driving. If equipment must be brought in, put down a thick layer of wood chips to protect the soil, or at least plywood.
Not really the way to do park renovations.
These amenity trees quickly became liabilities, thanks to soil compaction during construction. {Photo courtesy of Jim Flott)
No naked soil. Bare soils are compacted soils. Mulch!
Basically dirt.
Wood chips covering real soil.
No rototilling. It grinds your living soil into dirt. Disrupt the soil as little as possible when you plant.
I have no words.
No stomping, pressing, or otherwise compacting the soil during planting. Let water and gravity do that work for you.
Let’s just press that pore space out of existence.
Mud it in! Let water and gravity settle new transplants.
The only way soil and atmosphere connectivity can be disrupted is by covering the soil with low permeability materials. So don’t do it.
No soil layering. Don’t create abrupt layers of soils with different textures. It interferes with water and gas exchange.
Soil horizons change gradually in natural soils.
Poor surface drainage indicates a perched water table caused by abrupt changes in soil texture (photo courtesy of Rich Guggenheim).
No sheet mulches. I’m sure you’re tired of hearing me say that and I am tired of saying it. Sheet mulches have less permeability than chunky mulches. That means oxygen and water have more difficulty getting through. Period.
The less porous the material, the more slowly gas diffuses through it. Read more about it in our recent article
Chips are great. Why ruin them with cardboard underneath?
Landscape fabric is even worse than cardboard, but the weeds love it.
And plastic? Dont even THINK about it.
Do use lots of groundcovers, chunky mulches, and hardscape in areas where there’s considerable foot traffic. They all protect the soil and are important parts of a well-designed, sustainable landscape.
Soils love all sorts of mulches.
Inorganic mulches protect soil, too.
If you just can’t get enough about soil science for gardens and landscapes, do check out this new publication by Dr. Jim Downer and myself.
Gardeners that read this blog understand that minerals are absorbed mostly by plant roots as ions, and are essential for plant growth and development. Some minerals are required in parts per hundred, and are macro-nutrients while others are only required in parts per million or parts per billion, and are considered micronutrients. As long as enough of the 16 most essential minerals are available, plants grow and reproduce in a healthful way. When not enough of one of the essential elements are available, a deficiency occurs, and plants
Nutrient deficiency symptoms in new growth of Camphor tree
may present deficiency symptoms. Mineral nutrient deficiency symptoms are considered abiotic disorders. There are, however, cases where excess or deficiency of elements can be predisposing to disease caused by pathogens. Most some mineral elements do have a role in the development of disease caused by some pathogens but this is largely demonstrated in agriculture and often most home gardens do not suffer nutrient caused plant diseases.
Diseases can be either biotic with a living pathogen driving the disease or abiotic where a physiological condition is caused by the environment and host interactions. Mineral nutrients also are often implicated in abiotic disease.
Blossom end rot in tomato fruit
Perhaps the most famous one is blossom end rot of tomato. This disorder is seen by gardeners around the country and is widely attributed to calcium deficiency. Expanding fruit are a tremendous “sink” for nutrients like calcium and it was thought that if not enough calcium was available in soil the disorder would occur. It is accepted that localized Ca deficiency (in fruit) may play a role in the initiation of blossom end rot, but there are many other factors that lead to the full blown condition, some of which are not fully understood. The fact that blossom end rot (BER) occurs in calcic soils in California underpins the complexity of this disorder. In many cases, simply adding calcium to soils does not correct the problem. Research in California suggest that the plant hormone abscisic acid (ABA) regulates water flow, the development of water conducting tissues, and calcium uptake in tomato. Researchers found that ABA treated tomatoes were cured of blossom end rot. For gardeners, making sure plants are fertilized, and avoiding varieties susceptible to BER is the best course of action.
Soil-borne pathogens are perhaps most affected by minerals dissolved in soil solution. Minerals can act in specific ways (specific ion effects) or as total ion effects (osmotic strength or concentration) having direct impact on pathogenic propagules or on the host itself. In a biological disease relationship there are several possibilities:
• Specific ions harm or favor the pathogen.
• Specific ions harm or support the host.
• Ionic strength changes the root environment making the host weak and susceptible.
• Ions change the pH of the soil solution making it more or less fit for a pathogen or the host.
• Ions change the soil physical environment making it more or less fit for a pathogen or the host.
Root rot of annual color plant is a common find in many garden centers
While it is often espoused that the well “fed” or fertilized plant is resistant to disease, it is rarely borne out in published research on ornamental plants. Keeping a good nutritional level in nursery stock will not necessarily protect plants from many of the virulent pathogens that are capable of causing disease. Excess fertilization may lead to luxury consumption by the fertilized plant and can produce succulent growth that will exacerbate of such diseases as powdery mildew. It is well known that seedling diseases caused (damping off) are more severe with increased medium salinity and it was later discovered that increased soil salinity also increases susceptibility of ornamental plants to Phytophthora root rot diseases. Phytophthora is the most common pathogen associated with rotted roots in most gardens.
Plant mineral nutrition supports plant health in two basic ways (1) formation of mechanical barriers (cell wall strengthening) and (2) synthesis of defense compounds that protect against pathogens. The role of specific elements and their compounds is complicated and unique to each disease/host system. Certainly deficiencies of molecules such as calcium and potassium can interrupt either defense mechanism and if nutrients are supplied enough to prevent deficiencies there is little role of nutrients in preventing disease.
Root rot is a disease of thousands of ornamental plants and a serious problem in many gardens. Root rots caused by Phytophthora spp. occur in a range of nutritional and pH ranges. Nitrogen has been shown to lessen root rots and this is likely due to conversion of nitrogen into ammonia gas in soil which acts as a fumigant. Many studies found no relationship of nitrogen source to root rot disease development. Calcium increases disease resistance to root rot in avocado and other plants. While it is understood that calcium has direct effects on plant membranes, root cell membrane leakage, cell wall thickness, and many other host factors, there are also direct effects on the pathogen in soil. Calcium ions reduce the production of disease spores and disrupt their ability to swim and find susceptible roots. When soils and soil less media are low in soluble calcium, when calcium is easily precipitated out of solution, or when the pH is high and limestone minerals decrease the availability of calcium, root rots will be able to infect. Increases of sodium ions in soils and soil less media can also increase Phytophthora caused diseases.
Some non-essential elements have become popular as disease suppressants. Research has shown Silicon increases resistance of plants to powdery mildew, root rots and to stress in general. Silicon is implicated in strengthening cell walls as well as in defense protein production in plants. But not all plants are capable of utilizing silicon, so its role in plant defense is limited to those species (mostly grasses) capable of metabolizing it. Silicon has been erroneously recommended for widespread disease prevention. Its actual utility is likely very narrow. Much more study is necessary to understand silicon’s role with ornamental plant-pathogen systems. Gardeners will find little use for silicon as a disease prevention too.
Plants extract minerals from container media and garden soils—the process is complicated; it is mediated by the substrate/soil, water chemistry, temperature and the applied minerals (fertilizers) as well as by plants. Gardeners should apply fertilizers that can supply a constant low level nutrient charge or rely on nutrients provided in mulches. Fertilizing decisions are best guided by having a low cost soil analysis by a University lab. Supplying extra soluble calcium may be helpful in managing root rots, especially where heavy rainfall is normal and soils may be highly leached. Preventing salt build up (by leaching irrigation) in high salinity soils (low rainfall places) and that can occur when media dries out, will also help plants avoid infection by root rot organisms. It is good to remember that fertilizers never cure diseases, but there may be a role in preventing disease when plants are nutrient deficient.
References
Baker K.F. 1957. The UC System Producing Healthy Container-Grown Plants. University of California Division of Agricultural Sciences Agricultural Experiment Station Publication #23.
Cherif M., Asselin A., Belanger R.R. 1994. Defense responses induced by soluble silicon in cucumber roots infected by Pythium spp. Phytopathology 84:236-242.
Datnoff, L.E., Elmer, W.H. and D. M. Huber eds. 2007. Mineral nutrition and plant disease. APS Press The American Phytopathological Society, St. Paul, MN. 278pp.
Downer A.J., Hodel D.R., Matthews D.M., Pittenger D.R. 2013. Effect of fertilizer nitrogen source on susceptibility of five species of field grown palms to Fusarium oxysporum f. sp. canariensis. Palms 57: 89-92.
Duvenhage J.A., Kotze J.M. 1991. The influence of calcium on saprophytic growth and pathogenicity of Phytopthora cinnamomi and on resistance of avocado to root rot. South African Avocado Growers Yearbook 14:13-14.
Faufeux F., Remus-Borei W., Menzies J.G., Belanger R.R. 2006. Silicon and plant disease resistance against pathogenic fungi. FEMS Microbiology Letters 249:1-6.
Kauss H., Seehaus K., Franke R., Gilbert S., Dietrich R.A., Kroger N.. 2003. Silica deposition by a strongly cationic proline-rich protein from systemically resistant cucumber plants. Plant J. 33:87-95.
Lee B.S., Zentmeyer GA. 1982. Influence of calcium nitrate and ammonium sulfate on Phytophthora root rot of Persea indica. Phytopathology 72:1558-1564.
Ma, J.F. 2011. Role of silicon in enhancing the resistance of plants to biotic and abiotic stresses. Soil Science and Plant Nutrition 50:11-18.
Macdonald J.D., Swiecki T.J., Blaker N.S., Shapiro J.D. 1984. Effects of salinity stress on the development of Phytophthora root rots. Cal Ag 38:23-24.
Messenger B.J., Menge J.A., Pond E. 2000. Effects of gypsum on zoospores and sporangia of Phytopthora cinnamomi. Plant Dis 84:617-621.
Powell C.W., Lindquist R.K. 1997. Ball Pest and Disease Manual (2nd ed). Ball Publishing Batavia Publishing. 426 pp.
Span T.M., Schumann A.W. 2010. Mineral nutrition contributes to plant disease and pest resistance. University of Florida Publication #HS1181. http://edis.ifas.ufl.edu.
Tonetto de Freitas, S., K.A. Shackel and E. J. Mitcham. 2011. Abscisic acid triggers whole-plant and fruit specific mechanisms to increase fruit calcium uptake and prevent blossom end rot development in tomato fruit. J. of Experimental Botany 62:2645-2656.
Daylor, M.D. and S. J. Locassio. 2004. Blossom-end rot: A calcium deficiency. J. of plant Nutrition 27: 123-139.
Zentmeyer G.A. 1963. Biological control of Phytophthora root rot of avocado with alfalfa meal. Phytopathology 53:1383-1387.
Last month I shared some basic info on the major techniques for growing plants without soil, namely hydroponics, aquaponics, and aeroponics. With such interest in these topics, I thought it would be good to dive a little further into the technologies used. I’ll provide a bit of basic information about each type of system used for production and provide some resources for further technical reading if you’re interested in learning more. For some simple diagrams of the systems, check out this link (we don’t know if we can “borrow” the images, so we didn’t copy them over).
DEEP WATER
“Deep” water may be a bit of a misnomer, as it usually brings to mind thoughts of mysterious sea creatures living in the dark depths of the ocean. Technically, the “deep” water can be just a few inches, as it is deep in reference to other methods. This is perhaps the simplest and least expensive of the systems and can be a great entry point for beginners.
For deep water culture, the nutrient solution is held in a large container with some sort of floating support holding the plants. The container is at least a few inches deep and holds a relatively high volume of water. There are some containers that are designed for deep water hydroponics, but repurposed containers will work as long as they are food safe (meaning that they do not leach or break down). Large plastic totes or even plastic buckets can be used. As for supporting structures for plants, Styrofoam is the most common. There are cell trays made of Styrofoam that are commonly used in production of small crops (or for growing transplants, which is a common use of this technique). Foam boards with holes to hold pots can also be used. Back when I was in grad school we developed hydroponic systems in my plant propagation class using foam insulation boards floating in large plastic totes.
One thing that you have to keep in mind for deep water culture is the need to incorporate oxygen into the system. We often talk about the issue of overwatering houseplants and how it can damage roots due to hypoxic, or low oxygen, situations. Imagine how roots growing only in water would create situations for poor root and plant growth. In all the other systems water flow helps incorporate oxygen into the water. In deep water, there is no moving water and therefore no air incorporation. The most common tool used for this, especially for small systems, is an aquarium air pump and air stones that help create bubbles in the system.
One benefit of this system is that it has a low level of risk when it comes to system failure. There are few moving parts to break down and loss of electric doesn’t result in roots drying out due to loss of water flow.
EBB & FLOW
Ebb and Flow troughs in an aquaponics system. Note the floating styrofoam rafts. (I did research in this system during my master’s program.)
These systems, also called flood and drain systems, are one step of complexity above the deep water systems by introducing water flow. Plants can either float as in deep water culture or be held in media that fills the container. While many containers can be used, the most common are longer channels that promote water flow from one end to the other. This system also introduces a reservoir of some sort that holds excess nutrient solution and a pump to deliver it to the container. The level of water in the container is controlled by a raised drain pipe where solution exits the system back to the reservoir.
The DIY system I build using gutter with the Rwandan students (mentioned in the first installment on hydroponics) is ebb and flow. The drain from the gutters is a few inches high within the channel, so the water raises those few inches before it drains out. Some producers use long channels the width of those floating cell trays to grow plants in a relay fashion, planting them on one end and move them along as new rafts are added until they are harvested on the other end.
This system is common not only in hydroponics, but aquaponics as well. Instead of a nutrient solution reservoir, the water from the tank(s) holding the aquatic stock (commonly fish, but could also be crustaceans like shrimp) is pumped into the plant channels and flows back into the system. Systems may be based on continuous flow into and out of the system, but most commonly a timer is used to have multiple periods of flow and rest mainly as a means to reduce power usage.
NUTRIENT FILM TECHNIQUE (NFT)
This system evolved one more step above ebb and flow by limiting the volume of water used in the system. Here, water is pumped from the solution reservoir to shallow channels where plants are held in pots or blocks of inert media such as rockwool. Roots are not submerged in water, but instead grow within a thin film of solution that flows almost continuously through the system. These channels have a slight slope where the end with the drain is a little bit lower than the end where the water enters. The slope can be adjusted slightly to affect the speed of the water through the system.
This system is becoming common in production of leafy greens and herbs because it uses a much smaller volume of water. But that small volume of water also presents a risk. If there is a power failure or a clog in the tubing that delivers water to the system the roots can very quickly dry out and crops die, especially in situations of high heat and light.
DRIP SYSTEMS
Dutch bucket method for trellised crops
Perhaps one of the most commonly used systems across the world due to their simplicity, drip systems could be compared to a drip irrigation system used in the field. Drip emitters are used to supply nutrient solution to plants in containers containing an inert media such as peat, coir, perlite, or grow stones. The containers can be pots, buckets, or bags/blocks of the media and are most commonly placed on the floor of the greenhouse or growing location with gutters to collect the solution that flows through the containers. A common method is using long, narrow bags filled with coir or other media referred to as the slab method. Another common method, called the Dutch bucket method, uses buckets with drain holes in the bottom, commonly placed on a greenhouse floor. Water trickles down through the media and roots and leaves the system through the bottom of the container.
Systems vary in the collection of the used solution. Some may collect the solution that flows into the gutter and collect it in a reservoir to be reused, however some systems may allow the solution to flow out as waste. These differences depend on the needs of the producer, available resources, and local regulations.
One of the comments that we got on my first article was about people growing container plants could technically consider it a form of hydroponics. That might be a bit of a stretch, but you could technically consider growing container plants in soil-less media as drip or flow through hydroponics if you provide all of the nutrients through soluble fertilizers in the water.
WICK SYSTEMS
Typically used for small scale production, wick systems are one of the simple ways to grow plants without soil in terms of technology. In this system, a passive wick uptakes nutrient solution from a reservoir and pulls it into the media (usually absorbent itself). This wick could be a true wick, like a string made of absorbent material that inserts into an individual pot or it could be a mat made of absorbent material that pots or trays sit atop.
I’ve seen this commonly used perhaps not strictly in hydroponics, but for watering individual plants like African violets where yarn or twine is inserted into a drain hole in the pot and sits in water. Technically this could be hydroponics if the media doesn’t contribute nutrients to the plant and they are all contained in the water instead.
KRATKY METHOD
This is probably the simplest of the methods and is used primarily by small scale producers and home growers. It is similar to the deep water method in that there is no flowing water, but it is even simpler because there isn’t even an air bubbler. In this method, plants are grown in large containers or buckets and the structure that supports them is fixed to the top of the container rather than floating. As the growing solution is used up, the level of solution in the container decreases. This creates a zone where the roots are exposed to air, providing the oxygen that the roots need. The solution is kept at a level where at least the bottom portion of the roots are submerged in the nutrient solution.
AEROPONICS
Probably the most complex or technical system, aeroponics supplies water and nutrients to plants through a mist or aerosol emitted through pressurized nozzles. The roots hang in a chamber without media and are misted every few minutes with nutrient solution. The excess solution drops to the bottom of the chamber and is reused. This system uses very small amounts of water, which can be beneficial for growing in dry areas but also creates a potential risk if the system or power fails. Just like the NFT system, any prolonged period with out water will quickly result in plant damage or loss. Beside power loss, this systems is also prone to clogged emitters, since the pressurized nozzles rely on very tiny openings to pressurized the solution.
Keep in mind that several systems that are sold for home or small scale production that are labeled as aeroponic, such as AeroGarden and Tower Gardens, don’t technically use aeroponics to grow since the solution isn’t applied as a mist or aerosol. I would say they operate more like a vertical NFT system where water flows over the roots as it travels down the chamber.
It’s Halloween and terrifying things abound – particularly at garden centers. Below you’ll find a pictorial approach to four frightful follies. Enjoy – and keep your garden safe!
Scary soaps. No. Not on your soil to aerate it. Not on your plants as part of some homemade devil’s brew. Soap stays in your house.
Scrubbing bubbles!
SOAP is not an acronym for Super Organic Agricultural Product
Petrifying phosphate. Not for flowers. Definitely not for transplanting. No matter how friendly and natural they look on the shelf, they are death to mycorrhizae and any aquatic system they wash into.
Mounds of mycorrhical mortality
“Bone meal” can be anagrammed to make “le bemoan.”
Murderous mulches. No cardboard. No plastic. And definitely no astroturf. The word “smother” does not conjure up a pretty picture for living soils.
The chips are great. The cardboard….not so much.
Cardboard’s so resistant to water you can make ponds out of it!
There are faster ways to kill trees.
Is it mulch? Or a tire graveyard?
Artificial lawn should only be used for indoor minigolf.
Zany zombies. These useless products live on in their science-free environments. Just…go…away.
Business is good even if efficacy isn’t.
Yes, because plants love stag’s bladders and cow mesenteries.
I can’t improve on this description.
You can find posts on these products by using the “search” box on the left hand menu. Or you can consult your Ouija board using this handy mulch planchette.