Counting the Days to Maturity: Calculating planting dates for fall vegetables

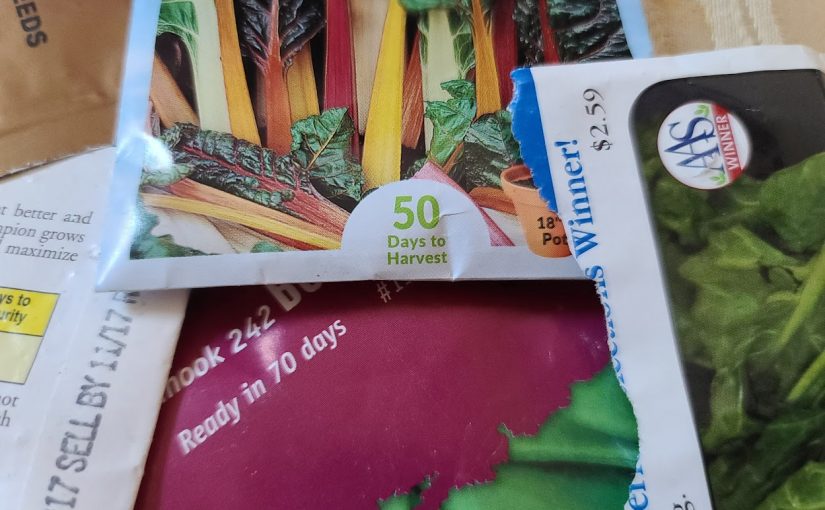
While most of the US is still seeing sweltering hot temps, the cool temps of fall and winter aren’t really all that far away for those of us unlucky (or lucky) enough to not live in a tropical climate.  The tomatoes, peppers, cucumbers, and other warm-season crops planted back at the beginning of summer are still puttering along, even if they might be getting a little long in the tooth and starting to look a little worse for wear ( especially if disease has ravaged them).  For those who aren’t quite done with gardening for the year or who want to reap the bounty of fall crops and get the most out of their production space, fall gardening can be a great tool to extend the garden season.  But knowing when to plant what is tricky, especially when we are talking about different weather patterns and frost dates all around the country.  So a bit of weather data, info from the seed packet or label, a touch of math, and a calendar can be great tools to figure out when you can plant no matter where you are.  Of course if you do live in one of those warmer tropical areas your planting calendar is kind of turned on its head from what us more northern gardeners face. You may prefer to time your planting to avoid high heat. 

The first thing to think about is what you can plant.  Cool-season crops such as the Cole crops (cabbage, kale, broccoli, etc.), leafy greens (lettuce, spinach, Bok choi, etc.), root crops (radishes, beets, turnips, scallions), and some cool weather loving herbs like cilantro and parsley are all par for the course for a garden going into cooler fall and winter temps.  Depending on when you have extra space in your garden to plant and how long your growing season is you can often sneak in a late planting of fast-growing warm season crops to mature before the last frost.  Beans, cucumbers, and summer squash all have varieties that are fast maturing and can be started mid-summer for an early fall harvest.  Unfortunately, as of this writing the window for those warm-season crops has passed for me, but others in warmer zones may still have time. 

One question I get asked often is whether you should start indoors or out. I always tell folks that for things normally direct-seeded, like beans or lettuce, sow as normal. For things that are normally started indoors, the choice is yours. Cole crops are started indoors in spring because they need warmer temps to germinate. Since it is hot outside, you won’t need to grow them indoors for the heat (though it may be too hot outdoors if temps are over 85). You can start them in containers in a protected area outdoors instead of trying indoors. Theoretically you could direct seed them into the garden, but management is difficult to keep them watered, weed-free, and alive out there in the cruel garden world.

To know what you can plant and when, the first bit of info you’ll need is from the seed packet or label (or do some research if you know the cultivar/variety).  You’ll want to know the “days to maturity”, which is an estimate of how long it will take to go from seed (or transplant) to edible crop.  For those warm season crops, you might want to shop around because those days to maturity can be wildly variable – you can find beans that mature in 60-65 days and some that take 100+.  You’ll want to choose faster maturing varieties. 

Assuming that you’ll want a harvest window longer than a day and given that plant growth slows down as temperature cools (respiration is temperature dependent so plant processes slow down as temperatures drop), you’ll want to add a few weeks to the maturity days to take that into account.  This should be sufficient for cool season crops that will survive well past the first frost and freeze dates.  The aim for cool season crops is to get them close to a mature size before cold weather sets in since their growth will slow down at that point.  For warm season crops you’ll want to add a little more time to provide a cushion against frost which will kill the plants.  For info on killing temperatures of certain crops, check out my previous article here

Graphical user interface, text, application, email

Description automatically generated

For example, if I wanted to plant Asian Delight Bok choi (I fell in love with it when I trialed it for the All-America Selections program) I’d see on the packet that it has an average maturity time of 37 days (which is pretty damn fast).  My math would be:

37 days (to maturity) + 14 days (harvest period) + 14 days (fall factor) = 65 days

Next, you’ll need to know a bit of weather data – more specifically the expected date of your first frost/freeze.  You can find this on the website of your local National Weather Service office, or get an idea from the map below. (This data is usually updated every decade or so – you’ll want to check it every few years for updates as the dates have been changing due to climate change.) The date ranges given are usually a median, meaning that half of the frost days fall before and half fall after the given dates.  Keep that in mind – sometimes frost will come earlier or be much later.

I live in Omaha, Nebraska so our median frost date (according to the map) is Oct 10.  Now I know that I need to plant my Asian Delight Bok choi 65 days before Oct 10.  I can grab a calendar and count backward from October 10 (or I can cheat and use an online date calculator like this one) and see that the suggested planting date is August 6.  Since I missed it by a week I can decide if I want to gamble a little and still plant since I know that it could very well frost later than Oct 10 and that the Bok choi will survive much later into the season anyway.  But it gives me an idea of what to expect. 

Had I wanted to plant something like beans for a late crop, my calculation would have definitely shown me that it was too late, letting me know that I shouldn’t waste my time.  For example, Blue Lake beans take around 55-60 days to mature (almost twice as long as my Bok choi), plus I need to add that extra 14 days for the frost factor meaning that I would have had to plant 97 days before first frost, which would have been in early July for me. 

You can extend the time you have for growing fall crops by using season extension techniques like row covers, low tunnels, cloches, etc.  For row covers, the materials you buy such as the spun fabric row cover will offer a certain number of degrees of protection.  For example, a medium weight row cover might offer 8 degrees of protection, meaning it will be 8 degrees warmer under the cover than the air temp.  Keep those in mind when planning your fall garden.  Perhaps we’ll have to talk about those in another article soon. 

Sources:

Fall Gardening (Nebraska Extension)

Fall Vegetable Gardening (Virginia Cooperative Extension)

Fall Frost Info (Weather.gov)

Water: Garden Friend….and Foe? – Water, Relative Humidity, and Plant Diseases

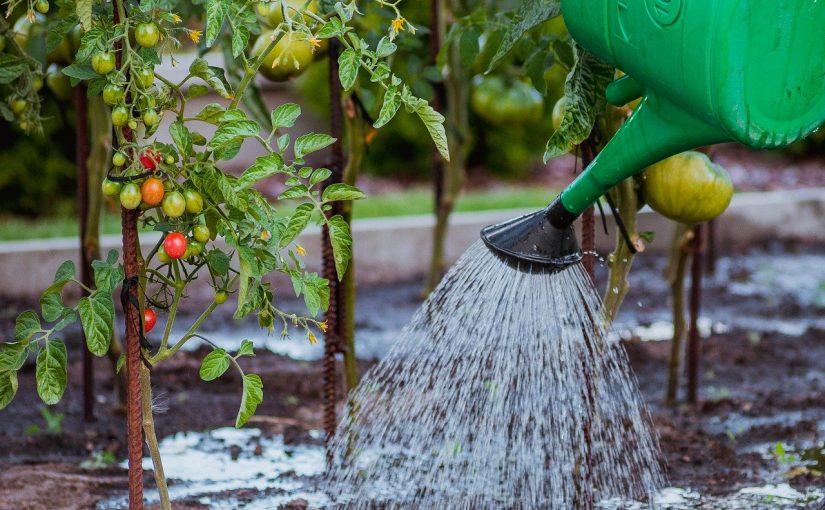
We all know that water is essential for life and that we have to ensure our landscapes, gardens, and houseplants all have a sufficient supply of the stuff.  Forget to water your garden during a hot, dry spell and it could mean disaster for your plants.  But water can also create issues for plants, usually when it is in an overabundance – water helps spread and develop diseases on foliage and excess soil moisture can damage roots, creating opportunities for root rots and other diseases.  How do you meet the water needs of the plant while also avoiding issues associated water?  Understanding how water affects disease organisms will help, along with some tried and true Integrated Pest Management Strategies.

Water and Pathogenic Microbes

Both bacteria and fungi require water to grow and reproduce.  Most do not have a mechanism to actively take up and manage water, so they uptake water mainly through osmosis.  This means there must be some form of water present for those microbes that are actively growing and especially for processes like reproduction which use not only a lot of energy but might also be required to carry spores in order to spread.

File:Septoria lycopersici malagutii leaf spot on tomato leaf.jpg -  Wikimedia Commons
Septoria leaf spot, a common fungal disease of tomato that requires water for initiation and development.

Both pathogenic microbes and beneficial (or neutral) microbes require water to thrive.  It is one side of what we refer to as the disease triangle.  Water (along with temperature) are major components of the “favorable environment” side of the triangle, with the other sides being a plant capable of being infected and a population of pathogens capable of infecting.  Those last two sides meaning you have to have a population of the pathogen big enough to initiate or sustain an infection and a plant that can actually be infected by that pathogen.  For example – one disease spore may or may not be enough to start an infection (depending on the pathogen), but several hundreds or thousands definitely can.  And the pathogen has to be one that can actually infect the plant – it doesn’t matter if you have a million spores of Alternaria solani (one of two closely related fungi that cause early blight in tomatoes) on your cucumber plants, they likely won’t get a disease.  But if there are spores of A. cucumerina, a different species, you’ll likely get leaf spot on those cucumbers.  But it doesn’t matter if you have both a susceptible plant and a pathogen, there has to be a favorable environment (water and temperature) for there to be a disease infection. 

As this paper points out, water in the form of liquid (rain, ground water, dew, etc) and vapor (air humidity, fog) can provide the environment for microbe development in the soil and on foliage.  Microbes in the soil are ubiquitous as water is typically available in most soils (except in droughty or arid areas) , but excess soil moisture can create booms in populations for both the “good” microbes and the “bad” ones.  Microbes that live on foliage (sometimes referred to as epiphytic since they rely on moisture from the atmosphere) are much more likely to be water stressed since they are exposed to the atmosphere.  When there isn’t water available on the surface of leaves (from rain, fog, etc.) microbes tend to colonize around areas where water leaves the plant – stomata and to a lesser extent around tricomes and hairs. 

The paper also points out high atmospheric humidity is positively correlated with the number of fungi on a leaf surface. It’s also a requirement for diseases microbe spores to germinate, for filamentous fungi to break dormancy, for pathogen survival, for microbe movement on the leaf surface, and for disease infections to be sustained.  It is also shown that heavy precipitation increases water availability to these microbes thus hastening their growth.  Precipitation also dislodges and disperses pathogen spores and cells to adjacent plant tissues, and to leaves of nearby plants.  High humidity also makes leaf cuticles more permeable and promotes opening of the stomata, which can serve as an entry point for pathogenic infection.

Once inside the plant, microbes such as fungi and bacteria can thrive on the aqueous environment inside a plant, moving easily between cells or into the vascular tissue (depending on disease).  Pathogens that thrive in wet conditions, however, may initiate water soaked lesions on the plant to develop conditions favorable to their growth. 

Water, water everywhere – so is there anything you can do?

Of course, water is naturally occurring and in most places falls from the sky in some form or another.  In some places very little precipitation falls, in others there’s a lot. And don’t forget about the humidity, dew, and fog (which are often more common in places that get more rain, but provide moisture even in dry climates).  There are a few places where the atmospheric moisture levels are in that “just right” zone to support plant growth but not pathogen growth, which makes agricultural production of certain crops easier.  You could consider these areas the “Goldilocks” zone for crop production.  For example, a lot of seed crops are produced in the Midwest and arid north West, potatoes in Idaho, apples in Washington, etc.  The conditions there mean that, at least when those crops were getting established (before the advent of modern pesticides) in those regions, disease pressure was low. 

You can’t stop the rain, of course, if you’re in a place both blessed and cursed with abundant rainfall or atmospheric humidity.  But there are some things that you can do reduce the likelihood of diseases spread or supported by that water and humidity.

  • Evidence shows that there is a positive correlation between the density of planting and disease incidence.  Therefore, proper plant spacing and pruning can do at least three major things.  First, having space between plants, especially in the vegetable garden, can reduce the splashing of pathogens from one plant to the next during a precipitation event.  Second, it increases air flow through the plant, which can reduce the likelihood of pathogen spores that might float in and land on foliage.  Third, it reduces humidity in the immediate microclimate around the plant. The increased air flow in addition to the reduced amount of foliage that is releasing water through transpiration can have a significant effect on the humidity, which can have a big effect on the germination, establishment, and survival.  
  • Utilize diverse planting plans in the vegetable garden and the landscape.  Research shows that while having a variety of plants increases the diversity of disease organisms, it actually reduces the infection rate possibly because pathogens splashing from plant to plant are less likely to find a host plant if they are surrounded by non-host plants.  This practice is promoted in intensive vegetable plantings such as square foot gardening. 
  • As stated earlier, precipitation can drastically increase the population of microbes on foliage.  This also includes water from overhead irrigation.  For example, this study found that overhead watering of cabbage led to significantly higher and faster rates of spread of the black rot fungus as compared to drip irrigation.  Therefore, reducing or avoiding overhead watering can reduce the likelihood of disease incidence. 
  • Timing of watering may also contribute to disease development.  The dew point, which usually happens during the night time hours, is when the air is totally saturated at 100% relative humidity and therefore cannot hold any more water.  This is the point where excess moisture is deposited as dew on surfaces (another source of water on the foliage) and little to no evaporation of water already on surfaces happens (learn more at weather.gov).  As shared in this book chapter review, lower temperatures resulting in reaching the dew point can extend the time leaves are exposed to high moisture and result in higher disease incidence. 
  • As our own GP Linda Chalker-Scott points out in this review, mulching not only retains soil moisture, reduces erosion and more but also reduces the incidence of disease in plants by reducing the splashing of soil or spores from rain or irrigation onto the plant.  This drastically reduces disease spread from pathogens found in the soil or on plant debris.  The organic matter from organic mulches also has the benefit of increasing the population of beneficial microbes, which out-compete the pathogenic microbes. 
Mulching and drip irrigation can both significantly reduce disease incidence in gardens.
  • Crop rotation, where crops are not grown in the same soil or plot for a number of years, also reduces disease incidence by reducing pathogen loads in the soil or from crop residues left in the garden.  This study shows significantly reduced disease incidence on potato and onion when a crop rotation plan of four years is utilized (meaning that either onions or potatoes are not planted in the plot for a minimum of four years, with other crops planted between those years). 
  • If root rots and pathogens are a problem, try improving drainage around the garden. Adding organic matter can help with water permeability of the soil over time. Raised beds can also drain faster than in-ground gardens.
  • Of course, if you’re having lots of problems with certain diseases on your plants, these cultural controls may not be enough.  Finding resistant varieties may be a necessary step in breaking the disease cycle in your garden.

Overview

While water is required for plant growth, it can cause issues with plant diseases if there is too much or if it lingers on the wrong parts of the plant for too long.  Water from rainfall, irrigation, high humidity, fog, and dew can all lead to the initiation, development, and longevity of plant fungal or bacterial diseases.  Reducing the amount, persistence of water or humidity on or around foliage can significantly reduce the likelihood of plant disease incidence.  Methods such as reducing overhead irrigation, timing of irrigation, mulching, and crop rotation are key cultural methods in reducing diseases spread by water. 

Sources:

Aung, K., Jiang, Y., & He, S. Y. (2018). The role of water in plant–microbe interactions. The Plant Journal, 93(4), 771-780.

Burdon, J., & Chilvers, G. A. (1982). Host density as a factor in plant disease ecology. Annual review of phytopathology, 20(1), 143-166.

Café-Filho, A. C., Lopes, C. A., & Rossato, M. (2019). Management of plant disease epidemics with irrigation practices. Irrigation in Agroecosystems, 123.

Chalker-Scott, L. (2007). Impact of mulches on landscape plants and the environment—a review. Journal of Environmental Horticulture25(4), 239-249.

Krauthausen, H. J., Laun, N., & Wohanka, W. (2011). Methods to reduce the spread of the black rot pathogen, Xanthomonas campestris pv. campestris, in brassica transplants. Journal of Plant Diseases and Protection, 118(1), 7-16.

Rottstock, T., Joshi, J., Kummer, V., & Fischer, M. (2014). Higher plant diversity promotes higher diversity of fungal pathogens, while it decreases pathogen infection per plant. Ecology95(7), 1907-1917.

Wright, P. J., Falloon, R. E., & Hedderley, D. (2017). A long-term vegetable crop rotation study to determine effects on soil microbial communities and soilborne diseases of potato and onion. New Zealand Journal of Crop and Horticultural Science, 45(1), 29-54.

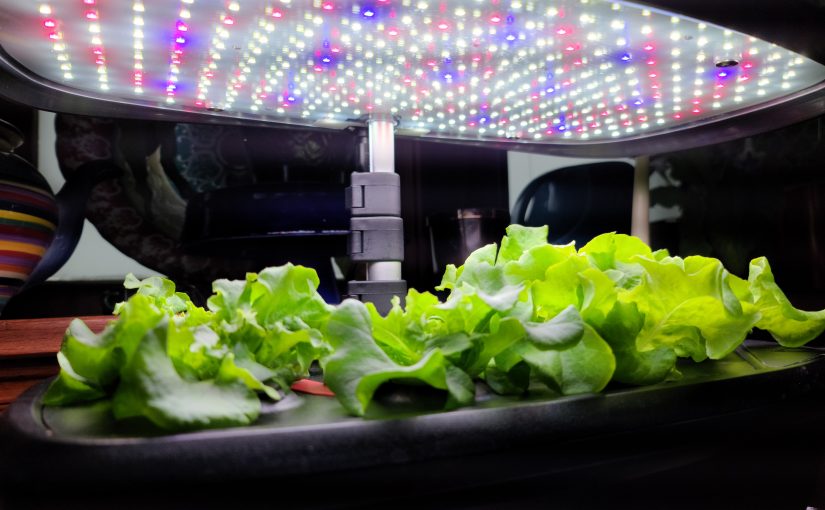
SUPER Thriving Lettuce?

The Garden Professors have previously written about the ubiquitous garden center product, SUPERthrive, here and here. The manufacturer claims a plethora of beneficial uses for SUPERthrive —everything from Christmas tree care to turf to hydroponics. They claim SUPERthrive will “revive stressed plants and produce abundant yields” and that it “encourages the natural building blocks that plants make for themselves when under the best conditions” thus “fortifying growth from the inside out,” but I know of no body of rigorous, peer-reviewed literature to support any of those claims (1, 2, 3, 4). In fact, I’m not entirely sure what those claims really mean, but I’m encouraged on their website and bottle to use it on every plant, every time I water, to receive these amazing benefits!

A test case

The hydroponics claim intrigued me because during the winter months I grow plants hydroponically under lights. One of the benefits the manufacturer claims is “restores plant vigor” and “works with all hydroponics systems.” As a plant scientist, and knowing something about the ingredients, I was skeptical to say the least, but I thought that if SUPERthrive was going to show any beneficial effect it would surely be in hydroponics since that is a more uniform environment than outdoors. So, I shelled out my $11 for 2 oz (the things we do for science!) and set off to design a simple experiment.

The hypothesis

A typical experiment like this starts with what we call the null hypothesis (denoted “H0”). The null hypothesis is defined prior to the experiment and often states that we think there will be no difference between the treatment and control. In this case, my null hypothesis is that the SUPERthrive treatment will have no effect on the mean fresh weight of the harvested lettuce relative to the control lettuce. Note that I haven’t made any hypotheses about other parameters that might be important, e.g., flavor, compactness, number of leaves, color, disease incidence, survival rate, etc. For this experiment I am interested in only one thing: total harvested weight as a signifier of healthier plants.

After the data is collected and analyzed, we decide whether to accept or reject the H0 by running an appropriate statistical test. If there is no statistically significant difference, then we cannot reject the H0—that is, we accept the H0 that there is no difference between treatment and control. If there is a statistically significant difference between treatment and control, then we say we reject the H0 and conclude that the treatment did have an effect. Keep in mind, sometimes no difference between treatment and control is a good thing, e.g., in toxicity studies.

Experimental design

With my skeptical spectacles on, I set up my experiment to test my hypothesis. I made a six-gallon batch of hydroponics nutrients suitable for leafy greens. I split the batch in half and added SUPERthrive, per the manufacturer’s dilution recommendation, to one of the three-gallon aliquots as the treatment. I then divided the control and SUPERthrive treatment each into six individual, identical, two-quart containers. I thus had six independent replicates of a treatment and a control. (See Figure 1 below for a schematic of the experimental design.)

Figure 1. Outline of experimental design

To further avoid any experimenter bias, I had my wife assign numbers randomly to each container, record which were SUPERthrive treatment and which were untreated control, and then re-sort all the containers. I had no idea which containers contained which nutrient mix. I did not open the “secret decoder envelope” until after all measurements were complete!

Figure 2. Identical 2 quart containers randomized on day 1 in the hydroponics solutions. This kind of hydroponics is called “Kratky” or passive. Enough nutrient solution is supplied at the beginning to last the plant for its entire life-cycle.

Into each of the 12 containers I placed a 12-day-old lettuce seedling, taking care to select plants that were of equal size and leaf number. The containers were then placed under my lights (cool white T8 fluorescent) for the remainder of the experiment. I rotated the rows of plants several times to try to control for any edge effects in my grow area. After 30 days in the containers, I harvested and weighed each plant.

Figure 3. Plants after 30 days of growth.

What did my experiment show?

The graph below is a box and whisker plot that shows the spread of the data and the mean for each group in grams of harvested fresh weight of the plants (roots were removed). In my experiment, the SUPERthrive treatment showed a clear drop in harvested fresh weight! In fact, the heaviest SUPERthrive plant weighed less than the smallest control plant, and the SUPERthrive set was much more variable in harvested weight. These results surprised me a bit.

Figure 4. Box and whisker plot of lettuce plant fresh weight. Master Blend: Master Blend nutrients; Master Blend + ST: Master Blend nutrients plus SUPERthrive (0.9 ml/gal.)

A standard statistical test (Student’s T-test, unpaired, two-tailed) was performed to show that that there was in fact a statistically significant difference (p<<0.01) between the two groups. Thus, we can reject the H0 (remember our null hypothesis is that there will be no treatment effect) and conclude that there is a difference between treatment and control harvested weights, with the treatment mean plant weight being significantly smaller than the control mean plant weight.

What can we make of this experiment?

Well, we need to keep in mind a few things.

1) Six replicates is a very small sample size; this could be a spurious, unlucky result. There is always some distribution of growth rate, even in a uniform genotype. Did I get unlucky and happen to put six plants that would always be on the smaller end of that distribution into SUPERthrive?

2) After analyzing the data, I discovered that four of the SUPERthrive plants ended up in the same row and were the smallest heads in the experiment (sometimes you flip a coin and get four heads in a row!). Could this be the reason for the unexpected results? The other two treated plants were in the other two rows, but neither was as large as the smallest control plant.

3) I do not have a perfectly controlled environment like one would find in a lab or even in a larger growing facility. However, something marketed with such aggressive claims of amazing plant health benefits and vigor should give a noticeable effect under a variety of imperfect, real-world conditions, such as those one would find in a home garden situation, don’t you think?

4) Perhaps my plants were already growing at their maximum potential and there was nothing for SUPERthrive to “improve.” Afterall, hydroponics indoors is already a relatively stress-free environment, as the SUPERthrive manufacturer also points out. Then what do they think their product is improving in hydroponics? Would I have seen an effect under less-than-ideal or more stressful conditions then? This could certainly form the basis of other testable hypotheses.

Conclusions

What I think we can conclude is that in this experiment, with this genotype of lettuce, and under these hydroponics conditions and environment, SUPERthrive had no positive effect whatsoever and may have even had a negative effect. Under other conditions would one see a positive effect? Possibly. Would different plants or genotypes respond to the SUPERthrive differently? Possibly. We must always be careful of over-extrapolating both positive and negative results from a single experiment.

But, because the individual ingredients have not been shown to provide any beneficial effect, and no plausible mode of action is given by the manufacturer for their broad general claims, we should remain highly skeptical. As pointed out in the previous post, the SUPERthrive manufacturer has certainly had plenty of time to scientifically demonstrate efficacy of their product, since they proclaim to be “always ahead in science.”

Because the results showed a clear and unexpected negative effect, the experiment surely needs to be repeated. Repetition is a central tenet of science. I hope to share additional results with you in a post later this spring—after all, I have a whole bottle of SUPERthrive and we love salad!

References

  1. Banks, Jon & Percival, Glynn. (2012) Evaluation of Biostimulants to Control Guignardia Leaf Blotch (Guignardia aesculi) of Horsechestnut and Black Spot (Diplocarpon rosae) of Roses. Arboriculture & Urban Forestry. 38(6): 258–261
  2. Banks, Jon & Percival, Glynn. (2014) Failure of Foliar-Applied Biostimulants to Enhance Drought and Salt Tolerance in Urban Trees. Arboriculture & Urban Forestry 40(2): 78–83
  3. Chalker-Scott, Linda. (2019) The Efficacy and Environmental Consequences of Kelp-Based Garden Products.
  4. Yakhin Oleg I., Lubyanov Aleksandr A., Yakhin Ildus A., Brown Patrick H. (2017) Biostimulants in Plant Science: A Global Perspective. Front. Plant Sci., 7:249

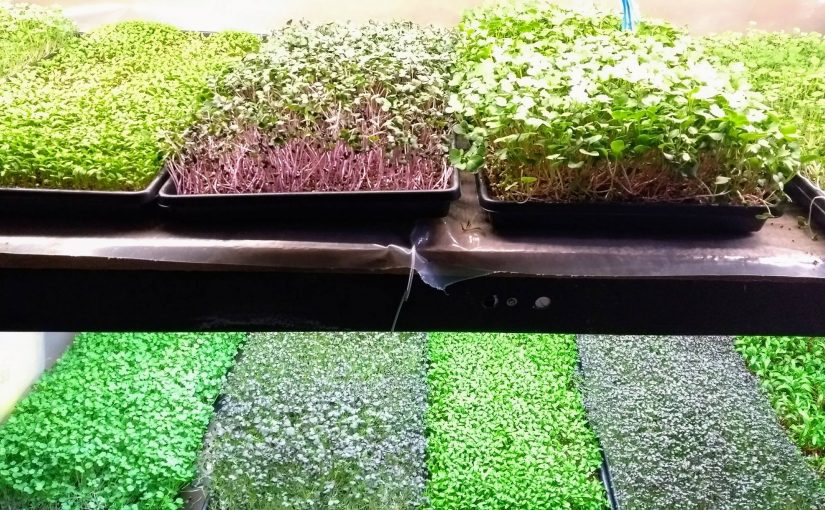
Tiny plants that pack a flavor and nutrition punch: getting in on the microgreen trend

If you do any searching for gardening (or even think about the color green), you’re likely bombarded with adds on social media and search engines about all stuff gardening.  One of the recent trends is microgreen production.  There’s all kinds of fancy little systems and gizmos that will help you grow microgreens for a price.  But what are microgreens?  Are they the same thing as sprouts? And do they have the same food safety issues as sprouts?  Let’s discuss, shall we?

What are microgreens?

Microgreens are basically tiny plants harvested shortly after germination.  Unlike sprouts, like the common alfalfa or bean variety, these baby plants are grown on a medium of some sort and just the “above ground” portion of the plant is harvested.  Sprouts, on the other hand, are typically grown in a moist environment without a medium and harvested whole -roots, seed, and all.  It is this wet and warm environment that make sprouts especially risky for food borne illness. 

Microgreens can be any number of different crops, but common types are kale, mustard, chard, broccoli, arugula, and radish.  Sunflower and pea are also common, but they fall more in the “shoot” classification since they are harvested a bit larger.  There’s lots of other crops that are used for microgreens, including herbs like cilantro and even marigolds, so the sky is the limit!

Why microgreens?

There are a few things that make them attractive to farmers which also are good for home growers.  First, it only takes 1-3 weeks for a finished crop.  This fast turn-around makes it easy to keep up with production needs for customers (or your own uses) and also reduces risk.  If a crop fails, it is much less damaging if it only took a week to grow rather than a whole field full of peppers that have been growing for months getting wiped out by disease or a storm. 

Second, is the value and profit.  While there is some investment in seed starting equipment and then continued expenses of seeds, trays, and media, microgreens have a high per pound value.  Microgreens are used in small quantities and are therefore sold in small quantities.  A small amount you may purchase at a farmers market for a few bucks may be an ounce or less.  When you calculate it out by the pound, microgreens are sold for between $20 and $200ish per pound (depending on the variety, organic production, other factors). 

And of course, microgreens lend themselves to year-round production.  It can be a fun and easy way to get some flavor and color on the plate even in the dead of winter.  Just a few square feet of production area can provide a decent sized crop, so it is great for those with limited space or no garden at all.

Look ma….I made fancy mac and cheese. All I had to do was add some microgreens.

Microgreens are popular with home cooks and chefs alike because they pack a flavor punch and add some color and texture with just a pinch or two of product.  Studies have shown that microgreens also pack a nutritional punch in a small package.  However, production practices can greatly influence nutrient content, especially light.  Microgreens grown with higher quantities (brightness) and quality (spectrum colors, mainly red and blue but also green) of light have higher nutrient values. 

How do you grow microgreens?

The way you grow microgreens lends itself to why they are so popular to grow, for both home enthusiasts and farmers alike.  Microgreens are basically recently germinated seedlings.  If you are good at seed starting, you can be good at growing microgreens.  Lots of the ads I’ve been seeing recently are for attractive but pricey growing trays and mats that you just lay down and water.  However, budget conscious gardeners can grow them pretty simply and inexpensively at home.  And you probably have most of the equipment you need, especially if you start your own seeds each year! 

Microgreens are usually grown in those flat plastic seedling trays, the type that don’t have cells in them (the ones used to hold the cell packs).  For those “in the know,” they’re called 1020 trays.  You can either use a sterile media like peat or coir or purchase specific fiber mats (I have some made from hemp -they work well but smell like a moldy gym sock full of weed when in use). We’ll talk about the importance of a sterile media when we talk food safety. 

A demonstration of sowing microgreen seeds on hemp fiber mats.

The sowing density of seeds can vary by crop due to seed and seedling size.  Typically, one ounce of seeds can sow anywhere from one to eight 1020 trays.  In general terms, large seeded crops like chard and beets may take up to ½ cup per tray and small seeded crops like radish or kale might require ¼ cup.  Tiny seeded crops, like sorrel may need just a few tablespoons.  If you’re really into production, Penn State extension has an excellent Excel calculator to calculate seeding rates. Typically, you’ll broadcast the seeds on top of your media and then maybe sprinkle a little more media on top to make it easy (no dibbler here!).

Most seeds require darkness to germinate, as well as high humidity.  You can use humidity domes and cover trays with an opaque material to achieve this, or you can use the trick that producers use and stack trays on top of each other for a day or two.  This keeps the seeds covered and dark and preserves moisture and humidity.  Just unstack them after a day or two and stick them in their growing location.  As with seed starting, you’ll have the most success if you provide some good quality light and heat.  (You can search through old articles to find lots of info on seeds starting).  There’s research that shows that light is a big factor in microgreen growth, coloration, and nutrition levels. 

You’ll harvest your microgreens typically one two three weeks after sowing.  Typically, this is done after at least one set of true leaves have formed, but you can usually let them go until there are at least two (or sometimes three) sets of leaves.  To harvest, use a sharp, cleaned pair of scissors to snip the seedling off just about soil level, being sure not to disturb the media so that you don’t get it on your precious produce.

There should be no need to wash the microgreens right after harvest and before storage, since they’re typically grown in a clean environment.  Washing before storage can increase storage moisture to levels that support microbial growth, reducing storage time and also increasing the risk of human pathogens.  Instead, store microgreens (and most leafy greens) without washing and wash just before use. 

Working with a local farmer to demonstrate microgreen production at a regional production conference.

Food Safety

As we learned when discussing what microgreens are and comparing them to sprouts, we learned that microgreens have been found to have much lower risk of human pathogens.  However, the risk is not zero, especially if production practices are conducive to pathogens.  We just discussed that washing prior to storage can lead to microorganism contamination, but there are a few other areas where contamination is easy.  To reduce contamination, follow these steps:

  • Always use clean and sanitized trays or containers.  If reusing trays, be sure to wash with soapy water then sanitize with a dilute bleach solution or other approved sanitizer. 
  • Keep the production area clean and sanitized.  Microgreens are often produced on multi-leveled vertical racks, so contaminants can drip down.  Make sure all surrounding surfaces are clean.
  • Use sterile media for production.  This is typically a soil-less media made primarily of peat or coir, like a seed starting mix, or specialized fiber growing mats.  Do not use regular potting soil, any mix containing compost, or anything containing soil to avoid the introduction of human pathogens or other microorganisms that might affect the crop, such as those that cause damping off.
  • Use cleaned and sterilized seed. Many companies sell seeds specifically for microgreens that have been processed to remove pathogens.  I’ve seen seed production, and while it isn’t filthy, it typically isn’t sterilized to the level of food production standards.  You can sterilize common seed at home using a solution of hydrogen peroxide or vinegar.  For guidance, visit this guide from K-State extension.
  • Use a clean source of potable drinking water.  If you wouldn’t drink it as is, don’t use it.  Typically this means it should be straight from the tap of a trusted source. 

Conclusion

Growing microgreens can be a fairly easy and enjoyable way to produce something fresh and green year round.  In terms of production practices, it is basically ramped up seed starting where your seedlings only grow a few weeks before harvest. This makes it a fairly easy process and one that can be done almost anywhere.  If you’re looking for an indoor gardening project or just want to add a quick source of nutrients to your diet, give microgreen production a try. 

Sources and resources:

Microgreen nutrition, food safety, and shelf life: A review

Microgreens and Produce Safety

Microgreens—A review of food safety considerations along the farm to fork continuum

A step-by-step guide for growing microgreens at home

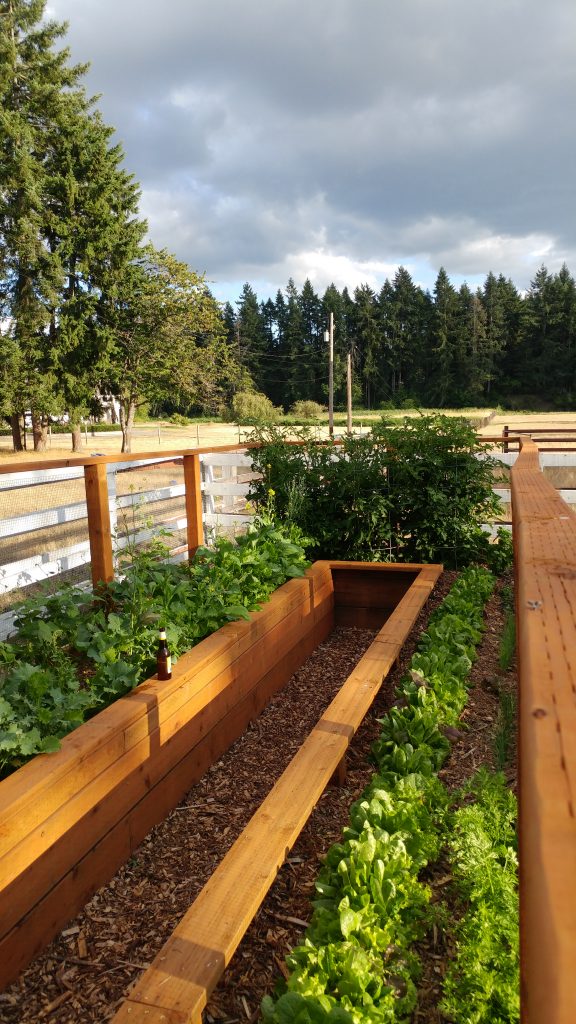
Planning Ahead (in a pandemic) for Vegetable Garden Success

Looking back to January 2020, most of us would have never imagined the year we’ve had.  All of our best laid plans went away and instead we socially distanced, scavenged for toilet paper, and canceled events and vacations.  But one thing that wasn’t canceled was gardening.  By June, garden retail sales had increased 8.79% over the average, a big jump for a trend that was already showing increased gardening over the last few years.  Wanting to grow food to ensure a safe food supply was one reason gardening increased this year, but it also served as away for people break the boredom of being stuck at home. 

One bit of advice that we in Extension always give to gardeners, young and old, is to plan ahead, especially if they are growing fruits and vegetables or starting their own seeds.  Given that rapid increase in garden sales, many would-be gardeners were frustrated to find the seed racks and plant shelves empty and online catalog retailers out of stock. From personal experience, I can tell you that white beets don’t look quite as pretty in the jar as those bright red ones.  Given the fact that the pandemic is likely to continue well into 2021, it would be a good idea for those thinking about gardening to plan ahead on what they want to grow and plan to buy seeds and supplies early.  This not only helps you plan out what you want to grow and when to start or plant it, but will also help you beat the rush and get the plants or varieties that you want. 

Here are some things to consider while planning for your vegetable (or other) garden:

  1. What are your garden goals?  Are you wanting to harvest for fresh eating only? Hoping to preserve harvest for later?  Have extra to sell or give away?  Figuring out what you hope to accomplish will help you plan out how to use your space most effectively.  Plan to plant extra of stuff you plan to preserve or give away, and plant it all at the same time to have a larger harvest.  If you’re focusing on fresh eating for just your family, planting smaller quantities of each plant and spacing them out over time would be better.
  2. What do you enjoy eating or growing?  Focus on the crops that you and your family like to eat, especially if you have limited garden space or time. 
  3. What resources are you willing to commit to gardening?  How much money do you have to invest in seeds, plants, or supplies?  And how much time do you have to spend per week?  You should base your garden size on what you can reasonably support.  And also look for investing in efficiencies.  For example, adding drip irrigation will be an investment of time and money up front, but will save on water bills and time spent watering the garden and will likely increase your harvests so it can have a pretty decent return on that initial investment.
  4. Are you planning on growing throughout the garden season?  Many people focus on gardening May through September and often miss those very productive early spring and fall months when cool season crops flourish.  Making a plan for using space effectively can include growing an early season, summer, and late season crop all in the same spot using interplanting or succession planting.  If you aren’t sure what to grow when in your climate, look for local growing guides or calendars to help.  Your local Extension office will likely have some good resources to share.  Having an idea what you want to grow throughout the season will also help you make early purchases to ensure you have what you need throughout the season.  Seeds are usually off the store shelves by mid to late summer, so buy seeds in the spring for those fall and late planted crops just to be prepared. 
  5. Are there things you want to grow that would be easier to buy?  This question is especially important if you have limited space, time, or money.  Crops like potatoes, cabbage, and onions are often cheaper for home growers to buy than grow and crops like squash can take up a lot of room and are often easy to buy (there’s usually plenty of zucchini everywhere in the summer).  Focus on those things you can’t buy like interesting varieties of tomatoes, peppers, etc.
  6. Are you ready to deal with diseases and pests throughout the garden season?  Be ready to scout the garden for pests and do a little research on the common pests and diseases on the crops you’re growing so you know what to look for.  You can often reduce the likelihood of pests and diseases by growing newer resistant cultivars versus older varieties and heirlooms that don’t have resistance bred in. 
  7. What has worked (or not worked) for you in the past?  Focus on growing those things you do well.  Take some time to research or learn how to better grow the things you haven’t grown so well in the past (extension resources are great for this- contact your local office or search for info online, looking for pages that end in .edu).  And don’t be afraid to try something new – you can find new favorites by trying out new cultivars or even new crops. 

Using some of these steps can help you plan ahead for a year of garden success. The key is to start early, and especially in 2021, buy those seeds and supplies early.  When you do, take a look at your plans for the whole garden season and plan accordingly in advance.  Though while you’re out there buying those seeds, be sure to leave a packet or two on the rack for me.  I’d prefer to have red beets for pickling this year instead of those white and yellow ones. 

Hydroponics for the Holidays? Home Systems are a hot holiday gift list item

Systems to grow fresh produce in your home using hydroponics or other automatic processes have been popular for several years but seem to be even more popular this year with more folks home and looking for something to do and hoping to produce their own food.  As a result, these systems are popping up on holiday wish lists and gift buying guides all over the internet.  But are they worth it?  And if so, what should you look for in a system? 

First off, what are these systems? And what is hydroponics?  Hydroponics is the process of growing plants without soil in a aqueous nutrient solution.  Basically, you provide all the nutritional needs of the plants through nutrient fertilizers dissolved in water.  These systems can grow plants faster and in a smaller space than traditional soil-based production. It also allows you to grow plants indoors and in areas where you would not normally be able to grow.

This Aerogarden (which is the previous generation) has a digital brain that controls light and water schedules for the specific growth phase of the plant and yells at you when it thinks you need to add more fertilizer solution.

As for systems, you might have seen what is probably the “oldest” one on the market – the AeroGarden.  Since it is the oldest and most common, that’s the example we’ll be staying with.  It has been around a few decades and has evolved from a basic electronic system to fully automatic, “smart”Bluetooth connected systems that you can control with your phone.  In recent years there have been many new systems come onto the market at all different sizes and price points.  A quick search of online retailers will usually provide an array of options – from DIY kits to plug-and-play enclosed systems such as “Click & Grow” and “Gardyn”. My only experience is with the Aerogarden system, so I can’t speak to any of the others (though I’d love to try them out!).

The answer to “are they worth it” is up to you, really.  Most home based hydroponic or aeroponic systems offer convenience, but at a cost.  Most cost several hundred dollars and are small, so they produce a small amount of produce (or other plants) at any one time. So you have to determine what goals you, or your intended giftee, have with the system. 

“Baby” lettuce, 18 days after sowing. The current version of this 9-plant Aerogarden system, called the “Bounty”, retails for $300 but you can usually get it for under $200 on sale.

The benefit of the “plug-and-play” enclosed systems like the AeroGarden is that basically you can take it out of the box, set it up in less than 10 minutes, and have some fresh lettuce or herbs in a few weeks.  It controls the water cycles, lighting, and all other conditions for growth.  You just drop in pods that contain the seeds suspended in a spongy-material.  The smallest system, that holds 3 plants, retails for $100.  As an additional expense comes from buying refill kits to replant. The mid-size systems are the most common and range from $150-$300.  The largest system, the “XL Farm” retails for $600. But these systems are commonly on sale at pretty significant discounts. 

For many systems, you typically buy a new set of pods (there are different plant variety selections), but there are pods you can buy to assemble your own using your own seeds.  For the AeroGarden, the pod kits range from $15 up to $30 to grow up to 9 individual plants. There are other plug-and-play systems on the market, as well as some kits that are more build-your-own and less automated. 

No matter which systems you buy (or gift), keeping these costs in mind is important.  If you’re looking for a fun and easy activity with the benefit of a little fresh produce and aren’t as concerned with production costs these systems may be for you – and if you are giving or getting them as a gift that definitely makes it more economical. But given the cost of the plug-and-play systems and the refill pods, they will never be an “economical” option for producing your own food.  If you are wanting to produce food on a budget and you’re interested in home hydroponics, look for plans to build your own or buy a DIY kit. 

The complicated issue of heavy metals in residential soils, part 1: What are toxic heavy metals, and where do they come from?

The popularity of home gardens is exploding as we wait out the COVID pandemic

So many of us are growing our own vegetables – either as experienced home gardeners or as COVID19-isolated novices. There is a lot of effort in figuring out garden beds, vegetable choices, and growing medium – but one of the issues rarely considered is whether there are heavy metals present in the local soil and/or growing medium. We can’t see heavy metals, or smell them, so we need to have a way of assessing their presence before we plant edibles.

In the next few months, I’ll tackle the complicated science behind this invisible threat. Today, let’s look at the heavy metals that are commonly found in garden soils and where they might come from.

What heavy metals do gardeners need to monitor in their soils?

Heavy metals are exactly that – they are dense elements that have certain chemical properties that define them as metals. In fact, most known elements are considered to be heavy metals. Fortunately, there are only a handful of heavy metals that are commonly found in residential soils. Some of these heavy metals are necessary for life – iron, manganese, and zinc, for example – but others have no known biological function. Arsenic and lead, for instance, can interfere with enzymatic activity and effectively poison biochemical pathways. There is no “safe” level of heavy metals that are not essential nutrients.

Here’s a table of the most common toxic heavy metals that might be found in your soil, and possible anthropogenic sources:

Heavy metal Sources of contamination
Aluminum* Smelting
Arsenic Pesticides, smelting, treated timbers (old)
Cadmium Paint
Chromium Fly ash, metals industry, paint, leather tanning, treated timbers (old)
Lead Gasoline (leaded), paint, pesticides, plumbing, smelting, solder
Nickel Plumbing, smelting

*Aluminum is a light metal, not a heavy metal, but has similar biochemical poisoning activity as toxic heavy metals

Some of these sources of contamination are not relevant to where I live – why do I need to test my soil?

Gardeners may be tempted to look at the chart above and feel relieved, because pesticides and paint no longer contain heavy metals, they don’t use old treated timbers, and they know that leaded gasoline is a thing of the past. What many don’t consider, however, is that heavy metals are elemental – they don’t break down, though they may change their chemical form. They are a permanent part of soil chemistry unless they are removed by physical or biological means.

The underlying soil in housing developments built on old agricultural land often contains high levels of arsenic – because that was the active ingredient in pesticides many decades ago. If the topsoil was removed during construction, it may have been taken to a commercial soil facility where it would have been used to create landscape fill mixes for new landscapes elsewhere. The same is true for land near older roadways where lead from gasoline was released from vehicles over many decades. Not only are lead, arsenic, and other heavy metals in the soil, they also end up in the air when soil is disturbed by erosion or tilling.

Nearly all soils contain some level of some heavy metals. They are naturally occurring, after all, so their presence is not necessarily from anthropogenic activities. Regardless of the source, it’s important to know whether any of these harmful elements are in your garden soils, especially if you are growing edibles. A soil test is the only way to find out.

Here is a soil test of my own raised bed system. While my nutrient levels are optimum, and lead is very low, the aluminum level is quite high. What should I do?

Why aren’t there guidelines on heavy metal uptake in vegetable gardens?

It would be ideal if there was a list of “safe” and “dangerous” vegetables to plant when heavy metals are present. Unfortunately, real life rarely fits into lists and there are numerous sources of variability. Next month I’ll discuss the complications that arise when we consider plant species, heavy metals, and environmental variables.

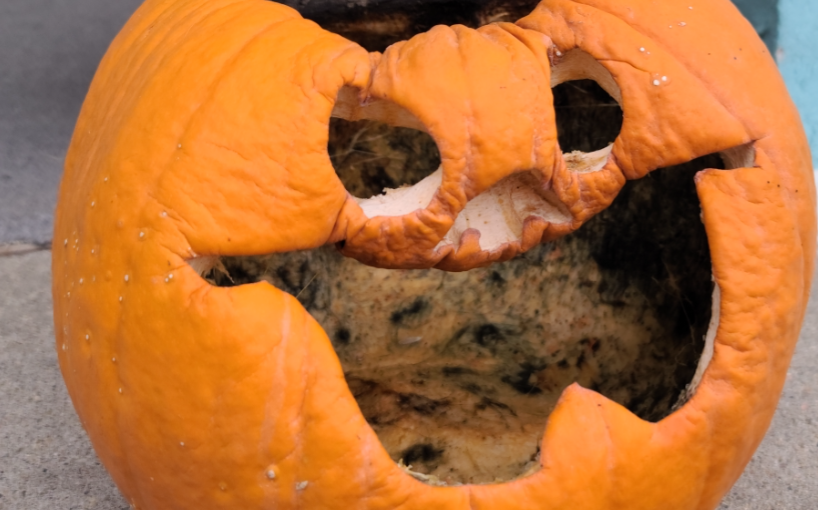
Smashing Pumpkin Myths: Bleaching to extend shelf (and porch) life

Peeps & Creeps - Home | Facebook

Scrolling through social media in September and October and you may see those basic signs of the season: scarves, pumpkin spice lattes, sweaters, and Halloween ideas galore.  One of those Halloween ideas is to extend the life of your pumpkins, carved or otherwise, by giving them a treatment with household bleach.  Keep scrolling and you might see another post decrying the use of bleach as inhumane and poisoning for wildlife.  So which is it?  Is bleach safe to use as a sanitizer on your jack-o’-lantern or are you poisoning the neighborhood squirrels?  Let’s use our gourd to explore the science.

The bleach acts as a sanitizer, neutralizing fungi and bacteria on the surfaces of the pumpkin that will cause decomposition and rot.  Even un-carved pumpkins will eventually succumb to degradation under the right conditions.  But if bleach kills fungi and bacteria, will it kill wildlife? The answer is – not if it is used correctly.  Bleach, and sodium hypochlorite (the active chemical in bleach) are toxic if consumed directly in concentrated amounts, however, dilute solutions break down quickly in the environment.  Products containing sodium hypochlorite, including plain household bleach, are actually approved and labeled for use as a sanitizer by produce farmers to reduce both human pathogens and decomposition microorganisms and extend the shelf life of produce that finds its way to the grocery store, farmers market, and any other avenue from the farmer to the consumer.  These wash water sanitizers are used more for reducing cross contamination of from pathogens introduced to the water from dirty produce, but it can reduce the microorganism load on produce items. If used correctly to sanitize the surface of the pumpkins, bleach DOES NOT pose an increased risk to wildlife (or human) health.

What is the proper way to use bleach in sanitizing that pumpkin so that it doesn’t face an early demise?

  1) Make sure the pumpkin is clean by washing with plain water or a mild detergent to remove any soil or debris.  Sanitizers like bleach are quickly neutralized (used up) on dirty surfaces (this is a good lesson for home cleaning, too – you cannot sanitize a dirty surface). 

2) Prepare a DILUTE solution of plain household bleach (unscented, and not “splashless”). The recommended concentration is 200ppm sodium hypochlorite, which you can achieve with 1 Tablespoon of bleach per gallon of water.

3) Apply the solution to the pumpkin using a spray bottle.  Alternatively, you can prepare enough solution to dunk the pumpkin(s) and immerse them in the solution.  If you are sanitizing a carved pumpkin, I would opt for the spray method – dunking may result in infiltration of the solution in to the exposed flesh. It will still break down since it is a dilute solution, but it will slow down the process since it protects the bleach atoms from air and sun exposure.

4) Allow the pumpkin to air dry.  Sanitation is not immediate (keep that in mind for sanitizing surfaces in the home, as well) and wiping can cause cross contamination

If I can do this with a pumpkin, should I be doing this with my other produce?

The short answer is NO.  It is not recommended that home grown or purchased produce be washed with any sort of detergent or chemical in the water.  Fresh cold water and friction should be sufficient for removing soil and pathogens on the surface.  Proper protocols, equipment, and training are needed to make sure sanitation is done properly. Knowing which produce items can and cannot be washed with a sanitizer is important. However, if you are harvesting produce like pumpkins or winter squash for long-term storage you may want to consider sanitation using the above methods.

I don’t want to use bleach, can I use something like vinegar?

There are many sanitizers approved for use by produce growers for sanitation, so bleach is not the only option.  For home consumers there aren’t so many options.  Vinegar is often mentioned as a wash for produce.  I found no direct mention in produce handling guides of using vinegar on pumpkin, but most produce wash solutions use vinegar at a much higher concentration because it is much less effective at sanitation.  I found rates ranging from 1/3 c vinegar to 1 c water to 100% undiluted household vinegar for use as a produce wash.

Sources:

Sanitizers Labeled for Use on Produce (Produce Safety Alliance)

Produce Wash Water Sanitizers (UMN)

Guidelines for the use of chlorine bleach as a sanitizer in food processing operations (OSU)

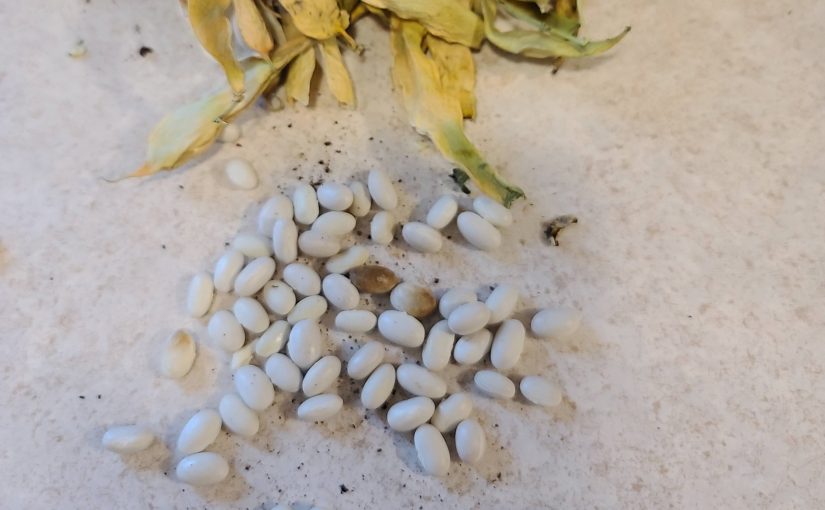
Saving for the Future: Seed Saving Tricks and Tips

As summer winds down and the summer crops and flowers start to slow down many gardeners start thinking about saving seeds. Who doesn’t love saving seeds from that favorite tomato or beautiful coneflower?  Not only do you have some for next year, but you can also share with your friends! There are definitely some things to consider and some myths out there when it comes to seed saving, so let’s talk about how to do it right. 

You’ll get the most consistent results from open pollinated or heirloom varieties that are self-pollinating.  These plants have genetics stable enough that the seeds you save will come out looking and acting like a close approximation to the plants from the previous season (with some variation based on your selection of the “best” plants you save seeds from. Self-pollinating species are: tomatoes, peppers, eggplant, beans, peas, peanuts (note, peppers and eggplants have more open floral structures that can be cross pollinated).  Most tree fruits like apples and pears are cross pollinated and they are notorious for not “breeding true” – even if you hand pollinate to ensure that the mother and father are both the same cultivar you’re likely to get surprises.  Stone fruits (peaches, plums, etc) are less variable but still not true-breeding.  Bee pollinated plants are also notoriously hard to save seed from, since they can cross pollinate with different varieties and cultivars from miles away.  It is especially interesting for plants that look totally different but are the same species (like pumpkin and zucchini).

A puccini or a zumpkin? Either way, it tasted nasty.

Myth: You can’t save seeds from those new modified hybrid plants. They’ve been made to be sterile

First off, hybrids aren’t genetically engineered and there are no GE plants available to home gardeners (most home garden crops don’t even have GE versions).  Hybrid plants do in fact usually produce viable seeds.  However, you won’t get the consistent results you will with open pollinated/hybrid varieties.  Hybrids are the F1 generation of a specific cross between a mother and father plant.  The offspring from that F1 generation (the plants from the seeds you save) is called the F2 generation will be a mix of traits – some will look like the F1 generation, some will look like the mother, some the father, and some the milkman.  So you’ll be in for a mixed bag of surprises.  According to our former GP colleague Joseph Tychonievich’s book “Plant Breeding for Home Gardeners” you can even develop a stable open pollinated variety from hybrids by saving seeds over a few seasons, selecting seeds from the plants that most resemble the cultivar you’re trying to save. 

You’ll want to make sure that the fruit/flower head that you’re saving seed from is mature.  This can be tricky for some vegetables, because we eat them in their immature states.  Peppers need to change from green to whatever their color is (red, yellow, orange, purple, etc),  cucumbers and zucchini (and other squash) need to turn into those massive, bloated fruits that often change to yellow or orange.  Beans often need to change to yellow or tan (and may have stripes).  For flowers, the seed heads or fruiting structures often need to turn brown and dry or start to open. 

If the weather cooperates, you’ll want to collect seeds from dry fruits/structured (beans, some flowers, etc) before significant rainfall so that seeds don’t become wet and potentially mold or break dormancy.  Collect seeds and place in a warm, dry location to let them continue drying out (if they’re small you want to put them somewhere they won’t blow away).  After drying, store seeds in envelopes or containers and put them in a cool dry place.  I often tell people to store seeds in the freezer – the cold temperature slows down respiration in the seeds and can extend their lifespan (the fridge is too moist/humid).  If you do that, drop your envelopes or containers down into a sealable container or bag to help keep condensation minimal when you pull them out of the freezer next year.

For home gardeners, it may not matter that you get plants next year that exactly copy the ones you saved seeds from – the fun can be in the surprise.  Who knows, you may discover a new variety – at least one that is exciting to you.  It can be fun seeing the variation in your new plants and finding something that you love. 

Epilogue: A special case – tomatoes

Most of the vegetable crops we grow don’t need any special treatment to break their dormancy (you’ll have to research flowers on a case-by-case basis) – save the seed and plant it next year and it will pop up.  Tomatoes are a bit of a special case.  If you scrape the seeds out of the fruit you’ll notice they’re still covered with the “goo” from inside the tomato which is called interlocular fluid (interlocular = between seeds).  The coating persists on the seed even if you wash them.  It has long been held that this coating retains some of the hormones of the fruit (like abscisic acid) that inhibits germination (though not all experts agree). So many sources will tell you to go through some process to break down the coating left on the seed, most commonly by placing the seeds and associated goo in a container, adding a bit of water, and letting them ferment for a few days.  You can dump them out and wash off all the gunk. Whether or not this is required to break dormancy is up for debate, but it does provide you with clean seeds that you can store easily.  There is also some evidence to suggest that this fermentation process helps remove pathogens on the exterior of the seed (heat treatment can help remove interior pathogens as well).

Some people just scoop out the seeds and smear the goo on a paper towel and try to scrape them off next year.  Some people add the step of washing, but this will still not remove all of the goo coating the seeds. This works if you’re not trying to share (or sell seeds) since they will stick to the paper towel. My guess is that the in the day or so that it takes for the goo to dry there is enough fermentation or decomposition going on to break dormancy.  If you don’t want the seeds stuck to a paper towel, you can use wax paper or some other non-binding surface, but you’ll still have dried goo on your seeds.

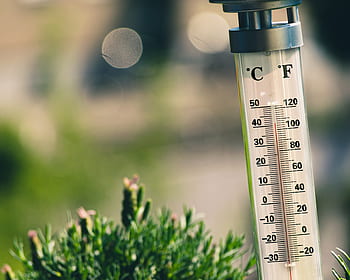
Some like it hot… but most do not: How high temperatures delay pollination and ripening

Ah, summer – vacations (pre-COVID), swimming pools (pre-COVID), ice cream, vegetable gardens, and, in many places, really high temperatures.  These things all go hand-in-hand (or at least they did before the pandemic). Many gardeners feel that the heat of mid-summer goes hand in hand with garden production; those high temps driving production on those fruiting plants like tomatoes and peppers.  But…..could they be wrong? 

We’ve had lots of extra hot days this summer in Nebraska, so it stands to reason that we should have really great production on those garden favorites like tomatoes, right? Then tell me why our extension office has received numerous questions this year about why tomatoes aren’t setting on or ripening.  Heck, we even had a Facebook post about tomatoes not ripening in the heat go viral (well, for our standards – 300,000 views/2,000 shares).  Could it be a disease?  Nope – it’s the heat. High daytime temperatures can have a big effect, but the effects are compounded when nighttime temperatures are high as well.

Tomatoes not ripening? You're not alone. Temperatures above 85 degrees will slow down the ripening process. Temperatures above 95 can stop the process all together. #NebExt #NeWX

Posted by Nebraska Extension in Douglas-Sarpy Counties on Wednesday, July 22, 2020

It turns out that high heat does two things in many of those fruiting vegetables (and of course fruits) that we grow.  First, it inhibits pollen production, which in turns reduces fruit set.  Second, heat inhibits gene expression for proteins that aid in ripening/maturation of the fruit.  Heat stress also reduces photosynthesis (Sharkey, 2005) in many different plants, which would slow down plant processes (such as fruit development and ripening) as it reduces the availability of sugars to fuel these processes.  So high heat can not only reduce the number of fruits developing on the plant, but also slow down the ripening process for fruits that have already set.  And if you think that these effects only happen at super extreme temps, most of the research studying temperature effects of this nature use a common “high ambient temperature” of 32°C/26°C for daytime/nighttime temperatures. For us U.S. Fahrenheit-ers, that’s 89.6°F/78.8°F, which isn’t really all that hot for most of us.

Many studies show that application of this “high ambient temperature” to crops such as tomatoes, beans, and corn during the pre-fertilization phases of reproduction (ie – flower/pollen development) can negatively effect fruit set.  The introduction of Porch and Jahn (2001) gives a pretty good overview of literature detailing the effect in beans (Phaseolus vulgaris).  I’ll sum it up here: heat stress while the pollen is forming (called sporogenesis) led to pollen sterility and failure of pollen to release from the anthers (dehiscence).  It also led to flower abscission (basically the plant aborts the flower) and reduce pollen tube formation (how the pollen nucleus gets through the stigma to the ovule for pollination) when applied during the period of pollen sac and ovary development.  And application during flower opening (anthesis) resulted in pollen injury (sterility) and reproductive organ abscission.  All of these effects lead to reduced fruit/seed set in beans.  (Interestingly, heat stress at the ovary development phase also led to parthenocarpy – basically the pods developed, sans seeds, without fertilization). 

However, we get the most calls about tomatoes (they’re the top crop for most home gardeners).  Is it the same issue?  Yep.  Numerous studies (Sato, et al., 2000; Pressman, et al., 2002; Abdul-BAki, 1992) show the same effect in tomatoes.  Pressman, et al. (2002) linked the effects on pollen to changes in carbohydrates in the anthers (reduced starch storage and carbohydrate metabolism). 

Tomato pollination and how to increase it in high tunnels
Tomato floral structures

To add insult to injury, high temperatures also slow down or stop ripening of crops like tomatoes.  Picton and Grierson (1988) found that 35°C (95°F) temperatures altered the gene expression in tomato fruits – inhibiting the expression of polygalacturonase, which softens cells walls, allowing the fruit to ripen.  Reduced photosynthesis would also reduce the availability of sugars for fruit development and ripening.

But there’s hope, both this season and in the long term!  The effect on the plants is not permanent. When temperatures drop below that “high ambient temperature” threshold pollen production, and therefore fruit set, will return to normal (as long as the plant is healthy).  Sato, et al. (2000) found that pollen release and fruit set resumed within a few days after heat stressed plants were “relieved” and temperatures dropped back into the optimal range of 26-28°C/22°C (78.8-82.4°F/71.6°F).  So many of those plants will become productive again (good news for my own tomatoes and beans, which had an initial flurry of production then went on vacation), especially as we head into fall.  And efforts are under way to develop and test heat stress resistant cultivars. 

This last point may be more important than you realized.  These production problems plague many areas around he world at current climactic norms.  Many fear that increasing temperatures will limit the productive capacity of many areas of the world that are already struggling.  It is easy to see how the difference in just of just a few degrees can take your veggie production from prolific to paltry.

You can also try to reduce the heat a bit yourself for an immediate fix. Shade cloth can help reduce temperatures a little bit, which may make all the difference in your garden if you’re just slightly over the “high ambient temperature” threshold.

Tomatoes under shade cloth | Tomatoes under shade cloth | Flickr
Tomatoes under shade cloth | Source: flickr.com

But in the meantime, if your vegetable garden has taken a summer siesta it will get around to producing again one day.  You’ll just have to take good care of the plants in the meantime.  And perhaps it’s a blessing in disguise – when its that hot I don’t want to be out working in the garden much, either.

Sources

  • Abdul-Baki, A. A. (1992). Determination of pollen viability in tomatoes. Journal of the American Society for Horticultural Science117(3), 473-476.Porch, T.G. and Jahn, M. (2001), Effects of high‐temperature stress on microsporogenesis in heat‐sensitive and heat‐tolerant genotypes of Phaseolus vulgaris . Plant, Cell & Environment, 24: 723-731. doi:10.1046/j.1365-3040.2001.00716.x
  • Pressman, E., Peet, M. M., & Pharr, D. M. (2002). The effect of heat stress on tomato pollen characteristics is associated with changes in carbohydrate concentration in the developing anthers. Annals of Botany90(5), 631-636.
  • Sato, S., Peet, M. M., & Thomas, J. F. (2000). Physiological factors limit fruit set of tomato (Lycopersicon esculentum Mill.) under chronic, mild heat stress. Plant, Cell & Environment23(7), 719-726.
  • Sharkey, T. D. (2005). Effects of moderate heat stress on photosynthesis: importance of thylakoid reactions, rubisco deactivation, reactive oxygen species, and thermotolerance provided by isoprene. Plant, Cell & Environment, 28(3), 269-277.