Tools, tips, and terrible traditions for raised beds – Part 3

Young vegetables thrive in mulched, weed-free raised bed.

Over the last couple of months I started a series on raised bed gardens, focusing on materials and preparation. In this final installment, I’ll focus on maintenance activities to avoid in your raised bed systems and remind you of three things you should always do.

Terrible traditions

We’ll start with some practices that damage soil structure and function (GP John Porter discussed this in much detail a few years ago). Tilling, once the mainstay of soil preparation for crops, is increasingly found to cause more damage than good. Grinding the soil into a material with the texture of coffee grounds might look pretty, but it’s devoid of the ped structure that allows water and gas to move through easily. It also increases microbial activity by bringing up microbial spores, which release carbon dioxide to the atmosphere as they digest whatever organic material is there. And tilling will increase the likelihood of erosion and compaction.

Soil runoff from tilled, unprotected field. The same thing will happen in your garden. Photo from Wikimedia.

This is the opposite of what gardeners should want: an optimal soil has natural structure which might look messy but allows for good drainage. It’s also more resistant to compaction and erosion, especially when it’s protected with mulch (more on this later).

Speaking of drainage, don’t be tempted to add gravel or some other coarse material at the bottom of the bed. The change in soil texture creates a perched water table, which makes for a soggy planting bed and optimal conditions for soil-borne diseases.

Classic experiment that demonstrates water does not move easily through different soil textures.

While we’re talking about unnecessary or harmful additions to your raised beds, let’s not forget the annual addition of compost or other rich organic material. This is a holdover from old agricultural practices and is not warranted unless you have an organic material deficiency. Without a soil test, you don’t have a clue about what your soil has or what it needs. The problems associated with routine amendments are discussed in this peer-reviewed fact sheet, and are exacerbated by the tillage that is often the means to incorporate compost. Likewise, don’t add fertilizers and pesticides unless you have conclusively identified nutrient deficiencies or pest issues.

If your nutrients are off scale, don’t add any fertilizer!

The last tradition I’d like to see shelved is growing cover crops. This practice originated in the management of agricultural fields, which were otherwise left bare after harvest. Outside of producing some kale or other winter vegetables, what’s the point of planting a cover crop in your garden, when you can protect the soil in other ways? Cover crops require water and nutrients, which eventually will need to be pulled or incorporated. You are forcing your soil system to continue to support plant growth and be subjected to disturbance with the planting and harvesting of the cover crop. Why not let the soil rest over the winter with a nice blanket of mulch? Give it a chance to regenerate its nutrient load while being protected from unnecessary disturbance.

A great arborist chip mulch has leaves or needles as well as wood.

Three tips

Two of these tips have been discussed many times in this forum, so I’ll direct you to longer discussions of soil testing and mulching. Mulching is not just important for protecting the soil bed after the growing season, but should be used on actively producing beds. A deep, coarse organic mulch will promote water and air movement, moderate soil temperatures, reduce weeds, and provide a slow feed of nutrients throughout the season. You’ll have to wait until your seeds are up to apply it, of course, but try to avoid bare soil as much as possible.
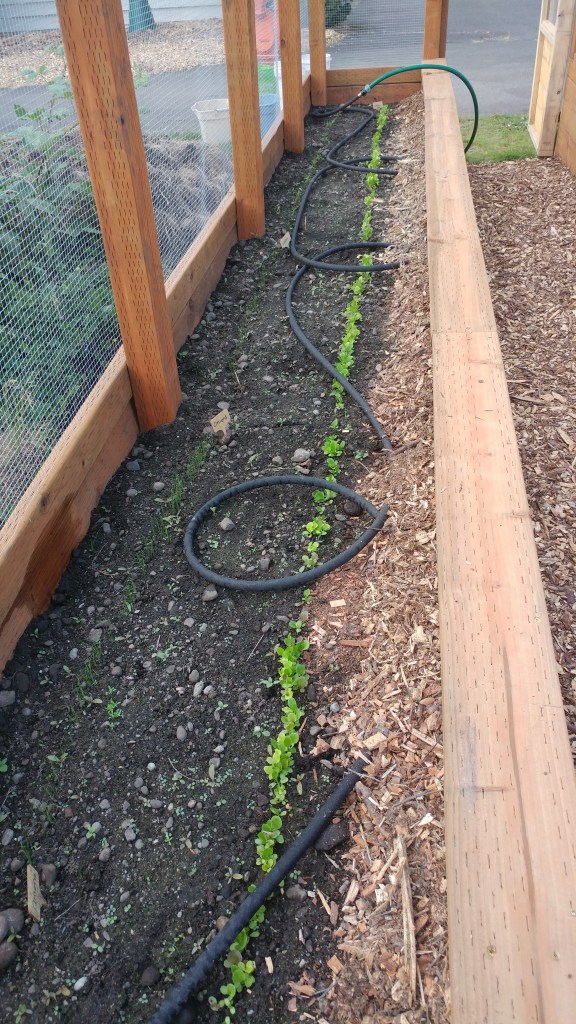
Though you’ll need to leave the soil bare during seed germination, you can still protect unplanted areas of the bed with mulch.

Soil testing is really crucial for any garden, but perhaps most important in vegetable gardens where harvesting may decrease key nutrients over time. It will also guide you in identifying potential heavy metal problems. The money you will save in not buying unnecessary fertilizers and other amendments will pay for many soil tests.

There is so much great information in a soil test that will help you make decisions about what to add – and what to avoid.

Sometimes you will need to add material to your existing beds if you are not using a natural soil. Soilless media (deceptively marketed as “potting soil” though no soil is to be found) will decompose and settle over time, leaving you with a sunken soil system. You will need to add more of the same sort of media to the beds, making sure you mix it in thoroughly to prevent a perched water table. (This is why you might consider using a natural soil and avoiding this annual chore – because a natural soil will not subside over time.)

This recommended planting media will decompose down to the oyster shells and lime over time.

Feel the Heat: Temperature and Germination


In most parts of the country it is time to dust off the seed starting trays, pick out your favorite seeds, and get a little plant propagation going on.  There’s definitely a lot of science (and perhaps a bit of art) to successful seed starting.  While the process starts (and relies on) the imbibition of water, one of the biggest factors that affects the success, efficiency, and speed of seed germination and propagation is temperature.  Germination relies on a number of chemical and physical reactions within the seed, and the speed and success of those reactions is highly temperature dependent. Respiration, where the seed breaks down stored carbohydrates for energy, is probably the most notable process involved that is temperature dependent (source).   Think of it in terms of a chemical reaction you might have done back in your high school or college chemistry class – there’s an optimum temperature for the reaction and any lower and higher the reaction might slow down or not happen at all.

Thinking of it this way, seeds and germination are just like Goldilocks and her porridge – there’s too hot, too cold, and “just” right.  Seeds are the same way – there’s a “just right” temperature for germination. The seeds of each species has a different optimal temperature for germination with a range of minimum and maximum temperatures for the process.

Why is important that seeds are started at their optimal temperature?

The optimal temperature is the one at which germination is the fastest. This may seem to only have consequences for impatient gardeners, but slower germination speeds increase the days to emergence for the seeds, which in turns means that the seeds and seedlings have a greater chance of failure. The early stages of germination are when seedlings are most susceptible to damping off, which can be caused by a number of fungal pathogens (Fusarium spp., Phytophthera spp., Pythium spp., etc.) that basically cause the seedling to rot at the soil level. These pathogens (as well as decomposers in some cases) can cause seeds to rot or decompose before emerging as well.  That’s why you’ll sometimes see seeds that are slow to germinate (or traditionally direct sown like corn, beans, and peas) treated with those colorful fungicides.  The fungicide gives the seed and seedling a little bit of protection (for a week or so, depending on the product), which is handy if you accidentally sow them before soil temperatures are optimal or if the species is slow to germinate.

If emergence is really slow, there’s also the possibility of stunting or failure due to exhaustion of the stored carbohydrates that the seed relies on until it begins photosynthesis.  So the closer to the optimal temperature the seed is, the faster the emergence and the highest percentage of germination success.

Image of graph showing relationship between soil temperature and seed germination.

What does this mean for home gardeners?

Whether you are starting seeds indoors or direct sowing outdoors, knowing the germination temps can help increase your likelihood of success.  You can find a variety of resources for the optimal germination temperature for your selected crops.  In general, most warm season plants, like tomatoes, peppers, and summer flowers are in the 70-80 °F range.  This is why most of the warm season crops are started indoors – so temperatures can be controlled to higher levels.

For vegetable crops, here’s a good resource for basic germination temperatures.  And here’s one for a few annual flowers.

Many of the cool season crops germinate at much lower temperatures, which means many of them can be directly sown early in the season rather than started indoors.  Crops such as spinach, lettuce, and other leafy greens have these lower germination temps and typically perform better if germinated at lower temps.

Germinating a variety of plants for our 2018 All-America Selections trials

It should be noted that this is for the soil temperature, not the air temperature. If you’re starting seeds in your home, most people don’t keep their homes in the 75 – 80 degree range in the winter.  Many commercial operations use warmed tables or beds for seed starting, rather than heating the whole facility to the necessary temp – it would be expensive.  For home growers, supplemental heat mats can help increase soil temp without having to heat a whole room.  In a pinch, you can even clean off the top of your fridge and keep seedlings there.  It is higher up in the room (heat rises) and most refrigerators create some amount of external heat as they run.

For any seeds that you’re direct sowing outdoors, whether they require higher or lower germination temperatures, you’ll have more success if you plan your sowing around soil temperatures rather than calendar dates (planting calendars can be good for estimation, though).  Investing in a soil thermometer can offer detailed information on the specific temperatures in your garden soil.  Or, if you have a good weather station nearby many of them have soil temperature probes that could give you a good idea of what the soil temperatures are in your region.

Direct-sown lettuce germinating for a fall crop

But don’t let the cool/warm season crop designation fool you – the Cole crops like cabbage and broccoli actually have an optimal germination temperature on the warmer side, but grow better in cooler temperatures to keep them from bolting (flowering).  This is why they need to be started indoors for spring planting, but you can start them outdoors (even trying direct sowing) for fall crops – they germinate in the heat and then slow growth as the temperatures drop.