An early 17th century “plague panel” from Augsburg. Public Domain picture courtesy of WikiCommons
It’s more than a little bit intimidating to be a part of the Garden Professors team, since I have no advanced degrees, and my undergraduate degree is in Mathematics, with no formal training in Botany, Horticulture or Plant Science at all.
I am, however, an avid and active hobby gardener; I read a lot; and I have a life-long love of learning and sharing what I’ve learned with others, which led to a nine-year stint as a county Extension Educator, implementing a county wide mosquito management program for West Nile, with additional responsibilities for pesticide education and consumer horticulture.
So, what I hope to do with my space here on the GP site, is share some of the other blogs that I read on a regular basis … ones I’ve learned to trust for either the expertise, or writing style, or some additional insight into plants or gardening, or issues that arise in gardening circles.
First up this week … Natures Poisons, a blog written by Dr. Justin Brower a forensic toxicologist – that’s someone who is employed CSI-like, to investigate possible crimes related to toxicology.
His blog isn’t directly related to his profession, however … as Dr. Brower explains:
I also like plants and gardening, and seeing how there are thousands of plant based poisons, there’s no shortage of material.
Some things I will write about:
•Nature’s Poisons – all types chemical and biological
•Interesting poisonings – recent and historical
•Old uses of Nature’s Poisons
So he’s a gardener, like me, and the rest of you folks who follow the GPs.
I like the blog, not only for the wit and wisdom, but also because it puts a realistic perspective around the idea of “natural” … something which we gardeners often mistakenly equate with benign.
Plants make chemicals to protect themselves from being eaten, and the science behind that, and our use, and avoidance of them, is fascinating.
Not only do you learn a lot about glucosinolates, and other chemicals in horseradish, but also a peek into the mind of a scientist.
Back inside the warm confines of the house, I cut off the tops of the horseradish roots, rinse off the dirt under water, and scrub them clean with a wash rag.
The “typical” method of preparing horseradish is to grate or grind the horseradish with an equal amount of water, wait a few minutes for the allyl isothiocyanate to build up to the desired hotness, then quench the reaction with a tablespoon or two of vinegar. Throw in a pinch of salt, and you’re done.
You’re always cautioned to do this in a well ventilated area or outdoors.
But screw that.
One, it’s cold outside, and two, and most importantly, I’m a Scientist.
If you like the blog, you’ll likely also like this book by Amy Stewart … Wicked Plants.
Once you’ve chosen cover crops that fit your vegetable rotation, management goals, and garden site (See Part III: Selecting Cover Crops for Vegetable Gardens), it’s time to plant! This article contains tips on sourcing seed, and planting and managing cover crops using hand tools.
As I outlined in Part I and II of this series, cover crops can serve many purposes in small-scale vegetable gardens, including soil quality improvement, nitrogen (N) fixation, weed suppression, and habitat for beneficial insects. To achieve maximum benefits from cover crops, it’s important to select appropriate species (or species mixtures) for each garden bed. In this article I’ll highlight promising annual cover crop species for different seasonal niches, management goals, and environmental conditions. Much of this information is based on preliminary results from two seasons of cover crop research in Brooklyn, NY community gardens.1
Vegetable gardeners are turning to cover crops to improve soil quality, add nitrogen (N) to the soil through legume N fixation, suppress weeds, and attract beneficial insects in their gardens. In this article I’ll introduce several groups of cover crops. Cover crop species can be broadly grouped into non-legumes (those that do not fix N, but take up and recycle nutrients left in the soil) and legumes (which fix N). Mixtures of non-legumes and legumes may offer the benefits of both types of cover crops.
Non-legume cover crops
Non-legume cover crops include species in several plant families:
Buckwheat (Fig. 1c, Polygonaceae) is a popular summer cover crop.
Fig. 1. Examples of non-legume cover crops used in vegetable gardens(Photo credits: M. Gregory)
Fig. 1a. Oats (Avena sativa) is a winter-kill cover crop in USDA Zones 7 and cooler. It is usually planted in late August, and dies with the first hard frosts.
Fig. 1b. Winter rye (Secale cereale) is a hardy over-wintering cover crop. It can be planted in September or October, and produces large amounts of biomass by May.
Fig. 1 c. Buckwheat (Fagopyrun esculentum) is a fast-growing summer cover crop, suitable for planting between spring and fall vegetable crops.
Benefits of non-legumes: 1, 2
Prevent erosion – Non-legumes establish and grow quickly, provide rapid soil cover, and have dense, fibrous root systems that hold soil in place.
Build soil organic matter – Non-legumes produce large amounts of biomass, which contributes to soil organic matter.3
Retain and recycle nutrients – Non-legumes take up nutrients left in the soil after vegetable harvest, which prevents them from being leached out of the garden during heavy spring rains.
Suppress weeds – With their vigorous growth and high biomass, non-legumes can successfully compete with weeds, even in fertile soils. Some non-legumes (winter rye, sorghum-sudangrass, and Brassicas) also release chemicals that inhibit weed germination and growth. Residues of grass cover crops also provide a weed-suppressive mulch that lasts much of the growing season.
Disease management — Some Brassicaceae cover crops also release chemical compounds that may help control soil-borne pathogens and parasites(e.g., fungi, nematodes) upon incorporation. Winter rapeseed (Brassica napus) greatly reduced Rhizoctonia damage and Verticillium wilt in potato crops.1, 2
Drawbacks and constraints of non-legumes:
Slow nutrient supply and/or N immobilization — Non-legumes have lots of carbon (C) relative to N during growth, which causes them to decompose slowly after mowing or incorporation. As a result, nutrients in non-legume residues may not be available to vegetable crops quickly. If non-legume residues are incorporated into the soil, they may actually immobilize (“tie up”) N for a few weeks as decomposer microbes take up soil N to balance the large amount of C in the plant residues they’re breaking down.1 For this reason, it’s best to wait several weeks after incorporating a non-legume before planting vegetable crops.
Legume cover crops
Legume cover crops include field peas (Fig. 2a) crimson clover (Fig. 2b), hairy vetch (Fig. 2c), and cowpeas. They provide many of the same benefits of non-legumes, with the additional benefits of nitrogen fixation and feeding pollinators.
Fig. 2. Examples of legume cover crops used in vegetable gardens (Photo credits: M. Gregory)
Fig. 2a.Field peas (Pisum sativum) can be planted as a winter-kill or early spring cover crop. It should only be planted in full sun, as this legume performs poorly in shaded areas.4
Fig. 2b.Crimson clover (Trifolium incarnatum) over-winters in Zones 7 and up, and can be used as a summer or winter-kill cover crop in cooler zones. Crimson clover is a high biomass producer and is quite shade-tolerant.4
Fig. 2c. Hairy vetch (Vicia villosa) is the hardiest legume, and will over-winter in even the northernmost parts of the US. It is an excellent legume for adding fixed N to the soil.4
Additional Benefits of legumes:
Figure 3. A bumblebee visits a crimson clover flower in a community garden. Photo credit: M. Gregory.
Nitrogen fixation – Legume cover crops add ‘new’ nitrogen (N) to the soil through N fixation, which occurs when N-fixing bacteria in legume roots take N from the air and convert it to a form the plant can use. When legume residues break down, this N is added to the soil for food crops.5
Build soil organic matter and soil quality – While legumes don’t usually produce as much biomass as non-legumes, they also help build soil organic matter.6, 7 Legumes are also excellent soil conditioners, because legume roots ooze sugars that stick soil particles together in larger crumbs, or aggregates.8, 9 This helps the particles fit together loosely, making for a soft, porous soil.
Attract beneficial insects – Many legume species provide resources for beneficial insects. Crimson clover provides pollen and nectar for native pollinator bees (Fig. 3), and both crimson clover and hairy vetch host predators such as lady beetles, which eat many pest insects.1
Drawbacks and constraints of legumes:1, 3
Slow growth, lower biomass — Legumes establish and grow more slowly than non-legumes, and usually produce lower biomass.
Less weed suppression — Legumes may not suppress weeds as effectively as non-legumes, particularly in soils with high N fertility. In Brooklyn gardens, legumes suppressed weeds in soils with low to moderate N fertility, but not in soils with high N fertility.4 Legume residues break down quickly, so weed control by legume mulch may be short-lived.
Seed cost — Legume seeds are more costly than non-legumes.
Cover crop mixtures
Mixtures of non-legumes and legumes often combine the benefits of both types of cover crops.
Benefits of nonlegume/legume mixtures:
Produce large biomass and suppress weeds effectively — In many cases, cover crop mixtures provide more complete soil cover, greater biomass production, and more effective weed suppression than plantings of just one species.1, 3 This is because mixtures of grasses and legumes use water, nutrients and sunlight very efficiently due to complementary root systems and growth habits. Grasses (like rye) also provide support for viny legumes (like hairy vetch), which allows the legume to access more light.
Increase N fixation — Planting legumes with grasses may enhance N fixation. Grasses out-compete legumes for soil N, forcing the legume to rely on N fixation. As long as the grass doesn’t suppress legume biomass (see below), this can increase the total amount of N fixed. Promising grass/legume mixtures for N fixation include rye/vetch and Japanese millet/cowpea.10
Optimize nutrient cycling and nutrient supply to crops — Mixtures provide the benefits of N ‘scavenging’ by non-legumes and N additions by legumes.1 At maturity, grass-legume mixtures often have an ideal C:N ratio of 25:1 – 30:1, which promotes a steady release of N for vegetable crop use as the cover crop plants decompose. N-rich legume residues prevent N tie-up that can occur when incorporating pure grass residues, while C-rich grass residues slow the breakdown of legume residues such that N is released at a rate that vegetable crops can use through the growing season.2, 11
Fig. 4. Examples of grass/legume mixtures used in vegetable gardens (Photo credits: M. Gregory)
Fig. 4a.Oats/ Field peas is a common winter-kill or early spring mixture. It should only be planted in full sun. Since oats may suppress field pea biomass and total N fixed,4 try seeding the field peas at a higher rate.
Fig. 4b. Rye/ hairy vetch is an excellent over-wintering mixture. The hairy vetch ‘climbs’ the rye, which allows the legume to access more light. In Brooklyn gardens, rye/vetch mixtures produced the highest biomass of any cover crop combination.4
Drawbacks and constraints of nonlegume/legume mixtures:
Reduced N fixation if nonlegume out-competes the legume – Mixing a non-legume with a legume may decrease the total amount of N fixed if the non-legume suppresses legume growth and biomass. This occurs in mixtures of: oats/field peas,4, 12 rye/crimson clover,4 and sorghum-sudangrass/cowpea.10 Seeding the legume at a higher rate may result in a more even distribution of nonlegume and legume biomass – gardeners can experiment to find the relative seeding rate that works best in your soil.
* * * * * * * * * * * * *
Understanding the benefits and limitations of non-legumes, legumes, and mixtures is a great starting point for selecting cover crops to plant in your garden. For guidance on choosing specific cover crops based on your vegetable crop rotation, management goals, and soil and light conditions, see Part III: Selecting Cover Crops for Vegetable Gardens.
(3) Snapp, S. S., S. M. Swinton, R. Labarta, D. Mutch, J. R. Black, R. Leep, J. Nyiraneza, and K. O’Neil. 2005. Evaluating cover crops for benefits, costs and performance within cropping system niches. Agronomy Journal 97(1):322-332.
(4) Gregory, M. M., L. E. Drinkwater. In preparation. Developing cover cropping practices to improve soil quality, nutrient cycling, and weed suppression in urban community gardens.
(5) Drinkwater, L. E. 2011. It’s elemental: How legumes bridge the nitrogen gap. The Natural Farmer, Summer 2011, pp. B-1 – B-6. Northeast Organic Farming Association, Barre, MA: Accessed online at: http://www.nofa.org/tnf/Summer2011B.pdf, 6 December 2014.
(6) Sainju, U. M., B. P. Singh, and W. F. Whitehead. 2002. Long-term effects of tillage, cover crops, and nitrogen fertilization on organic carbon and nitrogen concentrations in sandy loam soils in Georgia, USA. Soil & Tillage Research 63(3-4):167-179.
(7) Kong, A. Y. Y., J. Six, D. C. Bryant, R. F. Denison, and C. van Kessel. 2005. The relationship between carbon input, aggregation, and soil organic carbon stabilization in sustainable cropping systems. Soil Science Society of America Journal 69(4):1078-1085.
(8) Puget, P., L. E. Drinkwater. 2001. Short-term dynamics of root- and shoot-derived carbon from a leguminous green manure. Soil Science Society of America Journal 65(3):771-779.
(9) Haynes, R. J., M. H. Beare. 1997. Influence of six crop species on aggregate stability and some labile organic matter fractions. Soil Biology & Biochemistry 29(11-12):1647-1653.
(10) Drinkwater, L. E. 2011. A holistic view: Leguminous cover crop management in organic farming systems. The Natural Farmer, Summer 2011, pp. B-20 – B-24. Northeast Organic Farming Association: Barre, MA. Accessed online at: http://www.nofa.org/tnf/Summer2011B.pdf, 6 December 2014.
(11) Teasdale, J. R., A. A. Abdul-Baki. 1998. Comparison of mixtures vs. monocultures of cover crops for fresh-market tomato production with and without herbicide. HortScience 33(7):1163-1166.
(12) Schipanski, M. E., L. E. Drinkwater. 2012. Nitrogen fixation in annual and perennial legume-grass mixtures across a fertility gradient. Plant Soil 357(1-2):147-159.
Shawn Banks: Extension Blog Contributor Johnston County Extension Agent/Educator
North Carolina State University
shawn_banks@ncsu.edu
As an extension agent one question I often get asked by new gardeners is, “Where do I put a vegetable garden in my yard?” That leads to a lot more questions, but let’s answer the where question first. There are four basic considerations when selecting a garden site.
The first thing to consider is the need for direct or full sunlight. Most vegetables need a minimum of six to eight hours in order to produce a crop. However, the more sunlight they get the more bounteous the harvest will be. If there isn’t a spot in the yard that receives full sun all day, then the question becomes, is it better to have shade in the morning or in the evening? Morning sun will dry the dew from the leaves, reducing the chance of fungal diseases infecting the leaves.
Speaking of dew, the next consideration is water. How close is the water source to the vegetable garden. Many vegetables need to have consistent moisture. That means a water source should be easy to access to keep the soil moist throughout the growing season. The further the water is from the garden, the less likely it is that the garden will get watered on a regular basis. Have you ever wondered why the tomatoes crack, or the radishes split? One of the most common reasons is that the soil was very dry and then it rained a lot and the plant was trying to store as much water as possible, causing the cracks and splits
Another consideration is airflow. Many foliar diseases are caused by fungal pathogens. Most fungi need water standing on the leaf for eight or more hours before they can infect the leaf. Good airflow will dry the leaves out before the fungi can infect the plant. A hedge, a solid fence, or even a house may obstruct airflow. Another way to obstruct airflow is to plant too close together, but that is a discussion for another time.
Lastly comes the phrase “out of sight, out of mind”. This is very true for a vegetable garden. When selecting where to place the garden, consider ease of access. Many people find that when the garden is way in the backyard, they don’t tend it often enough. The soil dries out. The weeds take over. The crops don’t get harvested in a timely manner. In short, the garden doesn’t succeed. Select a garden site that is close enough that you will see it and want to tend to it.
These four site characteristics are the most important when selecting the location for a vegetable garden. Remember, a vegetable garden site needs a minimum of eight hours of direct sunlight, consistent moisture, good airflow, and easy access. A site with all four of these characteristics will ultimately produce more, have fewer problems with fungal diseases, and be better taken care of because it is visited more frequently and loved.
Keep in mind that if you don’t have anywhere in your yard that works, many options, such as container gardens, can help you have a productive garden anywhere.
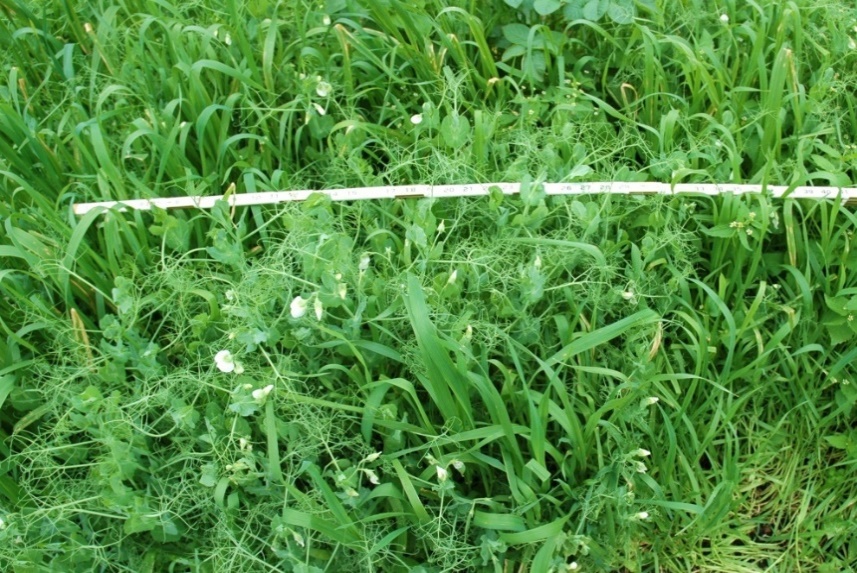
Figure 1. Rye and vetch cover crop in a community garden plot in May, just before it was cut down and mulched in preparation for planting vegetables. Photo credit: M. Gregory.
Cover crops are close-growing plants sown in rotation with food crops, or inter-seeded between food crops to cover bare ground. They are not harvested, but rather are planted to improve soil quality and provide other benefits for crop production and the environment. Before planting the next vegetable crop, most cover crops need to be cut down. The shoots can be chopped (or mowed) and left as mulch on the soil surface, or incorporated into the soil.
There is a large body of research supporting the use of cover crops on organic and sustainable farms.1 However, vegetable gardeners can successfully plant and manage cover crops with hand tools, and reap the benefits of this practice for their soil and crops.2
Why should I plant a crop that I’m not going to harvest?
Cover crops provide many benefits for future vegetable crop production, and for the garden agro-ecosystem as a whole. Incorporating cover crops in vegetable rotations may:
Increase soil organic matter levels, and therefore improve soil quality. As cover crop roots and shoots decompose, they build soil organic matter. This improves soil structure and water-holding capacity (Fig. 2), and increases slow-release nutrient reserves.3 Fresh cover crop residues also nourish beneficial soil fauna (bacteria, fungi, worms, etc.) that improve soil tilth and aeration, recycle plant and animal wastes, and release nutrients for crops to use.
Provide nitrogen for future food crops through legume nitrogen fixation. Cover crops in the legume family (e.g., beans, peas, clovers, and vetches) add “new” nitrogen (N) to the soil. Legumes host N-fixing bacteria in bumps on their roots, also called nodules (Fig. 3). These bacteria take N from the air and convert it to a form the legume can use . When the plant decomposes, the fixed N also becomes part of the soil organic matter. Eventually, this N is released by microbes for crop uptake.4
Improve nutrient retention and recycling. Over-wintering cover crops take up extra nutrients at the end of the growing season, which would otherwise be lost to leaching (when nutrients dissolve in rainwater and drain below the root zone, making the nutrients unavailable for plants). Over-wintering grasses like rye reduce N leaching by about 70% compared to bare soil.5
Suppress weeds. Growing cover crops reduce weed growth through competition (e.g., for space, light, moisture, and nutrients) and allelopathy (releasing chemicals that inhibit other plants). After , the cover crop mulch can prevent weed seedling emergence through the growing season.6
Attract beneficial insects. Cover crops often provide important resources (such as nectar and pollen and over-wintering habitat) for beneficial insects, including pollinator bees and natural enemies of insect pests like ladybugs and lacewing.1
Increase or maintain crop yields with less inputs. Well-managed cover crops can improve vegetable crop yields, or reduce the amount of fertilizer needed to obtain good yields.7-10
Figure 2. Demonstration illustrating the effect of soil organic matter (SOM) on water-holding capacity. Photo credit: Megan Gregory
On the left is soil from an urban garden that received a rye/vetch cover crop for more than five years, and therefore has high SOM.
On the right is soil from a garden that never received cover crops, and has lower SOM.
This photo was taken 30 minutes after pouring equal amounts of water through the soils. The high-OM soil held most of the water, while much water drained through the low-OM soil. Since both soils were of similar texture, the difference in water-holding capacity can be attributed to the SOM.
Figure 3. Nodules on the roots of legume cover crops: crimson clover (left) and hairy vetch (right). The nodules host nitrogen-fixing bacteria in the genus Rhizobia, which convert atmospheric nitrogen into plant-available forms. Photo credits: M. Gregory.
* * * * * * * * * * * * *
Vegetable gardeners have a number of cover crop options suited to different seasonal niches, management goals, and environmental conditions. To learn about the main groups of cover crops and how to select cover crops for your garden, see Part II (Types of Cover Crops) and Part III (Selecting Cover Crops).
(2) Gregory, M. M. and L. E. Drinkwater. In preparation. Developing cover cropping practices to improve soil quality, nutrient cycling, and weed suppression in urban community gardens.
(3) Snapp, S. S., S. M. Swinton, R. Labarta, D. Mutch, J. R. Black, R. Leep, J. Nyiraneza, and K. O’Neil. 2005. Evaluating cover crops for benefits, costs and performance within cropping system niches. Agronomy Journal 97(1):322-332.
(4) Drinkwater, L. E. 2011. It’s elemental: How legumes bridge the nitrogen gap. The Natural Farmer, Summer 2011, pp. B-1 – B-6. Northeast Organic Farming Association, Barre, MA. Accessed online at: http://www.nofa.org/tnf/Summer2011B.pdf, 6 December 2014.
(5) Tonitto, C., M. B. David, and L. E. Drinkwater. 2006. Replacing bare fallows with cover crops in fertilizer-intensive cropping systems: A meta-analysis of crop yield and N dynamics. Agriculture Ecosystems & Environment 112(1):58-72.
(7) Abdul-Baki, A. A., J. R. Teasdale, R. Korcak, D. J. Chitwood, and R. N. Huettel. 1996. Fresh-market tomato production in a low-input alternative system using cover-crop mulch. HortScience 31(1):65-69.
(8) Abdul-Baki, A. A., J. R. Stommel, A. E. Watada, J. R. Teasdale, and R. D. Morse. 1996. Hairy vetch mulch favorably impacts yield of processing tomatoes. HortScience 31(3):338-340.
(9) Abdul-Baki, A. A., J. R. Teasdale, R. W. Goth, and K. G. Haynes. 2002. Marketable yields of fresh-market tomatoes grown in plastic and hairy vetch mulches. HortScience 37(6):878-881.
(10) Abdul-Baki, A. A., J. R. Teasdale. 1997. Snap bean production in conventional tillage and in no-till hairy vetch mulch. HortScience 32(7):1191-1193.
Ward Upham: Extension Blog Contributor Extension Associate – Home Horticulture Rapid Response Coordinator
& Extension Master Gardener Coordinator
Kansas State University Extension
wupham@ksu.edu
Apple trees that are not pruned for several years will often produce so many branches that very little energy is left for fruit production. Overgrown apple trees are also difficult to harvest and spray. Gardeners who have such a tree are often at a loss as to how to get it back in shape.
Often the best (tongue-in-cheek) recommendation s for such a tree is to make one pruning cut at ground level and start over with a new tree. However, trees may have sentimental value that will make revitalization worth the time and effort. Realize that this will be a multi-year process because no more than 30 percent of the tree should be removed in one year. Here are some steps to follow:
Remove all dead wood. This does not count toward the 30 percent.
Remove suckers from the base of the tree.
Choose approximately six of the best branches to keep as scaffold branches. Remove all others. Branches should be cut flush to the branch collar. The collar is that natural swelling that occurs where a branch connects to the trunk or to a larger branch. Removing the collar would leave a larger wound that would take additional time to heal. Do not paint wounds. Research has shown that wounds heal more quickly if left open. Candidates for removal include branches with narrow crotch angles, which are more likely to break in wind and ice storms, and those that cross branches you will save. This may be all that is possible the first year if the 30 percent threshold has been reached.
Thin the branches on each scaffold branch. Remove crowded branches to open up the tree to light and allow humidity to escape. Shorten each scaffold branch by cutting back to a side branch. When you are through, the tree should have enough wood removed so that a softball can be thrown through the tree.
Severe pruning often will cause an apple to tree to produce vigorous side shoots from the trunk, called water sprouts. Main branches will also produce suckers that grow straight up. The suckers and water sprouts should be removed throughout the growing season so the center of the tree stays open.
In the case where a tree cannot be saved but you would like to preserve the apple tree variety, consider grafting. Scions taken from the old tree can be grafted onto a new rootstock to form a new tree. If you are not able to do so yourself, contact a local fruit tree nursery to find someone who may be able to help.
John Porter: Extension Blog Contributer Extension Agent, Ag and Natural Resources
West Virginia University John.porter@mail.wvu.edu
There’s been much ado in the press and on social media about the use of Genetically Modified Organisms (GMOs) in the food system. While there is a scientific consensus on their safety, many still reject their use. While the controversy rages on, an innocent bystander has taken fire, mainly from the spread of misinformation on social media. It seems that simple hybrids, produced through a selective, yet natural, breeding process have been mislabeled as genetically modified. These misinformation sources point to heirlooms as the only non-modified (and thus safe) source of food. The thought is that since the development of a hybrid is directed by humans, they are genetically modified. This simply isn’t the case.
The truth of the matter is that all of the food crops that we plant have been modified at some point in history through human intervention, whether purposeful or not. The simple act of seed saving is a selective breeding process selecting for the best and the tastiest. So even heirlooms are modified through human interaction. The comparison of a hybrid to a GMO is starkly false. I once saw someone explain it this way: breeding a hybrid is like crossing a beagle and pug, making a GM crop is like crossing a potato and a fish. While it is a simplistic comparison, it does make it a little easier to understand.
Many of the heirlooms we now have today were developed by breeders over the last century or so. No one man had such an impact on agriculture as Luther Burbank, who was a prolific plant breeder and a well-known national hero. However, in today’s anti-science fervor, would he be considered more of a villain than a hero? That was the topic of one of my recent newspapers articles. Read more about Luther Burbank, 19th century garden hero.
When diseases occur in urban landscapes, it is often presumed that fungicides are the most important and effective disease management tools available. However, a good sanitation program can help reduce the need for chemical controls and can improve the effectiveness of other practices for managing disease. This often-overlooked disease management tool reduces pathogen numbers and eliminates infective propagules (inoculum such as fungal spores (figure 1c) , bacterial cells; virus particles; and nematode eggs) that cause disease.
Figure 1a. Marigold blossom infected with Botrytis Figure 1b. Pathogen levels can build up on marigold flowers if diseased tissue is left in the landscapeFigure 1c. Infecting spores on plant surface
Certain foliar fungal and bacterial leaf spots can become prevalent during rainy or humid growing seasons. When disease management is neglected, pathogen populations build-up and continue to increase as long as there is susceptible plant tissue available for infection and disease development (Figures 1a-c). Infected plant tissue infested soil and pathogen inoculum all serve as sources of pathogens that can later infect healthy plants.
Figure 2. Fallen leaves can serve as a source of inoculum (fungal spores) for additional infections. Many pathogens overwinter in fallen debris and then produce infective spores the following spring.
Reduction of pathogens by various sanitation practices can reduce both active and dormant pathogens. While actively growing plants can provide host tissue for pathogen multiplication, dead plant material (foliage, stems, roots) can harbor overwintering propagules for months or years (Figure 2).
These propagules can travel via air/wind currents, stick to shoes or tools, or move with contaminated soil or water droplets. Thus, prevention of spread of pathogens to healthy plants and the elimination of any disease-causing organisms from one season to another are the foundations for a disease management program using sanitation practices.
Sanitation Practices
Elimination and/or reduction of pathogens from the landscape results in fewer pathogen propagules. The following sanitary practices can reduce amounts of infectious pathogens:
Figure 3a. Cankers are common overwintering sites for disease-causing pathogens
Remove diseased plant tissues from infected plants. Prune branches with cankers (Figure 3a) well below the point of infection (Figure 3b). Cuts should be made at an intersecting branch. Rake and remove fallen buds, flowers, twigs, leaves, and needles.
Figure 3b. Remove infected branches, making cuts well below points of infection
Disinfest tools used to prune galls and cankers. Cutting blades should be dipped into a commercial sanitizer, 10% Lysol disinfectant, 10% bleach, or rubbing alcohol between each cut.
If using bleach, rinse and oil tools after completing work, to prevent corrosion.
Discard perennial and annual plants that are heavily infected and those with untreatable diseases (e.g. root rots, Figure 4; and vascular wilts). Dig up infected plants to include as much of the root system as possible, along with infested soil.
Figure 4. Heavily infected plants or those with untreatable diseases, such as black root rot (images left and right), should be removed from the landscape.
If infected plants are to be treated with fungicides, prune or remove infected tissue (flowers, leaves) and debris to eliminate sources for spore production or propagule multiplication. This should be done before fungicide application. Fungicide effectiveness may be reduced when disease pressure is heavy, which can result when pathogen levels cannot be reduced sufficiently by chemical means (fungicides).
Discard fallen leaves, needles (Figure 5), prunings, and culled plants. Never leave diseased plant material in the landscape, as pathogens may continue to multiply by producing spores or other propagules. Infected plant material should be buried, burned, or removed with other yard waste.
Figure 5. Black fruiting structures of the pine needlecast pathogen contain spores (images left and right). Removal of infected plant tissue helps reduce amounts of inoculum in the landscape.
Do not compost diseased plant material or infested soil because incomplete composting (temperatures below 160˚ F) may result in survival of propagules.
Homeowners should be cautious about storing diseased limbs and trunks as firewood or using the woodchips as mulch. For example, wood from trees infected with Dutch elm disease should be debarked before placing in a firewood pile.
Remove weeds and volunteer plants to prevent establishment of a “green bridge” between plants. A green bridge allows pathogens to infect alternate hosts until a more suitable one becomes available. Be sure to remove aboveground parts AND roots.
Soil from container-grown plants should not be reused from one season to the next because pathogens can survive in soil.
R.K. Jones, North Carolina State University (Fig. 1A), courtesy Bugwood.org
M.C. Shurtleff, University of Illinois (Fig. 1B), courtesy Bugwood.org
David Cappaert, Michigan State University (Fig. 1C), courtesy Bugwood.org
Theodor D. Leininger, USDA Forest Service (Fig. 2), courtesy Bugwood.org
Joseph O’Brien, USDA Forest Service (Fig. 3, right), courtesy Bugwood.org
Elizabeth Bush, Virginia Tech (Fig. 4, left), courtesy Bugwood.org
Bruce Watt, University of Maine (Fig. 4, right), courtesy Bugwood.org
Andrej Kunca, National Forest Centre, Slovakia (Fig. 5, left), courtesy Bugwood.org
Robert L. Anderson, USDA Forest Service (Fig. 5, right), courtesy Bugwood.org
John R. Hartman, University of Kentucky (Fig. 3, left)
William H. McCaleb, Blog Contributor
Program Assistant for Agriculture and Natural Resources, Halifax County, VA. and Master Gardener
For gardeners in the eastern U.S., last year was a better than normal gardening season. Better than normal yield, better than normal precipitation, and in our case in Virginia cooler than normal which yielded excellent spring cool season crops as well as early summer crops.
But all good things must come to an end; that being the result of several heavy frosts. With that said, I am looking forward to next year’s challenges and what I want to grow for our family. Oh, for the taste of one more summer ripened tomato, but for now, that is a dream and it is time to reflect on what grew well in the garden as well as what didn’t do so well. Hopefully you have kept a garden journal to help you in this task. I find that writing down details of what is planted, the orientation, spacing, fertilization/liming rates and frequency, weekly rainfall amounts, production amounts, etc. is helpful as you start planning for the next season.
Like me, you should start thinking about what you want to grow in 2015. Take time to reflect on your 2014 garden production, care, and location. Also, evaluate what went right and what went wrong with the plants and varieties you planted and harvested. This will start you off in the right frame of mind in preparing for the next growing season. Good planning and preparation for next year gives you the tools to have an even better gardening season. A successful vegetable gardener is a happy well fed gardener!
I know, you too are already missing those fresh tomatoes, potatoes, peppers, squash, okra, and other great home grown vegetables we treated ourselves to this year, but the next season is ‘just around the corner’ so to speak. After all the days are getting a little longer. Spring can’t be far away!
If you just happen to live in an area that hasn’t had frost yet, take your prompt from your plants: when annuals and seasonal vegetables turn brown and begin to die back, it is time to clean up your garden.
Clean up the Garden Your best action is to remove any spent or failing plant materials. Experienced gardeners know that many of the bacteria, fungi, and other disease-causing organisms that caused those diseases. Pathogens that are sources of those diseased plants this past season can survive over the winter in dead leaves, stems, roots, and dropped fruits that get left in the garden. Much like a piece of bread that is kept too long and looks like it has penicillin growing on it, garden debris also will carry the pathogens that can come alive with those same problems when the temperatures begin to rise in the spring. Prevention of diseases and insect infestation now, will keep you from a repeat of problems in next year’s garden.
A good leaf rake, given enough ‘elbow grease’, works well in getting the bulk of dead plant material out of your garden. If you experienced early or late blight or other tomato related diseases this past growing season, you want to make sure you reduce, to the best of your ability, the risk of repeating that problem again next year. Yes, there are many new varieties of vegetables available today that are ‘resistant’ to some of these diseases, but ‘resistant’ does not mean they are immune to them. You don’t want to take the chance of returning pathogens, so do a good job, cleaning and ‘sanitizing’ your garden now. Make sure, when removing the plant debris, that you totally destroy that debris so that no pathogens are left behind.
To Compost or Not! Can you compost this dead plant material and use it next spring? Information that you find from Extension offices across the U.S. will recommend that you do not. The reason being is that most people do passive composting i.e. put it in a pile, and then using what compost develops, put the compost back in the garden for the next season. It is best to burn the plant material; this will destroy the pathogens and weed seeds as well and return some carbon back into the ground when you spread it out. Please check local/state laws prior to burning. Many states and/or localities have burn bans especially this time of the year. Another method, if your local law allows it you can bag the material and send it to the landfill. Each year there are more localities that ban yard waste from their landfills. If you are not sure, check with your locality to learn more about your local waste and recycling laws.
If you do decide to go with active composting; composting at a temperature 140°F, or higher, will destroy many of the disease organisms as well as many weed seeds. You will need a temperature probe to monitor compost temperatures. It’s really not hard to source a compost thermometer either through the internet or local retail outlets such as garden centers or nursery supply stores. If in doubt about your compost pile reaching these high temperatures, it is best to side with caution and discard the material by properly bagging it or by burning based on your local ordinances.
Preventing Overwintering Pathogens Some of our most notorious insects of the garden such as Mexican bean beetle, squash vine borers, European corn borer, cabbage loopers, can also overwinter in garden debris. Larvae will use debris as a safe harbor. Flea beetles and spider mites, as well, can find food and winter shelter in spent plant material and weeds.
After you have finished cleaning up the debris from your garden, it is time to turn over the soil to both aerate and break up any remaining debris into smaller pieces that will be turned under. A good rototiller will help make this job easier. Once buried, any plant material left will decompose more rapidly.
For some pests and pathogens, turning over the soil after removing spent plant materials is recommended as the main line of defense against overpopulation next year. Consider this information from “Home and Horticultural Pests: Squash Bugs and Squash Vine Borers,” from Kansas State University,
“A vigorous autumn… rototilling can physically destroy cocoons and larvae (of the squash vine borer). Brought to the surface, cocoons and larvae are more susceptible to predation by birds and exposed to cold winter elements, leading to their demise. Deep plowing physically destroys cocoons and larvae burying them deep beneath the soil surface so pupated moths become entombed underground.”
Steps to a Healthier Garden If you haven’t done a soil test in three years or more, it is time to retest and determine the needs of your garden soils based on what you will be growing in the next season. Soil test kits and instructions are available from your local Extension Office. Also, in planning next year’s garden, rotation of your crops is a must do item. This simple action will help keep disease issues down. If your soil test(s) recommend liming, you can go ahead and put down lime this time of year, allowing it to start adjusting the pH. If the ground is frozen already, wait until spring. As you add lime, you can also help build soil structure by incorporating compost or shredded leaves. These soil additives will also add beneficial micro-nutrients and beneficial organisms. If you want to further build the soil, you may want to consider putting in a cover crop that will not only hold soil, but when tilled in early spring, will further build a healthier garden soil. A legume such as white or red clover would be something to consider. Check with your local Extension Office for best cover crop recommendations for your area.
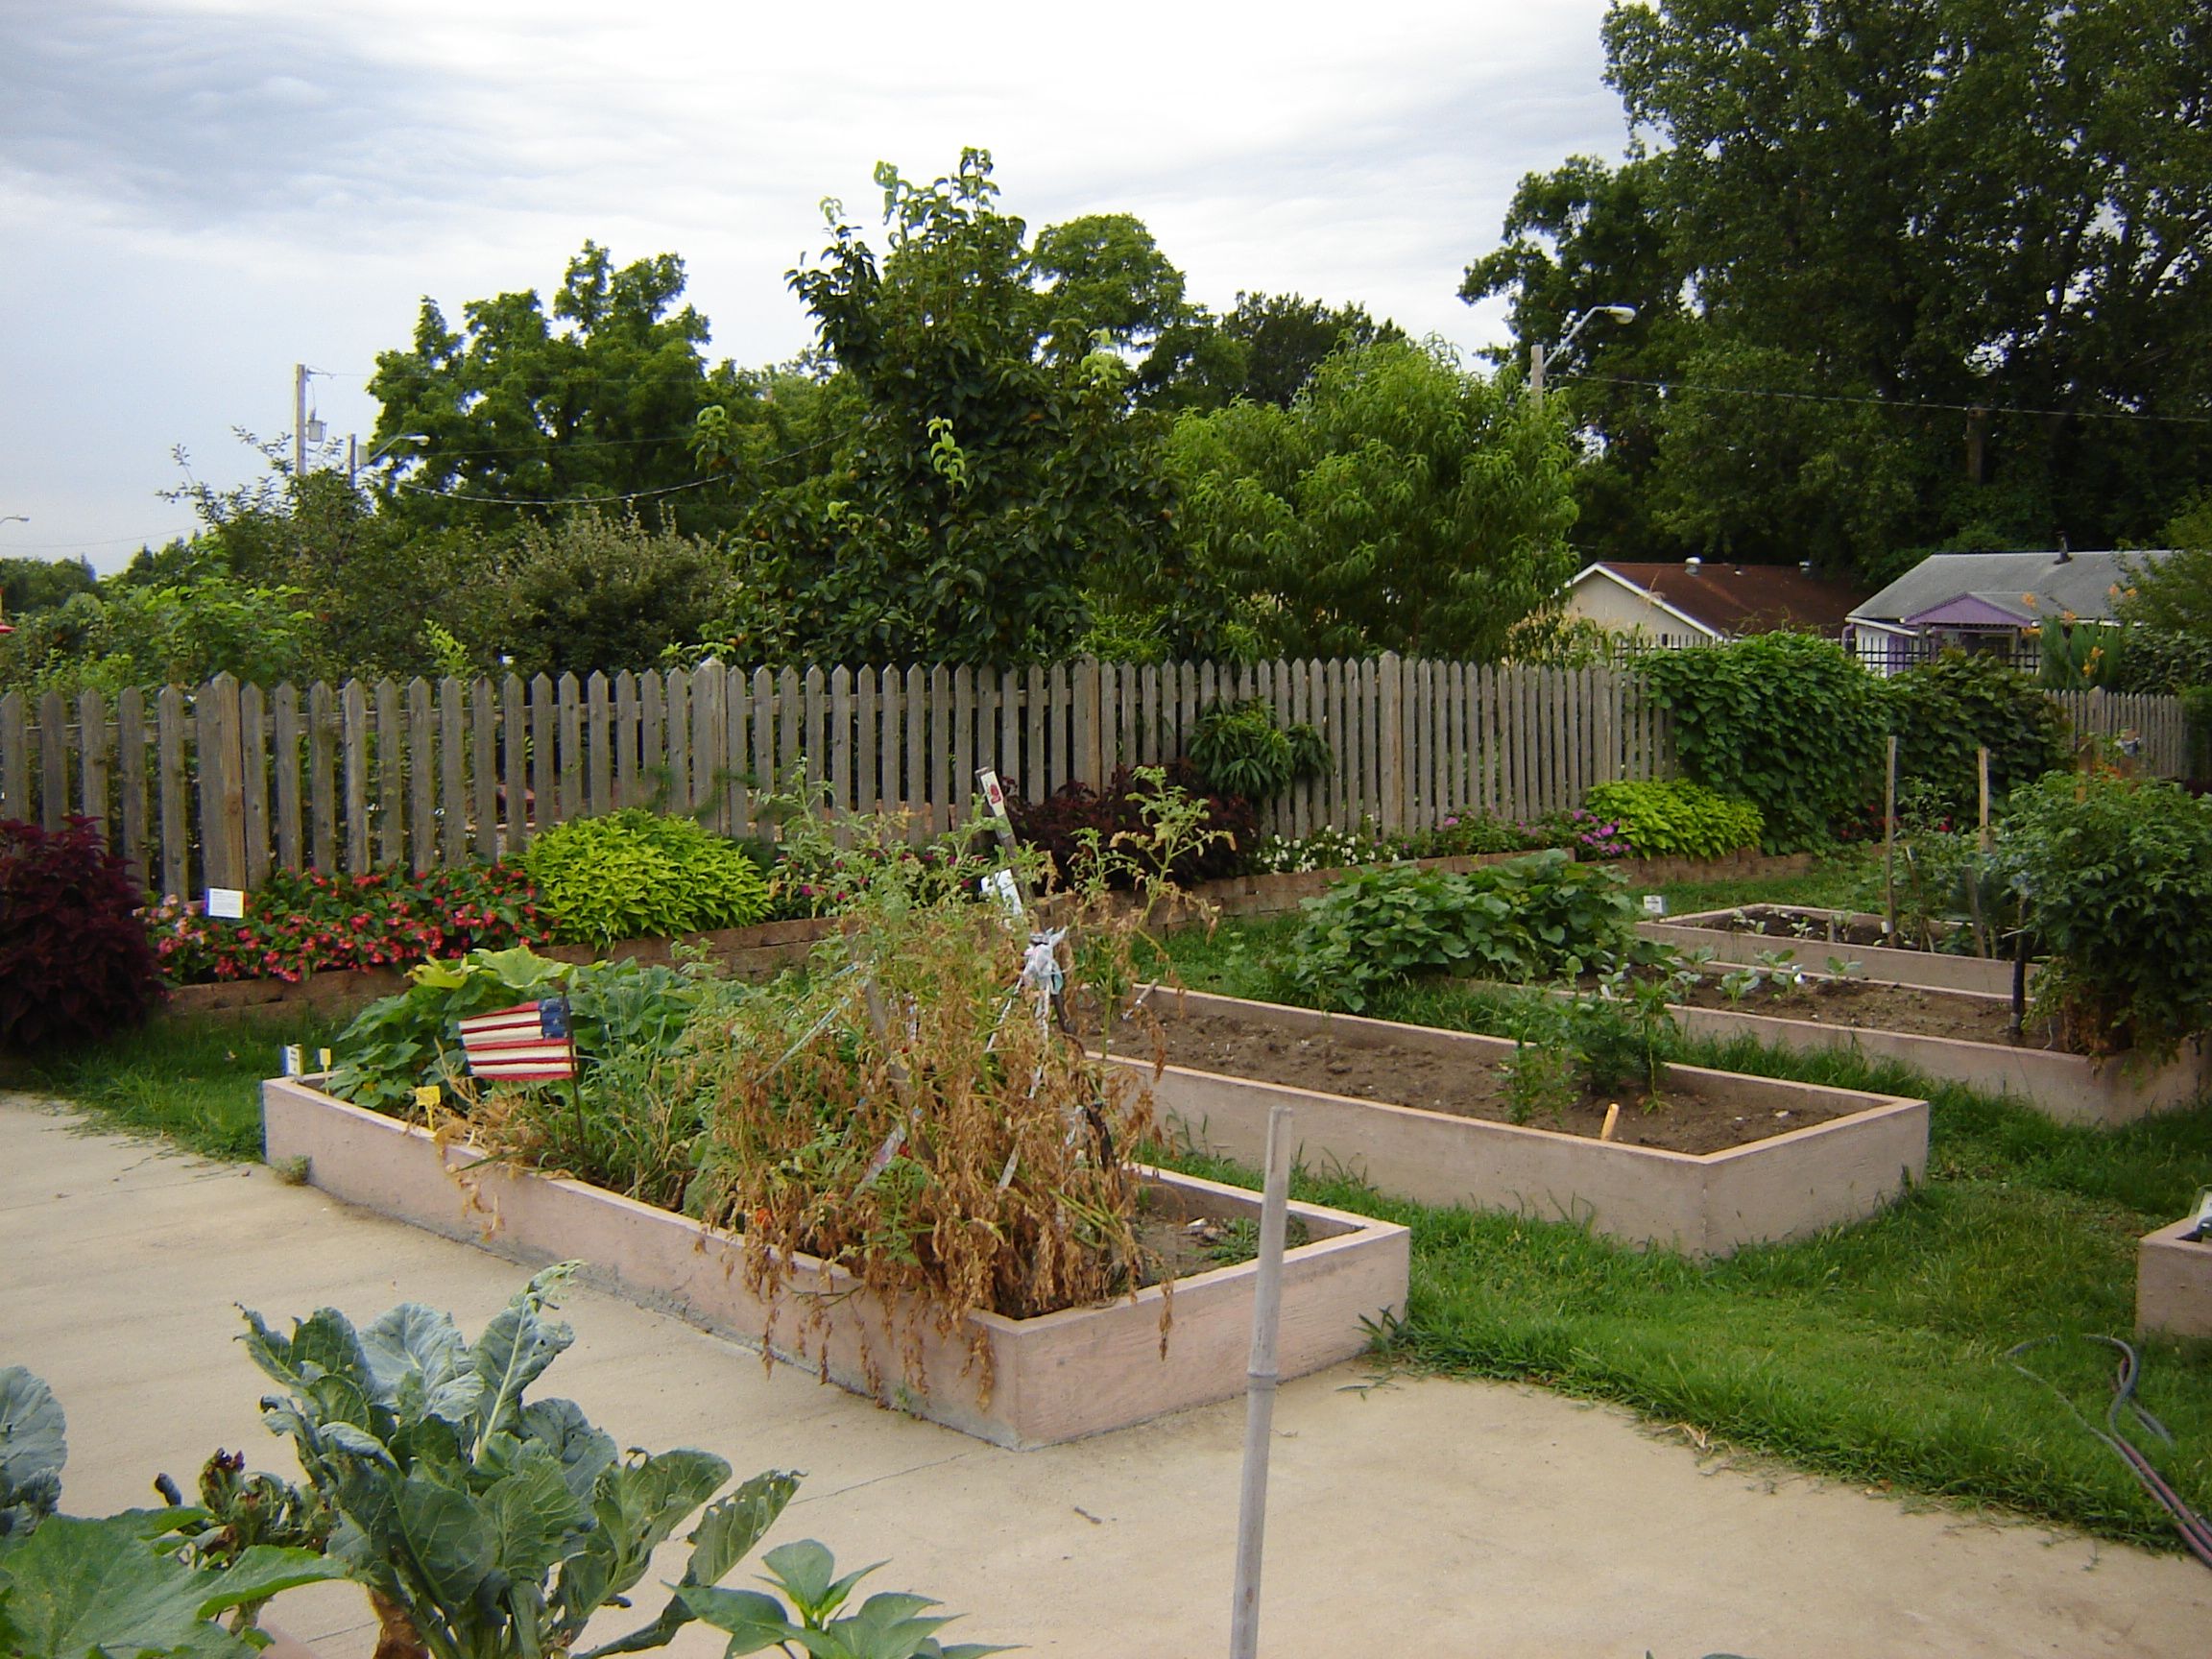
“Three Sister’s Garden-Fall Clean-up “Southern Virginia Botanical Gardens” Photo by W. McCaleb 10/28/14 Corn, Beans, and Squash was grown here as the native Cherokee have done for centuries. Cleaned up and ready for spring 2015!


